
Where to Find Skull Tyrant in Hollow Knight Silksong: The Terrible Tyrant Quest Guide
Learn how to find and defeat the Skull Tyrant in Hollow Knight Silksong’s Terrible Tyrant quest. Complete walkthrough including prerequisites, location guide, and boss fight strategies.
The Return to Bone Bottom: When Old Areas Offer New Challenges
One of the most satisfying aspects of Hollow Knight Silksong is how previously explored areas reveal new secrets as Hornet gains abilities. The Terrible Tyrant quest perfectly embodies this Metroidvania design philosophy – what seemed like an empty, inaccessible area in The Marrow suddenly becomes the stage for an intense boss encounter once you’ve progressed far enough in your journey.
This quest represents more than just another boss fight; it’s a test of how well you’ve mastered your newfound mobility and combat skills. The Skull Tyrant isn’t just hiding in some remote corner – it’s actively prowling an area you’ve likely passed dozens of times, waiting for you to become strong enough to face it.
Ready to face the tyrant? Start your adventure on Steam, PlayStation, Xbox, or Nintendo Switch.
Advertisement
Prerequisites: What You Need Before Starting
Essential Ability: Wall Jump (Cling Grip)
The absolute requirement for this quest is the Cling Grip wall jumping ability. Without it, you simply cannot reach the Skull Tyrant’s lair. If you haven’t unlocked this crucial skill yet, our complete wall jump unlock guide will walk you through the process step-by-step.
Why wall jumping is crucial:
- Access to the hidden area above the lava lake
- Vertical navigation within the Skull Tyrant’s domain
- Escape routes during the boss fight itself
- Exploration of bonus areas you’ll discover along the way
Progression Requirements
The quest becomes available after you’ve made significant progress through both Greymoor and Bellhart. This isn’t arbitrary – the game wants to ensure you have enough experience and upgrades to handle what’s essentially a mid-game boss encounter disguised as a side quest.
Recommended preparation:
- Multiple health upgrades – The Skull Tyrant hits hard and often
- Silk capacity improvements – You’ll need sustained ability usage
- Combat experience from other boss fights
- Confidence with wall jumping – Practice in safer areas first
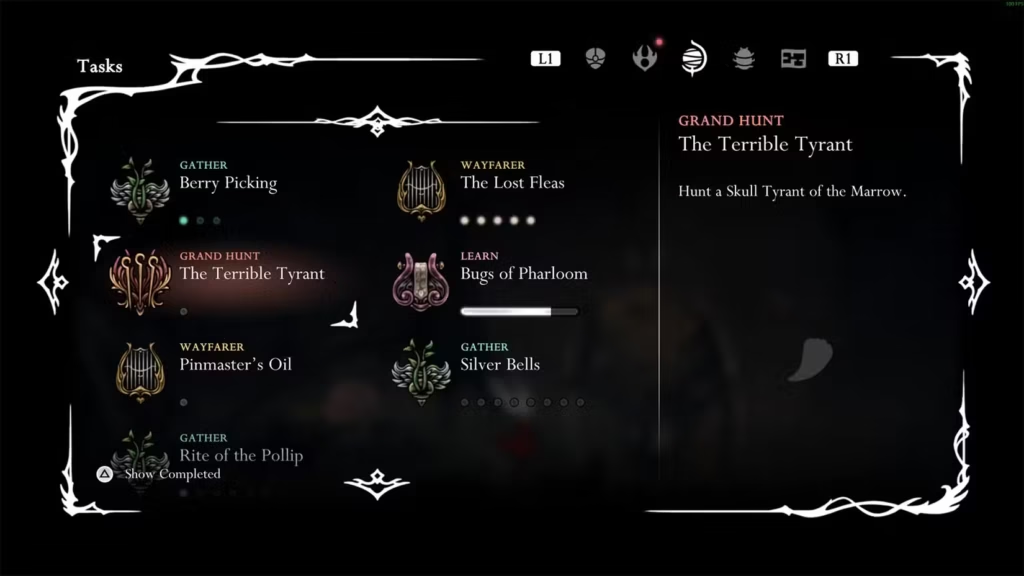
Finding the Quest: The Wishwall Returns
Once you meet the prerequisites, return to Bone Bottom and check the Wishwall. The Terrible Tyrant quest will now be available, describing a “Skull Tyrant prowling the caves above the great path.” This cryptic description points toward The Marrow region, specifically an area that was previously inaccessible.
Quest activation mechanics:
- Simply taking the quest causes the Skull Tyrant to spawn
- No additional triggers required once you accept
- The boss remains until defeated, even if you leave the area
- Quest completion requires returning to the Wishwall with proof of victory
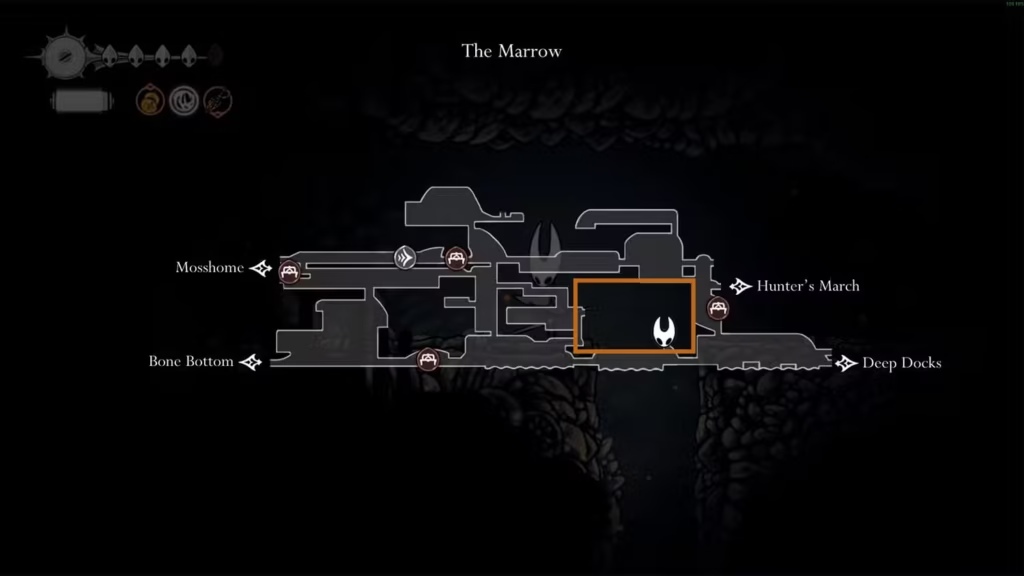
Navigating to the Skull Tyrant’s Lair
Starting Point: The Marrow’s Eastern Mystery
Head to The Marrow’s eastern section, where you’ll find what initially appears to be an empty lava lake. This area likely puzzled you during your first visit – clearly significant, but seemingly inaccessible. Now, with wall jumping unlocked, its true purpose becomes clear.
Advertisement
Key insight: You must enter from the right side on your first visit. This isn’t just a navigation tip – entering from the right activates a bridge mechanism that allows safe passage over the lava. Miss this detail, and you’ll find yourself swimming in molten rock.
The Hidden Entrance
Look for a passage above the lava lake on the right side. This is where your wall jumping skills become essential. The entrance is positioned specifically to require vertical movement – Team Cherry’s way of ensuring you have the necessary abilities before proceeding.
Navigation tips:
- Scan the walls carefully – The entrance can blend with the rocky environment
- Use your map to identify unexplored sections
- Look for subtle visual cues like different rock textures or shadows
- Trust the level design – If an area looks suspiciously empty, there’s usually a reason
The Underground Path
Once inside the hidden area, you’ll begin a journey that tests multiple skills:
Phase 1: Horizontal Progression
- Move left through the initial chamber
- Defeat scattered enemies – They’re not particularly dangerous but can complicate navigation
- Navigate obstacles using standard jumping and dodging techniques
- Maintain momentum – The path is designed for fluid movement
Phase 2: Vertical Ascent
- Reach the wall that requires climbing
- Use Cling Grip extensively – This is your primary mobility tool
- Pace your climbing – Don’t rush and risk falling
- Watch for landing platforms – Strategic rest points exist throughout the ascent
Phase 3: The Approach
- Break through the wall on the right at the top
- Encounter the Skull Brute – A mini-boss that previews the main fight’s intensity
- Continue right through the hole to the next area
- Navigate the final approach to the Skull Tyrant’s chamber
Critical Navigation Point: The Skull Scuttler
When you encounter the small Skull Scuttler, pay attention – this marks a crucial direction change. The instinct might be to continue left, but the Skull Tyrant actually lies to the right. This deliberate misdirection tests whether you’re paying attention to environmental cues or just following linear paths.
Advertisement
Why this matters:
- Wrong direction leads to dead ends or other areas entirely
- Right direction brings you directly to the boss encounter
- Environmental storytelling – The Scuttler’s placement isn’t accidental
- Player testing – Confirms you’re navigating intentionally, not randomly
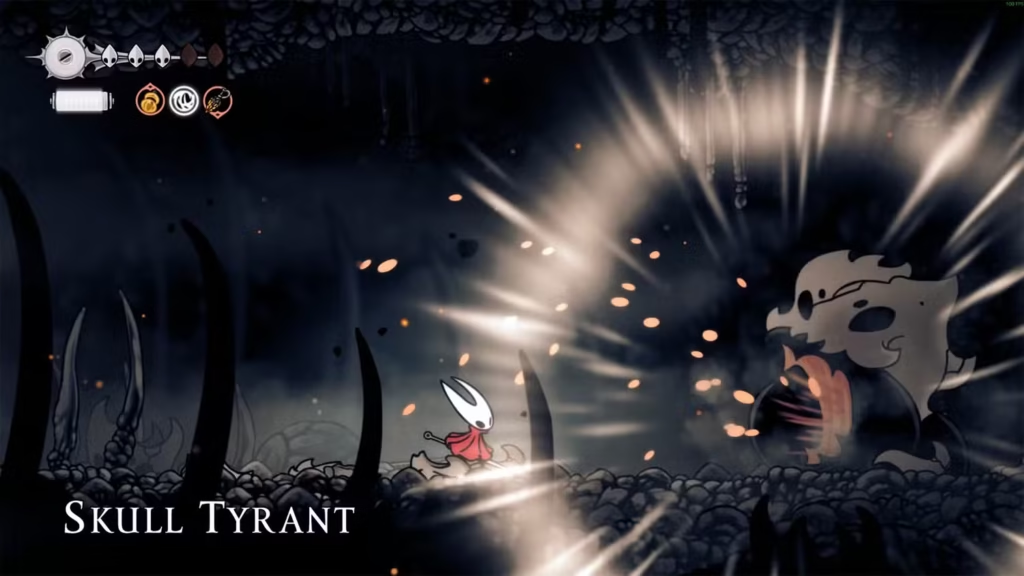
The Skull Tyrant Encounter: Battle Strategy
Understanding Your Opponent
The Skull Tyrant represents a significant step up in difficulty from most enemies you’ve faced. This is an aggressive, relentless boss that doesn’t give you much breathing room. Its attack patterns are designed to keep you moving constantly while looking for brief damage windows.
Primary attack patterns:
- Continuous assault – Rarely stops attacking long enough for extended combos
- Earthquake generation – Area-of-effect attacks that limit safe positioning
- High damage output – Mistakes are costly and quickly compound
- Mobility challenges – Uses the environment to complicate your movement
Combat Strategy
Patience over aggression: The Skull Tyrant punishes greedy players who try to force damage opportunities. Instead, focus on:
- Defensive positioning – Stay mobile and look for natural safe spots
- Window identification – Learn to recognize brief attack cooldowns
- Damage efficiency – Make every hit count when opportunities arise
- Resource management – Don’t waste Silk on unnecessary abilities
Earthquake management: The boss’s signature earthquake attacks require specific responses:
- Vertical escape – Wall jumping becomes crucial for avoiding ground-based damage
- Timing recognition – Earthquakes have tells that allow preemptive positioning
- Safe zone identification – Some areas of the arena offer better protection
- Movement planning – Don’t get caught in corners when earthquakes start
Advanced Combat Tips
Use the environment: The Skull Tyrant’s arena isn’t just decoration – walls and platforms can be strategic resources for movement and positioning.
Pattern learning: Like all Silksong bosses, the Skull Tyrant follows patterns. Spend early attempts learning these rather than focusing purely on damage.
Equipment optimization: Consider your trinket loadout before the fight. Defensive options might be more valuable than pure damage increases given the boss’s aggressive nature.
Rewards and Quest Completion
The Crown Fragment
Defeating the Skull Tyrant yields a Crown Fragment, which serves as proof of your victory. This isn’t just a trophy – it’s a tangible reward that provides both immediate benefits and long-term progression value.
Completion process:
- Defeat the Skull Tyrant in combat
- Collect the Crown Fragment from the arena
- Return to Bone Bottom’s Wishwall
- Turn in the fragment for your rewards
The rewards are substantial enough to make this challenging quest worthwhile, particularly given the effort required to access and complete it.
The Respawn Mechanic
Here’s where the quest becomes particularly interesting: the Skull Tyrant respawns when you rest at the Bone Bottom bench after the initial defeat. This isn’t a bug – it’s an intentional feature that transforms a one-time boss into a repeatable challenge.
Why this matters:
- Practice opportunities – Fight the boss multiple times to master its patterns
- Farming potential – If the rewards are worth repeating the encounter
- Skill testing – Measure your improvement over multiple attempts
- Convenience – No need to navigate back to the lair for subsequent fights
Strategic considerations:
- When to respawn – Only trigger this when you’re ready for another fight
- Preparation time – Use the interval between spawns to upgrade equipment or skills
- Risk assessment – Each fight carries the same risks as the original encounter
Integration with Overall Progression
Timing Considerations
The Terrible Tyrant quest works best when approached at the right point in your progression:
Too early: Without sufficient upgrades, the fight becomes frustratingly difficult rather than challengingly rewarding.
Too late: Over-leveling the encounter reduces its impact and the satisfaction of victory.
Sweet spot: Attempt this quest when you’ve recently unlocked wall jumping and have a few combat upgrades but haven’t completely outgrown mid-game challenges.
Skill Development Benefits
Beyond the tangible rewards, this quest provides valuable skill development:
Movement mastery: The navigation requirements reinforce wall jumping techniques in practical situations.
Combat patience: The Skull Tyrant teaches the value of defensive play and pattern recognition.
Environmental awareness: The hidden location emphasizes the importance of thorough exploration.
Boss fight fundamentals: Serves as good preparation for later, more complex encounters.
Exploration Rewards
While hunting for the Skull Tyrant, you’ll likely discover additional secrets in The Marrow region. The path to the boss often reveals:
Hidden passages that were previously inaccessible without wall jumping Optional treasures tucked away in hard-to-reach corners Environmental lore that adds context to the region’s history Practice opportunities for movement techniques in a relatively safe environment
Consider this quest part of a broader re-exploration of early areas with your enhanced abilities. Our essential beginner tips include strategies for systematic area revisitation that can help you maximize these opportunities.
Troubleshooting Common Issues
“I Can’t Find the Hidden Entrance”
Solution steps:
- Verify you have wall jumping – Absolutely required for access
- Approach from the east – Other directions may not activate necessary mechanisms
- Look above the lava lake – The entrance is elevated, not at ground level
- Check your map for unexplored areas marked with question marks
“The Boss Fight is Too Difficult”
Preparation options:
- Upgrade your health before attempting the fight
- Practice wall jumping in safer areas to improve escape options
- Study attack patterns by surviving rather than focusing on damage initially
- Consider equipment changes that prioritize survivability over offense
“I Completed the Quest But Want to Fight Again”
Respawn process:
- Rest at the Bone Bottom bench after initial completion
- The boss will appear in the town area for immediate combat
- No need to navigate back to the original lair
- Fight mechanics remain the same as the original encounter
Advanced Strategies and Speedrun Considerations
For players interested in optimizing their approach:
Route efficiency: Plan your path to minimize backtracking between the Skull Tyrant’s lair and Bone Bottom.
Combat optimization: Learn the fastest safe strategies for defeating the boss without taking unnecessary risks.
Sequence breaking potential: Investigate whether completing this quest early provides benefits for later progression.
Completion integration: Consider how this quest fits into broader completion goals and achievement hunting.
Long-Term Value
The Terrible Tyrant quest exemplifies Silksong’s approach to optional content – it’s challenging enough to feel meaningful but integrated naturally into the progression system. The respawn mechanic ensures the content remains relevant beyond initial completion, while the navigation requirements reinforce newly acquired abilities.
For completionists: This quest is essential for 100% completion and provides good practice for similar hidden challenges throughout the game.
For combat enthusiasts: The repeatable boss fight offers ongoing challenge and skill development opportunities.
For explorers: The quest encourages thorough re-examination of familiar areas with fresh perspective and capabilities.
Ready for more challenges? Our guides for other early game quests and progression strategies can help you tackle additional content with confidence.
The Skull Tyrant awaits in the depths of The Marrow, a testament to how Metroidvania design can transform familiar spaces into new adventures. With the right preparation and persistence, this terrible tyrant will fall to Hornet’s needle, adding another victory to your growing legend in the kingdom of Pharloom.
Advertisement