Understanding Leapers: The Bison Threat
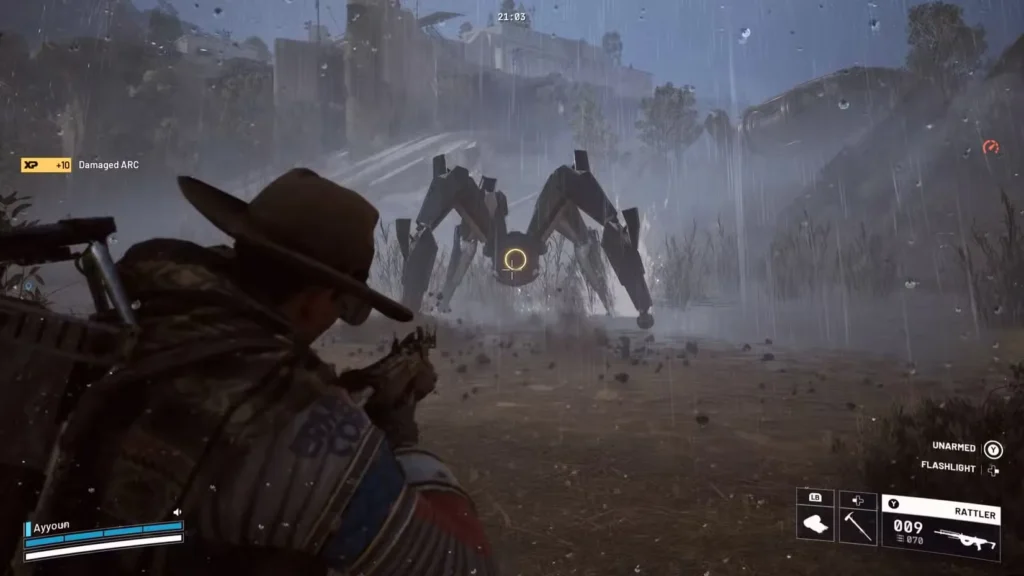
Leapers—formerly known as Bison during development—represent one of ARC Raiders’ most formidable mechanical threats. These massive ARC machines patrol the Rust Belt with devastating capabilities that can instantly eliminate unprepared players. Their signature attack, a physics-defying leap followed by a crushing ground pound, has ended countless raids before players even understood what hit them.
Leaper Characteristics:
- Size Class: Large ARC machine (equivalent to mini-boss)
- Primary Threat: Long-distance leap attack with one-hit-kill potential
- Secondary Abilities: EMP surge, armor plating, high durability
- Weak Point: Eye (vulnerable spot requiring precision targeting)
- Primary Weakness: Fire damage (critical for efficient elimination)
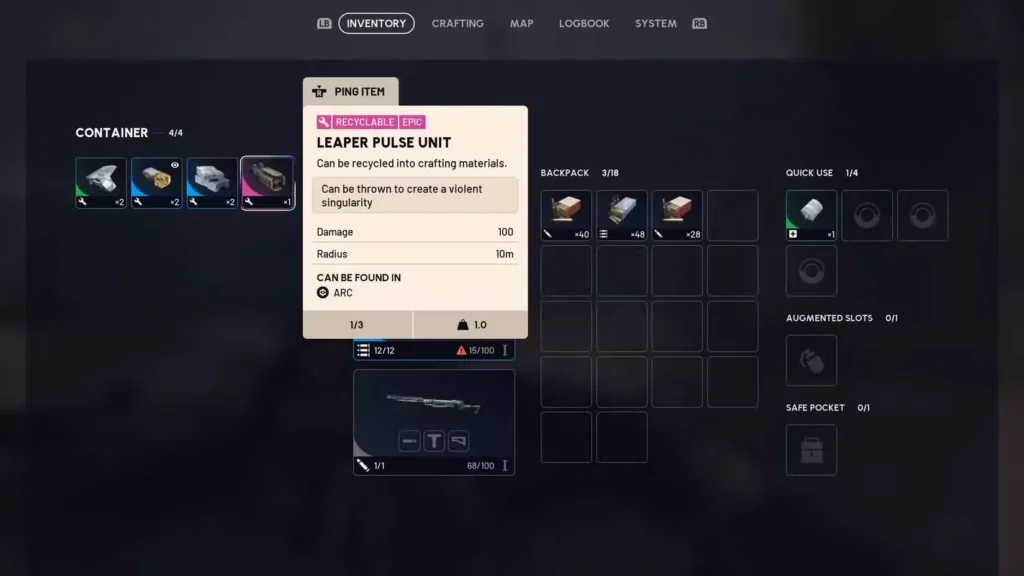
Why You Need Leaper Pulse Units:
Crafting Applications:
- Advanced mechanical components for high-tier items
- Specialized equipment requiring rare ARC materials
- Workbench upgrades at advanced levels
Quest Requirement:
- Into the Fray quest from Celeste requires Leaper Pulse Unit
- Quest rewards include exclusive cosmetics and premium items
- Part of Celeste’s advanced questline progression
Strategic Value: Learning to efficiently defeat Leapers prepares you for other large ARC encounters and demonstrates mastery of combat mechanics essential for late-game content.
Where to Find Leapers in ARC Raiders (All Spawn Locations)
Unlike random ARC patrols, Leapers spawn in consistent, predictable locations—making them farmable once you know where to look.
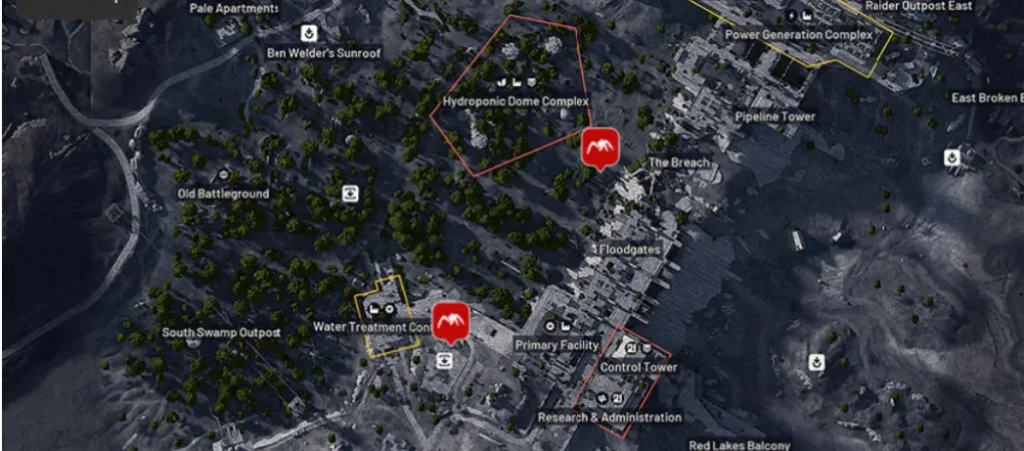
Dam Battlegrounds Leaper Spawns (Best Location)
Dam Battlegrounds hosts the most reliable Leaper spawns in the game:
Location #1: East of Hydroponic Dome Complex
Map Position: Eastern side of Hydroponic Dome Complex POI
Spawn Reliability: Very high (80-90% spawn rate)
Environmental Features:
- Open area with nearby dome structures
- Safe spots inside dome doorways
- Minimal other ARC interference
- Good sightlines for combat
Tactical Advantages:
- Dome doorways provide perfect safe zones (Leaper can’t enter)
- Relatively isolated from other high-traffic areas
- Easy to set up defensive position before engagement
- Quick escape routes if things go wrong
Location #2: Water Treatment Control Elevator Area
Map Position: Near Water Treatment Control elevator
Spawn Reliability: High (75-85% spawn rate)
Environmental Features:
- Field Depot nearby (safe zone option)
- More complex terrain with obstacles
- Potential for other ARC presence
- Closer to player traffic zones
Tactical Advantages:
- Field Depot interior provides protected fighting position
- Terrain obstacles can break Leaper’s charge
- Alternative escape routes available
- Can lure Leaper into chokepoints
Spawn Confirmation Strategy
When deploying to Dam Battlegrounds specifically for Leaper farming:
Efficient Route:
- Check Location #1 first (Hydroponic Dome Complex area)
- If no Leaper present, proceed to Location #2 (Water Treatment)
- High probability (90%+) of finding Leaper at one of these two spots
- Rare scenario: Both locations spawn Leapers simultaneously
Time Management:
- If neither location has a Leaper (rare), consider:
- Completing other Dam Battlegrounds quests while waiting
- Extracting and redeploying (spawns reset)
- Farming other materials while in-raid
Best Loadout for Killing Leapers in ARC Raiders
Successfully defeating a Leaper requires specific equipment choices. While higher-tier gear makes the fight easier, this guide focuses on commonly available equipment accessible to most players.
Primary Weapon: High Armor Penetration Required
Critical Stat: ARC Armor Penetration
Leapers have heavy armor plating that resists standard ammunition. You MUST bring weapons with high ARC armor penetration or the fight becomes unnecessarily prolonged and dangerous.
Recommended Primary Weapons:
Anvil (Top Choice)
- Ammo Type: Heavy Ammo (excellent ARC penetration)
- Availability: Relatively common drop/craft
- Combat Range: Medium to long
- Why It Works: Consistent armor penetration, reliable damage per shot
- Ideal For: Players comfortable with slower fire rate, precision shooting
Ferro (Alternative Primary)
- Ammo Type: Heavy Ammo (excellent ARC penetration)
- Availability: Common early-mid game weapon
- Combat Range: Medium
- Why It Works: Good balance of damage and fire rate
- Ideal For: Players preferring faster shooting rhythm
Hullcracker (Premium Option)
- Ammo Type: Heavy Ammo (maximum ARC penetration)
- Availability: Rare blueprint from quests (Tian Wen’s questline)
- Combat Range: Medium to long
- Why It Works: Highest damage per shot against armor
- Ideal For: Experienced players with access to advanced weapons
Minimum Requirement: ANY weapon using Heavy Ammo or possessing high ARC armor penetration stats. Without proper armor penetration, you’ll empty multiple magazines with minimal effect.
Secondary Weapon: Backup DPS Options
Purpose: Backup damage, clearing support ARCs, emergency defense
Recommended Secondaries:
Arpeggio (Versatile Choice)
- Medium range capability
- Good fire rate for sustained damage
- Obtained from Broken Monument quest or drops
- Reliable backup when primary runs dry
Any Medium-Long Range Weapon:
- Avoid pure close-quarters weapons (too dangerous near Leaper)
- Maintain engagement distance capability
- Consider ammo availability (don’t run same type as primary)
Alternative Options:
- DMRs for precision support damage
- Assault rifles for versatile engagement
- Any upgraded weapon you’re comfortable with
Key Principle: Your secondary supports your primary. If primary is Heavy Ammo, secondary should use different ammo type to avoid running out mid-fight.
Blaze Grenades: Why They’re Essential for Leaper Fights
Why Blaze Grenades Are Essential:
Leapers have a specific vulnerability to fire damage—this isn’t just helpful, it’s the difference between a 3-minute fight and a 10-minute struggle.
Minimum Requirement: 3x Blaze Grenades
Recommended: 4-5x Blaze Grenades (insurance for missed throws)
How to Obtain Blaze Grenades:
Method 1: Looting
- Found in military containers
- Weapon caches throughout maps
- Higher-value POIs have better spawn rates
Method 2: Crafting (Reliable)
- Requires: Level 3 Explosives Station
- Recipe: 1x Explosive Compound + 2x Oil per grenade
- Blueprint: Obtained from What Goes Around quest (Apollo)
Why Craft Instead of Loot:
- Guaranteed availability before raid
- Stock multiple batches for repeated attempts
- No RNG dependency
- Cost-effective for farming multiple Leapers
Explosive Compound Sources:
- Common loot throughout maps
- Crafted at Explosives Station
- Purchased from traders
Oil Sources:
- Industrial areas on all maps
- Recycling mechanical items
- Common crafting material
Additional Equipment for Safe Leaper Combat
Defensive Gear:
- Heavy Shield minimum (Leaper deals massive damage)
- Shield types with high capacity preferred
- 3-4 healing items (Adrenaline Shots, Vita Sprays)
- Surge Shield Rechargers for extended fights
Utility Items:
- Smoke grenades (emergency escape)
- Ziplines (repositioning, escape)
- Binoculars (scout area before engagement)
Augments:
- Safe Pocket augment (CRITICAL for protecting Pulse Unit)
- Combat-focused augments for damage boost
- Healing augments for survivability
Complete Combat Strategy: The Safe Zone Method
This cheese/easy method minimizes risk by exploiting Leaper’s inability to enter confined spaces while maintaining aggressive offensive pressure.
Phase 1: Pre-Combat Preparation
Step 1: Locate Your Leaper
Deploy to Dam Battlegrounds and navigate to one of the confirmed spawn locations. Use your map and these visual landmarks:
Hydroponic Dome Complex:
- Large dome structures are unmistakable
- Leaper patrols eastern perimeter
- Visible from distance due to size
Water Treatment Control:
- Look for elevator structure
- Field Depot nearby
- Leaper typically in open area adjacent
Step 2: Clear Support ARCs
Before engaging the Leaper, eliminate smaller ARC units in the immediate area:
Common Support ARCs:
- Wasps – Flying drones (high priority—interrupt your targeting)
- Hornets – Aggressive flying units (eliminate immediately)
- Pops – Ground units (low threat but distracting)
- Fireballs – Ranged fire units (moderate threat)
Why Clear First:
- Prevents damage from multiple sources simultaneously
- Eliminates distractions during critical Leaper fight
- Reduces chance of accidental death to small units
- Allows focus on weak point targeting
Clearing Strategy:
- Use secondary weapon (save primary ammo for Leaper)
- Prioritize flying units first (hardest to avoid)
- Quick elimination—don’t get bogged down
- Stay mobile to avoid Leaper attention during clearing
Step 3: Identify Your Safe Zone
This is the cornerstone of the easy method—finding a structure the Leaper cannot enter but you can fight from:
At Hydroponic Dome Complex:
- Dome Doorways are ideal safe zones
- Leaper physically cannot fit through doorframe
- You can shoot outward freely
- Easy to duck inside if Leaper attempts leap attack
At Water Treatment Control:
- Field Depot interior provides protection
- Doorways and windows for shooting
- Leaper cannot enter building
- Multiple exit points if needed
Safe Zone Requirements: ✓ Opening large enough for player
✓ Too small for Leaper to enter
✓ Clear sightlines to fight area
✓ Allows you to shoot outward
✓ Easy to retreat into quickly
Step 4: Position Yourself
Enter your chosen safe zone and set up your firing position:
- Stand just inside the doorway/entrance
- Maintain clear line of sight to Leaper
- Have Blaze Grenades equipped and ready
- Primary weapon loaded with full magazine
- Shields at maximum capacity
Phase 2: Engaging the Leaper
Step 5: Initial Aggro
Draw the Leaper’s attention to begin the fight:
- Aim at the Leaper’s eye (glowing weak point on head)
- Fire 2-3 shots with your Heavy Ammo primary weapon
- Leaper will turn toward you and begin approaching
- Retreat into safe zone as it approaches
Why Target the Eye:
- Only weak point on Leaper’s body
- Significantly increased damage multiplier
- Essential for efficient kills
- Body shots deal minimal damage due to armor
Audio/Visual Cues:
- Leaper makes distinctive roaring sound when aggroed
- Will turn directly toward you
- Begins moving in your direction
- May perform initial leap if far away
Step 6: Establish Burn Damage (Critical)
Once the Leaper is approaching your safe zone:
- Throw a Blaze Grenade aimed at the Leaper’s eye/head area
- Grenade explodes on impact, coating Leaper in flames
- Fire damage begins ticking (watch for damage numbers)
- Leaper is now burning—this is when you deal maximum damage
Blaze Grenade Throwing Tips:
- Aim slightly above Leaper (grenade arcs)
- Lead moving targets
- Eye-level or higher for best coverage
- Don’t throw from too far—get within effective range first
Fire Damage Mechanics:
- Burns for 10-15 seconds per grenade
- Deals damage over time independent of shooting
- Amplifies all damage taken by Leaper
- Multiple grenades extend burn duration
- Visual indicator: Leaper covered in flames
Step 7: Sustained DPS Phase
While the Leaper burns, maximize your damage output:
Optimal Combat Rhythm:
- Leaper burning (from Blaze Grenade)
- Aim at eye specifically (use ADS for precision)
- Fire Heavy Ammo continuously into weak point
- Watch burn timer—when flames diminish
- Throw another Blaze Grenade immediately
- Resume shooting while new burn activates
- Repeat until Leaper destroyed
Ammo Management:
- Monitor ammunition count
- Reload during Leaper’s retreat moments
- Switch to secondary if primary runs dry (less ideal)
- Don’t waste shots on armored body parts
Damage Optimization:
- Every shot should hit the eye if possible
- Fire damage + eye weak point = fastest kill
- Missing eye shots drastically extends fight
- Take extra moment to aim rather than spray
Phase 3: Handling Leaper’s Counter-Attacks
The Leaper won’t stand still while you shoot it. Understanding and countering its attacks ensures your survival.
Attack Pattern 1: Leap Strike
What Happens:
- Leaper crouches briefly (warning animation)
- Launches into massive vertical jump
- Travels significant distance through air
- Lands with area-of-effect ground pound
- One-hit-kill potential if caught in impact zone
Counter-Strategy:
- When you see crouch animation, immediately retreat into safe zone
- Leaper cannot reach you inside doorway/building
- Wait for landing impact (shockwave doesn’t penetrate walls)
- Re-emerge and continue shooting
Safety Note: This is why the safe zone method works—leap attacks are negated completely by proper positioning.
Attack Pattern 2: EMP Surge
What Happens:
- Leaper emits electromagnetic pulse from body
- Disables electronic equipment temporarily
- Affects shields, some weapons, and equipment
- Medium range area effect
Counter-Strategy:
- Watch for electrical charging animation
- Maintain distance (stay in doorway, don’t chase too close)
- If shields disabled, wait for recharge before exposing yourself
- EMP duration is brief—resume fighting quickly
Counter-Strategy:
- Prepare smoke grenades before fight
- Ziplines can help reach alternate safe zones
- Sometimes repositioning is smarter than chasing
- Don’t overextend from safe zone trying to finish it
Phase 4: Final Elimination & Looting
Step 9: Confirming the Kill
Leapers have high durability—expect the fight to take several minutes even with optimal strategy:
Kill Confirmation:
- Leaper’s movement becomes sluggish (low health indicator)
- Eventually collapses and explodes
- Distinctive death animation
- Body remains on ground for looting
Approximate Time to Kill:
- With Blaze Grenades + Heavy Ammo: 3-5 minutes
- Without fire damage: 8-12+ minutes
- Body shots only (no eye hits): 15-20+ minutes
Step 10: Looting the Leaper Pulse Unit
After the Leaper is destroyed, its body contains valuable components:
Looting Priority:
- Approach the Leaper’s corpse carefully (ensure it’s fully dead)
- Locate the destroyed eye component specifically
- Loot the eye first (contains Leaper Pulse Unit)
- Immediately place Pulse Unit in Safe Pocket
- Loot remaining components if desired
Critical Safe Pocket Step:
This cannot be stressed enough: The Leaper Pulse Unit MUST go into a Safe Pocket immediately upon looting.
Why This Matters:
- Quest items are lost on death if not protected
- Repeating Leaper fight is time-consuming
- Safe Pockets guarantee item survival even if eliminated
- No second chances—protect your reward instantly
Additional Loot from Leaper:
- ARC Motion Cores (crafting materials)
- Heavy mechanical components
- Sometimes rare weapon attachments
- General crafting materials
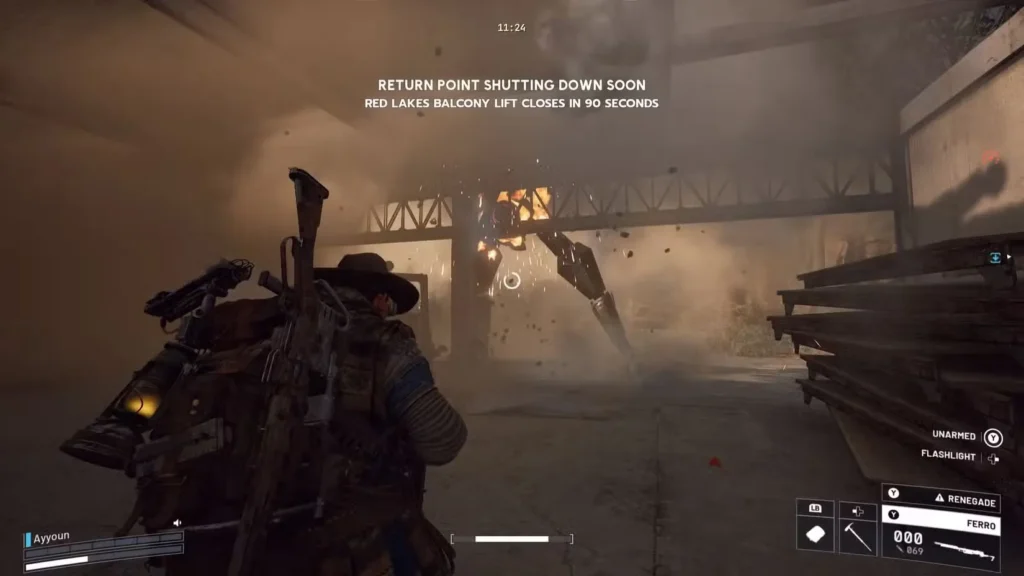
Phase 5: Safe Extraction
With the Leaper Pulse Unit secured in Safe Pocket:
Extraction Priority:
- Head to nearest extraction point immediately
- Don’t risk the Pulse Unit on additional combat/looting
- Use Raider Hatch if you have a key (safest)
- Even in Safe Pocket, extracting quickly is smart practice
Post-Fight Considerations:
- You’ve likely used significant ammo and healing items
- Shield may be damaged from EMP or near-misses
- Other players may have heard combat and investigated
- Extract before your vulnerable state becomes fatal
Alternative Leaper Combat Strategies in ARC Raiders
While the safe zone method is easiest, other approaches exist:
Method #1: Mobile Kiting (Advanced Players)
For experienced players comfortable with movement:
Strategy:
- No fixed safe zone—constant movement during fight
- Use terrain obstacles to break Leaper’s charge
- Requires excellent spatial awareness
- Dodge leap attacks through positioning
Advantages:
- Fight anywhere, no safe zone needed
- Faster completion (more aggressive)
- Better loot positioning flexibility
Disadvantages:
- Higher risk—one mistake can be fatal
- Requires mastery of Leaper attack patterns
- More healing items consumed
- Not recommended for first-time attempts
Method #2: Elevation Advantage (Terrain Required)
Using verticality against the Leaper:
Strategy:
- Position on elevated structures
- Shoot down at Leaper below
- Some leaps can’t reach maximum height
- Jump down to safety zones when needed
Advantages:
- Leaper’s leap less effective against extreme height
- Better overview of battlefield
- Can escape via zipline quickly
Disadvantages:
- Limited locations offer proper elevation
- Falling can be fatal
- If Leaper reaches you, nowhere to retreat
- Requires specific terrain knowledge
Method #3: Squad Focus Fire (Team Play)
Team combat approach:
Strategy:
- Multiple players focus fire simultaneously
- Rotate aggro when someone needs to heal
- Combined Blaze Grenades ensure constant burn
- Revive teammates if downed
Advantages:
- Fastest kill time (distributed damage)
- Safety in numbers
- Can afford riskier positioning
- Shared loot benefits
Disadvantages:
- Requires coordinated squad
- Loot distribution questions
- One player’s mistake affects whole team
- Overkill for single Pulse Unit need
Leaper Pulse Unit for Into the Fray Quest in ARC Raiders
The Leaper Pulse Unit serves as a key component for Celeste’s “Into the Fray” quest.
Into the Fray Quest Overview and Objectives
Quest Giver: Celeste
Quest Name: Into the Fray
Primary Objective: Obtain and deliver Leaper Pulse Unit
Additional Quest Requirements:
- May require other items (check quest log for specifics)
- Leaper Pulse Unit is typically the hardest component
- Other materials usually easier to farm
Into the Fray Quest Rewards (What You Get)
Into the Fray Completion Rewards:
- Radio Renegade Outfit (Exclusive cosmetic)
- Burgerboy Backpack Charm (Cosmetic attachment)
- Vulcano III weapon (Combat utility)
- 40x Shotgun Ammo (Resource reward)
Reward Value Analysis:
The exclusive cosmetics (Radio Renegade outfit and Burgerboy charm) are the primary draw—these items aren’t obtainable elsewhere. The Vulcano III weapon and ammunition provide immediate tactical benefits.
Quest Difficulty Rating:
Into the Fray ranks as one of the more challenging early-to-mid quests due to the Leaper combat requirement. However, with proper preparation and the safe zone method, it’s consistently completable by players of all skill levels.
How Into the Fray Fits Your ARC Raiders Progression
Into the Fray is part of Celeste’s advanced questline:
Related Celeste Quests:
- A Bad Feeling (Early Celeste quest)
- Greasing Her Palms (Mid-tier mission)
- Into the Fray (This quest – combat challenge)
- Additional advanced quests requiring technical components
Completing Celeste’s full questline unlocks access to advanced crafting materials and technical equipment.
Common Leaper Combat Mistakes to Avoid in ARC Raiders
Mistake #1: Using Weapons Without Armor Penetration
Problem: Using weapons without Heavy Ammo or adequate ARC penetration
Result: Fight takes 15-20+ minutes, running out of ammo mid-fight
Solution:
- Verify your primary weapon uses Heavy Ammo BEFORE deploying
- Check weapon stats for ARC armor penetration
- Don’t attempt with standard light/medium ammo weapons
- Craft or acquire proper weapons first
Mistake #2: Not Bringing Blaze Grenades (Critical Error)
Problem: Attempting Leaper fight without fire damage
Result: Extremely prolonged fight, high ammo consumption, increased danger
Solution:
- Always bring minimum 3x Blaze Grenades
- Craft them beforehand at Explosives Station
- Fire vulnerability is not optional—it’s essential
- Stock extras for repeated attempts if needed
Mistake #3: Ignoring Safe Pockets and Cover
Problem: Storing Leaper Pulse Unit in regular inventory
Result: Death during extraction loses the Pulse Unit, must repeat entire fight
Solution:
- Equip Safe Pocket augment before deployment
- Place Pulse Unit in Safe Pocket IMMEDIATELY upon looting
- Verify placement (check augment slots)
- This single step prevents hours of wasted effort
Mistake #4: Fighting Leapers in Open Areas
Problem: Engaging Leaper in open field with no retreat position
Result: One-shot death from leap attack, wasted resources
Solution:
- Always identify safe zone before starting fight
- Position near doorways or small structures
- Test that Leaper cannot enter before committing
- Safe zone method eliminates 80% of fight difficulty
Mistake #5: Forgetting to Clear Support ARCs First
Problem: Fighting Leaper while Wasps and other ARCs attack simultaneously
Result: Distraction, damage from multiple sources, accidental death
Solution:
- Clear all small ARCs before engaging Leaper
- Use secondary weapon to conserve primary ammo
- Prioritize flying units (hardest to avoid)
- Clean battlefield = focused Leaper fight
Mistake #6: Shooting Body Instead of Leaper’s Eyes
Problem: Shooting Leaper’s armored body instead of eye weak point
Result: Minimal damage, fight extends to 15-20+ minutes, ammo depletion
Solution:
- Aim exclusively at glowing eye
- Use ADS (aim down sights) for precision
- Take time to line up shots correctly
- Every body shot is essentially wasted ammunition
Mistake #7: Chasing Leapers Beyond Your Safe Zone
Problem: Following Leaper away from safe zone when it retreats
Result: Caught in open during leap attack, separated from safety
Solution:
- Let Leaper retreat—it will return
- Maintain position near safe zone
- Use retreat time to reload, heal, and reposition
- Don’t abandon tactical advantage for aggression
How to Farm Multiple Leaper Pulse Units Efficiently
If you need multiple Pulse Units for crafting or want to farm efficiently:
Multi-Kill Strategy:
- Complete first Leaper at Hydroponic Dome Complex
- Travel to second location (Water Treatment Control)
- If second Leaper present, repeat strategy
- Extract with two Pulse Units
Respawn Mechanics:
- Leapers respawn on new raid deployments
- Same locations remain reliable
- Can farm repeatedly across multiple raids
- Each kill provides new Pulse Unit
Efficiency Tips:
- Craft large batch of Blaze Grenades beforehand
- Stock adequate Heavy Ammo reserves
- Use established strategy—don’t experiment mid-farm
- Extract after each successful kill (don’t risk multiple Pulse Units)
Final Tips for Getting Leaper Pulse Units in ARC Raiders
Defeating your first Leaper represents a significant milestone in ARC Raiders progression. These massive machines embody the game’s philosophy: preparation and strategy triumph over raw mechanical skill. The seemingly impossible becomes routine once you understand the enemy’s weaknesses and exploit environmental advantages.
The safe zone method transforms what could be a frustrating, gear-destroying experience into a methodical, almost relaxing process. Yes, it takes several minutes. Yes, you’ll use multiple Blaze Grenades and significant ammunition. But you’ll walk away with your Leaper Pulse Unit intact, your gear undamaged, and the confidence to farm additional Pulse Units whenever needed.
For Into the Fray quest completion, the Leaper Pulse Unit is your gate to exclusive cosmetic rewards and Celeste’s continued questline. For crafting applications, these Pulse Units unlock advanced equipment and workbench upgrades. Either way, mastering Leaper combat is non-optional for serious progression.
Remember: Safe Pockets protect your reward, Blaze Grenades exploit the weakness, Heavy Ammo penetrates the armor, and safe zones negate the danger. Follow this formula, and Leapers transform from terrifying threats into farmable resource nodes.
Available Now: PlayStation | Xbox | Official Site