The Secret Drink Menu at Reba’s Diner
Hidden within Ashes of the Damned lies one of the most valuable Easter eggs for survival: a secret drink mixing system that grants free perks. While most players are spending their hard-earned Essence at perk machines, you can snag powerful buffs without spending a single point.
This guide breaks down the Mixologist achievement—how to craft four unique “well-prepared drinks” that grant Quick Revive, Jugger-Nog, Speed Cola, and Stamin-Up completely free. Beyond the achievement and Calling Card, these free perks can be game-changers for early-round economy and high-round pushes.
Important Limitation: You can only craft and drink ONE well-prepared drink per match. Choose wisely based on your strategy, or return in subsequent games to unlock the others and complete the achievement.
Quick Links:
- Free Quick Revive Recipe
- Free Jugger-Nog Recipe
- Free Speed Cola Recipe
- Free Stamin-Up Recipe
- Achievement Tips
How the Drink System Works
The concept is simple: collect three specific ingredients scattered across the Ashes of the Damned map, bring them to Reba’s Diner at Exit 115, and interact with the soda machine to mix your drink. Each ingredient combination creates a different perk.
The Central Hub: All drinks are crafted at Reba’s Diner in the Exit 115 area. This location becomes your final destination regardless of which perk you’re targeting.
Strategic Considerations:
- Plan your ingredient route efficiently to minimize backtracking
- Collect ingredients while completing other objectives like Pack-a-Punch or wall buy acquisitions
- Choose your free perk based on your loadout and playstyle
- Remember: one drink per game, so prioritize accordingly
Free Quick Revive Recipe
Perk Benefit: Revive teammates faster + accelerated health regeneration
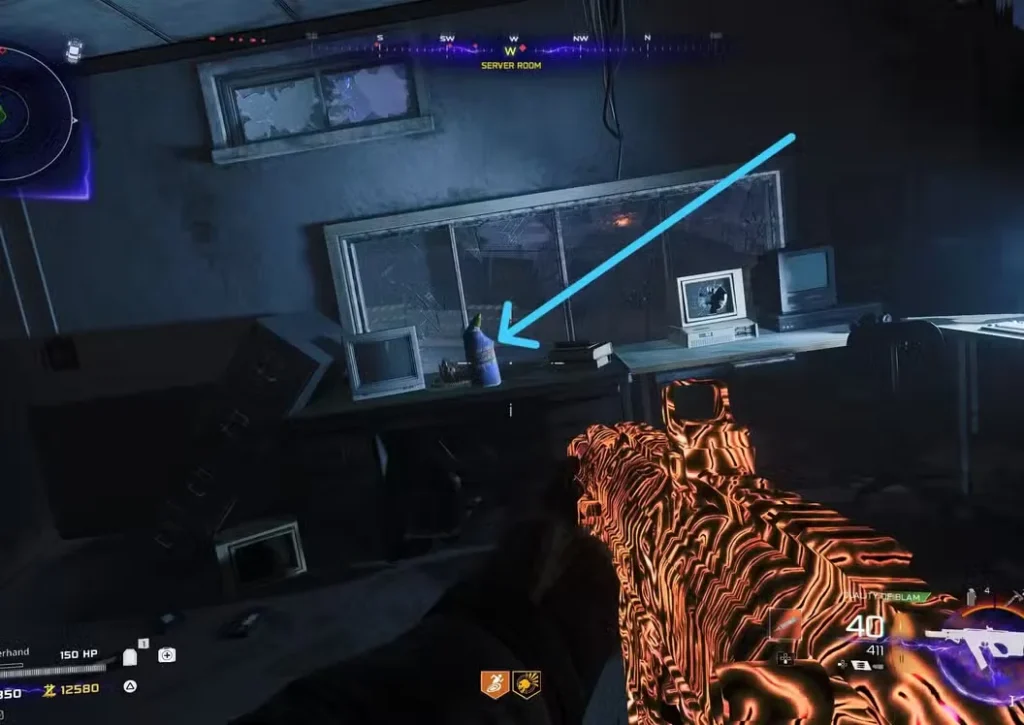
Ingredient #1: Bleach (Server Room – Janus Towers Plaza)
Navigate to the Server Room in Janus Towers Plaza. On the west side of the room, you’ll spot a desk with a bottle of bleach sitting on top. Interact to collect it.
Navigation Tip: Janus Towers Plaza is one of the central areas you’ll pass through frequently. Grab this early if you’re planning a Quick Revive run.
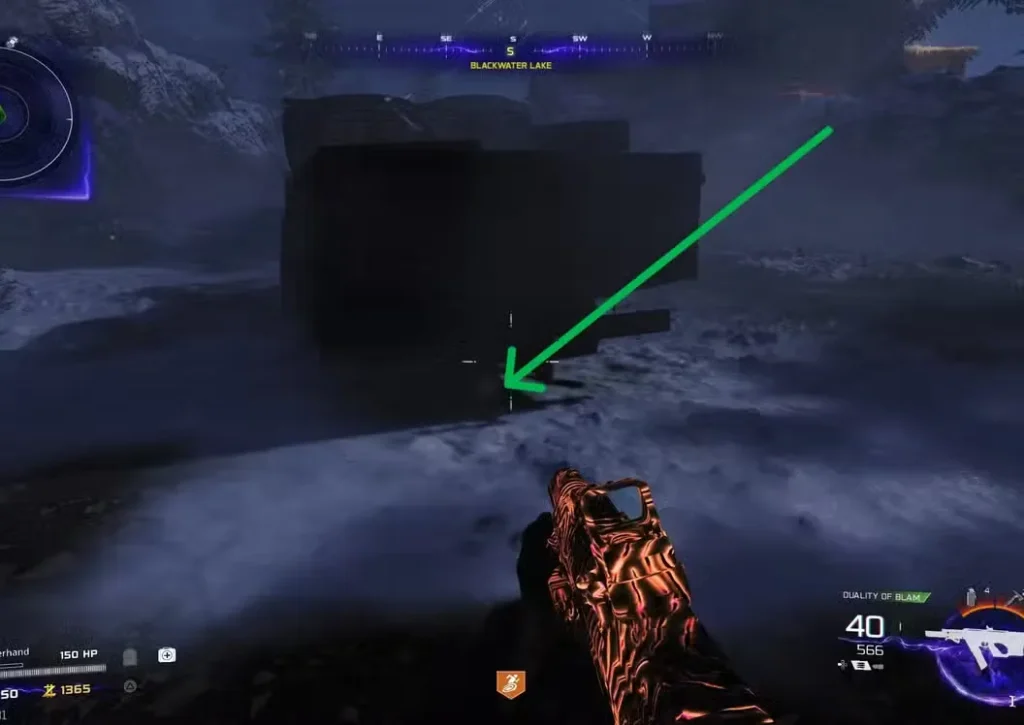
Ingredient #2: Fish (Blackwater Lake)
Head to Blackwater Lake and locate the Mystery Box spawn point on the wooden pier. Directly across from this spawn, you’ll find a fish that can be picked up.
Why This Matters: Blackwater Lake connects to multiple areas, making this an easy pickup during natural map traversal. Check out our training spots guide for optimal routes through this area.
Ingredient #3: Stim Shot (Control Room – Zarya Cosmodrome)
Inside the Control Room at Zarya Cosmodrome, examine the northeast wall. You’ll find a cabinet with a Stim Shot on the second shelf from the top.
Location Context: Zarya Cosmodrome houses important locations including a wall buy for the DS20 Mirage. If you’re running optimal weapons, you’ll likely pass through here anyway.
Crafting Your Drink
Return to Reba’s Diner at Exit 115 with all three ingredients. Approach the soda machine and interact with the empty cup twice. You’ll consume your well-prepared drink and receive Quick Revive free of charge.
Best Use Case: Quick Revive shines in co-op matches where teammate revives are crucial. The health regeneration bonus also helps solo players recover from mistakes faster.
Free Jugger-Nog Recipe
Perk Benefit: Increased maximum health (essential for survival)
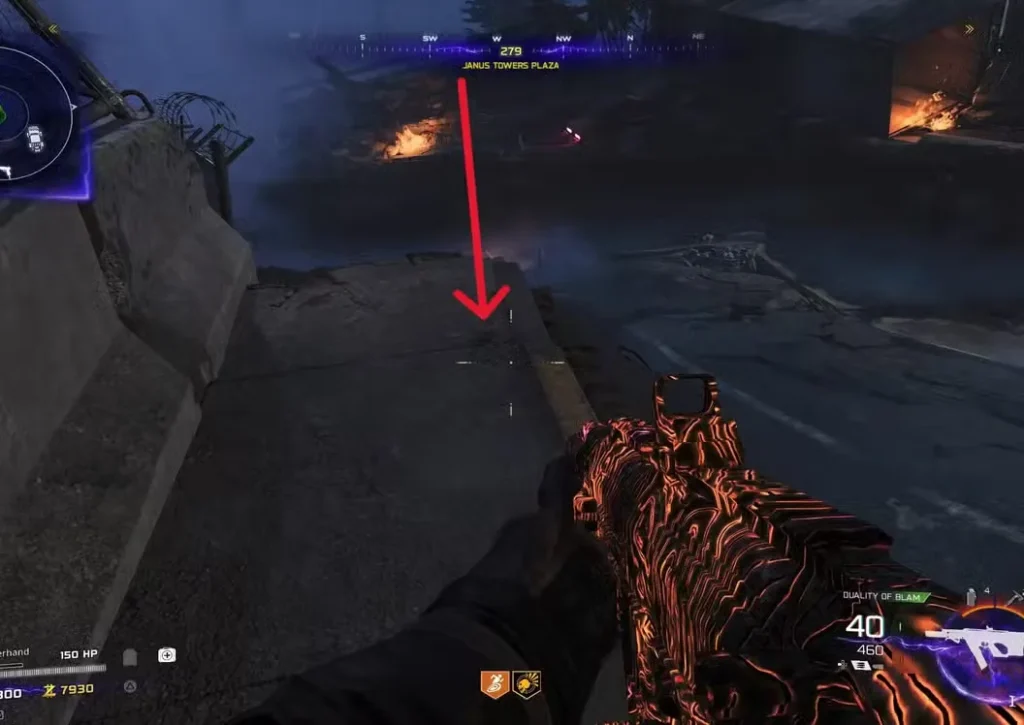
Ingredient #1: Plant (Janus Towers Plaza)
In Janus Towers Plaza, locate the raised road on the west side that leads toward Blackwater Lake. Walk along this elevated path until you spot a plant sitting on the edge—interact to collect it.
Pro Tip: This plant is easy to miss if you’re rushing. Slow down on the raised road and scan the edges carefully.
Ingredient #2: Bottle (Barn – Vandorn Farm)
Travel to Vandorn Farm and enter the Barn. Face west toward the Cellar entrance. Between the gaps in the barn wall, you’ll spot a bottle that can be collected.
Map Knowledge: Vandorn Farm also offers its own Survival mode variant. Familiarize yourself with this area for both game modes. See our Vandorn Farm guide for complete coverage.
Ingredient #3: Eggs (Reba’s Diner Kitchen – Exit 115)
Head to Reba’s Diner at Exit 115 and enter the kitchen area. Look at the north rack of supplies, where you’ll find a carton of eggs ready for pickup.
Efficiency Note: Since you’re already at your final destination, grab this ingredient last. Collect the other two items first, then swing by the kitchen before mixing your drink.
Crafting Your Drink
With all three ingredients in hand, approach the soda machine at Reba’s Diner and interact with it. You’ll receive Jugger-Nog as your free perk.
Strategic Value: Jugger-Nog is arguably the most important perk in Zombies. The extra health pool dramatically improves survivability, making this the top choice for most players. Combined with manual armor plating, you become significantly tankier.
Free Speed Cola Recipe
Perk Benefit: Faster reloads + quicker armor plate application
Ingredient #1: Plant (Blackwater Lake)
Enter Blackwater Lake from Janus Towers Plaza. You’ll immediately encounter a crashed cart. Face south from this cart, then go prone. While prone, you’ll be able to pick up a plant item on the ground.
Hidden Detail: Going prone is essential—you won’t see the prompt while standing. This is one of the trickier pickups, so don’t rush past it.
Ingredient #2: Nuts (Hargrove’s Mercantile – Ashwood)
Travel to Ashwood and use the zipline on the east side to reach the upper section of town. Enter Hargrove’s Mercantile and examine the south wall. You’ll find a box of nuts inside a crate on the floor.
Traversal Tip: The zipline system in Ashwood provides quick vertical movement. Master these routes for efficient high-round strategies.
Ingredient #3: Sugar Packets (Reba’s Diner – Exit 115)
Inside Reba’s Diner at Exit 115, locate the serving table. Next to a coffee mug and handbag, you’ll spot sugar packets that can be collected.
Item Visibility: These packets are small but clearly visible on the serving table. Take your time scanning the diner interior.
Crafting Your Drink
Return to the soda machine at Reba’s Diner with all ingredients and interact to receive Speed Cola.
Performance Impact: Speed Cola significantly reduces downtime during combat. Faster reloads mean more consistent DPS, while quicker armor plating keeps you protected during intense rounds. Essential for weapons with small magazines like the Ryden 45k or Razor 9mm.
Free Stamin-Up Recipe
Perk Benefit: Increased sprint speed and duration
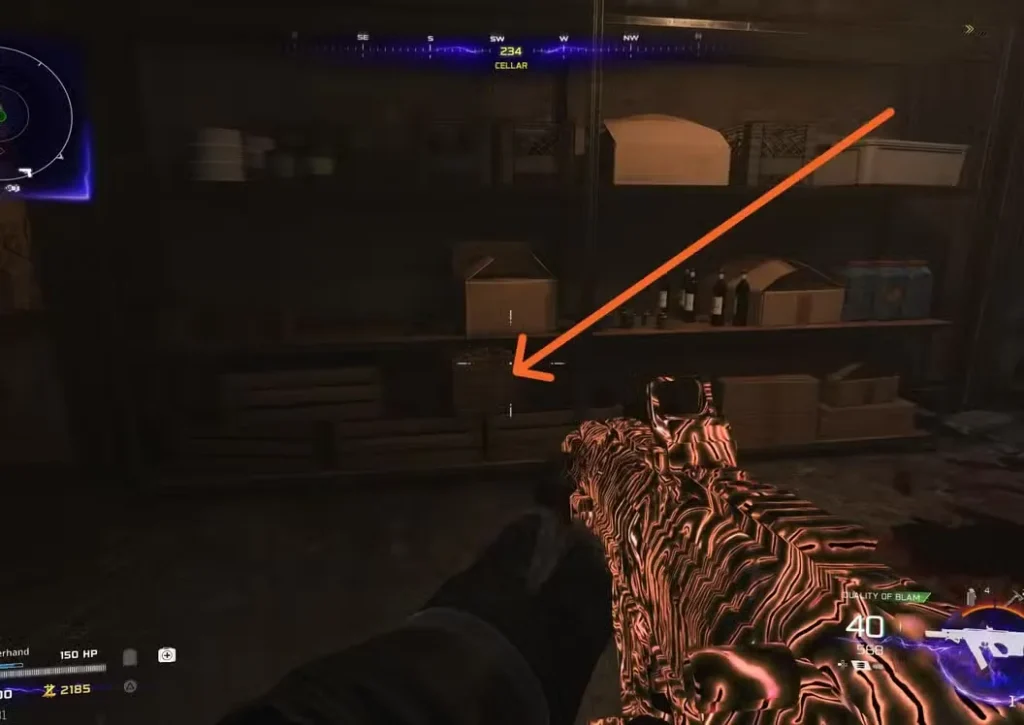
Ingredient #1: Nuts (Cellar – Vandorn Farm)
Navigate to Vandorn Farm and enter the Barn. Descend into the Cellar area and examine the southwest wall. On the bottom shelf, you’ll find a box of nuts.
Cellar Context: The Cellar is an important location for various Easter eggs and objectives. Learn this layout thoroughly for efficient runs.
Ingredient #2: Beans (Hargrove’s Mercantile – Ashwood)
Head to Ashwood and take the east zipline up to Hargrove’s Mercantile. Behind the counter, you’ll spot a bag of beans leaning against a cabinet.
Navigation Efficiency: Since you’re already visiting Ashwood’s upper area, this pairs well with the Speed Cola ingredients if you’re planning multiple runs across different matches.
Ingredient #3: Gasoline (McDougal’s Service Station – Exit 115)
Travel to Exit 115 and locate McDougal’s Service Station. Outside the building, face northwest and check by the trash can. You’ll find a gasoline can available for pickup.
Safety Note: This exterior location is exposed to zombie spawns. Clear the area before searching, especially in later rounds.
Crafting Your Drink
Head to Reba’s Diner at Exit 115. Interact with the soda machine behind the cash register to craft your Stamin-Up drink.
Tactical Application: Stamin-Up is crucial for training zombies and maintaining distance from hordes. The extended sprint duration prevents you from getting cornered, while increased speed creates more breathing room during intense moments. Pairs perfectly with mobile weapons like SMGs.
Mixologist Achievement & Rewards
Achievement Requirements: Craft all four unique drinks across multiple matches of Ashes of the Damned.
Reward Breakdown:
- First Drink: Soda Sommelier Calling Card unlocked
- All Four Drinks: Mixologist achievement/trophy completed
- Gameplay Benefit: Knowledge of all four recipes for strategic perk selection
Achievement Strategy:
- Match 1: Craft Jugger-Nog (most universally valuable)
- Match 2: Craft Speed Cola (improves weapon performance)
- Match 3: Craft Stamin-Up (essential for training)
- Match 4: Craft Quick Revive (complete the achievement)
Time Investment: Each ingredient collection takes roughly 5-10 minutes depending on your route efficiency and zombie interference. Factor this into your early-game strategy.
Optimizing Your Ingredient Routes
Efficient Collection Path Example (Jugger-Nog):
- Start game → Navigate to Janus Towers Plaza
- Grab plant on raised road
- Head to Vandorn Farm → Collect bottle in Barn
- Return to Exit 115 → Grab eggs in Reba’s Diner kitchen
- Mix drink at soda machine
Map Knowledge Resources:
- Study perk locations for full map awareness
- Learn Pack-a-Punch routes to combine objectives
- Master training spots near ingredient locations
Solo vs Co-op Considerations:
Solo Players: Free perks save crucial Essence for weapon upgrades and Pack-a-Punch. Prioritize Jugger-Nog or Speed Cola first.
Co-op Teams: Coordinate who collects which drink across matches. Quick Revive becomes more valuable with teammates to revive.
Frequently Asked Questions
Q: Can I drink multiple well-prepared drinks in one match?
No, you’re limited to one drink per game. Choose based on your immediate needs and strategy.
Q: Do I need to collect ingredients in a specific order?
No, collect them in whatever order makes sense for your route. Just ensure you have all three before mixing.
Q: Can I save ingredients across matches?
No, ingredients reset between games. You must collect all three fresh ingredients each match.
Q: Which free perk should I prioritize first?
Jugger-Nog for most players, as increased health benefits all playstyles. Speed Cola or Stamin-Up work well for aggressive mobile builds.
Q: Do free perks count toward the four-perk limit?
Yes, these occupy a perk slot just like purchased perks. Plan your perk loadout accordingly.
Integration with Overall Strategy
Free perks fit beautifully into the broader Zombies economy system:
Early Game (Rounds 1-10):
- Collect ingredients while opening map areas
- Save Essence for weapon wall buys and Pack-a-Punch
- Get free Jugger-Nog instead of spending 2,500 Essence
Mid Game (Rounds 10-30):
- Use saved Essence for field upgrade augments
- Purchase additional perks to complement your free one
- Invest in ammo mod augments
High Rounds (30+):
- Free perk allowed earlier investment in weapon camos
- More Essence available for armor plates and equipment
- Strategic advantage compounds over long matches
Additional Resources:
- Zombies Beginner Tips for new players
- Best Settings & Optimization for performance
- Should You Prestige? for progression guidance
- Permanent Perks Guide for advanced strategies
Ending Note
The Mixologist Easter egg represents one of the best value propositions in Ashes of the Damned. A few minutes of ingredient collection can save thousands of Essence over the course of a match, resources you can reinvest into weapons, upgrades, and equipment.
Whether you’re grinding camo challenges, attempting the main Easter egg, or pushing for high rounds with optimal loadouts, these free perks provide a meaningful advantage.
Start with Jugger-Nog for maximum survivability, then work through the others across multiple matches to complete the achievement. Your Essence bank—and your survival rate—will thank you.
Community Resources:
Happy hunting, and may your drinks be well-prepared!