How to Get Psychic Bombs in Metroid Prime 4 Beyond
The Morph Ball is iconic in Metroid history, but it’s only half as useful without bombs to complement it. In Metroid Prime 4: Beyond, this classic ability returns as Psychic Bombs—your essential tool for destroying obstacles, accessing hidden areas, and even giving yourself extra height while rolling around in ball form.
You’ll unlock Psychic Bombs relatively early in your adventure through the alien world of Viewros, specifically in the Fury Green region after a significant temple dungeon. But getting there requires navigating through ancient ruins, solving puzzles with the Control Beam, and defeating a massive flora boss named Carvex.
This guide walks you through the entire process: crossing the Infinity Bridge, exploring the Fury Green temple, conquering the Carvex boss fight, and finally claiming the Psychic Bombs ability. Plus, we’ll cover a few collectibles you shouldn’t miss along the way.
For more ability unlocks and progression tips, check out our comprehensive Metroid Prime 4: Beyond gameplay guide.
When Do You Get Psychic Bombs?
Timeline in the Game:
Psychic Bombs are unlocked after rescuing Myles MacKenzie (the Federation Engineer) and progressing through the Fury Green region. Specifically, you’ll earn this ability by:
- Crossing the Infinity Bridge
- Navigating the ancient Fury Green temple
- Unlocking the Control Beam ability
- Defeating Carvex, the temple’s boss
This happens relatively early—typically within the first few hours of gameplay, depending on your exploration pace. It’s one of the first major ability unlocks that significantly expands what you can access throughout Viewros.
Why Psychic Bombs Matter:
Once you have them, you’ll immediately notice how many previously inaccessible areas suddenly open up:
- Destructible obstacles marked by specific visual cues
- Hidden Morph Ball passages containing collectibles
- Bomb jump opportunities for reaching higher platforms
- Puzzle solutions requiring precise bomb placement
If you’ve been exploring thoroughly and marking blocked passages on your mental map, this is when you’ll want to backtrack and grab all those goodies.
Step 1: Cross the Infinity Bridge

After rescuing Myles MacKenzie, your friendly (and chatty) Federation Engineer companion, you’ll make your way deeper into the Fury Green region. Eventually, you’ll reach a massive bridge spanning the jungle—the Infinity Bridge.
You might have actually spotted this bridge in the distance during earlier exploration. It’s pretty hard to miss once you know what you’re looking at. When you finally find the entrance, the path forward becomes clear: cross that bridge and enter the temple on the other side.
Combat Encounter: Jungle Grievers
Here’s where things get spicy. As you traverse the Infinity Bridge, you’ll be ambushed by several waves of Jungle Grievers—aggressive creatures that attack in groups.
Combat Tips:
- Myles is useless here—don’t expect any help from your engineer buddy
- Use charged shots to deal maximum damage quickly
- Strafe constantly to avoid their coordinated attacks
- Missiles from your Missile Launcher work great for crowd control
- Keep moving forward—standing still gets you surrounded
The encounter isn’t particularly difficult if you maintain mobility and use your full arsenal. Samus is more than a match for these beasts, but they can overwhelm you if you get careless.
Once you’ve cleared the waves and crossed the bridge, you’ll reach the entrance to the Fury Green temple.
Step 2: Navigate the Fury Green Temple
The temple interior is classic Metroid—ancient alien architecture mixed with environmental puzzles that require your growing arsenal of abilities.

Unlock the Control Beam
Shortly after entering the temple, you’ll acquire the Control Beam ability. This is one of the coolest powers in Metroid Prime 4: Beyond:
How Control Beam Works:
- Fire a beam that you can control independently while time slows to a crawl
- Steer the beam through complex pathways to hit switches or targets
- Essential for solving puzzles throughout the temple (and later areas)
- Adds a puzzle-solving dimension that feels fresh for the series
You’ll use the Control Beam extensively throughout this temple, so get comfortable with the mechanics. The game does a good job teaching you gradually through increasingly complex puzzles.
Reach Base Camp
Using your Psychic Glove (which you should already have by now) and the newly acquired Control Beam, navigate through sealed doors and puzzle rooms until you reach Base Camp.
What’s at Base Camp:
When you first arrive, Myles will immediately take interest in the Lamorn Control System on the left side of the room. This ancient technology controls various functions throughout the temple.
You’ll also notice several non-functional doors—classic Metroid design language for “come back later with better abilities.”
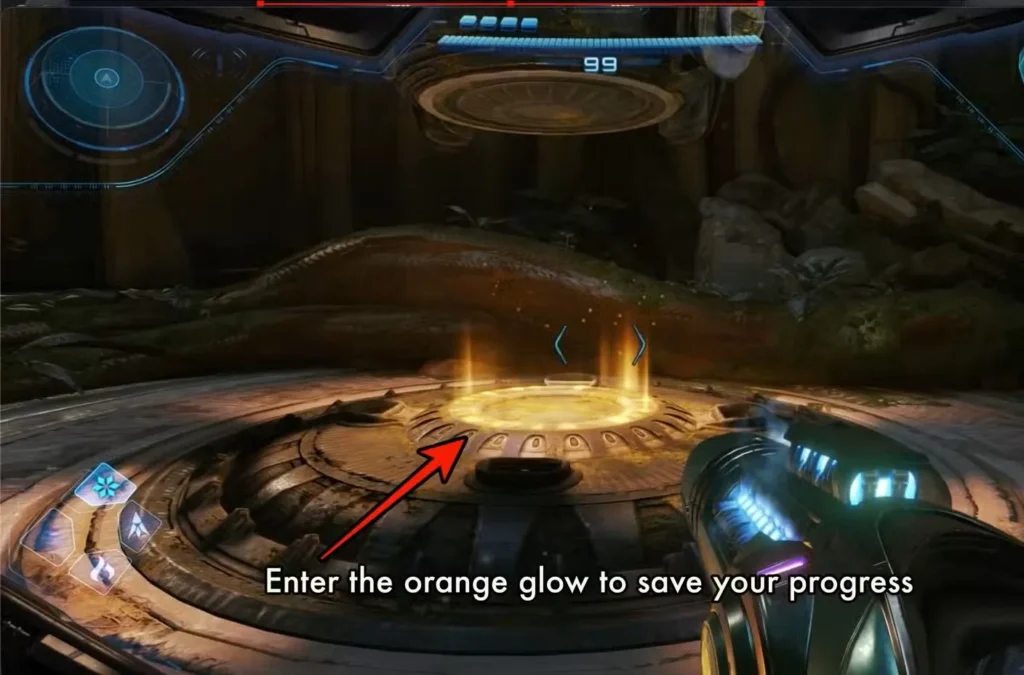
Important: Save Your Progress
Head through the eastern doorway to find a save room. Use it. The upcoming sections get progressively more challenging, and you don’t want to lose progress to a careless death.

Partial Door Unlock Puzzle
After saving, return to Base Camp and interact with the console near the Lamorn Control System. This triggers a short cutscene where:
- Myles analyzes the ancient technology
- You share language data with him (Samus is surprisingly helpful)
- He partially unseals the door leading deeper into the temple
The Catch:
The door mechanism won’t activate from this side of the room. Classic puzzle design. Look for a hole in the wall beside the door—you can fire your Control Beam through it to activate the mechanism from the opposite side.
Once the door opens, proceed through until you reach a Morph Ball entrance. Transform and wind your way through the small tunnel to the far side.
Step 3: The Ceremonial Chamber
Beyond the Morph Ball tunnel, you’ll enter a room with two statues flanking a central access node. Scan one of the statues to trigger a short cutscene.
Green Energy Crystals Explained
This cutscene provides crucial information about Green Energy Crystals—collectibles scattered throughout Metroid Prime 4: Beyond.
Why They Matter:
Green Energy Crystals are important for endgame progression. The game doesn’t explicitly force you to collect them early, but ignoring them creates a potential grind later when you need a specific total to progress.
Pro Tip: Collect Green Energy Crystals whenever you encounter them. Future you will thank present you for not having to backtrack through the entire game hunting for missed crystals.
The Ceremonial Chamber Puzzle
In the large chamber beyond, you’ll find:
- A raised pressure plate overlooking a small pond
- Three nodes situated around the water’s edge
Solution:
- Stand on the pressure plate to activate all three nodes
- Use your Control Beam to strike each node in sequence
- The pathway requires precision—steer carefully through the environment
- Successfully hitting all nodes unseals the room on the far side
Optional Exploration:
There’s a room on the left side of this area called the Sanctum of the Guardians. You can’t fully explore it yet, but make a mental note:
Return here after defeating the temple boss to gain additional lore about Carvex and the temple’s history. For more details, check our dedicated guide on the Sanctum of Guardians in Fury Green.
Final Approach
Continue forward using your Psychic Glove ability to manipulate objects in your path. Beyond the next set of doors lies the temple’s climactic encounter: Carvex.
Step 4: Defeat Carvex to Unlock Psychic Bombs
When you enter the boss chamber, a cutscene reveals Carvex—a massive flora-based boss that guards the Psychic Bombs ability.
Carvex Boss Fight Overview
This fight primarily tests your mastery of the Control Beam ability you just acquired.
Core Mechanics:
- Carvex attacks with tendrils that you must destroy
- Use the Control Beam to steer attacks through its defenses
- The boss has multiple phases with escalating difficulty
- Precise aim and timing are more important than raw damage output
Why This Fight Matters:
Carvex isn’t just a skill check—it’s teaching you how to use Control Beam in combat scenarios. The lessons learned here apply to future boss fights and environmental puzzles throughout the game.
For a complete breakdown of attack patterns, strategies, and phase transitions, see our dedicated Carvex boss fight guide. That guide covers:
- Detailed attack pattern analysis
- Optimal positioning strategies
- Phase-by-phase breakdown
- Common mistakes to avoid
Claim Your Reward
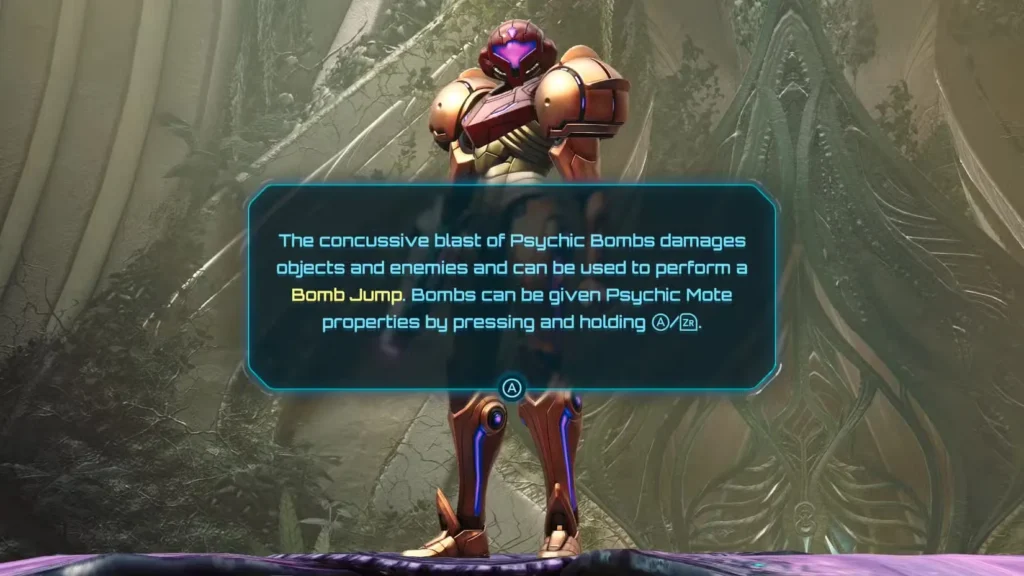
Once Carvex falls, you can finally claim the Psychic Bombs power-up. This ability allows you to:
- Deploy up to three Morph Ball bombs at a time
- Destroy obstacles and barriers marked with specific visual cues
- Unlock new routes and discover hidden secrets
- Perform bomb jumps for extra vertical mobility in Morph Ball form
Bomb jumps are particularly useful—lay a bomb, let it launch you upward, then lay another at the peak for additional height. Mastering this technique opens up tons of sequence breaks and shortcut opportunities.
Step 5: Exit the Temple (With Your New Ability)
After defeating Carvex, the entrance you came through is sealed—classic Metroid dungeon design. You’ll need to find an alternate exit using your newly acquired Psychic Bombs.
The Morph Ball Exit Passage
Look for a small passage on the side of the boss chamber—just large enough for Morph Ball form to fit through.
How to Proceed:
- Transform into Morph Ball (press Y)
- Enter the passage
- You’ll immediately encounter a blockage
- Drop a Psychic Bomb (press A) to destroy it
- Continue through, destroying obstacles as you encounter them
The passage winds through several rooms, each with destructible barriers that require Psychic Bombs. It’s the game’s way of forcing you to practice with your new ability immediately.
Return Through Ceremonial Chamber
The Morph Ball passage deposits you back in the Ceremonial Chamber—the room with the pressure plate puzzle you solved earlier. From here, you’ll retrace your steps toward Base Camp.
Don’t Miss This: Hidden Missile Upgrade
On your way back to Base Camp, you’ll go through another small Morph Ball segment in an area called Broken Hall.
Critical Collectible:
Keep your eyes peeled for a destructible weak point that you can now destroy with Psychic Bombs. Behind it, you’ll find a Missile Expansion—one of many upgrades that increase your maximum missile capacity.
Why This Matters:
Missile Expansions are crucial for late-game boss fights and certain environmental puzzles. Missing them early means backtracking later when you realize you’re under-equipped. Grab every expansion you encounter.
For more on optimizing your arsenal, check our guide on the Missile Launcher and its upgrades.
Step 6: Return to Base Camp
From Broken Hall, continue to the next room to reunite with Myles MacKenzie at Base Camp. He’ll update you on your next objectives in Metroid Prime 4: Beyond.
What Happens Next:
Myles will analyze the data you’ve gathered and point you toward the next major area. Typically, this involves:
- Progressing to Volt Forge (the electric-themed second dungeon)
- Exploring more of Fury Green with your expanded abilities
- Hunting for collectibles you previously couldn’t reach
If you’re wondering what to tackle next, our guide on where to go after Volt Forge covers the optimal progression path through the mid-game.
What to Do With Psychic Bombs
Now that you’ve unlocked this essential ability, here’s how to make the most of it:
Immediate Backtracking Opportunities
Return to Earlier Areas:
- Fury Green has several blocked passages you can now access
- Look for cracked walls or suspicious barriers
- Many Energy Tanks and Missile Expansions are hidden behind Psychic Bomb barriers
Visual Cues to Watch For:
- Cracked or damaged surfaces
- Morph Ball-sized passages with visible obstructions
- Areas that seem suspiciously empty or dead-ends
Combat Applications
Bomb Jumps:
- Essential for reaching high platforms without other mobility options
- Can be combined with the Psychic Boots (unlocked later) for even greater vertical mobility
- Practice the timing: drop bomb → rise → drop second bomb at peak → repeat
Enemy Encounters:
- Some enemies are vulnerable to Psychic Bombs
- Useful for destroying environmental hazards during combat
- Can create space between you and melee attackers in Morph Ball form
Puzzle Solving
Many puzzles throughout Viewros require Psychic Bombs:
- Timed sequences where you must destroy multiple targets
- Chain reaction puzzles involving explosive barrels
- Hidden pathways revealed only by bombing specific walls
Additional Tips for the Fury Green Temple
Resource Management:
- Make liberal use of the save room at Base Camp before attempting Carvex
- Scan everything—lore entries provide context and sometimes gameplay hints
- Don’t rush through puzzles; the game wants you to learn each ability thoroughly
Collectible Hunting:
- The Sanctum of Guardians has important lore—definitely return post-boss
- Green Energy Crystals are scattered throughout the temple—grab them all
- Scan the statues and environmental details for completion percentage
Combat Strategy:
- The Jungle Grievers on the Infinity Bridge can be dealt with at range
- Save missiles for tough encounters; regular charged shots work fine for standard enemies
- Keep your health topped off before entering new areas
For more collectibles and hidden content, including special unlocks, see our guide on Metroid Prime 4 amiibo rewards.
Frequently Asked Questions (FAQs)
How do you get Psychic Bombs in Metroid Prime 4?
To get Psychic Bombs in Metroid Prime 4, you must progress through the Fury Green temple after rescuing Myles MacKenzie. Cross the Infinity Bridge, navigate the temple using your Control Beam ability, and defeat Carvex, the temple’s boss. The Psychic Bombs are your reward for winning this fight, unlocking Morph Ball bomb capabilities.
When do you unlock Morph Ball bombs in Metroid Prime 4 Beyond?
You unlock Morph Ball bombs (called Psychic Bombs) relatively early in the game—within the first few hours of gameplay. Specifically, it happens after completing the Fury Green temple dungeon and defeating Carvex. This is one of the first major ability unlocks that expands your exploration options significantly.
What do Psychic Bombs do in Metroid Prime 4?
Psychic Bombs allow you to deploy up to three Morph Ball bombs at a time while in Morph Ball form. They destroy specific obstacles and barriers, unlock hidden passages and collectibles, and can be used for bomb jumps—launching yourself upward for additional vertical mobility. They’re essential for both exploration and puzzle-solving throughout the game.
Where is the Fury Green temple in Metroid Prime 4?
The Fury Green temple is located across the Infinity Bridge in the Fury Green region. After rescuing Myles MacKenzie, progress through Fury Green until you reach the massive bridge spanning the jungle. Cross it while fighting waves of Jungle Grievers, and you’ll arrive at the temple entrance on the far side.
Master the Basics Early
Learning how to get Psychic Bombs in Metroid Prime 4 is just the beginning. This ability is foundational to almost everything that comes after—from navigating dungeons to defeating bosses that require precise bomb placement.
The Fury Green temple serves as an extended tutorial for the Control Beam and Psychic Bombs, teaching you mechanics you’ll use throughout the entire game. Don’t rush through it. Take your time to:
- Master Control Beam steering
- Practice bomb jump timing
- Collect all available Green Energy Crystals
- Explore every room thoroughly
Once you’ve conquered Carvex and claimed your bombs, you’ll be ready for the next major challenge: Volt Forge. And when you finally unlock the Vi-O-La motorcycle in that area, you’ll have the mobility to revisit everywhere you’ve been and grab all the collectibles you’ve been mentally marking.
For complete walkthrough coverage, boss strategies, and collectible locations, check out our main Metroid Prime 4: Beyond hub. And if you’re ready to start your adventure, grab the game from Nintendo’s official store.
Now get out there and start bombing your way through Viewros, bounty hunter!