Hunting down every Aurylene in Aburrey Quarry can feel like a serious challenge. This region’s vertical layout, with its multiple floors, hidden caves, and locked areas, makes it easy to miss collectibles tucked away in corners. But don’t worry—this guide walks you through all 17 Aurylene locations in Aburrey Quarry with clear directions and tips to help you grab them efficiently.
Before diving into the locations, make sure you’ve completed the Quarry Rescue side mission. This unlocks the entire area and gives you access to all the sections you’ll need to explore. If you’re stuck on that puzzle door, check out our Quarry Rescue door puzzle guide. For more tips on exploring Talos-II and getting the most out of your adventure, visit our Arknights Endfield guides hub.
Download Arknights Endfield on PC via Epic Games, Android, or check out the official website for more info.
Aurylene Location #1: Quarry Entrance Cave
Start at the Quarry Entrance teleport point and head west toward the Rare Growth marker. You’ll spot a cave entrance—go inside and take the lift down to level 2B.
Once you’re on 2B:
- Walk north down the tunnel
- Take another lift back up to a higher platform
- Clear out the enemies blocking your path
- Turn left and look for some stacked crates
- Climb up—the first Aurylene is sitting on top of one of the crates
This one’s pretty straightforward, though the enemies can be a bit annoying if you’re underleveled. If you need help boosting your characters, our level up and promote characters guide has you covered.
Aurylene Location #2: Deep Management Post
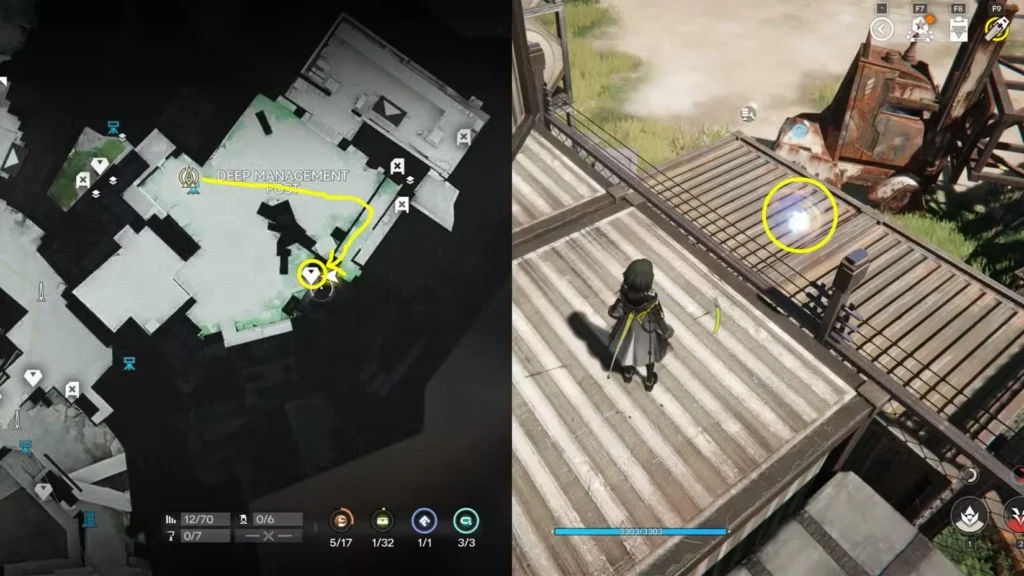
Fast travel to the Deep Management Post teleport point. This one’s super easy—just look for a cargo container nearby. The Aurylene is floating right on top of it. No enemies, no puzzle, just grab and go.
Aurylene Location #3: Column Jump
From Aurylene #2, head south and climb up the stacked cargo containers. Once you’re at the top, you’ll see a column below with an Aurylene circling around it. Jump down carefully—you don’t want to miss the platform and have to climb all the way back up.
Aurylene Location #4: Staff Lounge (Requires Power)
Jump down from the previous location and move east toward the Staff Lounge. The Aurylene is floating near the southern edge, but there’s a catch—the area is locked behind an electric door.
To unlock it:
- You need to provide power to the Electric Nexus
- Connect several Relay Towers using the Sub-PAC from an earlier region
- Once the power’s flowing, the door opens and you can grab the collectible
If you’re having trouble with power management, our increase power output guide should help clear things up.
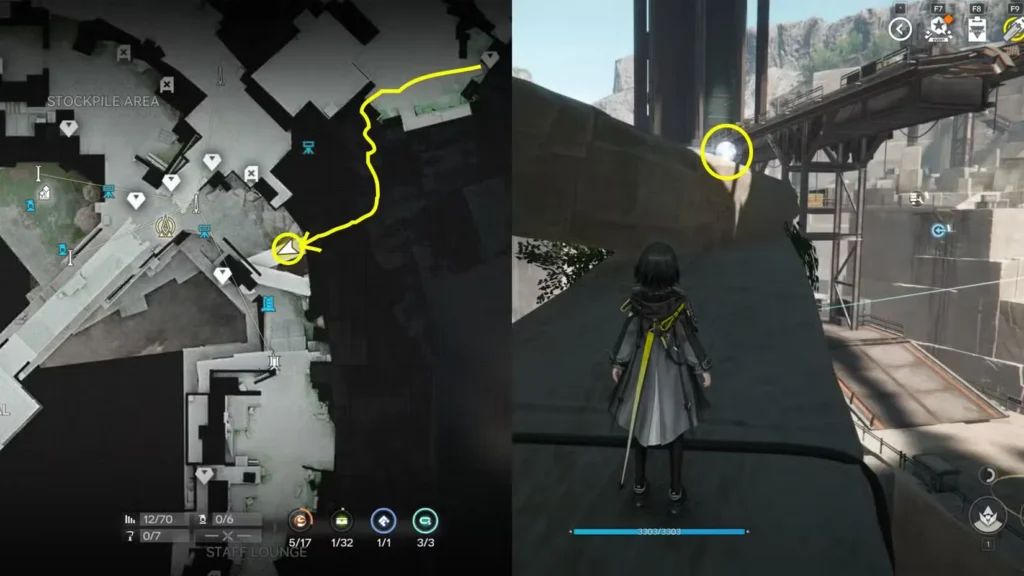
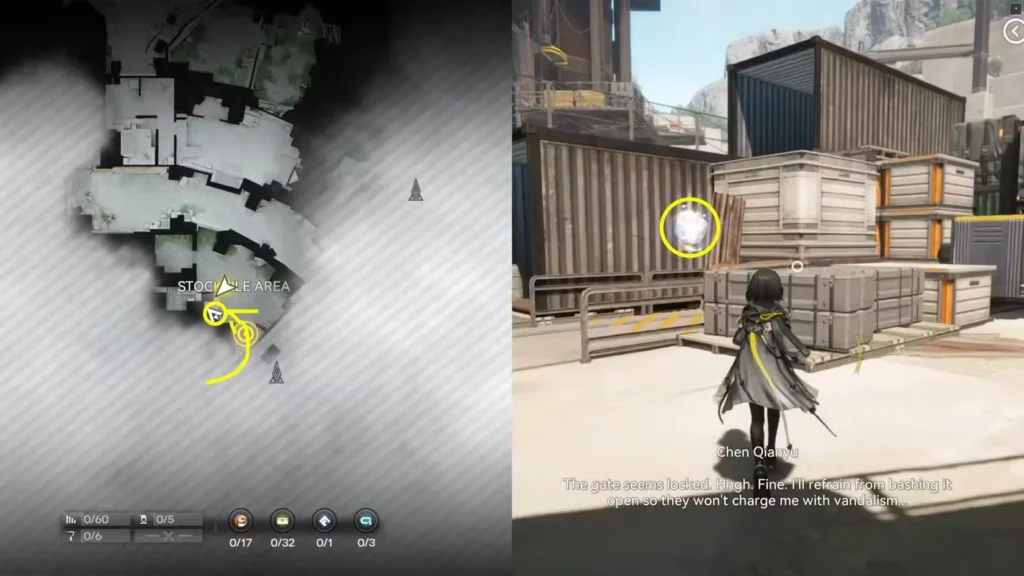
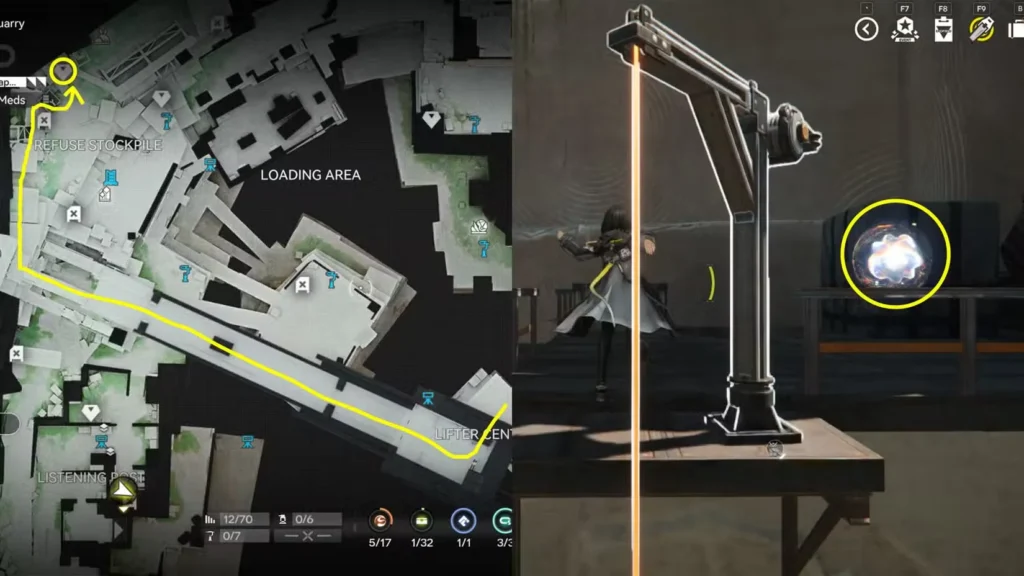
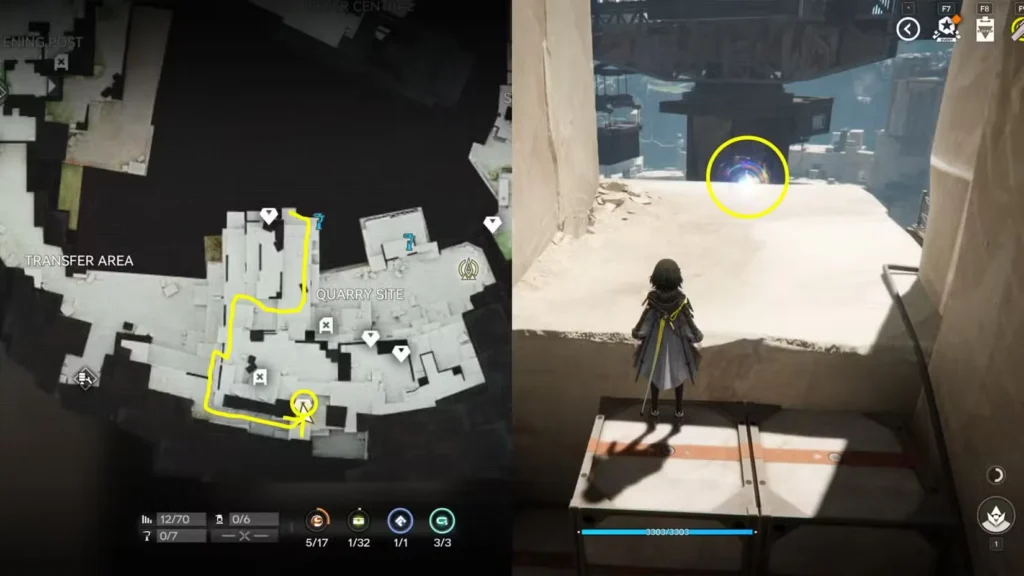
Aurylene Location #5: Stockpile Area Platform
Teleport to the Stockpile Area teleport point. From there, carefully jump down to the lower southern platform. The Aurylene should be visible from the moment you arrive—it’s just sitting there waiting for you.
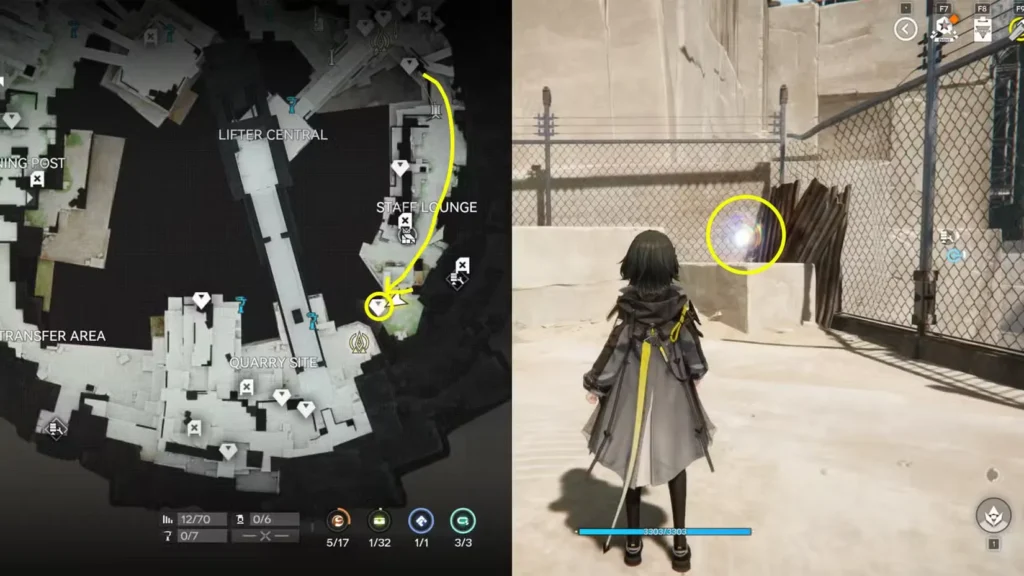
Aurylene Location #6: Northwest Chase
Go back to the Stockpile Area teleport point and head northwest. As you get close to the Aurylene, it’ll start moving—typical. Follow it down as it floats around, and once it stops, snag it. These moving ones can be a bit annoying, but at least they don’t go far.
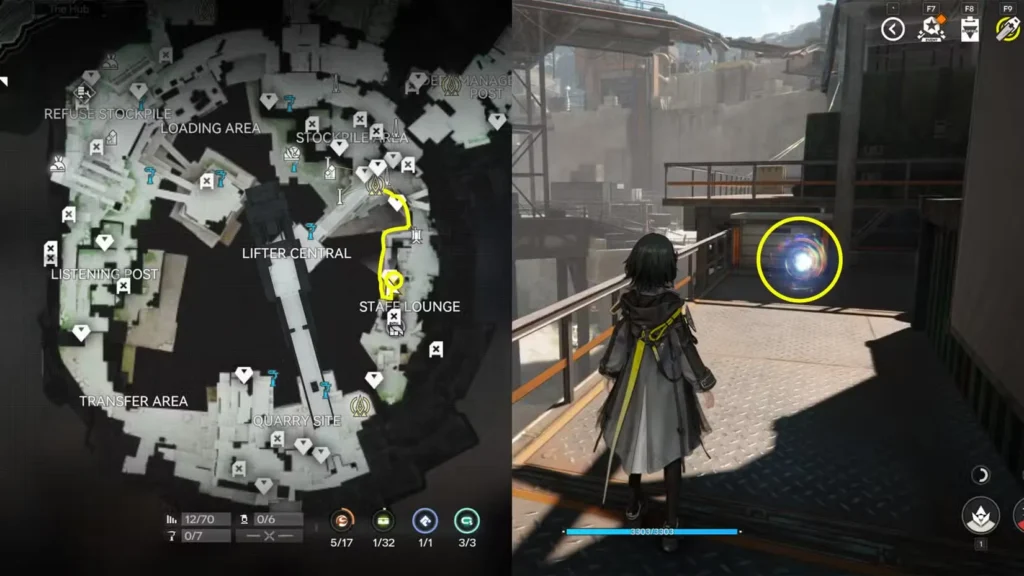
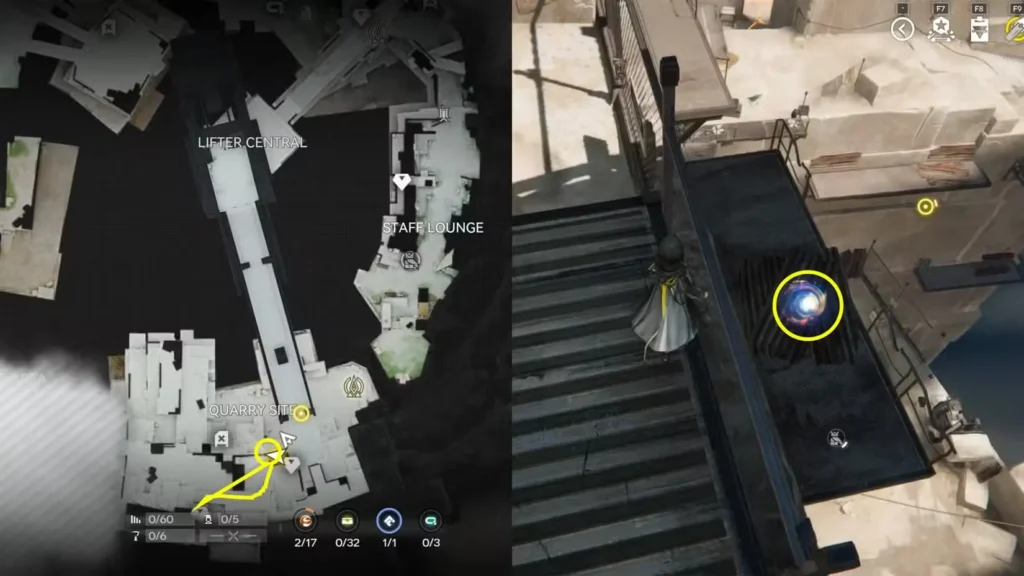
Aurylene Location #7: Stockpile Cargo Stack
Still in the Stockpile Area, move north and look for another set of stacked cargo containers. Climb up to the top and collect the Aurylene. Getting the hang of cargo climbing yet? You’ll be doing a lot of it in this region.
Aurylene Location #8: Lifter Central First Floor
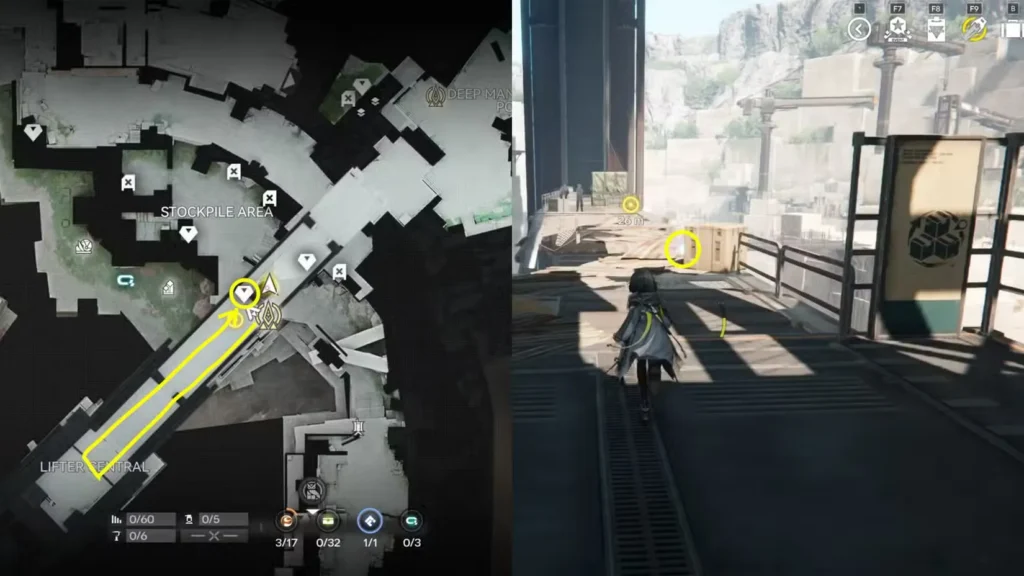
Head over to Lifter Central and take the elevator up to the first floor (1F). Once you’re there, walk northeast. The Aurylene is pretty visible—no tricks, no hidden spots, just sitting out in the open.
Aurylene Location #9: Lifter Central Western Corner
From Aurylene #8, go to the farthest western corner of the same floor. Climb up another cargo stack and grab the ninth collectible. These cargo containers are everywhere, huh?
Aurylene Location #10: Lifter Hand Glide
This one’s a bit more involved. Teleport back to the Stockpile Area and return to Lifter Central. Take the elevator to the second floor (2F) this time.
Once you’re on 2F:
- Turn the Lifter so it faces west
- Use the rope to climb up onto the Lifter’s arm
- Walk down the arm toward the end
- Use another rope to glide down
- Head north toward the Rare Growth markers
- The Aurylene will start moving—follow it until it stops
- Collect it
This sequence feels like a mini platforming puzzle. Just take your time and don’t rush the glide down—it’s easy to overshoot.
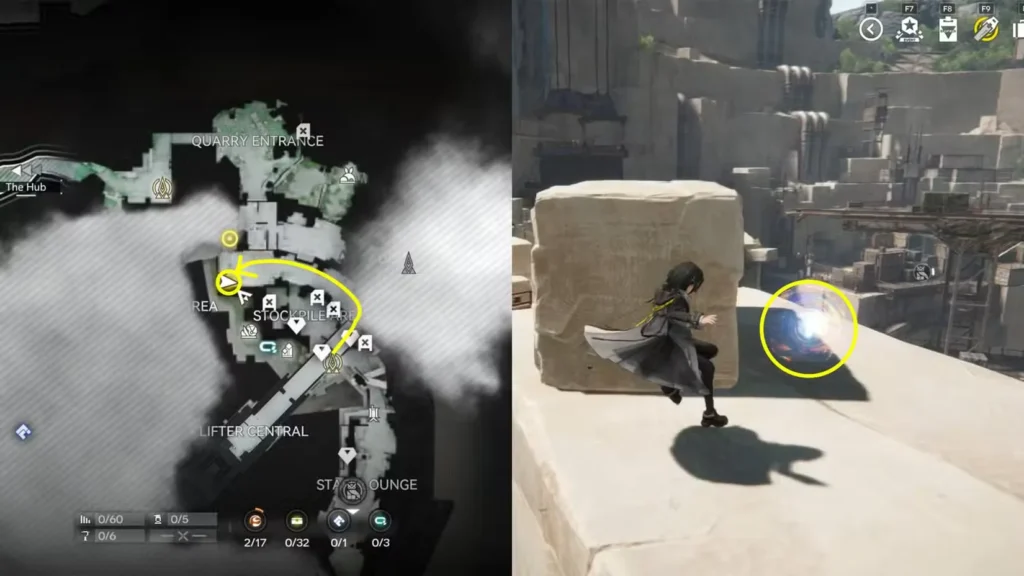
Aurylene Location #11: Southern Cliff Climb
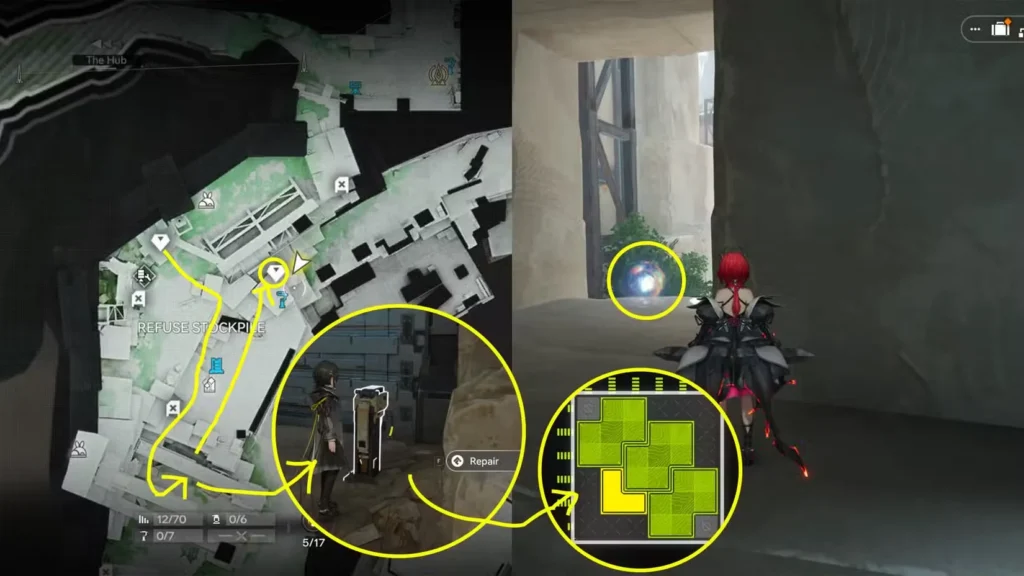
From the previous Aurylene, jump down the southern edge. You’ll need to do a bit of repair work here:
- Find the locked door and repair it
- Head inside the small cave
- Climb up the cliff inside
- Grab the eleventh Aurylene at the top
Not too complicated, but if you’re running low on resources, check our blueprints guide and aerospace materials guide to stock up.
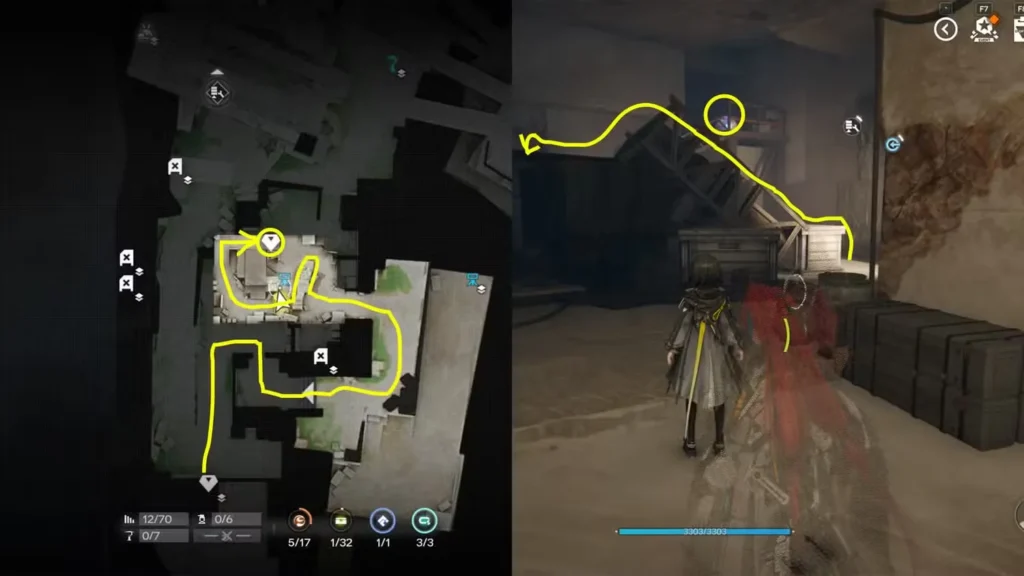
Aurylene Location #12: Forklift Cave
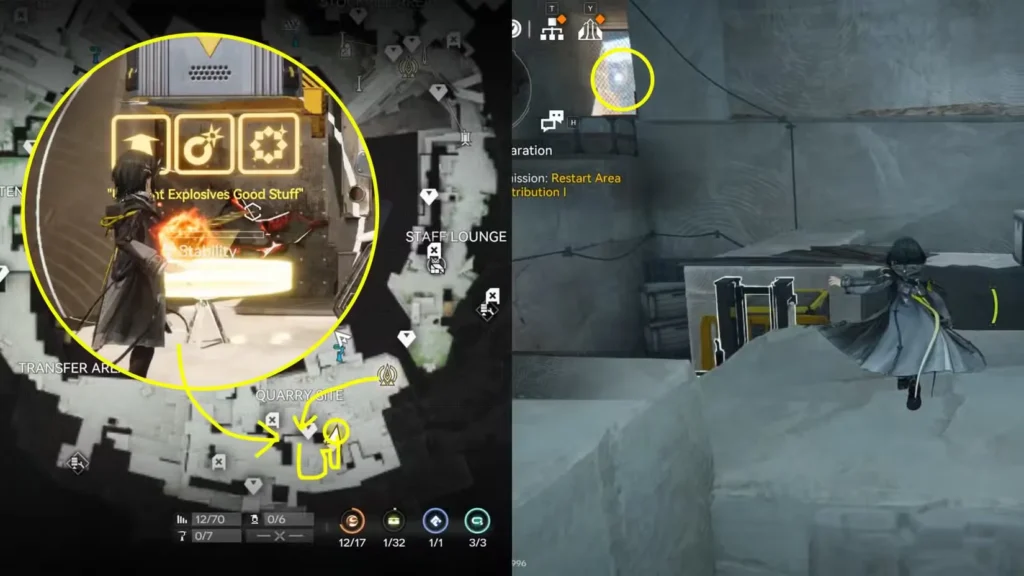
Teleport to the Quarry Site teleport point. Right in front of a forklift, you’ll encounter some enemies. Take them out first—they’re blocking your path.
After the fight:
- Open your inventory and use an explosive (you should have picked these up during exploration)
- Destroy the Destructible Object blocking the path
- Climb up the revealed area to find the next Aurylene
This is one of the few spots where you need to use explosives, so keep that in mind. For more on managing your inventory efficiently, take a look at our quick stash guide.
Aurylene Location #13: Rope Upper Platform
Exit the cave from Aurylene #12 and look for a rope leading upward. Climb it to reach a higher platform, then keep climbing until you reach the top. Once you’re up there, go behind the rocks to find a small hidden platform with the thirteenth Aurylene.
This one’s easy to miss if you don’t explore behind the rock formations—always check behind stuff in this game!
Aurylene Location #14: Bounce Device Column
From the highest ground near Aurylene #13, use the Bounce Devices to reach an even higher platform. Carefully jump down the western cliff toward a small ledge—it’s easy to overshoot, so aim carefully.
Once you land:
- Head south into a cave
- Use the Bounce Device inside to reach some vertical columns
- Climb the columns up to find the fourteenth Aurylene
The platforming here can be tricky. If you’re playing on mid-range hardware and experiencing frame drops, our 60fps mid-range laptop settings guide might help smooth things out.
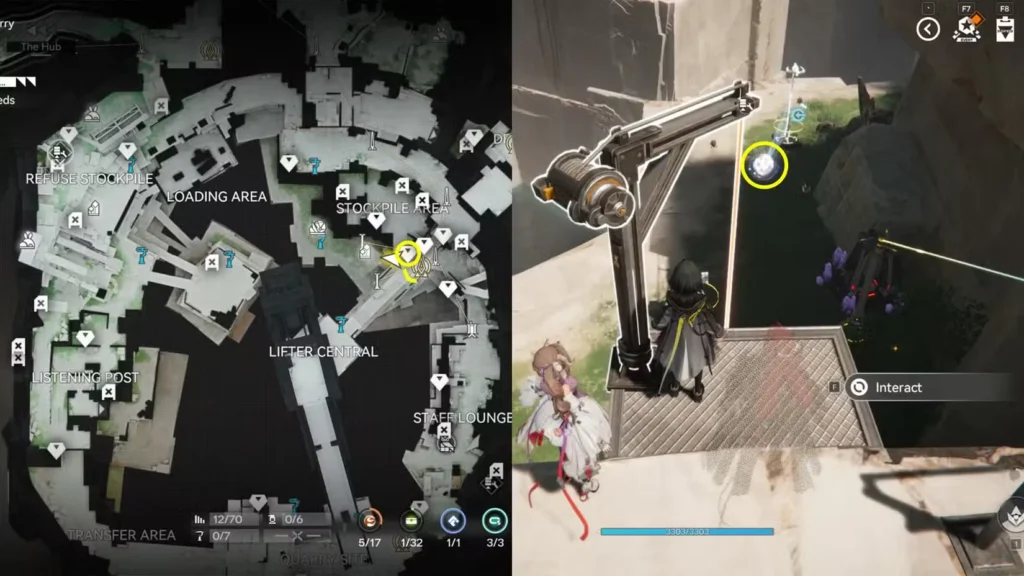
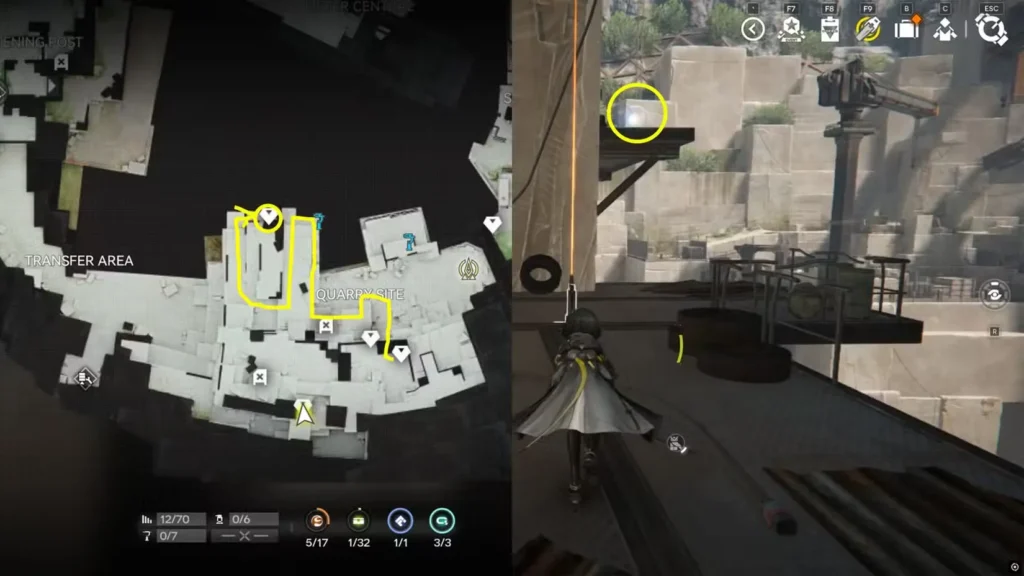
Aurylene Location #15: Forklift Crane
Jump down to the lower cliff and head toward the area with forklifts parked between two boxes. Interact with one of the forklifts to lift its crane, creating a makeshift platform. Use the raised crane to reach the next Aurylene.
Who knew forklifts could be so useful? This is one of the more creative collectible placements in the region.
Aurylene Location #16: Western Bounce Device
From Aurylene #15, move west and jump down to the lower level. Follow the path until you reach the end, where you’ll find another Bounce Device. Use it to launch yourself up to the sixteenth Aurylene.
Almost there! Just one more to go.
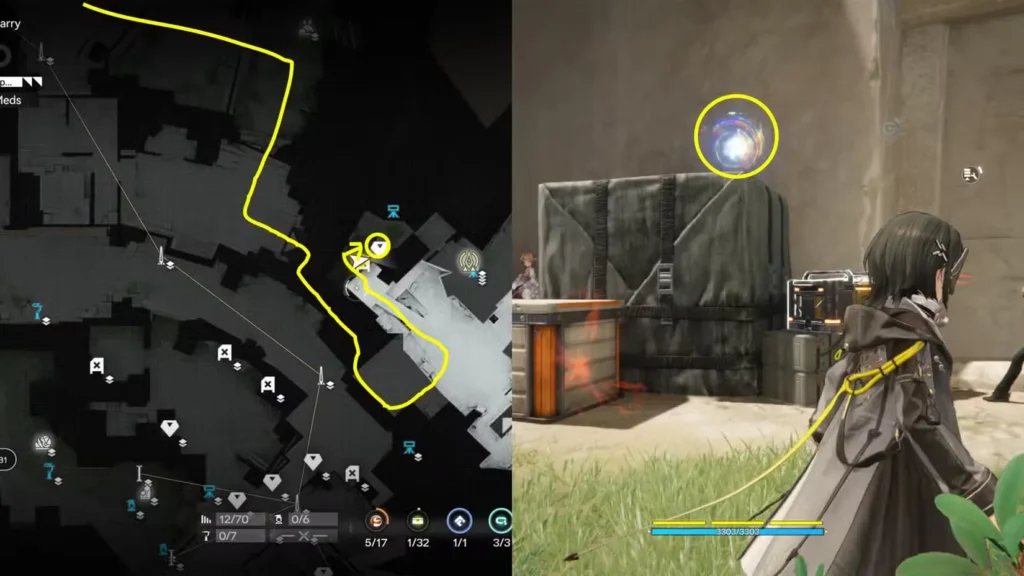
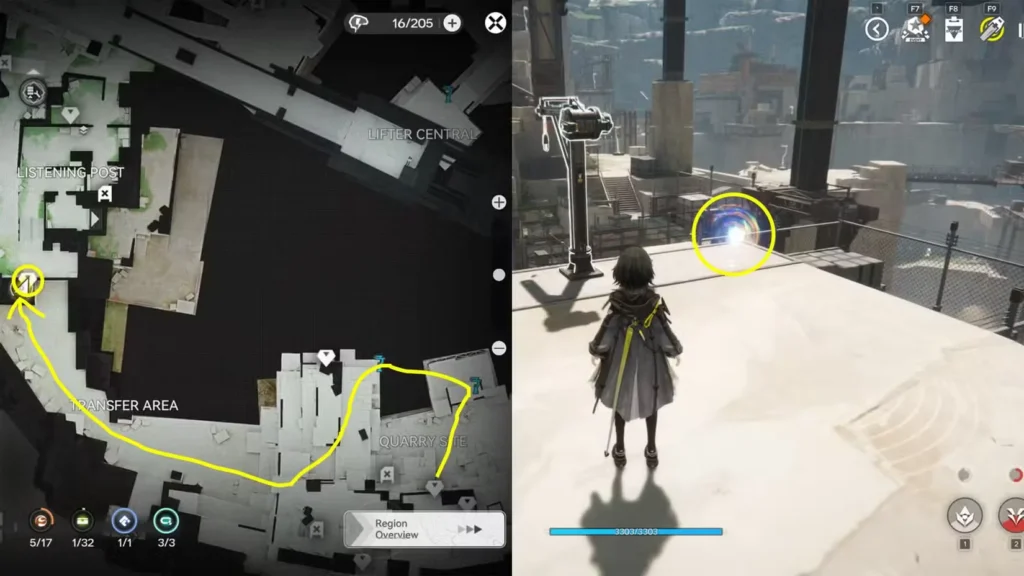
Aurylene Location #17: Listening Post Key Card
The final Aurylene is locked behind a door on the Listening Post’s 2B floor. You’ll need a Worn Key Card to open it.
Here’s how to get the key card:
- Teleport to the Stockpile Area teleport point
- Go to the Staff Lounge
- Find an NPC named Lonnard
- Open the shop interface and buy the Worn Key Card from the Grocery section
Once you have the key card, return to the Listening Post, unlock the door on 2B, and grab the last Aurylene.
That’s all 17 Aurylene collectibles in Aburrey Quarry! This region definitely tests your exploration skills with its vertical design and hidden paths. If you’re hunting for more collectibles, our origeometry guide can help you track down other regional items.
Looking to improve your team setups? Check out our character guides for Endministrator, Ardelia, Laevatain, and Last Rite. And if you’re wondering how elemental reactions work with your team comp, our elemental reactions guide has all the details.
Frequently Asked Questions
Do I need to complete the Quarry Rescue mission before collecting Aurylene?
Yes, absolutely. The Quarry Rescue side mission unlocks several key areas in Aburrey Quarry. Without completing it, you won’t have access to important sections like the Staff Lounge or the Listening Post. Finish that mission first before starting your Aurylene hunt.
How do I unlock the Staff Lounge door for Aurylene #4?
The Staff Lounge is locked behind an electric door that requires power. You need to connect several Relay Towers using the Sub-PAC from a previous region to provide electricity to the Electric Nexus. Once the power is connected, the door unlocks automatically and you can enter to collect the Aurylene.
Where do I get explosives for Aurylene #12?
You should have picked up explosives during your general exploration of the Aburrey Quarry and surrounding regions. They’re found in loot containers and sometimes dropped by enemies. If you’re running low, keep exploring and opening crates—explosives are common enough that you’ll find more as you progress through the game.
Can I collect all Aurylene in one run, or do I need to come back later?
You can collect all 17 Aurylene in one efficient run as long as you’ve completed the Quarry Rescue mission and have the necessary items (explosives for #12 and enough currency to buy the Worn Key Card for #17). Just follow the order in this guide and you should be able to grab them all without needing to make multiple trips back to town.