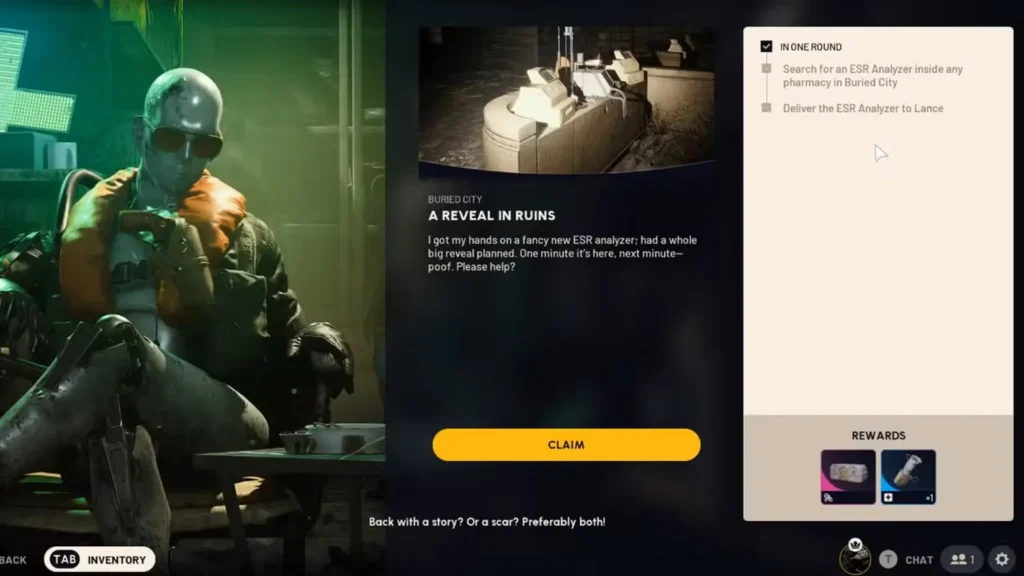
Lance’s requests in Arc Raiders always seem to involve fetching things he could probably get himself if he just left Esperanza once in a while. This time, he wants an ESR Analyzer from a pharmacy in Buried City, and naturally, you’re the one who has to risk life and limb to retrieve it. Welcome to A Reveal in Ruins, a straightforward fetch quest that’s actually one of the easier missions in the game—provided you know exactly where to go.
The beauty of this quest is its simplicity. Unlike multi-stage missions like A Lay of the Land that send you across entire maps, A Reveal in Ruins requires you to visit a single location, grab an item, and extract. The pharmacy location I’ll show you is not only easy to reach but sits conveniently close to an extraction point, making this one of the most efficient quests in terms of time and risk.
Let me walk you through exactly where to find the pharmacy, how to get the ESR Analyzer, and the smartest way to complete this quest with minimal fuss.
A Reveal in Ruins Quest Overview
Quest Giver: Lance at Esperanza
Map: Buried City
Difficulty: Low to Medium
Extraction Required: Yes—you must deliver the ESR Analyzer to Lance
What Lance Wants
Lance needs an ESR Analyzer from any pharmacy in Buried City. While there are technically multiple pharmacies across the map, one location stands out as significantly easier and safer than the others.
Quest Rewards
While specific rewards may vary, completing A Reveal in Ruins typically provides:
- Currency (Coins) for purchasing equipment
- Crafting materials for workbench projects
- Experience points toward leveling progression
- Potential equipment or consumables
The real value of this quest isn’t necessarily the rewards themselves—it’s the efficiency. You can complete A Reveal in Ruins in under 10 minutes with minimal risk, making it excellent for quick progression between longer farming sessions.
Buried City Pharmacy Location: Best Spot for ESR Analyzer
While Lance’s instructions mention “any pharmacy in Buried City,” you definitely want to choose the easiest, safest option available.
Recommended Pharmacy Location
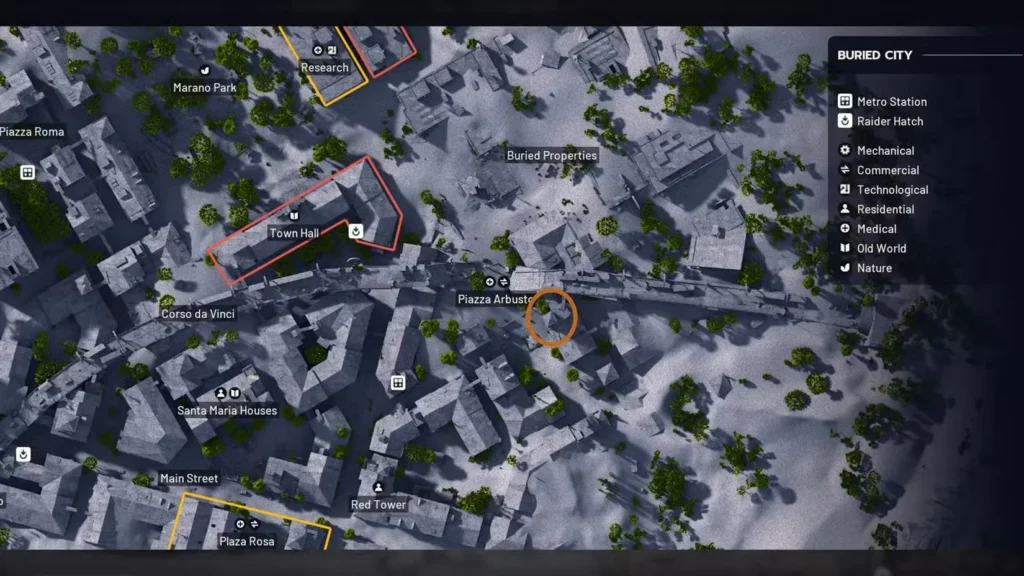
Map: Buried City
Region: Eastern side
Landmark: Directly below Piazza Arbusto
Nearby: Eastern Station (extraction point)
This pharmacy is the optimal choice for several reasons:
Accessibility: Easy to reach from most spawn points without traversing high-risk zones
Low threat level: Not a major contested area, so player traffic is relatively light
Proximity to extraction: Eastern Station entrance is right in front of the pharmacy, providing immediate escape options
Clear navigation: Piazza Arbusto serves as an obvious landmark for finding the location
Why This Pharmacy Over Others?
Other pharmacies exist in Buried City, but they’re typically:
- Located in more dangerous, contested areas
- Farther from extraction points
- Surrounded by heavier ARC enemy presence
- In zones with more hostile player activity
Unless you have specific reasons to visit other areas, this eastern pharmacy is your best bet for efficient quest completion.
Getting to the Buried City Pharmacy
Spawn Considerations
Check your spawn location immediately: When you load into Buried City, assess where you are relative to the eastern side. If you spawn:
Near the eastern area: Perfect—head directly to the pharmacy
Central or western spawn: This quest is still doable, but consider whether the travel distance is worth it for this particular run
Far western spawn: You might want to skip A Reveal in Ruins on this run and focus on other activities or quests closer to your position
Navigation Route
- Orient toward the eastern side of Buried City using your map
- Locate Piazza Arbusto as your landmark reference
- Head toward the area directly below Piazza Arbusto
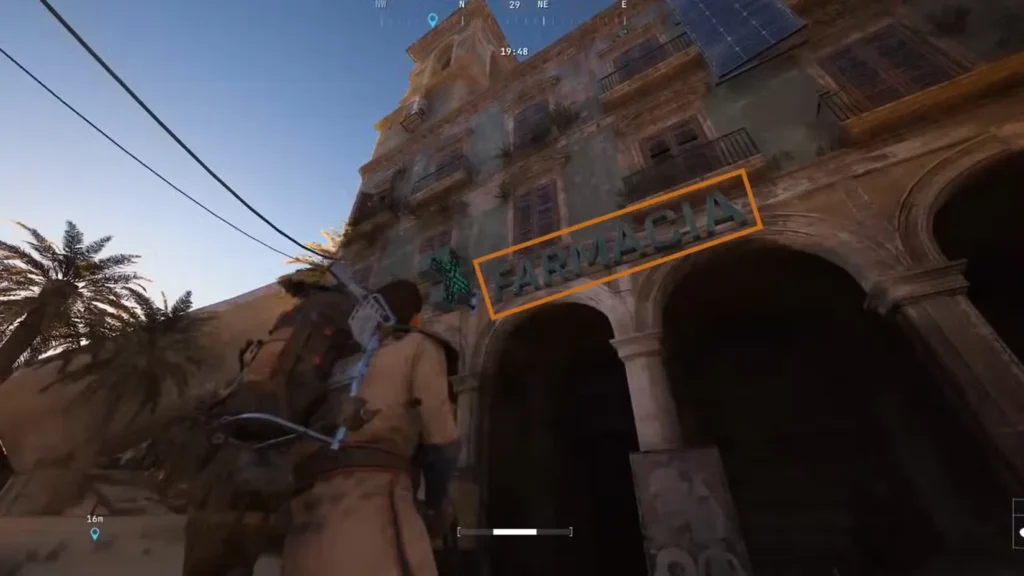
- Look for the pharmacy building—it should be clearly marked or identifiable by its storefront
- Note the Eastern Station entrance in front of the pharmacy for later extraction
Travel Safety Tips
Avoid unnecessary combat: You’re here for a quick objective, not prolonged engagements. Stealth past ARC enemies when possible.
Watch for player movement: Listen for gunfire and footsteps that indicate hostile Raiders in the area.
Stay aware of surroundings: Even “safe” areas can have threats. Don’t tunnel vision on reaching the pharmacy.
Mark extraction early: Mentally note where Eastern Station is so you can make a quick exit after grabbing the analyzer.
Loadout Recommendations for A Reveal in Ruins Quest
Since A Reveal in Ruins is a low-risk fetch quest, you don’t need to bring your most expensive gear.
Suggested Approach
Go light if quest-focused: Bring a free or cheap loadout if your sole purpose is completing the quest. This minimizes losses if something goes wrong.
Basic defensive capability: At minimum, bring:
- One reliable weapon for self-defense
- Basic shield (Light or Medium)
- Minimal healing items
- Ammunition for potential encounters
Safe Pockets: Even with a cheap loadout, use Safe Pockets to protect the ESR Analyzer once you collect it. Quest items can be lost on death if not properly protected.
When to Bring Better Gear
Combine with other activities: If you’re also planning to:
- Complete other Buried City quests
- Farm blueprints or materials
- Engage in PvP encounters
- Then bring appropriate gear for those activities
Known threats: If you’re aware of heavy player activity or ARC presence, upgrade your equipment accordingly.
ESR Analyzer Location: How to Find It in the Pharmacy
Once you arrive at the pharmacy, the actual collection process is straightforward.
Step-by-Step Collection
- Approach the pharmacy entrance
- Open the door and enter the building
- Navigate through the pharmacy interior toward the back area
- Locate the cashier’s desk at the far end of the space
- Move behind the cashier’s desk
- Look for the ESR Analyzer (it should have an interact prompt)
- Press the search/interact button to collect the analyzer
- Immediately store it in Safe Pockets to protect it from loss
What the ESR Analyzer Looks Like
The ESR Analyzer should be clearly marked with an interaction prompt once you’re close enough. It’s typically placed on or near the cashier’s desk area, making it relatively obvious once you’re in the right location.
Interior Threats
ARC enemies: Occasionally, ARC units patrol interior spaces. Clear any threats before searching for the analyzer.
Turrets: Some Buried City interiors have automated defenses. Stay alert for turret placements.
Hostile players: The pharmacy’s accessibility makes it popular for this quest. Other players might be attempting the same objective or camping the location for easy eliminations.
Environmental awareness: Check corners, doorways, and windows for ambush positions before committing to the search.
Deliver to Lance: A Reveal in Ruins Quest Completion
After successfully collecting the ESR Analyzer, the quest updates with a new objective: Deliver the ESR Analyzer to Lance.
This means you must successfully extract from the raid and return to Esperanza. The analyzer does you no good if you die before extraction—you’ll have to return and grab it again.
Two Extraction Options
Option 1: Quick Intentional Death (If You Have Nothing Valuable)
If you’re running a throwaway loadout with no valuable loot and only care about completing the quest:
Intentionally die to ARC enemies: This immediately ends your run and returns you to Esperanza where you can turn in the analyzer to Lance.
Why this works: Death counts as “ending the run,” which completes the delivery requirement. If you used Safe Pockets correctly, the analyzer survives your death.
When to use this method:
- You have zero valuable loot
- Your gear is completely disposable
- You want the absolute fastest completion time
- No other objectives remain for this run
Warning: Only do this if you genuinely have nothing worth keeping. Otherwise, you’re wasting resources unnecessarily.
Option 2: Eastern Station Extraction (Recommended)
The Eastern Station entrance is right in front of the pharmacy, making it the ideal extraction method for this quest:
Why Eastern Station is perfect:
Proximity: Literally steps away from the pharmacy exit
Safety: Indoor extraction point provides cover and limited entry points
Efficiency: Minimal travel time between objective and extraction
Flexibility: Allows you to keep any other loot or gear you’ve collected
Extraction Process
- Exit the pharmacy after collecting the ESR Analyzer
- Move to Eastern Station entrance (directly in front of the pharmacy)
- Enter the extraction zone
- Wait for the extraction timer to complete
- Stay alert for last-second threats or player ambushes
- Successfully extract and return to Esperanza
Extraction Safety Tips
Don’t celebrate early: Players often camp extraction points for easy eliminations. Stay focused until you’ve fully extracted.
Use cover: Position yourself defensively within the extraction zone rather than standing in the open.
Listen constantly: Audio cues for footsteps, gunfire, or ARC movement can save your life during extraction.
Have backup plans: Know alternative exits from Eastern Station if hostile players enter and you need to reposition.
Team extraction: If playing with friends, have them provide overwatch during your extraction.
Common Mistakes to Avoid in A Reveal in Ruins Quest
Not using Safe Pockets: The most frustrating mistake is collecting the analyzer without Safe Pocket protection, then losing it to death before extraction.
Starting from bad spawns: Committing to this quest when you spawn on the opposite side of Buried City wastes time that could be spent on more accessible objectives.
Bringing expensive gear unnecessarily: If you’re only doing the quest, don’t risk premium equipment when a basic loadout suffices.
Ignoring surroundings: Tunnel vision on the quest objective while hostile players approach and eliminate you.
Not marking extraction: Forgetting where Eastern Station is relative to the pharmacy and wasting time searching for it after collection.
Fighting unnecessarily: Every combat encounter risks quest failure. Avoid engagements that don’t directly threaten your objective.
Looting too slowly: Taking your time in the pharmacy attracts attention. Get in, grab the analyzer, get out.
Combining A Reveal in Ruins Quest with Other Activities
Since you’re already in Buried City’s eastern area, consider maximizing your run efficiency:
Nearby Opportunities
Other Buried City quests: Check if you have missions like Marked for Death that overlap geographically
Material farming: Collect Rusted Gears, Mechanical Components, or other resources while traveling
Blueprint hunting: Buried City has known blueprint locations—check nearby containers
Supply Drops: If you spot a Supply Drop console, consider calling one in for extra ammunition and resources
Experience farming: Eliminate ARC enemies for XP toward max level
Resource Route Planning
If you’re combining activities, plan your route efficiently:
- Start with the pharmacy (primary objective)
- Hit nearby loot containers for materials
- Complete secondary objectives if time permits
- Return to Eastern Station for extraction
This approach maximizes value per raid while keeping the ESR Analyzer quest as your priority focus.
Solo vs Team Strategies for A Reveal in Ruins Quest
Solo Approach
Stealth prioritization: Avoid drawing attention to yourself—complete the objective quietly
Speed over thoroughness: Get in, grab the analyzer, extract immediately
Conservative combat: Only fight when absolutely necessary for survival
Safe Pocket protection: Essential since you have no teammates to recover your gear if you die
Team Approach
Role assignment:
- One player grabs the analyzer
- Others provide perimeter security
- Someone monitors extraction zone
Coordinated movement: Travel together for mutual protection
Shared resources: Team members can cover healing, ammunition, and defensive needs
Extraction support: Teams can defend the extraction zone more effectively than solo players
A Reveal in Ruins Quest Efficiency Analysis
Time investment: 5-10 minutes for experienced players who know the route
Risk level: Low if you follow the eastern pharmacy route and use Eastern Station extraction
Reward value: Moderate—good for quick progression but not game-changing
Repeatability: Like most quests, this is likely a one-time completion per character/progression cycle
Is It Worth Doing?
Yes, if:
- You want structured PvE content over random looting
- You spawn near the eastern side of Buried City
- You’re building quest completion for progression rewards
- You have 10 minutes for a quick, focused objective
Skip if:
- You spawn far from the eastern area with limited play time
- You’re carrying extremely valuable loot you don’t want to risk
- You’re focused on blueprint farming or other specific activities
- Server population seems unusually hostile and dangerous
Advanced Tips for A Reveal in Ruins Quest
Scout before committing: If you’re unsure about the area’s safety, observe from a distance before approaching the pharmacy
Time your entry: If you hear combat nearby, wait for it to resolve before entering. Let other players clear each other out.
Fake extraction: If you suspect players are camping Eastern Station, enter another extraction zone briefly, then circle back to Eastern Station after they assume you’ve left the area
Night raids: Consider running this quest during night cycles when loot quality increases for nearby containers, though ARC presence also intensifies
Multi-quest runs: Stack this with other Buried City quests like those near Su Durante Warehouse for efficient completion
Final Thoughts on A Reveal in Ruins Quest
A Reveal in Ruins exemplifies what simple fetch quests should be—straightforward objectives with clear locations and efficient completion paths. Unlike complex multi-stage missions that send you across entire maps into dangerous territory, this quest respects your time by placing the objective near a safe extraction point.
Lance might be too lazy to get his own ESR Analyzer, but at least he’s not asking you to fight your way through Control Tower A6 or unlock puzzle doors on Blue Gate. The eastern pharmacy location makes this one of the most newcomer-friendly quests in Arc Raiders, perfect for players still learning Buried City’s layout.
The key to success is simple: check your spawn, travel to the eastern pharmacy below Piazza Arbusto, grab the ESR Analyzer from behind the cashier’s desk, protect it with Safe Pockets, and extract through Eastern Station. Follow those steps and Lance will have his precious analyzer in under 10 minutes.
Just remember: even easy quests can go wrong if you’re not paying attention. Stay alert, don’t get greedy with unnecessary looting, and extract as soon as you have the objective. Lance’s trust in your delivery skills isn’t worth dying for.
Now get out there, grab that analyzer, and show Lance what happens when he asks nicely. And if you’re looking for more quest variety, don’t forget about opportunities on other maps like Spaceport’s A Lay of the Land.
Available on PlayStation and Xbox, Arc Raiders continues to provide varied quest content across its maps. Good hunting, Raider!