Quest Overview: Broken Monument
Tian Wen’s “Broken Monument” quest represents a focused scavenging mission in one of Dam Battlegrounds’ most cluttered and dangerous areas—the Scrap Yard. Unlike multi-map quests that require several deployments, this entire mission unfolds in a single concentrated location, making it theoretically quick to complete but practically challenging due to the environmental hazards and player traffic.
Quest Details:
- Quest Giver: Tian Wen
- Location: Scrap Yard, Dam Battlegrounds (Southeast)
- Objectives: Collect 3 items in a small area
- Difficulty: Medium (Environmental confusion, high player risk)
- Completable in: Single raid deployment
What Makes This Quest Challenging:
The Scrap Yard’s visual clutter creates a needle-in-a-haystack scenario. Broken vehicles, scattered mechanical debris, and similar-looking containers make identifying specific quest items frustrating without precise guidance. Add hostile players competing for the same objectives and ARC patrols, and you’ve got a recipe for repeated frustration—unless you know exactly where to look.
Broken Monument Quest Overview in ARC Raiders
What You Get for Completing Broken Monument
Quest Completion Rewards:
- Arpeggio I – Solid weapon unlock for combat versatility
- Compensator II – Premium weapon attachment reducing recoil
- 80x Medium Ammo – Substantial ammunition supply
Strategic Value:
The Arpeggio I weapon combined with the Compensator II attachment creates an immediate combat effectiveness boost. Medium ammo in bulk quantities (80 rounds) represents significant resource value, saving you farming time or coin expenditure.
How Broken Monument Fits Tian Wen’s Questline
As part of Tian Wen’s combat-focused mission series, completing this quest continues unlocking better weapon rewards and attachments. Her questline emphasizes firepower improvement—essential for players prioritizing combat effectiveness over support or medical builds.
How to Prepare for Broken Monument Quest
Best Loadout for Scrap Yard Collection
Since this quest requires collecting items in a contested area, your loadout should balance survivability with efficiency:
Weapon Selection:
- Medium-range primary for versatility (Scrap Yard has mixed engagement distances)
- Close-quarters secondary for building/container searches
- Avoid sniper-only loadouts—too many obstacles and corners
Defensive Gear:
- Medium Shield minimum (expect encounters)
- 2-3 healing items (Adrenaline Shots or Sterilized Bandages)
- Safe Pocket augment highly recommended
Utility Items:
- Smoke grenades (escape/concealment tool)
- Binoculars (scout before approaching)
- Zipline optional (limited vertical use in Scrap Yard)
Special Consideration: Raider Hatch Key
Bringing a Raider Hatch Key dramatically improves extraction safety:
- Guaranteed extraction regardless of combat situation
- Protects quest items from loss on death
- Scrap Yard has Raider Hatches nearby
- Worth the investment given quest item value
Free Loadout Viability:
While possible with free loadouts, the Scrap Yard’s player traffic makes combat likely. Consider:
- Adequate gear to defend yourself if contested
- Balance risk tolerance with gear value
- Free loadout acceptable if confident in stealth approach
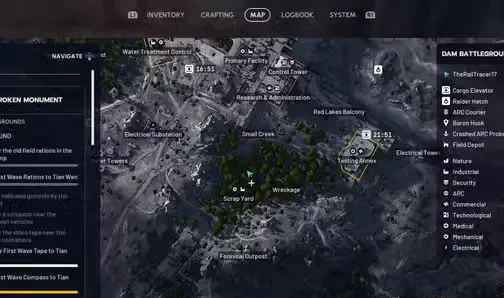
How to Find Scrap Yard in ARC Raiders (Location Guide)
Scrap Yard Location on Dam Battlegrounds Map
Map Position: Southeast section of Dam Battlegrounds
Distinctive Features: Large concentration of broken vehicles and mechanical debris
Player Traffic: Medium-High (valuable loot draws attention)
From Common Spawn Points:
Southern Spawns:
- Closest spawn locations to Scrap Yard
- 1-2 minute travel time
- Advantage: Quick access to quest area
Western/Central Spawns:
- 3-4 minute travel time
- Approach from main Dam areas
- Pass through potentially contested zones
Northern Spawns:
- Longest travel time (4-5+ minutes)
- Can avoid main traffic routes
- Consider if Scrap Yard seems too hot early-raid
Approach Strategy:
Before entering Scrap Yard:
- Scout from distance with binoculars
- Listen for gunfire indicating active combat
- Watch for player movement among the debris
- Time your entry during quiet moments
- Use cover during approach—don’t sprint directly in
Scrap Yard Environmental Hazards to Avoid
Visual Clutter:
The Scrap Yard’s defining characteristic is overwhelming visual noise:
- Dozens of broken vehicles (similar appearances)
- Scattered mechanical components everywhere
- Multiple containers (most are empty)
- Limited distinguishing features between areas
Navigation Challenges:
- Easy to become disoriented among identical-looking debris
- Quest items blend into environment
- Difficult to maintain directional awareness
- No clear landmarks for reference
Tactical Obstacles:
- Limited sightlines due to vehicle debris
- Multiple hiding spots for hostile players
- Sound dampened by environmental density
- ARCs patrol through narrow pathways
Counter-Strategies:
- Use map constantly for orientation
- Note distinctive vehicles as waypoint markers
- Move methodically—rushing causes missed items
- Clear one section before moving to next
All 3 Item Locations for Broken Monument Quest
Item #1: First Wave Compass Location (Southwest Scrap Yard)
The compass represents your first objective and sets the pattern for the entire quest—small containers hidden among overwhelming debris.
Precise Location:
- Map Reference: Directly below the “S” in “Scrap Yard” text on your map
- Visual Landmarks: Multiple broken-down vehicles clustered together
- Container Type: Small metal container (about shoebox-sized)
Step-by-Step Directions:
- Enter Scrap Yard from the southwest approach
- Safest initial entry point
- Puts compass location closest to entry
- Navigate toward the “S” map marker
- Open your map for precise positioning
- Look for the letter “S” in “Scrap Yard”
- Position yourself directly beneath this letter
- Identify the vehicle cluster
- Multiple broken-down vehicles form a small grouping
- Vehicles in various states of disrepair
- Metallic debris scattered between them
- Locate the small metal container
- Between the vehicles (not inside them)
- Ground level placement
- May be partially obscured by debris
- Interaction prompt appears when close
- Collect the compass
- Interact with the container
- Compass automatically added to quest items
- Immediately place in Safe Pocket if equipped
Common Search Mistakes:
❌ Searching inside vehicles instead of between them
❌ Moving too quickly past the container
❌ Checking wrong vehicle clusters (multiple exist)
❌ Not referencing map for precise positioning
Safety Tips:
- Clear the immediate area of ARCs before searching
- Listen for player footsteps constantly
- Don’t tunnel vision while searching—maintain awareness
- Have escape route identified before committing to search
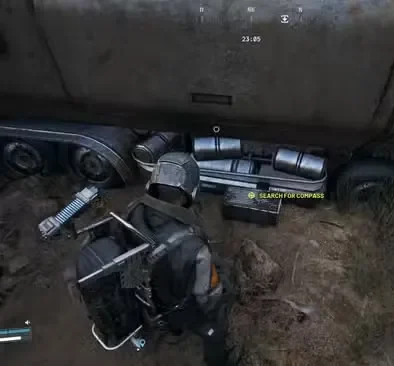
Item #2: First Wave Videotape Location (Northeast Containers)
After securing the compass, you’ll move northeast through the Scrap Yard to find the videotape.
Precise Location:
- Map Reference: Above the “a” in “Scrap Yard” text on your map
- Visual Landmarks: Two large cylindrical metal objects on the ground
- Container Type: Small container adjacent to cylinders
Step-by-Step Directions:
- From compass location, head northeast
- Approximately 30-40 meters travel
- Navigate between vehicle debris
- Use map to maintain correct heading
- Look for two large cylindrical metal objects
- These are the primary landmark for this item
- Both cylinders lying horizontally on ground
- Distinctive shape stands out from vehicle debris
- Positioned near each other
- Search area immediately next to cylinders
- Small container placed adjacent to (not inside) cylinders
- Ground level spawn
- May be on either side of the cylinders
- Verify map position
- Should be roughly above the “a” in “Scrap Yard”
- Use this as confirmation you’re in correct area
- If too far from this position, recalibrate
- Collect the videotape
- Interact with container
- Videotape added to quest items
- Place in Safe Pocket immediately
Navigation Challenges:
The distance between compass and videotape creates vulnerability:
- Exposed movement through Scrap Yard
- Multiple vehicle clusters look similar
- Easy to overshoot the cylinder landmark
- Players may be searching the same area
Movement Strategy:
Stealth Approach:
- Move cover-to-cover between vehicles
- Crouch when near potential player positions
- Minimize time in open spaces
- Use audio cues to detect threats
Speed Approach:
- Quick sprint between objectives
- Rely on speed over concealment
- Higher risk but faster completion
- Best if Scrap Yard seems relatively empty
Hybrid Approach (Recommended):
- Move quickly through open areas
- Slow down near containers and landmarks
- Sprint, then pause to listen and assess
- Balance speed with safety
Item #3: Old Field Rations Location (Bus Container Far Northeast)
The final quest item requires traveling to the northeastern edge of the Scrap Yard.
Precise Location:
- Map Reference: Far northeast section of Scrap Yard
- Visual Landmarks: Open bus-shaped container (distinctive shape)
- Container Type: Box inside the bus container
Step-by-Step Directions:
- From videotape location, continue northeast
- Longest travel segment of the quest
- Approximately 40-50 meters
- Moving toward Scrap Yard’s edge
- Identify the bus-shaped container
- Most distinctive landmark of all three items
- Rectangular container with bus-like shape
- Open interior (accessible from ends or sides)
- Stands out from scattered vehicle debris
- Enter the bus container
- Walk inside the container
- Interior is relatively clear compared to outside
- Final quest box is inside
- Locate the rations box
- Should be clearly visible inside bus container
- Standard container interaction
- Easier to spot than previous items due to clearer space
- Collect the rations
- Interact with final quest item
- Quest collection phase complete
- All three items now in inventory/Safe Pockets
Final Item Considerations:
By this point, you’ve been in Scrap Yard for several minutes:
- Player awareness of your presence is high if you’ve been spotted
- ARCs may have respawned in cleared areas
- You’re at the far edge—longer extraction route
- Other players may have completed earlier items and caught up
Post-Collection Priorities:
Immediate Actions:
- Verify all three items collected (check quest log)
- Confirm items are in Safe Pockets
- Assess threat level (any nearby combat/players?)
- Plan extraction route
- Move toward extraction immediately
Don’t Get Greedy:
- Resist urge to loot more of Scrap Yard
- Quest completion more valuable than random loot
- Every additional minute increases risk
- Extract with your quest items secured
How to Survive Scrap Yard (Threat Management)
Dealing with Enemy Players in Scrap Yard
Scrap Yard’s confined spaces and valuable loot make player encounters extremely likely.
Common Player Scenarios:
Scenario 1: Another Player Also Doing Quest
- Most common situation
- They’re searching same containers
- Race to collect items first
- High tension—both players vulnerable while searching
Response Options:
- Aggressive: Eliminate competition, collect items safely
- Evasive: Let them collect, attempt theft or extract with what you have
- Speed: Rush collection before confrontation
- Avoidance: Wait for them to finish and leave
Scenario 2: Players Farming General Scrap Yard Loot
- May not be quest-focused
- Unpredictable movement patterns
- Might ignore you if non-threatening
- Could attack opportunistically
Response Options:
- Avoid combat unless attacked
- Give wide berth during collection
- Use their engagement with ARCs as distraction
- Extract quickly before situation escalates
Scenario 3: Ambush/Campers
- Players waiting to eliminate quest runners
- Positioned at collection points or extraction routes
- Extremely dangerous—prepared for combat
Response Options:
- Scout thoroughly before approaching items
- Use smoke grenades for concealment
- Consider alternate timing (wait them out)
- Bring combat-capable loadout for self-defense
PvP Engagement Decision Matrix:
Fight When: ✓ You have gear advantage
✓ Better positioning
✓ They’re distracted by ARCs
✓ You’ve already collected all items
✓ No escape route available
Avoid Fighting When: ✗ You’re undergeared
✗ Haven’t collected all items yet
✗ Multiple enemy players present
✗ Low on health/shields
✗ Clear escape path exists
Avoiding and Fighting ARC Enemies
While players pose the primary threat, ARCs patrol Scrap Yard and can complicate collection efforts.
Common ARC Types in Scrap Yard:
- Pops – Basic ground units, low threat
- Fireballs – Ranged fire attacks, moderate threat
- Sentinels – Occasional patrols, high threat if encountered
ARC Management Strategies:
Stealth Approach:
- Avoid engaging ARCs when possible
- Use their patrol patterns to time movement
- Crouch near containers to reduce detection
- ARCs make noise—use this to track positions
Combat Approach:
- Clear ARCs before searching containers
- Prevents interruption during collection
- Gunfire attracts players—major downside
- Quick elimination minimizes exposure
Hybrid Approach (Recommended):
- Eliminate ARCs blocking direct paths
- Avoid unnecessary fights with peripheral ARCs
- Use environmental cover to break line of sight
- Save ammunition for potential player encounters
Critical Rule: Never let ARCs corner you while searching containers. Clear immediate threats first, then search—not simultaneously.
Broken Monument Extraction Strategies
With all three quest items collected, safe extraction becomes your highest priority.
Standard Extraction Points (Return Pods)
Nearest Return Points from Scrap Yard:
Southeast Extraction:
- Closest to Scrap Yard location
- Shortest travel distance
- Most obvious extraction—likely watched by players
- High risk of extraction camping
Southern Extraction:
- Slightly farther but often less contested
- More natural terrain coverage during approach
- Good compromise between distance and safety
Route Planning:
- Check map for nearest active Return Point
- Plan route using maximum cover
- Avoid predictable straight-line paths
- Sprint across open areas, walk near cover
- Listen constantly for player activity
Extraction Timing:
- Extract during combat elsewhere (distraction)
- Avoid extracting when you hear nearby players
- Sometimes waiting 2-3 minutes creates opportunity
- Don’t rush extraction if area is hot
Premium Extraction: Raider Hatch Method
The safest extraction method if you brought a Raider Hatch Key.
Raider Hatch Locations Near Scrap Yard:
Several Raider Hatches exist in the southeastern Dam Battlegrounds region:
- Check your map for hatch icons
- Identify closest hatch to Scrap Yard
- Plan route before collecting final item
Why Raider Hatch Is Superior:
✓ Guaranteed extraction – No player interference possible
✓ Protects quest items – Can’t be lost to late-game combat
✓ Reduces stress – Know extraction is secure
✓ Saves time – Immediate exit once reached
Cost-Benefit Analysis:
Raider Hatch Key Investment:
- Keys obtained through quests or crafting
- One key consumed per use
- Quest reward value (weapon + attachment + ammo) justifies key cost
- Insurance against losing hours of quest progress
Recommendation: For this quest specifically, a Raider Hatch Key is worth using. The three-item collection requirement means losing even one item to death requires repeating the entire quest.
Emergency Extraction When Under Attack
If Extraction Seems Impossible:
Option 1: Wait It Out
- Find secure hiding spot
- Monitor player activity
- Extract when opportunity presents
- Time is on your side—patience wins
Option 2: Create Distraction
- Throw noisemaker away from extraction
- Sprint toward extraction during confusion
- Risky but can work in desperate situations
Option 3: Fight Through
- Eliminate blocking players
- Clear path to extraction
- High risk—only if confident in combat
- Remember: quest completion > kills
Option 4: Stash and Extract Empty
- Hide in secure location
- Extract without quest items (they’re in Safe Pockets)
- Not losing items is success even without standard extraction
- Can attempt retrieval in future raid if items somehow lost
Critical Decision Point:
Ask yourself: “Is fighting worth risking the quest items?”
- Often the answer is no
- Avoiding combat preserves quest progress
- One successful extraction beats multiple failed combat attempts
Common Broken Monument Quest Mistakes to Avoid
Mistake #1: Searching Without Map Reference Points
Problem: Wandering Scrap Yard aimlessly, checking random containers
Solution:
- Open map frequently
- Use letter positions in “Scrap Yard” text as landmarks
- Verify location before searching
- Reference visual landmarks (cylinders, bus container)
Mistake #2: Ignoring Safe Pockets and Cover
Problem: Collecting items in regular inventory, losing everything on death
Solution:
- Equip Safe Pocket augment before raid
- Place each item in Safe Pocket immediately upon collection
- Even if eliminated, quest items protected
- Single most important preparation step
Mistake #3: Staying Too Long After Getting Items
Problem: Looting more of Scrap Yard after collecting all quest items
Solution:
- Extract immediately after final item
- Additional loot not worth risking quest completion
- Every minute increases encounter risk
- Be satisfied with quest rewards—they’re substantial
Mistake #4: Loud Combat That Attracts Other Players
Problem: Fighting every ARC, alerting all players to your location
Solution:
- Stealth approach when possible
- Only eliminate blocking ARCs
- Quiet movement between items
- Save ammunition for player threats
Mistake #5: Using Predictable Extraction Routes
Problem: Running straight to nearest Return Point
Solution:
- Vary extraction paths
- Use terrain and cover
- Avoid obvious direct routes
- Sometimes longer path is safer
Mistake #6: Tunnel Vision While Looting
Problem: Focus entirely on containers, ignoring surroundings
Solution:
- Quick glances around while searching
- Listen for footsteps constantly
- Position for quick escape before searching
- Environmental awareness = survival
How to Complete and Turn In Broken Monument Quest
Returning Items to Tian Wen at Base
After successful extraction with all three items:
- Return to Speranza (main menu)
- Navigate to Vendors/Traders tab
- Select Tian Wen
- Complete “Broken Monument” quest
- Receive rewards
Best Uses for Broken Monument Rewards
Arpeggio I Weapon:
- Test in shooting range or low-stakes raid
- Determine if it fits your playstyle
- Consider upgrading with found attachments
- May become primary weapon depending on performance
Compensator II Attachment:
- Reduces vertical recoil significantly
- Equip on automatic weapons for best effect
- Pairs well with medium-range combat style
- Improves accuracy during sustained fire
80x Medium Ammo:
- Substantial ammunition reserve
- Supports 2-3 well-equipped raids
- Coin value if sold instead
- Consider stockpiling for future high-stakes raids
Integration with Tian Wen’s Questline
Broken Monument is one step in Tian Wen’s combat-focused quest series:
Related Tian Wen Quests:
- The Right Tool – Early weapon rewards
- Marked for Death – Shotgun attachments
- A Better Use – Weapon modifications
- Broken Monument – This quest
- The Major’s Footlocker – Exclusive Hullcracker blueprint
Progression Benefits:
Completing Tian Wen’s full questline provides:
- Diverse weapon unlocks for different playstyles
- Premium weapon attachments (all tiers)
- Ammunition stockpiles
- Access to exclusive weapon blueprints
For players prioritizing combat effectiveness, Tian Wen’s quests should be high priority alongside Lance’s medical missions and general quest completion.
Advanced Broken Monument Quest Strategies
Speed Run Method (Under 5 Minutes)
For experienced players who know Scrap Yard:
- Deploy with memorized item locations
- Sprint directly to each item in sequence
- Minimize searching time (know exact spots)
- Raider Hatch Key ready for instant extraction
- Complete in under 5 minutes
Requirements:
- Perfect location knowledge
- Confident in combat if contested
- Raider Hatch Key prepared
- High-risk, high-reward execution
Patient Stealth Approach (Beginner-Friendly)
For cautious players or first-time completers:
- Deploy mid-raid (10-15 minutes after start)
- Scout Scrap Yard thoroughly before entering
- Wait for player activity to clear
- Methodically collect items with full safety protocols
- Extract via safest route even if longer
Advantages:
- Minimizes player encounters
- Lower stress experience
- Higher success rate for new players
- Teaches proper caution habits
Squad Sweep Strategy (Team Play)
For team play:
- Entire squad deploys together
- One player collects while others provide security
- Overwatch positions cover collection points
- Team extracts together with shared protection
Benefits:
- Safest completion method
- Deterrent against opportunistic players
- Faster if contested (backup in fights)
- Squad members can stack their own quests
Final Tips for Broken Monument Quest Success
Broken Monument exemplifies ARC Raiders’ quest design philosophy: simple objectives made challenging through environmental complexity and player competition. The Scrap Yard’s visual clutter transforms straightforward collection into a navigation puzzle, while the compressed area creates inevitable player interactions that test your combat readiness and tactical decision-making.
The key to success isn’t mechanical skill—it’s preparation, map knowledge, and knowing when to avoid combat. Safe Pockets and Raider Hatch Keys convert this from a frustrating death loop into a manageable, completable quest. The substantial rewards (weapon, attachment, ammunition) justify the effort and prepare you for more challenging content ahead.
Whether you blitz through in five minutes or take the methodical approach over fifteen, the crucial element is extracting safely with all three items intact. Every decision—from initial approach to final extraction—should prioritize quest completion over ego-driven combat or greedy additional looting.
Master this quest, and you’ve mastered the fundamental skills needed for every collection mission in ARC Raiders: efficient navigation, threat assessment, item protection, and safe extraction under pressure.
Available Now: PlayStation | Xbox | Official Site