Understanding Dam Control Tower Key Value
The Dam Control Tower represents one of the most rewarding locked locations in ARC Raiders, offering premium loot in exchange for finding the right key and successfully navigating its defensive systems. While locked rooms throughout the game contain valuable items, the Control Tower’s unique positioning and access requirements make it both challenging to reach and less contested than other high-value locations.
What Makes This Key Special:
- Opens the Dam Control Center at the top of Control Tower POI
- Located in Dam Battlegrounds, one of the game’s most loot-dense maps
- Relatively low player traffic compared to other locked rooms
- Contains high-tier crafting materials and weapon blueprints
- Proximity to extraction points makes looting and escaping efficient
The trade-off? Finding the key requires searching specific locations or completing a particular quest, and accessing the control room involves navigating a vertical elevator shaft with potential turret defenses.
How to Get Dam Control Tower Key in ARC Raiders (3 Methods)
There are two primary methods for acquiring this valuable key: farming specific loot locations or completing a quest reward. Let’s explore both approaches in detail.
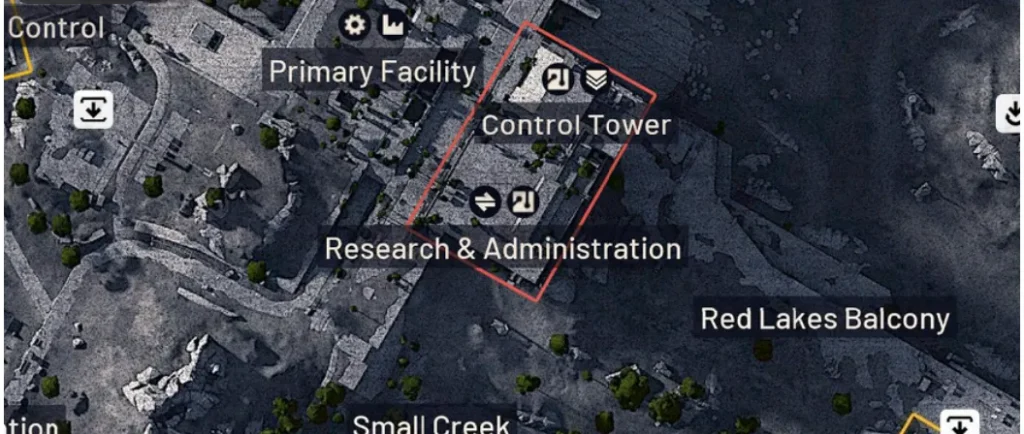
Method #1: Research & Administration Building (Best Location)
The Research & Administration building stands as the most reliable farming location for Dam Control Tower Keys, sitting directly adjacent to the Control Tower itself.
Location Details:
- Map Position: Right next to Control Tower POI in Dam Battlegrounds
- Key Spawn Location: Second floor desk drawers
- Danger Level: High (premium loot area with heavy player traffic)
Step-by-Step Key Farming:
- Navigate to Research & Administration
- Easily identifiable large building next to Control Tower
- Multiple entry points available
- High-value area that attracts aggressive players
- Reach the Second Floor
- Locate stairs or elevator access
- Listen for other players before ascending
- Have weapons ready—this is a common ambush point
- Search Desk Drawers Systematically
- Check every desk drawer on the second floor
- Keys spawn randomly in drawers—not guaranteed each run
- Also check jackets hanging on walls (alternate spawn points)
Important RNG Factor:
The Research & Administration drawers contain random keys for various locked rooms across multiple maps. You might find:
- Dam Control Tower Key (your goal)
- Blue Gate Confiscation Room Key
- Other map-specific keys
- Sometimes no keys at all
This randomness means multiple farming runs might be necessary to find specifically the Dam Control Tower Key.
High-Risk, High-Reward Considerations:
Why It’s Dangerous:
- Positioned in one of Dam Battlegrounds’ hottest zones
- Players rushing Control Tower often check this building first
- Multiple floors create vertical combat complexity
- Limited escape routes when contested
Why It’s Worth It:
- Extremely close to the Control Tower itself
- If you get the key here, you can immediately use it
- The building itself contains excellent loot beyond keys
- Efficient routing: farm key → use key → extract
Safety Tips for Research & Administration:
✓ Scout from distance before approaching
✓ Enter through less obvious side entrances
✓ Close doors behind you to slow pursuers
✓ Keep audio volume high to detect other players
✓ Have an escape plan before entering
✓ Use Safe Pockets to protect found keys
Method #2: Northwestern Residential Areas (Safer Alternative)
For players who prefer lower-risk farming with less player competition, several residential POIs on Dam Battlegrounds’ northwestern side offer key spawn opportunities.
Recommended Safe Farming Locations:
Ruby Residence (Best Low-Risk Option)
- Location: Northwestern corner of Dam Battlegrounds
- Danger Level: Low-Medium (unmarked POI with minimal traffic)
- Key Spawn Points: Desk drawers, jacket pockets
- Why Choose This: Isolated location means fewer player encounters
Strategy:
- Ideal for players spawning in the northwest
- Check every container systematically
- Lower key spawn rate but safer farming
- Good for free loadout farming runs
Pale Apartments
- Location: Northwestern Dam Battlegrounds
- Danger Level: Low-Medium
- Key Spawn Points: Residential furniture, drawers
- Why Choose This: Multiple containers increase chances
Ben Welder’s Sunroof POI
- Location: Northwestern Dam Battlegrounds
- Danger Level: Low
- Key Spawn Points: Desk drawers, containers
- Why Choose This: Less known location with decent spawn rates
Northwestern Area Drawbacks:
⚠ Player Spawn Point Proximity: A spawn point exists near these northwestern locations, meaning:
- If you spawn elsewhere and travel here, other players may have already looted
- Early-spawn players often clear these areas quickly
- Timing matters—arrive too late and pickings are slim
⚠ Distance from Control Tower: Successfully finding a key here means a long trek to actually use it, increasing exposure time.
Best Northwestern Strategy:
- Only farm these locations if you spawn nearby
- Rush immediately upon deployment to beat competitors
- Check all three locations in sequence before extracting
- If you find a key, decide whether to use it immediately or save for a future run
Method #3: Shani’s Quest Reward (Guaranteed Drop)
The most reliable, guaranteed method for obtaining a Dam Control Tower Key is completing Shani’s “The Trifecta” quest.
Quest Details:
- Quest Giver: Shani
- Quest Name: The Trifecta
- Rewards: 1x Dam Control Tower Key, 2x Defibrillator, 1x Raider Hatch Key
Why This Method Is Superior:
✓ Guaranteed key – No RNG farming required
✓ Additional valuable rewards – Defibrillator and Raider Hatch Key
✓ One-time effort – Complete quest, receive key permanently
✓ Predictable – Know exactly what you’re working toward
Quest Completion Considerations:
The Trifecta quest requires finding Snitch Scanners across Dam Battlegrounds. While this takes effort, the guaranteed rewards (including the Dam Control Tower Key) make it worthwhile for players who want certainty over RNG farming.
Recommendation: If you’re serious about accessing the Dam Control Center multiple times, complete The Trifecta quest first. Use the guaranteed key to learn the Control Tower layout and loot, then decide if additional farming is worthwhile.
Best Dam Control Tower Key Farming Route
Efficient Multi-Location Farming Circuit
For maximum farming efficiency on Dam Battlegrounds, consider this route:
Northwestern Spawn Strategy:
- Ruby Residence (30 seconds from spawn)
- Pale Apartments (1 minute travel)
- Ben Welder’s Sunroof (1.5 minutes travel)
- If no key found, extract or continue general looting
Central Spawn Strategy:
- Research & Administration (high risk, high reward)
- If survived and found key, use immediately at Control Tower
- Extract via nearby Red Lakes Balcony
Key Management:
Once you’ve found a Dam Control Tower Key:
Immediate Use:
- Best if you found it at Research & Administration (close proximity)
- High risk but maximum efficiency
- Requires confidence in combat ability
Save for Later:
- Store in stash for future Dam Battlegrounds runs
- Combine with other Dam quests like A Lay of the Land
- Use during lower-traffic raids for safer looting
- Bring Safe Pocket augments to protect it
Where to Use Dam Control Tower Key in ARC Raiders
The Dam Control Center sits at the top of a long elevator shaft on the northeastern side of the Control Tower POI. Reaching it requires vertical navigation through a potentially defended shaft.
Understanding the Control Tower Layout
Vertical Structure:
- Base entrance points at ground level
- Long elevator shaft extending upward
- Machine gun turret may guard upper sections
- Dam Control Center at the top
- Multiple access routes to base
Key Defensive Challenge: The Turret
A machine gun turret often guards the upper elevator shaft, creating a significant obstacle:
Turret Characteristics:
- Automated defense targeting anything in its range
- Positioned to cover zipline approach
- High damage output—can eliminate quickly
- Must be destroyed or bypassed to safely ascend
Turret Counter-Strategies:
Option 1: Destroy from Distance
- Use weapons with good armor penetration
- Rifles and DMRs work well from safe angles
- Grenades can quickly eliminate turrets
- Peek from cover to minimize exposure
Option 2: Smoke Grenade Coverage
- Deploy smoke at turret’s targeting zone
- Quickly zipline through smoke cloud
- Requires speed and timing
- Some chip damage likely but survivable with shields
Option 3: Coordinate Squad Fire
- Multiple players focus fire simultaneously
- Faster destruction with less individual exposure
- One player can provide covering fire while others ascend
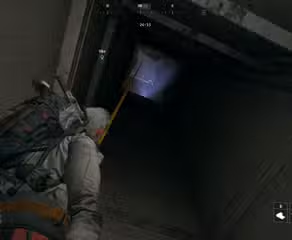
Visual Identification: Look for glowing lights or laser beams in the upper shaft—these indicate turret presence.
How to Access the Dam Control Tower (3 Routes)
Route 1: Red Lakes Balcony Approach (Recommended)
Starting Point: Red Lakes Balcony extraction point
Difficulty: Easy
Exposure: Low
Directions:
- Navigate to Red Lakes Balcony area
- Approach the Control Tower from this direction
- Find the door at the tower’s base
- Enter to access elevator shaft
Why This Route:
- Simplest navigation
- Less exposure to open areas
- Close to extraction point (efficient loot-and-leave)
- Natural routing from northwestern farming locations
Route 2: Research & Administration Corridor
Starting Point: Research & Administration building
Difficulty: Medium
Exposure: Medium-High
Directions:
- Face Research & Administration’s main entrance
- Don’t enter—instead turn right
- Follow the long corridor along the building’s exterior
- Continue to the corridor’s end
- Open the door to access elevator shaft
Why This Route:
- Convenient if farming keys at Research & Administration
- Allows immediate key usage after finding one
- Higher player traffic risk
- Efficient for speed runners
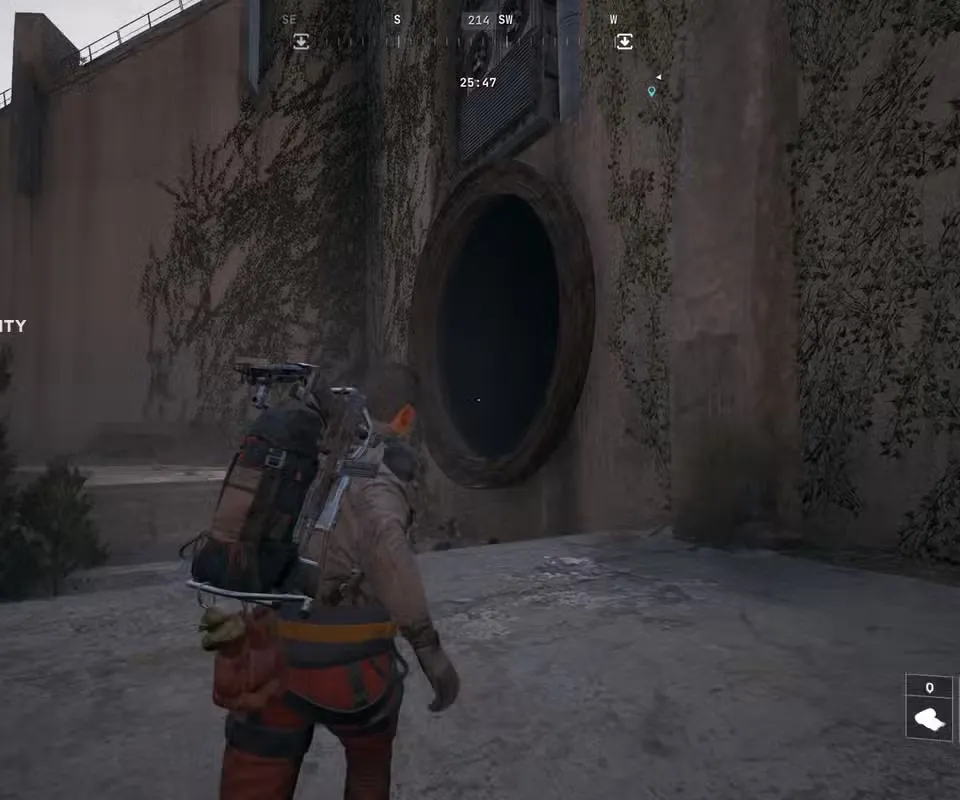
Route 3: Northern Lake Bed Approach
Starting Point: North or northeast map areas
Difficulty: Medium
Exposure: Low-Medium
Directions:
- Navigate to the lake bed area
- Follow the floodgates along the dried lakebed
- Look for an open sewer grate
- Enter through the grate to reach Control Tower base
Why This Route:
- Least obvious entry—fewer players know it
- Good for stealthy approaches
- Slightly longer but avoids main traffic areas
- Natural route from northern spawn points
Ascending the Elevator Shaft
Once you’ve reached the base of the Control Tower:
Step 1: Scout for Turret
- Look upward through the elevator shaft
- Check for glowing lights or laser patterns
- Listen for turret mechanical sounds
- Assess whether turret is present
Step 2: Neutralize Turret (If Present)
- Choose your counter-strategy (destroy or smoke)
- Position for safe engagement
- Ensure you have enough ammo/grenades
- Don’t rush—take the time to safely eliminate it
Step 3: Navigate Zipline System
The elevator shaft contains multiple ziplines for vertical traversal:
From Bottom Approach:
- First zipline takes you to mid-level
- Second zipline brings you to Dam Control Center
- Keep momentum during ascent
- Have weapon ready at each level
Important: If starting from the bottom (lake bed or sewer approach), you’ll use two ziplines to reach the top. If entering from higher access points (Red Lakes Balcony), you may only need one zipline.
Step 4: Reach Dam Control Center
After the final zipline, you’ll arrive at the Dam Control Center entrance. The locked door will have an interaction prompt when you approach with the key in your inventory.
How to Use Dam Control Tower Key and Loot Efficiently
Unlocking the Control Room Door
Simply approach the locked door and interact to use your Dam Control Tower Key. The door opens, granting access to the control room’s contents.
Key Consumption: Using the key consumes it—one key equals one entry. Plan accordingly.
Best Looting Strategy Inside Control Room
Maximize Your Haul:
The Dam Control Center contains multiple high-value containers and items:
Container Priority:
- Weapon crates – Check for purple/legendary weapons first
- Secured lockers – Often contain rare blueprints
- Desks and cabinets – Crafting materials and attachments
- Floor spawns – Don’t miss items on surfaces
Safe Pocket Management:
Safe Pockets become crucial here:
- Equip augments with maximum Safe Pocket slots before the raid
- Immediately place high-value loot in Safe Pockets as you find it
- Prioritize blueprints, legendary items, and rare materials
- This protects your most valuable finds even if eliminated during extraction
Time Management:
Don’t overstay your welcome:
- Spend 2-3 minutes maximum looting
- Other players may arrive to contest the area
- The longer you stay, the more risk you accumulate
- Grab the best items and prepare to extract
Inventory Space:
Ensure adequate backpack space before entering:
- Empty non-essential items before using the key
- Bring a larger backpack if available
- Make tough decisions—leave lower-value items behind
- Focus on highest value-to-weight ratio items
Expected Loot Quality (Rare to Epic Items)
While exact loot tables vary, the Dam Control Center typically contains:
High-Tier Items:
- Purple and Legendary weapon blueprints
- Advanced Mechanical Components
- Rare weapon attachments (Tier II and III)
- Heavy Gun Parts
- Premium shields and healing items
Crafting Materials:
- Advanced Electrical Components
- Processors
- Synthesized Fuel
- Heavy-tier crafting resources
Potential Legendary Spawns:
- Exclusive weapon blueprints
- Rare modification components
- High-value tradeable items
Dam Control Tower Extraction Strategies
With valuable loot secured, safe extraction becomes your highest priority.
Recommended Extraction Route (Safest)
Primary: Red Lakes Balcony Elevator
Advantages:
- Extremely close to Dam Control Center
- Quick descent via elevator
- Direct route to extraction point
- Minimal exposure time
Directions:
- Exit Dam Control Center
- Descend elevator shaft (reverse of entry)
- Head to Red Lakes Balcony extraction point
- Extract with your loot
Timing Considerations:
- Extract immediately if you hear nearby combat
- Don’t stop to fight unless absolutely necessary
- Speed over additional looting at this point
- Your Control Center haul is more valuable than random pickups
Raider Hatch Extraction (Premium Method)
For maximum security, a Raider Hatch exists just north of the Red Lakes elevator.
Why Use Raider Hatch:
- Guaranteed safe extraction (if you have a key)
- Eliminates extraction point camping risk
- Perfect for protecting high-value Control Center loot
- Worth the Raider Hatch Key investment
Requirements:
- Must have a Raider Hatch Key
- Note: Hatches disabled during Hidden Bunker events
Strategy: If you’re planning to use the Dam Control Tower Key, consider bringing a Raider Hatch Key specifically for extraction. The investment pays off when you’re carrying premium loot.
Common Extraction Threats to Avoid
Common Dangers:
- Players camping extraction points
- Opportunistic attackers seeing you exit Control Tower
- ARC patrols between Control Tower and extraction
- Other players also trying to extract
Counter-Measures:
- Use smoke grenades to obscure your movement
- Sprint unpredictably to avoid sniper fire
- Keep shields recharged
- Have healing items ready
- Extract during combat elsewhere (distraction)
Emergency Scenarios:
If extraction seems too hot:
- Find cover and wait for opportunity
- Consider alternate extraction points
- Use terrain for concealment
- Sometimes waiting 2-3 minutes lets threats clear
Advanced Dam Control Tower Key Strategies
Full Circuit Strategy (Multi-Key Farming)
Maximize value from a single Dam Battlegrounds raid:
- Farm key at Research & Administration or northwestern residences
- Use key immediately at Dam Control Center
- Stack other quests like A First Foothold or Eyes in the Sky
- Extract with multiple objectives complete
Efficiency: Complete 3-4 objectives in one run instead of separate raids.
Quest Reward Priority Method (Guaranteed Key)
If you haven’t completed The Trifecta yet:
Optimal Progression:
- Complete The Trifecta quest for guaranteed key
- Use quest reward key to learn Control Tower layout
- Assess whether the loot justifies future key farming
- If yes, farm additional keys using knowledge gained
The Safe Pocket Insurance
Before using any Dam Control Tower Key:
Preparation Checklist: ✓ Equip augment with maximum Safe Pocket slots
✓ Bring Raider Hatch Key for extraction
✓ Ensure adequate backpack space
✓ Stock healing items and shield rechargers
✓ Bring turret-killing equipment (grenades/AP weapons)
✓ Know extraction route before entering
This preparation ensures that even if things go wrong, your most valuable finds are protected.
Squad Coordination for Tower Raids
For team play:
Role Distribution:
- Scout: Checks for turret, scouts extraction route
- Breacher: Uses the key, enters first
- Security: Guards entrance while others loot
- Looter: Focuses on grabbing highest-value items quickly
Communication:
- Call out high-value finds
- Coordinate Safe Pocket usage
- Alert team to approaching threats
- Agree on extraction timing
Common Mistakes to Avoid
❌ Using key without Safe Pockets – Risk losing best loot
❌ Bringing key without turret counter-measures – Get eliminated in shaft
❌ Overstaying in Control Center – Greed gets you killed
❌ No extraction plan – Panic during emergency situations
❌ Full inventory before looting – Can’t carry premium items
❌ Fighting unnecessarily during extraction – Lose loot to third parties
❌ Not checking for turret before ascending – Instant death mid-zipline
❌ Using key without Raider Hatch Key – Risky extraction with valuable loot
How to Combine Dam Control Tower with Other Quests
The Control Tower area intersects with several other activities:
Efficient Quest Stacking in Dam Battlegrounds
- The Trifecta – Rewards Dam Control Tower Key
- A Lay of the Land – Nearby objectives
- Hatch Repairs – Raider Hatch locations
Control Tower in Relation to Other POIs
- Research & Administration (key farming)
- Red Lakes area (extraction)
- Dam Surveillance areas
Loot Route Integration: Incorporate Control Tower into your best loot routes on Dam Battlegrounds for maximum efficiency.
Final Tips for Dam Control Tower Key Success
The Dam Control Tower Key represents one of ARC Raiders’ best risk-versus-reward opportunities. While acquiring the key requires either RNG farming or quest completion, and accessing the control room demands navigating vertical challenges and turret defenses, the premium loot inside often justifies the investment.
The strategic positioning near Red Lakes Balcony extraction makes the entire operation remarkably efficient when executed properly: find or use key → navigate shaft → eliminate turret → loot quickly → extract immediately. Total time from key use to extraction: 5-7 minutes with proper execution.
Whether you choose the guaranteed quest reward route or prefer the RNG excitement of farming residential areas, understanding all access routes, turret counter-strategies, and extraction options dramatically improves your success rate. The Control Center’s relatively low player traffic compared to other premium locations makes it one of the smarter plays for experienced Raiders seeking high-value loot without extreme competition.
Remember: the most valuable loot in the world means nothing if you can’t extract safely. Prioritize Safe Pockets, plan your extraction, and know when to cut losses and run. The Dam Control Tower will be there for your next raid.
Available Now: PlayStation | Xbox | Official Site