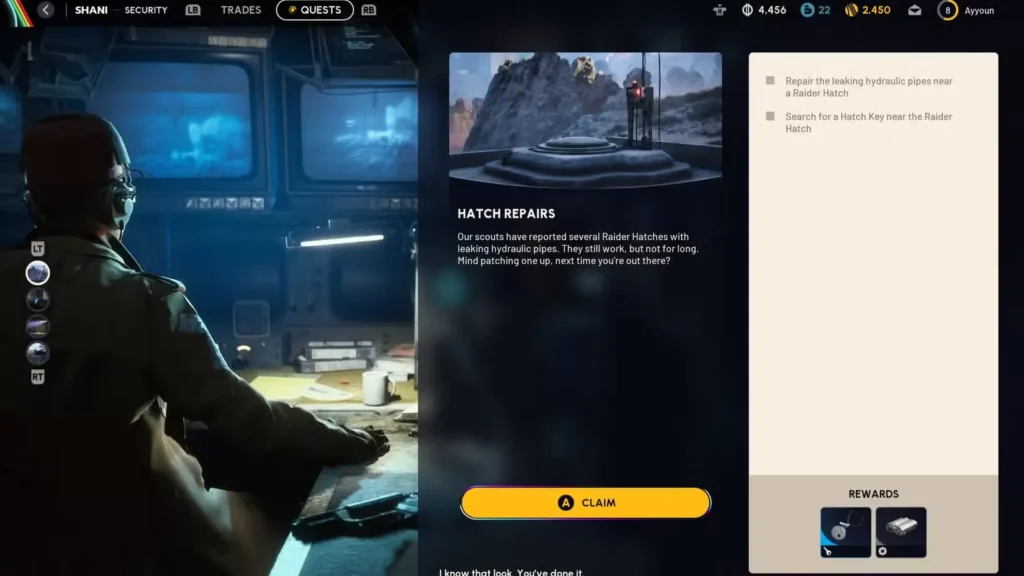
The Hatch Repairs quest in Arc Raiders is one of those early missions that new players should prioritize immediately. Why? Because it rewards you with a free Raider Hatch Key—an item that normally costs a painful 9,000 coins to purchase. That’s significant savings for what amounts to a simple repair job that takes less than five minutes to complete.
Shani reports that several Raider Hatches across the maps have leaking hydraulic pipes that need fixing. Your job is to locate one of these hatches, conduct the repairs, and collect your reward. It’s straightforward, low-risk, and provides essential equipment that dramatically improves your extraction success rate.
Let me walk you through everything you need to know about finding Raider Hatches, completing the repairs, and maximizing the value of this quest.
Hatch Repairs Quest Overview
Quest Giver: Shani at Esperanza
Maps: Available on all four maps (Dam Battlegrounds, Buried City, Spaceport, Blue Gate)
Difficulty: Very Low—perfect for beginners
Extraction Required: Yes—you must extract to complete the quest
Quest Rewards
Completing Hatch Repairs provides:
- Raider Hatch Key (normally 9,000 coins value)
- Binoculars (useful scouting equipment)
The Raider Hatch Key alone makes this quest incredibly valuable. These keys provide access to secure extraction points that are:
- Faster than normal extractions
- More defensible due to limited access
- Less likely to be camped by hostile players
- Safer from ARC enemy interference
Binoculars, while less exciting, are genuinely useful for scouting distant locations, spotting threats, and planning your movement across maps.
Raider Hatch Locations: All Maps Guide
Before we dive into locations, let’s clarify what Raider Hatches are and how they differ from standard extractions.
What Are Raider Hatches?
Raider Hatches are premium extraction points that require a Raider Hatch Key to activate. They offer several advantages over normal extractions:
Speed: Faster extraction timer than standard methods
Security: Limited access points make them harder for enemies to assault
Stealth: Less obvious than large extraction zones like elevators or trains
Consistency: Available on all maps with predictable locations
Safety: Generally positioned away from high-traffic combat zones
How to Identify Raider Hatches on Your Map
When you open your map, look for extraction symbols that appear as downward-pointing arrows entering a sphere. The key identifying features are:
Symbol design: Arrow pointing down into circular/spherical shape
No timer displayed: Unlike normal extractions (elevator, train, air duct) which show countdown timers, Raider Hatches have no timer next to their icon
Consistent spawns: Each map has exactly four Raider Hatch locations
Map distribution: Hatches are spread across different regions of each map
Once you understand this visual distinction, finding Raider Hatches becomes trivial—just scan your map for the timerless extraction symbols.
Raider Hatch Locations: All Maps Guide
While I recommend checking your in-game map for precise locations, here’s the breakdown of Raider Hatch distribution:
All Maps Feature Four Raider Hatches Each
Dam Battlegrounds: 4 Raider Hatches
Buried City: 4 Raider Hatches
Spaceport: 4 Raider Hatches
Blue Gate: 4 Raider Hatches
Total across all maps: 16 Raider Hatch locations
Choosing Which Hatch to Visit
Spawn proximity: Pick whichever Raider Hatch is closest to your spawn location. This quest works at any hatch, so choose convenience.
Safety consideration: Some hatches are in safer, low-traffic areas while others sit near contested zones. For this quest, prioritize proximity over perfection.
Familiarity: If you’re learning a new map, use this quest as an opportunity to explore and memorize Raider Hatch positions for future extractions.
Current threats: If you hear heavy combat near one hatch location, simply choose a different one. There’s no requirement to use a specific hatch.
Quest Rewards for Hatch Repairs
Once you’ve identified a nearby Raider Hatch on your map, follow these steps:
Step 1: Travel to the Raider Hatch
- Open your map after spawning into any raid
- Identify the Raider Hatch symbols (downward arrows with no timer)
- Choose the closest or safest hatch to your current position
- Navigate to that location using terrain and cover
Travel tips:
- Avoid unnecessary combat en route
- Listen for hostile players or ARC enemies
- Use stealth over direct confrontation
- Keep your objective in mind—this is a quick quest, not a combat mission
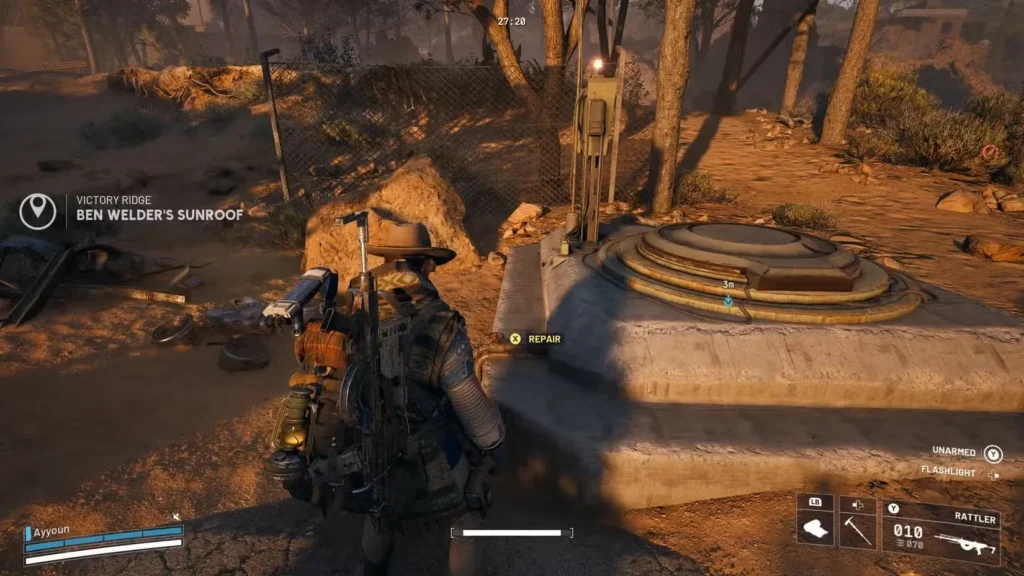
Step 2: Locate the Repair Point
When you arrive at the Raider Hatch:
- Find the Raider Hatch terminal (the control console for the extraction)
- Move behind the terminal
- Look for the hydraulic pipes above or near the terminal area
- Locate the interactable repair point above the pipes (should have a prompt when you’re close)
- Interact with the repair point to begin fixing the pipes
The repair interaction is straightforward—just hold the indicated button until the repair completes. The process takes a few seconds and doesn’t require any special items or tools.
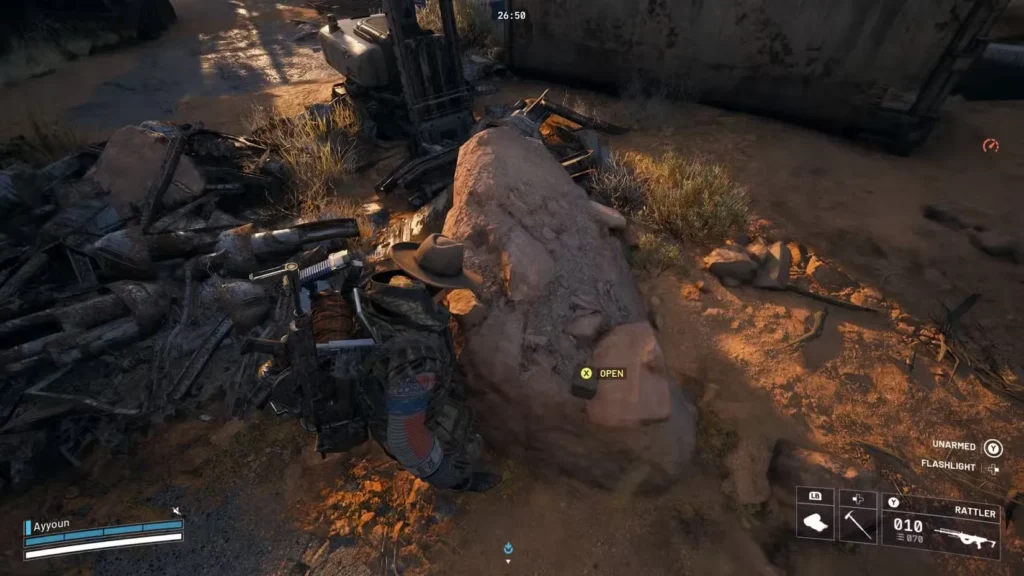
Step 3: Find the Reward Box
After completing the pipe repairs, the quest updates with a new objective: find a box near the Raider Hatch.
What to look for:
- A box or container with a yellow interaction icon
- Located somewhere in the immediate vicinity of the Raider Hatch
- Contains the quest reward: a Raider Hatch Key
Search the box to collect the Raider Hatch Key. This is the primary reward for the quest and should be protected in your Safe Pockets immediately after collection.
Step 4: Make Your Extraction Decision
Now you face an interesting choice: use the key immediately or save it for later.
Option A: Use the Key Immediately (Recommended for Quest Completion)
Advantages:
- Completes the quest instantly
- Guarantees quest reward claim at Esperanza
- Fastest possible completion time
- No risk of losing the key before extraction
How to do it:
- Activate the Raider Hatch terminal
- Use your newly acquired Raider Hatch Key
- Complete the extraction
- Return to Esperanza and claim rewards from Shani
When to choose this option:
- Your primary goal is quest completion
- You’re running a minimal loadout with nothing valuable to lose
- You want the fastest possible completion time
- You’re not combining this with other activities
Option B: Save the Key and Use Normal Extraction
Advantages:
- Keeps the Raider Hatch Key for future use
- Allows you to extract at a more convenient location
- Lets you complete other objectives before extracting
- Preserves the key for emergency situations
How to do it:
- Store the key safely in Safe Pockets
- Navigate to a normal extraction point (elevator, train, air duct)
- Complete standard extraction with the key in your inventory
- Return to Esperanza and claim rewards from Shani
When to choose this option:
- You’re combining the quest with other activities
- A normal extraction is more conveniently located
- You want to save the key for a future high-stakes raid
- You’re farming materials or blueprints and plan to stay longer
Important note: Either extraction method completes the quest. You’ll receive the same rewards (Raider Hatch Key + Binoculars) regardless of how you extract.
Claiming Your Rewards
After successfully extracting:
- Return to Esperanza (automatic after extraction)
- Visit Shani’s trading interface
- Navigate to the quest tab
- Claim your Hatch Repairs quest rewards:
- Raider Hatch Key (in addition to the one you found)
- Binoculars
Wait, two keys? Yes! You get the key from the box during the quest, and then Shani gives you another key as the quest reward. This means completing Hatch Repairs actually nets you two Raider Hatch Keys total—even more valuable than initially apparent.
Loadout Recommendations
Since Hatch Repairs is an extremely low-risk quest, you don’t need premium gear.
Minimal Loadout Approach
Weapons: Basic firearms for self-defense only
- One reliable primary weapon
- Backup sidearm if desired
Shield: Light Shield is sufficient
- You shouldn’t encounter heavy combat
- Avoid wasting expensive shields on this simple quest
Healing: Minimal healing items
- 1-2 healing consumables for emergencies
- Unnecessary if you avoid combat entirely
Utility: Nothing special required
- Standard movement speed is fine
- No special equipment needed
When to Bring Better Gear
Combining activities: If you’re also planning to:
- Complete other quests on the same map
- Farm Snitch Scanners or other materials
- Engage in blueprint hunting
- Then bring appropriate gear for those activities
Known threats: If server population is unusually hostile, upgrade accordingly
Common Mistakes to Avoid
Not using Safe Pockets: After finding the key in the box, immediately protect it with Safe Pockets. Dying before extraction means losing the key and having to repeat the quest.
Overthinking the repair location: The repair point is always behind/near the Raider Hatch terminal. Don’t wander far searching for it.
Getting distracted by combat: This is a 5-minute quest. Avoid unnecessary fights that risk quest failure.
Bringing expensive gear: Don’t waste premium equipment on this low-risk objective.
Not checking the map first: Some players wander randomly looking for hatches instead of just opening the map and navigating directly to one.
Forgetting to claim rewards: After extracting, remember to actually visit Shani and claim your quest rewards from the trading interface.
Using the wrong extraction type: If you accidentally use a normal extraction instead of a Raider Hatch, you’ve potentially wasted the opportunity to learn how Raider Hatch extractions work.
Combining Hatch Repairs with Other Activities
While Hatch Repairs is quick enough to complete in isolation, you can maximize efficiency by stacking activities:
On the Same Raid
Other quests: Complete nearby quests like:
- A Reveal in Ruins (Buried City)
- A Lay of the Land (Spaceport)
- With a Trace (Blue Gate)
Material farming: Collect resources while traveling to the hatch:
Experience farming: Eliminate ARC enemies for XP toward max level
Blueprint hunting: Check containers near your route for rare blueprints
Strategic Value of Raider Hatch Keys
Understanding why Raider Hatch Keys are valuable helps you appreciate this quest’s rewards:
Why Keys Matter
Cost avoidance: At 9,000 coins each, keys are expensive to purchase. This quest gives you two for free—18,000 coins value.
Emergency extractions: When you’re carrying valuable loot and need a safe exit, Raider Hatches are often your best option.
PvP escape: If hostile players are camping normal extractions, Raider Hatches provide alternative escape routes.
Speed advantage: Faster extraction times mean less exposure to threats during the vulnerable extraction phase.
Quest requirements: Some advanced quests may require Raider Hatch extractions, making keys essential for progression.
For more details on maximizing Raider Hatch usage, check our complete Raider Hatch Key guide.
Solo vs. Team Approaches
Solo Strategy
Speed over combat: Avoid all unnecessary engagements. Get to the hatch, complete repairs, extract.
Route planning: Choose the safest path to your selected Raider Hatch based on current map awareness.
Situational awareness: Without teammates to watch your back, audio cues become critical.
Immediate extraction: Unless you have compelling reasons to stay, extract immediately after finding the key.
Team Strategy
Efficiency distribution: One player completes the quest while others provide security or handle different objectives.
Shared learning: If teammates haven’t done this quest, they can observe the process and complete it on their own runs.
Combined objectives: Teams can efficiently stack multiple quests and activities on a single raid.
Extraction flexibility: Teams can choose between Raider Hatch or normal extraction based on collective needs.
Advanced Tips for New Players
Do this quest early: Hatch Repairs should be one of your first completed quests due to its simplicity and valuable rewards.
Learn hatch locations: Use this quest as an opportunity to memorize Raider Hatch positions for future raids.
Practice extractions: If you’ve never used a Raider Hatch, this quest provides a safe opportunity to learn the mechanics.
Map exploration: Visit different maps for this quest to familiarize yourself with each region’s layout.
Resource habit formation: Get used to protecting quest items with Safe Pockets—a critical habit for harder quests later.
Quest Efficiency Analysis
Time investment: 3-5 minutes for experienced players who know hatch locations
Risk level: Very low—minimal combat or threat exposure required
Reward value: Excellent—two Raider Hatch Keys plus Binoculars represent significant resource savings
Repeatability: This is a one-time quest per character/progression cycle
Verdict: Essential Early Quest
Hatch Repairs is arguably one of the best quests in Arc Raiders for new players. The combination of:
- Extremely low difficulty
- Minimal time investment
- High-value rewards
- Educational value (learning hatch locations)
- Low gear requirements
…makes this an absolute must-complete mission as soon as you have access to it.
Final Thoughts
Hatch Repairs perfectly demonstrates what early-game quests should be: simple, rewarding, and educational. Shani’s task teaches you about Raider Hatch locations while providing equipment that significantly improves your long-term survival prospects. The free Raider Hatch Keys alone justify the minimal effort required.
For new players especially, this quest offers an excellent introduction to Arc Raiders’ quest system without the overwhelming complexity of multi-stage missions like A Lay of the Land or puzzle-based challenges like Raider’s Refuge. You load in, navigate to a nearby hatch, fix some pipes, grab a box, and extract. Simple, efficient, rewarding.
The decision of whether to use your newfound key immediately or save it for later adds a nice strategic element. If you’re purely focused on quest completion, use it right there. If you’re planning additional activities or want to preserve it for a future high-stakes extraction, save it and use a normal extraction instead. Both approaches complete the quest—choose based on your immediate priorities.
Now get out there, find any Raider Hatch on any map, fix those hydraulic pipes, and claim your free keys. Shani’s counting on you, and frankly, the 18,000 coins worth of free Raider Hatch Keys make this one of the best deals in the game.
Available on PlayStation and Xbox, Arc Raiders rewards players who complete straightforward quests efficiently. Good hunting, Raider!