
How to Get Fireball Burners in ARC Raiders – What Goes Around Quest Walkthrough
Learn how to get Fireball Burners in ARC Raiders by defeating Fireball ARC machines. Complete guide for What Goes Around quest with spawn locations and combat strategies.
Meet the Fireball: Your Flamethrower-Wielding Nemesis
Fireball ARC units are among the most visually impressive—and potentially lethal—enemies you’ll encounter in ARC Raiders. These spherical machines roll through abandoned facilities armed with integrated flamethrowers, ready to torch anyone who gets too close. Unlike passive reconnaissance units like ARC Surveyors, Fireballs actively hunt players and have no qualms about turning you into charcoal.
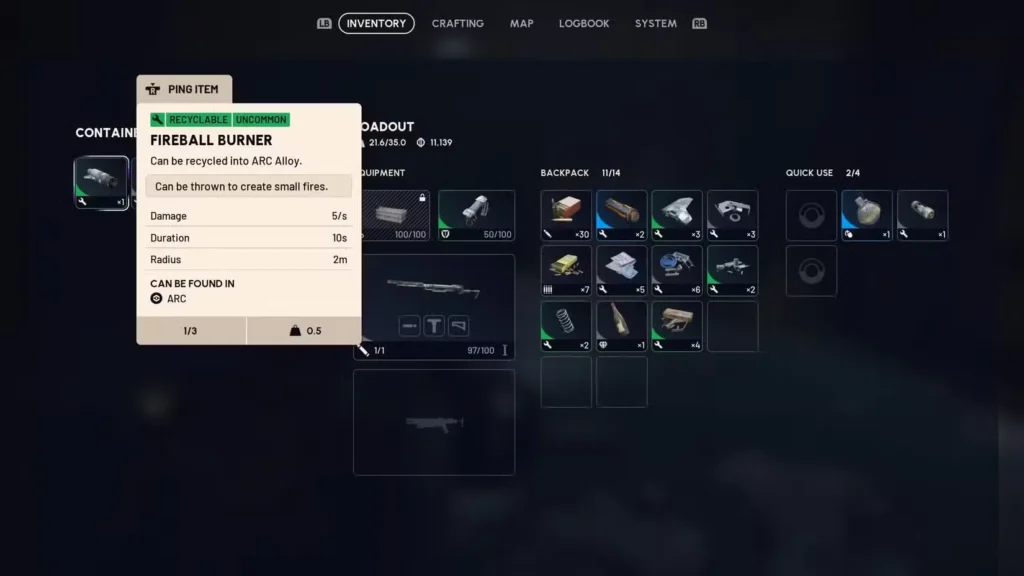
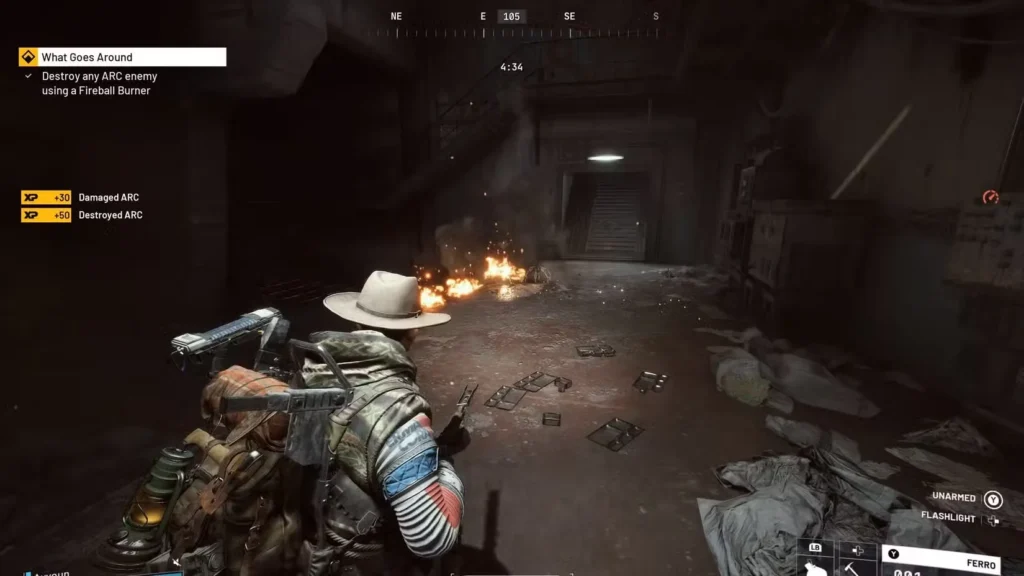
The good news? Defeating these pyromaniacs rewards you with Fireball Burners—throwable incendiary weapons that you can either use immediately against other ARCs or save for crafting Workshop upgrades. The What Goes Around quest from Shani specifically requires you to use Fireball Burners against ARC enemies, creating a satisfying irony of burning the machines with their own technology.
Let’s break down everything you need to know about finding, fighting, and farming Fireball units for their valuable Burner components.
What Are Fireball Burners Used For?
Before we hunt these enemies, let’s understand why you need their drops:
Advertisement
Primary uses:
- What Goes Around quest completion – Shani’s quest requiring you to burn ARCs with their own weapons
- Crafting material – Component for Workshop upgrades and modifications
- Direct combat use – Throwable fire weapon against enemies
- Anti-ARC effectiveness – Particularly good against mechanical enemies
Why they’re valuable:
Unlike common drops you’ll ignore, Fireball Burners serve multiple purposes. Even after completing What Goes Around, you’ll want to collect these for crafting and combat applications.
Comparison to other ARC drops:
- ARC Motion Cores – More common, general crafting
- Sentinel Firing Cores – Rarer, specific upgrades
- Fireball Burners – Medium rarity, specialized use
Understanding Fireball ARC Units
Before engaging these enemies, know what you’re facing:
Physical characteristics:
- Spherical shape – Ball-like frame similar to Surveyors
- Blue circular LEDs – Distinctive visual identifier on the sides
- Compact size – Smaller than many other ARC types
- Rolling mobility – Moves by rolling across terrain
Combat behavior:
Advertisement
- Active aggression – Will pursue and attack players
- Flamethrower deployment – Opens hatch to arm weapon systems
- Close-range specialist – Most dangerous at short distances
- Fire status effect – Can ignite players, causing continuous damage
Tactical patterns:
Fireballs use a predictable attack sequence:
- Detect player presence
- Roll toward target
- Stop and open hatch
- Deploy flamethrower
- Spray fire in forward cone
Understanding this pattern is key to defeating them efficiently.
Spawn Locations: Where to Find Fireballs
Fireball units technically spawn on all maps, but certain locations see far higher frequency:
Best Farming Locations
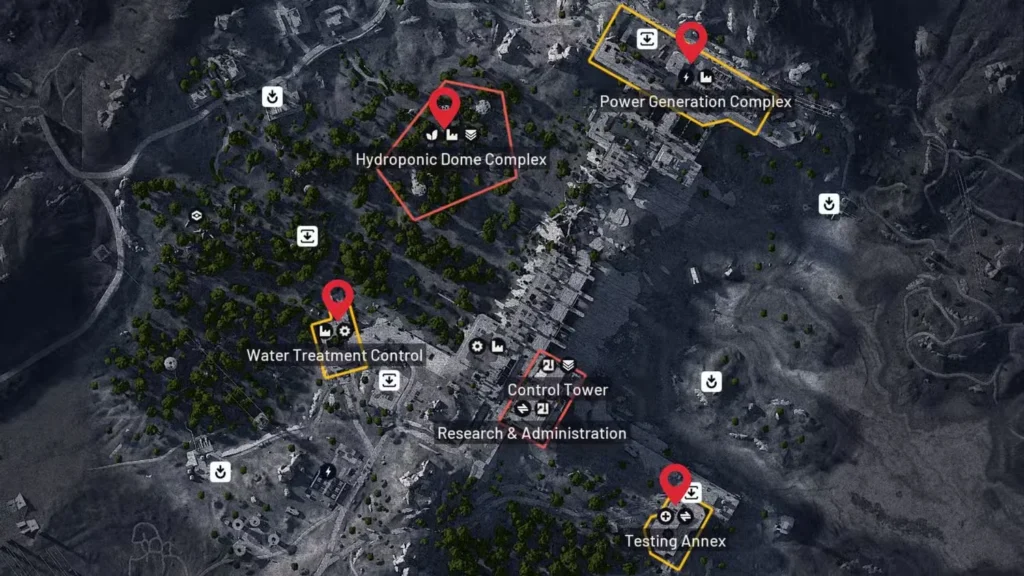
Dam Battlegrounds (Primary):
- Research & Administration building
- Testing Annex facility
- Control Tower interior sections
- Abandoned structures throughout map
Buried City (Secondary):
- Research facility areas
- Hospital lower levels
- Industrial zones near Parking Garage
- Underground sections of major buildings
Why these maps:
Fireballs favor indoor industrial environments—research stations, abandoned facilities, and underground areas. Dam Battlegrounds and Buried City have the highest concentration of these terrain types.
Advertisement
Terrain Preferences
High-probability zones:
- Interior spaces – Buildings, corridors, rooms
- Research facilities – Labs and testing areas
- Underground sections – Basement levels and tunnels
- Industrial complexes – Manufacturing or storage zones
Low-probability zones:
- Open fields – Rarely spawn in completely open areas
- Village housing – Residential buildings see fewer Fireballs
- Exterior perimeters – Map edges less likely
Strategic implication:
If you’re specifically hunting Fireballs, prioritize interior exploration of research-themed buildings. Avoid wasting time checking open areas or purely residential zones.
Spawn Density Comparison
Dam Battlegrounds Research & Administration:
- Spawn frequency: High
- Multiple Fireballs possible: Yes
- PvP risk: Very high
- Best for: Efficient farming with acceptable risk
Buried City Research Facility:
- Spawn frequency: Medium-high
- Multiple Fireballs possible: Yes
- PvP risk: High
- Best for: Alternative when Dam is too contested
Other locations:
- Spawn frequency: Low to medium
- Best for: Opportunistic farming during other objectives
If you completed Medical Merchandise quest, you already know many of these buildings—Fireballs often share spawn zones with medical facilities.
Loadout Requirements: What to Bring
Unlike casual quests where free loadouts work, hunting Fireballs requires specific gear:
Essential Weapon Types
Heavy ammo weapons (strongly recommended):
- Ferro – Excellent ARC armor penetration
- Anvil – High damage, good against armored enemies
- Other heavy weapons – Any gun using heavy ammo works
Why heavy ammo matters:
Fireballs have protective armor plating. Light ammo weapons take significantly longer to destroy them, wasting time and ammunition. Heavy ammo cuts through armor efficiently.
Alternative weapon options:
If you don’t have heavy weapons:
- Upgraded assault rifles with weapon mods
- DMRs for precision damage
- Shotguns at very close range (risky)
Just understand that non-heavy weapons require more shots and time.
Defensive Gear
Recommended protection:
- Fire-resistant gear if available
- Shield (Ferro minimum)
- Healing items – Mushrooms or medical supplies
Why fire protection matters:
Getting caught by the flamethrower inflicts continuous burning damage. Fire resistance reduces this significantly, but healing items work as backup.
Inventory Management
For What Goes Around quest:
- Safe Pockets – Protect Fireball Burners you collect
- Quick-use slot – Equip Burner for easy throwing
- Backup Burners – Bring 3-4 minimum for quest safety
For general farming:
- Storage space for multiple ARC drops
- Room for incidental loot from buildings
- Stash management preparation
Combat Strategy: How to Defeat Fireballs
Two distinct methods exist for killing Fireball units—each with different risk/reward profiles:
Method 1: Distance Shooting (Safe but Slow)
Basic approach:
- Spot the Fireball – Look for blue LEDs on sides
- Maintain distance (~15-20 meters minimum)
- Start shooting – Target center mass
- Keep backing up if it advances
- Continue firing until destroyed
Advantages:
- Minimal fire damage risk
- Forgiving of mistakes
- Works with any weapon type
- Low skill requirement
Disadvantages:
- Uses more ammunition
- Takes longer to kill
- May alert other enemies or players
- Fireball might escape if you lose tracking
When to use:
- You’re low on health/supplies
- Multiple threats present
- Unfamiliar with Fireball behavior
- Running lower-tier weapons
Fire management tip:
If you do get ignited while maintaining distance:
- Stop shooting temporarily
- Sprint away from the Fireball
- Keep moving – Movement extinguishes fire faster
- Return to engagement once flames are out
The rolling motion helps extinguish flames more quickly than standing still.
Method 2: Hatch Shot (Risky but Efficient)
Advanced technique:
- Let the Fireball approach – Don’t shoot yet
- Aim at center mass – Pre-aim where hatch will open
- Wait for hatch opening – It will stop and deploy weapon
- Shoot inside the hatch immediately
- Watch it explode – Instant or near-instant kill
Why this works:
The internal mechanisms exposed when the hatch opens are the Fireball’s critical weak point. Direct shots into this opening bypass armor entirely, causing massive damage.
Advantages:
- Extremely fast kill time
- Minimal ammo consumption
- Satisfying when executed well
- Efficient for farming multiple Fireballs
Disadvantages:
- Requires nerve (letting it approach)
- Timing window is brief
- Miss = you’re in flamethrower range
- Higher skill ceiling
When to use:
- You’re confident in your aim
- Have full health and shields
- Farming efficiency matters
- Comfortable with Fireball patterns
Pro execution tips:
- Pre-aim at head height where hatch will appear
- Use higher fire-rate weapons to land multiple shots in window
- Position near cover you can retreat behind if you miss
- Practice timing – The hatch opens consistently
Method 3: Explosive Approach (Resource-Intensive)
Alternative method:
- Throw grenades at Fireball’s position
- Use explosive weapons if available
- Detonate from safety
Why this works less well:
Fireballs are mobile and relatively small targets. Grenades often miss or deal partial damage. Save your explosives for grouped enemies or more valuable targets.
Situational use only:
- Multiple Fireballs grouped together
- You’re pinned down and need area denial
- Have surplus grenades with no other use
Looting Fireball Burners
After destroying a Fireball:
Loot Collection Process
Step-by-step:
- Approach the destroyed Fireball – Blue LEDs will be dark
- Interact with the body – Standard looting prompt
- Collect Fireball Burner – Primary quest item
- Grab additional drops – Often includes mechanical components
- Transfer to Safe Pocket immediately if doing quest
What you’ll typically receive:
- 1x Fireball Burner (guaranteed)
- Mechanical components (common)
- Scrap materials (occasional)
- ARC-related crafting items (varied)
Important timing:
Loot Fireballs immediately after defeat. Other players can steal loot if you delay, and in chaotic situations, you might lose track of which destroyed unit you haven’t looted yet.
Managing Multiple Burners
For What Goes Around quest:
You only need one successful throw to complete the quest, but smart players bring 3-4 Burners as insurance:
- First Burner: Your actual quest attempt
- Backup Burners: In case you miss or kill is stolen
- Extra insurance: Protects against accidental drops or death
Storage strategy:
- Safe Pocket: Quest-critical Burners
- Regular inventory: Excess for future use
- Stash storage: Long-term supply if farming bulk
Review Safe Pocket usage if you’re unclear on protected item mechanics.
What Goes Around Quest: Complete Walkthrough
Now that you understand Fireballs, let’s complete Shani’s quest:
Quest Overview
Quest giver: Shani
Objective: Destroy ARC enemies using Fireball Burners
Difficulty: Easy (once you have Burners)
Required items: 1+ Fireball Burners
Phase 1: Obtaining Fireball Burners
Preparation:
- Accept quest from Shani
- Equip heavy ammo weapon (Ferro/Anvil preferred)
- Bring defensive gear and healing items
- Plan your route – Dam Battlegrounds or Buried City
Farming execution:
- Deploy to chosen map – Spawn near research facilities
- Navigate to high-probability zones – Interior buildings
- Hunt Fireball units using combat methods above
- Collect Fireball Burners from defeated enemies
- Secure 3-4 Burners minimum for safety margin
Time investment:
Experienced players: 10-20 minutes
New players: 30-45 minutes
Spawn RNG affects this significantly. You might find three Fireballs immediately or search for 30 minutes before encountering one.
Phase 2: Using Fireball Burners
Setup:
- Equip Fireball Burner in quick-use slot (important!)
- Choose appropriate map – Any map works
- Deploy for second raid
- Locate suitable ARC targets
Valid targets for quest:
- Ticks – Small spider-like ARCs (easiest)
- Pops – Common spherical enemies
- Other Fireballs – Maximum irony
- Most other ARC types – Generally work
Invalid targets:
- Human players (obviously)
- Environmental objects
- Non-ARC enemies
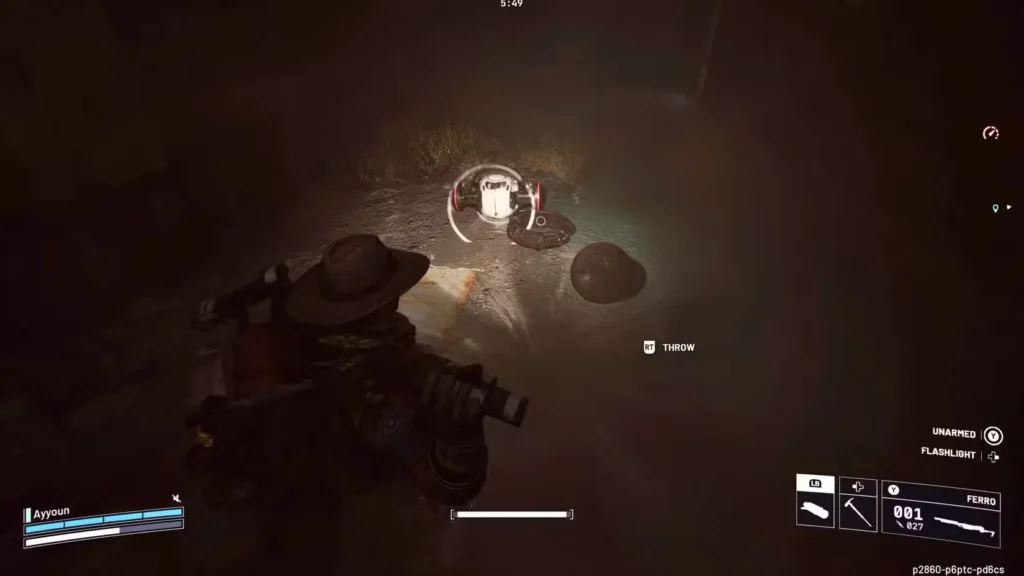
Phase 3: The Actual Throw
Execution:
- Find your target ARC – Ticks or Pops recommended
- Get within throwing range (~10-15 meters)
- Aim at the target – Lead moving enemies slightly
- Throw Fireball Burner using quick-use key
- Watch enemy burn – Fire damage over time
- Confirm destruction – Enemy must die from fire
Critical detail:
The enemy must be destroyed by the fire damage, not by you shooting it afterward. Let the flames do the work. If you shoot and kill it while it’s burning, the quest might not register.
If you miss:
- Use backup Burner
- That’s why you brought 3-4
- No penalty for failed throws beyond wasted Burner
Phase 4: Completion
Final steps:
- Wait for quest update – Should show as completed
- Extract safely – Standard extraction protocol
- Return to Shani at vendor menu
- Collect rewards
Quest rewards:
(Include actual rewards here if known—the original article didn’t specify)
Common Quest Issues
Problem: Quest didn’t register
Possible causes:
- Enemy died from bullets, not fire
- Wrong enemy type targeted
- Server lag delayed registration
- Quest wasn’t active when you threw
Solution: Try again with another Burner on a different target.
Problem: Ran out of Burners
Solution: Extract, farm more Fireballs, return to complete quest.
Problem: Died before extracting after completing objective
Solution: If quest shows completed in log, you should be fine. Verify with Shani.
Efficient Farming Routes
For players needing multiple Burners:
Route 1: Dam Battlegrounds Research Focus
Optimized path:
- Spawn near Research & Administration
- Enter building via safest access point
- Systematically clear floors hunting Fireballs
- Move to Testing Annex if needed
- Extract with Burners
Time: 15-25 minutes per run
Expected yield: 1-3 Fireball Burners
Route 2: Buried City Research Circuit
Alternative route:
- Spawn Buried City near Research facility
- Check Research thoroughly
- Move to Hospital lower levels if empty
- Hit Industrial zones as backup
- Extract
Time: 20-30 minutes per run
Expected yield: 1-2 Fireball Burners
Route 3: Mixed Objective Efficiency
For multi-tasking players:
Combine Fireball hunting with other objectives:
- Cracked Bioscanner farming – Same medical buildings
- Blueprint collection – Research facilities often have these
- Supply Drops – Check while traveling
Efficient raiders always stack objectives per raid.
Advanced Combat Techniques
For experienced players seeking optimization:
Technique 1: Chain Engagement
When multiple Fireballs present:
- Identify all Fireballs in area
- Engage furthest first – Prevents flanking
- Use hatch-shot method for speed
- Loot quickly between kills
- Clear all before looting completely
Why this works:
Fighting multiple Fireballs sequentially is safer than getting surrounded. Kill order matters.
Technique 2: Environmental Exploitation
Use terrain advantages:
- Doorways – Fireballs must approach single-file
- Elevation – Shoot down at them from platforms
- Corners – Break line-of-sight to control engagement
- Explosive barrels – Shoot them near Fireballs for bonus damage
Technique 3: Solo vs. Squad Tactics
Solo optimization:
- Stealth and surprise
- Hit-and-run on single targets
- Conservative resource management
- Quick extractions
Squad optimization:
- Coordinated fire – Multiple players focus one Fireball
- Designated looter – One person collects while others cover
- Overwatch positioning – Someone watches for PvP threats
- Resource sharing – Distribute Burners among team
Common Mistakes to Avoid
Mistake #1: Underestimating Flamethrower Range
The error: Getting too close thinking you’re safe
The fix: Flamethrowers have surprising reach. Maintain at least 10 meters unless executing hatch-shot method.
Mistake #2: Forgetting Fire Extinguishing Mechanics
The error: Standing still while burning, taking full damage
The fix: Sprint and roll immediately when ignited. Movement dramatically speeds up fire extinguishing.
Mistake #3: Using Wrong Weapons
The error: Bringing light ammo weapons exclusively
The fix: Heavy ammo or upgraded weapons make Fireball fights far more manageable.
Mistake #4: Not Securing Quest Items
The error: Collecting Burners without Safe Pocket protection
The fix: Always use Safe Pockets for quest-critical items.
Mistake #5: Completing Quest Without Extraction
The error: Burning an ARC with Burner, then dying before extracting
The fix: Quest only counts after successful extraction. Prioritize getting out alive.
Alternative Uses for Fireball Burners
Beyond What Goes Around quest:
Combat Applications
Tactical uses:
- ARC crowd control – Fire damages multiple enemies
- Denial tool – Creates burning zones enemies avoid
- Panic weapon – Effective against player ambushes
- Harvester engagements – Fire damage is universally effective
Crafting Integration
Workshop applications:
- Upgrade materials for certain modifications
- Component in advanced recipes
- Trade value if trading systems expand
Long-term Value
Don’t just farm the minimum needed for What Goes Around. Fireball Burners remain useful throughout your progression journey. Stock extras in your stash for future needs.
Integration with Other Quests
Fireball farming combines well with several other objectives:
Compatible quests:
- Medical Merchandise – Same Research buildings
- Cracked Bioscanner hunting – Medical facilities overlap
- Blueprint farming – Research areas have both
- General resource farming – Interior buildings have diverse loot
Resource synergy:
While hunting Fireballs, collect:
- Mechanical components
- Rusted gears and tools
- ARC Motion Cores from defeated enemies
- Medical supplies from facility containers
Never make single-objective raids when you can accomplish multiple goals.
Progression Context: Why This Quest Matters
What Goes Around sits in the mid-tier of Shani’s quest progression:
What it teaches:
- Enemy-specific hunting – Targeting particular ARC types
- Resource utilization – Using enemy drops as weapons
- Risk assessment – Close-combat scenarios against dangerous enemies
- Preparation importance – Bringing right gear makes dramatic difference
How it fits progression:
This quest bridges simple collection missions and more complex combat challenges. It requires:
- Moderate combat skill
- Specific gear loadout
- Multi-phase planning (farm, then use)
- Understanding of ARC enemy behavior
Successfully completing What Goes Around demonstrates you’re ready for harder content that combines farming, combat, and strategic thinking.
Final Thoughts on Fireball Burners
Fireball hunting feels more dangerous than it actually is once you understand the combat patterns. These enemies look intimidating with their flamethrowers, but they follow predictable behaviors that skilled players can exploit.
Key takeaways:
- Use heavy ammo weapons (Ferro/Anvil) for efficient kills
- Master hatch-shot technique for speed farming
- Bring 3-4 Burners minimum for What Goes Around
- Let fire damage complete kills during quest
- Extract immediately after quest completion
The What Goes Around quest teaches an important lesson: in ARC Raiders, enemies drop resources that become weapons against themselves. This philosophy extends to many ARC types—understanding how to repurpose enemy drops into tactical advantages accelerates your progression significantly.
Pro tip: After completing the quest, keep farming Fireballs occasionally. Having 5-10 Burners in your stash provides tactical flexibility for future raids. They’re particularly useful when you need reliable ARC damage without using expensive ammunition.
Ready to turn the tables on these flamethrower-wielding spheres? Download ARC Raiders on PlayStation or Xbox and start your pyromaniac robot hunting today.
Good luck with your Fireball farming, and remember—if you catch fire, roll away!
Advertisement