The Raider’s Refuge on Blue Gate is one of those locations that immediately catches your attention — there’s a locked cellar door with four light bulbs that clearly leads to something valuable, but no obvious way to open it. Unlike most loot in ARC Raiders, you can’t just walk up and interact with this one. You need to solve a puzzle first, and that puzzle involves finding four hidden buttons scattered throughout the area.
This isn’t a simple task. The buttons are deliberately hidden in obscure locations, and to make matters worse, their positions randomize with each raid — spawning from a pool of over 20 known locations. That means memorizing one solution won’t help you on your next run. One important rule before you start: the puzzle can only be completed once per session. If another player has already pressed the buttons in your raid, the cellar will be open or the buttons gone entirely.
The reward for your effort? Some of the best loot on the Blue Gate map, including epic crafting materials, legendary weapons, and valuable blueprints. This guide covers every button spawn location, the fastest clearing strategy, and exactly what loot to expect inside the Raider’s Refuge cellar.
Where Is Raider’s Refuge in ARC Raiders? (Blue Gate Map Location)
Raider’s Refuge is a medium loot value POI located in the northwest region of the Blue Gate map. The area consists of a multi-story building with various interior and exterior spaces, along with a mysterious locked cellar that contains premium loot.
Why Raider’s Refuge Matters
High-tier loot concentration: The cellar contains some of the rarest items on Blue Gate, including:
- Epic and Legendary weapons
- Weapon blueprints for crafting advanced gear
- Epic crafting materials like Sentinel Firing Cores
- Valuable trinkets worth significant coins
- Rare resources for workbench upgrades
Consistent value: Unlike random loot spawns that might disappoint, successfully accessing the cellar almost always yields worthwhile rewards.
Blueprint farming potential: For players working on their blueprint collection, Raider’s Refuge cellar is one of the more reliable sources.
The Danger Level
Raider’s Refuge isn’t a walk in the park. The area is a hotspot for both AI threats and hostile players:
ARC enemy presence:
- Rocketeers (multiple units that pose serious firepower threats)
- Snitches (which can call reinforcements if not destroyed quickly)
- Wasps and Hornets (aggressive flying units)
- Spotters (reconnaissance drones)
- Bombardiers (area-denial artillery units)
- Turrets inside the main building (stationary but deadly automated defenses)
Player traffic: The promise of epic and legendary loot attracts experienced Raiders, making PvP encounters likely.
First-time recommendation: If you’re visiting Raider’s Refuge for the first time, bring a free or cheap loadout. Learn the layout, button locations, and escape routes without risking expensive gear. Once you’re familiar with the area, you can return with proper equipment for serious farming runs.

How to Open the Raider’s Refuge Cellar Door – Puzzle Explained
The locked cellar door at Raider’s Refuge has four light bulbs mounted on it. These bulbs serve as your progress indicator—each button you activate illuminates one bulb. When all four bulbs turn green, the door unlocks and you can descend into the basement.
Key Puzzle Mechanics
Randomized button locations: The four buttons spawn in different positions each raid from a pool of common locations. You can’t just memorize a single route and repeat it.
Indoor and outdoor spawns: Buttons can appear both inside the main Raider’s Refuge building and in exterior locations around the property.
Vertical puzzle design: Some buttons require climbing, using ziplines, or accessing elevated positions. This isn’t just a ground-level search.
No time limit: Take as long as you need to find the buttons—there’s no timer counting down. The main pressure comes from enemy threats and other players.
Persistent activation: Once you press a button, it stays activated even if you die or leave the area temporarily (within the same raid).
All Raider’s Refuge Button Locations in ARC Raiders
Since button positions randomize, I’ll break down the most common spawn locations by category. During your search, systematically check these areas until you’ve found all four.
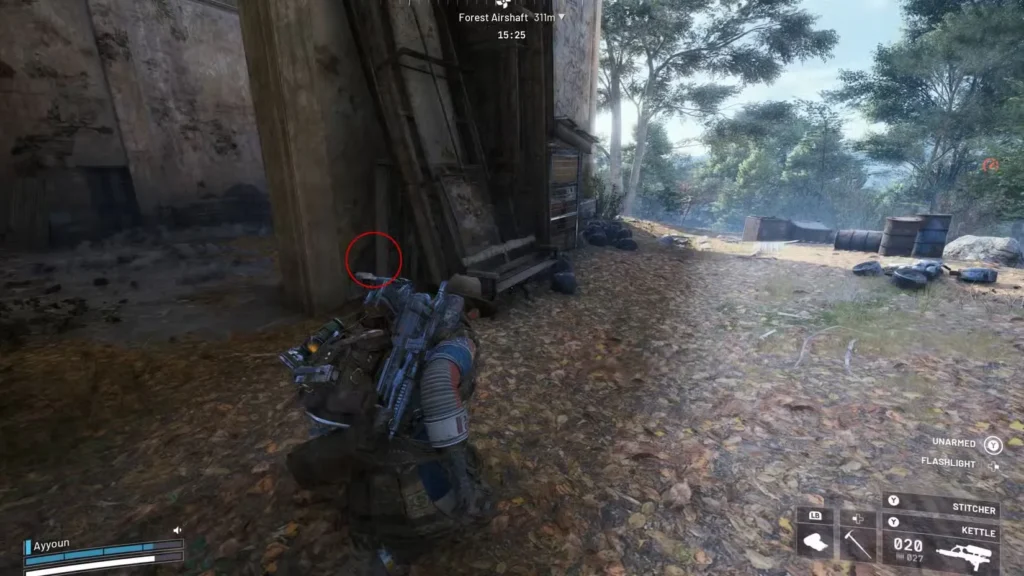
Button Spawn Locations #1: Cellar Door Area
The area immediately around the cellar door itself has several potential button spawns:
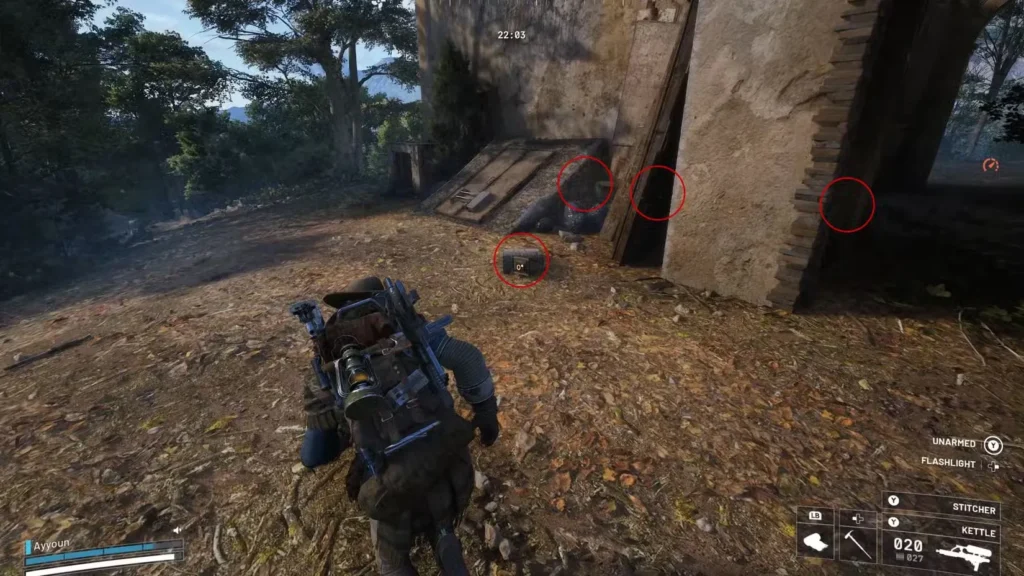
Right side of the cellar door: Check the ground and walls to the right as you face the door. Buttons often spawn in this corner.
Directly in front of the cellar door: Look at the ground right in front of the door—sometimes the button is hiding in plain sight.
Between plank and wall near doorway: There’s a gap between structural elements near the Raider’s Refuge doorway where buttons can hide. Look carefully at wall seams.
Left side of the doorway: Similar to the right side, buttons frequently spawn on the left as well. Check both ground level and slightly elevated positions.
Pro tip: Always start your search at the cellar door itself and work outward. Checking these immediate locations first can save you time if buttons happen to spawn here.
Button Spawn Locations #2 Generator and Doorway Area
The generator and main doorway area offers multiple spawn points:
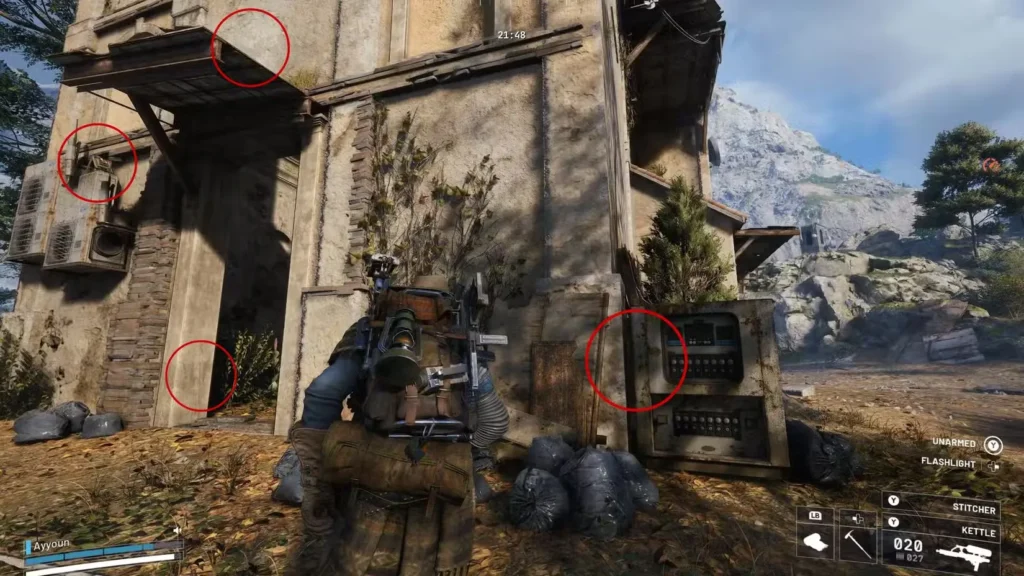
In front of the generator: Face the generator and check the ground directly in front of it. This is a common spawn.
Next to the doorway: Check both sides of the Raider’s Refuge main doorway for buttons on walls or ground level.
On top of the west doorway overhang: This one requires effort. You need to:
- Enter the building and locate the zipline
- Use the zipline to reach a window opening
- Climb through to access the overhang
- Check the top of the overhang for the button
Above outdoor AC units (left side of overhang): Look directly above the exterior AC units on the left side. The button can spawn on the overhang edge here.
Navigation note: The overhang buttons are among the trickiest to reach. If you’re having trouble finding your fourth button, these elevated positions are worth checking carefully.
Button Spawn Locations #3: Collapsed Ceiling Area
Inside Raider’s Refuge, there’s a collapsed ceiling section that creates interesting vertical spaces. Once you climb to the roof and drop through:
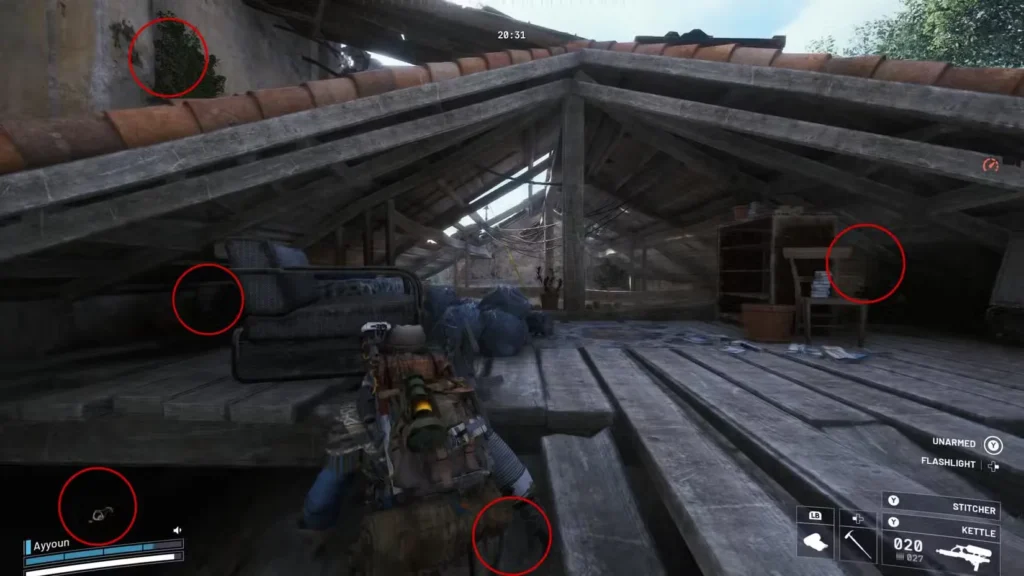
Under floorboards to the left: After dropping through the collapsed ceiling, check under damaged floorboards on the left side.
Behind the long chair: Look behind furniture, specifically the elongated chair/couch in this area.
Behind small shelf to the right: A small shelf on the right side can hide a button behind it.
Beginning of floorboards: Check where the floorboards start—buttons sometimes spawn at these transition points.
On top of roof tiles near the bush: Vegetation and roof tile combinations create hiding spots. Look carefully near any bushes.
Strategy: This area has multiple spawn points, making it statistically likely that at least one button will be here. Always check the collapsed ceiling section thoroughly.
Button Spawn Locations #4: Interior Structural Areas
The interior of Raider’s Refuge has several vertical challenges:
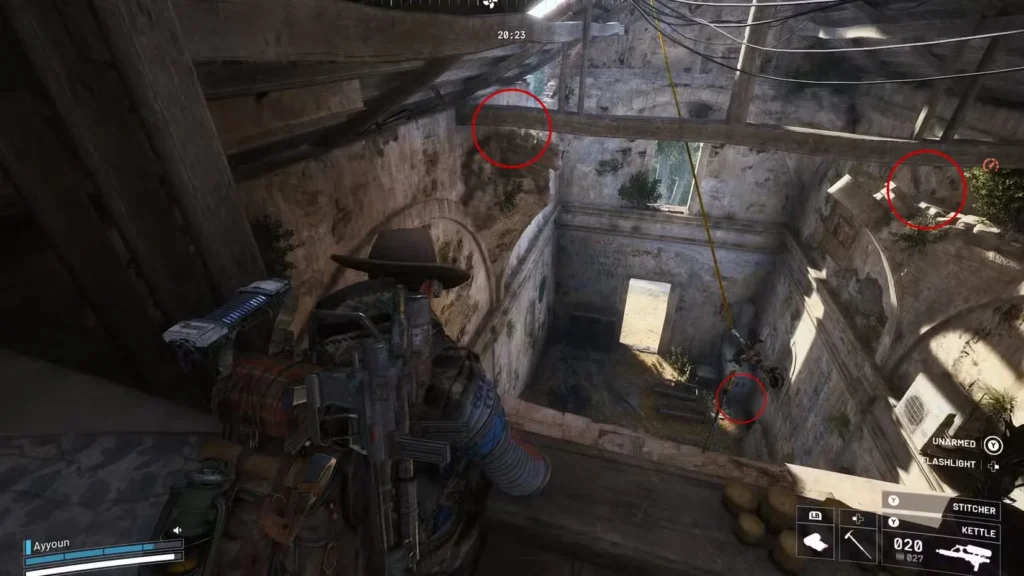
High up on broken structure (left side):
- Use the zipline to gain altitude
- Time your jump correctly to grab a ledge
- Activate the button while on the ledge
- This requires practice and can be frustrating until you nail the timing
Opposite broken structure (right side):
- Use AC units as climbing platforms
- Navigate to the elevated platform
- Activate the button from this position
First floor next to breachable bin: On the ground floor, look near containers and bins you can breach and search. A button often spawns in this area.
Climbing tips: The zipline buttons are among the hardest to reach. If you’re struggling, consider marking these locations for last—check all ground-level positions first before attempting difficult parkour sections.
Button Spawn Locations #5: Watch Tower Area
The watch tower near Raider’s Refuge has two potential button spawns:
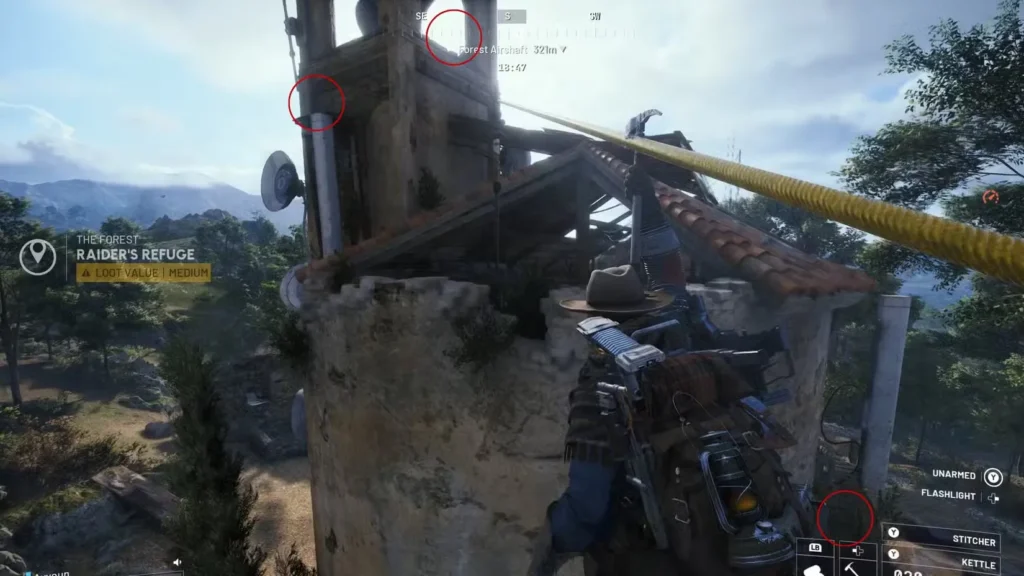
On the overhang below the tower: Look at the structural overhang that connects to or sits below the watch tower platform.
Atop the tower itself: The highest point of the watch tower can have a button spawn.
Two access routes:
- Zipline route: Faster but requires precise navigation
- Ladder inside Raider’s Refuge: Slower but more reliable. The ladder provides safe access to the tower height
Tactical consideration: The watch tower offers excellent visibility for spotting approaching threats. If you need to activate a button here, take a moment to scan for hostile players or ARC enemies before descending.
Button Spawn Locations #6: Northern Entrance
The northern entrance to Raider’s Refuge has a specific spawn point:
Inside fallen steel panels: Near the northern entry, look for collapsed or leaning steel panels. The button can spawn in the gaps and crevices created by these panels.
Identification tip: These steel panels are distinctive and easy to recognize once you know what you’re looking for. This is usually a quick location to check.
Button Spawn Locations #7: Damaged Roof
The roof of Raider’s Refuge provides multiple hiding spots:
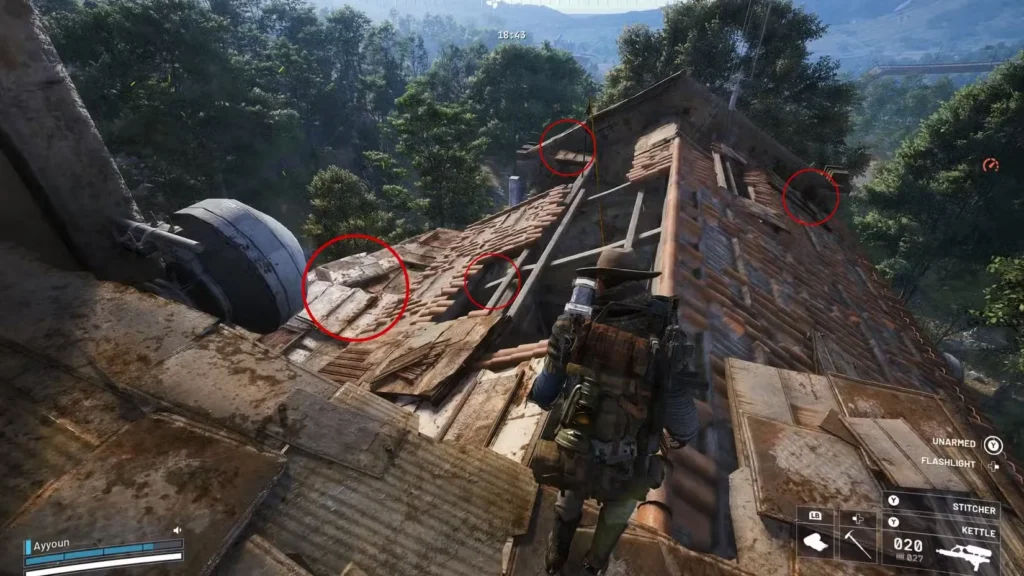
Inside roof tiles: Buttons can be embedded within or between damaged roof tiles. Check carefully—they blend in with the environment.
On makeshift metal roof plates: Temporary metal patching on the damaged roof can hide buttons. Look for irregularities in the roofing material.
Access method: Reach the roof via interior navigation or by climbing exterior structures. Once on top, systematically scan all damaged sections.
How to Find All 4 Buttons Fast – Step-by-Step Strategy
Rather than randomly wandering, use a systematic approach:
Step 1: Ground Level Sweep
Start by checking all ground-level locations:
- Cellar door immediate area
- Generator and doorway positions
- First floor interior spots
- Northern entrance steel panels
This eliminates the easiest locations first.
Step 2: Mid-Level Positions
Check elevated but easily accessible spots:
- Collapsed ceiling area (requires minimal climbing)
- First floor interior structures
- AC unit platforms
Step 3: High-Difficulty Locations
Finally, tackle the challenging positions:
- Zipline-access broken structures
- Watch tower (both routes)
- Roof sections
- Overhang positions
Step 4: Systematic Elimination
As you find buttons, make mental notes of which categories you’ve checked. This prevents redundant searching and helps you narrow down remaining possibilities.
Solo vs. Team Strategy for the Raider’s Refuge Button Puzzle
Solo Strategy
Prioritize safety: Clear ARC enemies before beginning your button search. Trying to hunt buttons while under fire is frustrating and dangerous.
Watch for players: Pause periodically during your search to listen for footsteps or gunfire. Other Raiders will ambush distracted button-hunters.
Use Safe Pockets: If you find valuable loot during your search, store it in Safe Pockets immediately.
Have an escape plan: Know where the nearest extraction point is before you start hunting buttons.
Team Strategy
Divide and conquer: Split up to check different location categories simultaneously. This dramatically speeds up the button hunt.
Assign roles:
- Button hunters focus on finding and activating switches
- Overwatch watches for threats and provides cover
- Loot coordinator handles basement looting once door opens
Communication: Call out which locations you’ve checked and which buttons you’ve found to avoid redundant searches.
Extract together: Coordinate extraction so the entire team leaves with their rewards intact.
What’s Inside the Raider’s Refuge Cellar? (Loot Breakdown)
Once all four buttons are activated and the door opens, descend the ladder into the basement. Here’s what you can expect:
Loot Container Types
Cupboards and drawers: Medium-value containers with crafting materials
Weapon cases: High chance of epic and legendary weapon spawns
Specialized crates: Rare resources and blueprint drops
Trinket spawns: Valuable items worth significant coin when sold
Common Rewards & Rare Drops (Bobcat Blueprint, Security Code)
Based on community findings, the cellar frequently contains:
- Epic crafting materials (including rare components for workbench upgrades)
- Legendary and Epic weapons (fully functional, not just blueprints)
- Weapon blueprints (for crafting additional copies)
- High-value tools (worth thousands of coins)
- Sentinel Firing Cores and other specialized materials
- Rare consumables and utility items
Looting Efficiently
Speed matters: Other players might have heard you enter or seen the opened cellar door. Loot quickly and prepare to defend your position.
Prioritize valuable items: If your inventory space is limited, take legendaries, epics, and blueprints first.
Use Safe Pockets immediately: As soon as you grab valuable items, protect them with Safe Pockets.
Don’t get greedy: Once you’ve secured the best loot, extract. Staying too long increases the risk of losing everything.
Dealing With Threats at Raider’s Refuge
The combination of valuable loot and puzzle-solving creates vulnerability. Here’s how to manage threats:
ARC Enemies
Clear before button hunting: Eliminate or avoid ARC enemies before starting your search. Trying to find hidden buttons while fighting Rocketeers is inefficient.
Turret awareness: The interior turret is particularly dangerous. Learn its firing arcs and either destroy it or navigate around its coverage.
Snitch management: Destroy Snitches immediately to prevent reinforcement calls during your button hunt.
Rocketeer priority: These enemies deal massive damage. Eliminate them first or maintain cover awareness.
Hostile Players
Audio cues: Listen for footsteps, gunfire, or Supply Drop flares that indicate other players nearby.
Ambush points: The cellar door itself is an obvious ambush location. Scan the area before descending into the basement.
Fighting vs. fleeing: Sometimes it’s better to abandon the cellar run and extract with whatever you’ve already found rather than risk losing everything in a fight.
Team advantage: This puzzle is much safer with teammates providing security while you search.
Common Mistakes to Avoid in Raider’s Refuge Runs
Bringing expensive gear on first attempts: Learn the puzzle and area layout with cheap loadouts before risking premium equipment.
Ignoring threats during button hunts: Players often tunnel vision on finding buttons and miss approaching enemies.
Not clearing the interior turret: That turret will ruin your day if you forget about it during frantic button searching.
Looting too slowly: Take forever in the basement and you’re practically inviting other players to ambush you.
Forgetting Safe Pockets: Finding legendary loot means nothing if you die before extraction and lose it all.
Not knowing extraction routes: Plan your exit before opening the cellar. Don’t figure it out while carrying valuable loot with hostiles approaching.
Advanced Raider’s Refuge Farming Tips
Memorize spawn pool: While positions randomize, the pool is finite. The more you run Raider’s Refuge, the faster you’ll find buttons.
Time optimization: Experienced players can complete the puzzle in under 5 minutes. Speed reduces exposure time.
Night raids: Consider running this during night cycles when loot quality increases, though ARC presence also intensifies.
Combine with quests: If you have Blue Gate quests active, complete them on the same run for efficiency.
Resource route: Combine Raider’s Refuge with other Blue Gate farming routes for comprehensive material gathering.
Is Raider’s Refuge Worth the Risk?
For players seeking:
- Legendary weapons – Absolutely worth it
- Epic crafting materials – Yes, high spawn rates
- Blueprint collection – Excellent source
- Coin farming – Very profitable when successful
- Early game progression – Maybe wait until better equipped
Risk vs. reward verdict: For mid to late-game players with decent gear and game knowledge, Raider’s Refuge cellar is one of the best loot opportunities on Blue Gate. The combination of guaranteed high-tier rewards and the ability to repeat the puzzle makes it worthwhile despite the inherent dangers.
For new players, I’d recommend learning the area first with throwaway gear, then returning once you’re comfortable with the layout and mechanics.
Final Thoughts on the Raider’s Refuge Cellar Puzzle
Unlocking the Raider’s Refuge cellar door is one of Arc Raiders’ more engaging environmental puzzles. Unlike simple looting, it requires exploration, problem-solving, and a bit of parkour skill. The randomized button locations keep it fresh across multiple runs, preventing the puzzle from becoming completely trivial once you’ve solved it once.
The real challenge isn’t the puzzle itself—it’s completing it while managing threats from ARC enemies and hostile players. Success requires balancing efficient button hunting with situational awareness and tactical decision-making. Do you clear all enemies first, or try to sneak the puzzle and get out quickly? Do you fight rival players for control of the area, or concede and try again later?
These decisions make each Raider’s Refuge run unique. Combined with the genuinely valuable loot in the cellar, it’s become one of my favorite locations on Blue Gate despite—or perhaps because of—the challenges involved.
Now get out there, find those four buttons, and claim that legendary loot. Just don’t forget to watch the turret, clear those Snitches, and always have an extraction plan ready.
Available on PlayStation and Xbox, Arc Raiders continues to reward players who solve its environmental puzzles. Good hunting, Raider!
Also Check: Blox Fruits Tier List 2026