Straight Record Quest Overview in ARC Raiders
Tian Wen’s “Straight Record” quest introduces a unique challenge in ARC Raiders—finding and disabling an old EMP trap that’s been interfering with raider communications across Dam Battlegrounds. What makes this quest particularly frustrating for first-time players is that the primary location, Victory Ridge, doesn’t appear on your map, forcing you to navigate using environmental landmarks and geographical clues.
Quest Details:
- Quest Giver: Tian Wen
- Location: Victory Ridge (unmarked), Dam Battlegrounds
- Primary Objective: Disable the Old EMP Trap
- Secondary Objective: Activate three power switches in sequence
- Difficulty: Medium (Navigation challenge, puzzle mechanics)
- Completable in: Single raid deployment
What Makes This Quest Unique:
Unlike straightforward collection missions, Straight Record combines navigation challenges with environmental puzzle-solving. The unmarked Victory Ridge location tests your map reading skills, while the power switch sequence requires methodical exploration and interaction with the game’s electrical systems. It’s a quest that rewards patience and thorough investigation over combat prowess.
Straight Record Quest Rewards in ARC Raiders
What You Get for Completing Straight Record
Tian Wen’s Rewards for Straight Record:
- 5x Medium Gun Parts – Essential for weapon upgrades
- 3x Advanced Mechanical Components – Premium crafting materials
Strategic Value:
Medium Gun Parts are perpetually needed for weapon modification and maintenance, making them valuable for any combat-focused build. Advanced Mechanical Components represent high-tier crafting materials used in workbench upgrades and advanced equipment construction.
Reward Comparison:
While not as flashy as weapon unlocks or cosmetics, these crafting materials have sustained utility throughout your entire playthrough. They’re the building blocks for progression rather than immediate tactical upgrades—making this quest particularly valuable for players focused on long-term gear optimization.
How Straight Record Fits Tian Wen’s Questline
Straight Record sits within Tian Wen’s combat and technical-focused quest series:
Related Tian Wen Quests:
- The Right Tool – Early weapon rewards
- Broken Monument – Scrap Yard collection
- Marked for Death – Combat attachments
- Straight Record – Technical puzzle mission
- The Major’s Footlocker – Exclusive blueprint reward
Completing her full questline unlocks progressive weapon upgrades and exclusive equipment unavailable elsewhere.
How to Prepare for Straight Record Quest
Best Loadout for Straight Record Quest
Since this quest focuses on navigation and puzzle-solving rather than combat, your loadout can be relatively light:
Minimal Combat Gear:
- Basic weapon for self-defense
- Light or Medium Shield
- 1-2 healing items
Essential Utility:
- Safe Pocket augment (standard practice)
- Binoculars (helpful for identifying landmarks from distance)
- Zipline (optional—Victory Ridge has some elevation changes)
Free Loadout Viability:
This quest is actually perfect for free loadout runs:
- Minimal combat expected at Victory Ridge
- No valuable items to protect during quest
- Quest completion reward is the goal
- Low player traffic in Victory Ridge area
Squad vs. Solo:
Either approach works well:
- Solo: Quick, stealthy completion
- Squad: Security while solving puzzle, faster landmark identification
Why Victory Ridge is Hard to Find (Hidden Location)
Why Victory Ridge Isn’t Marked:
Victory Ridge functions as a transitional zone between major POIs rather than a destination itself. Think of it as the “between spaces” on the Dam Battlegrounds map—areas that exist geographically but don’t merit their own map marker. This design choice makes sense lore-wise (it’s an abandoned, disrupted area) but creates navigation challenges for quest completion.
Navigation Philosophy:
Instead of following map markers, you’ll use:
- Geographical position relative to marked POIs
- Environmental features (roads, terrain, structures)
- Landmark triangulation (positioning between known points)
- Visual identification of debris and electrical poles
This old-school navigation approach can be refreshing after numerous “follow the waypoint” quests.
How to Find Victory Ridge in ARC Raiders (Complete Map Guide)
Victory Ridge Location on Dam Battlegrounds Map
Location Description:
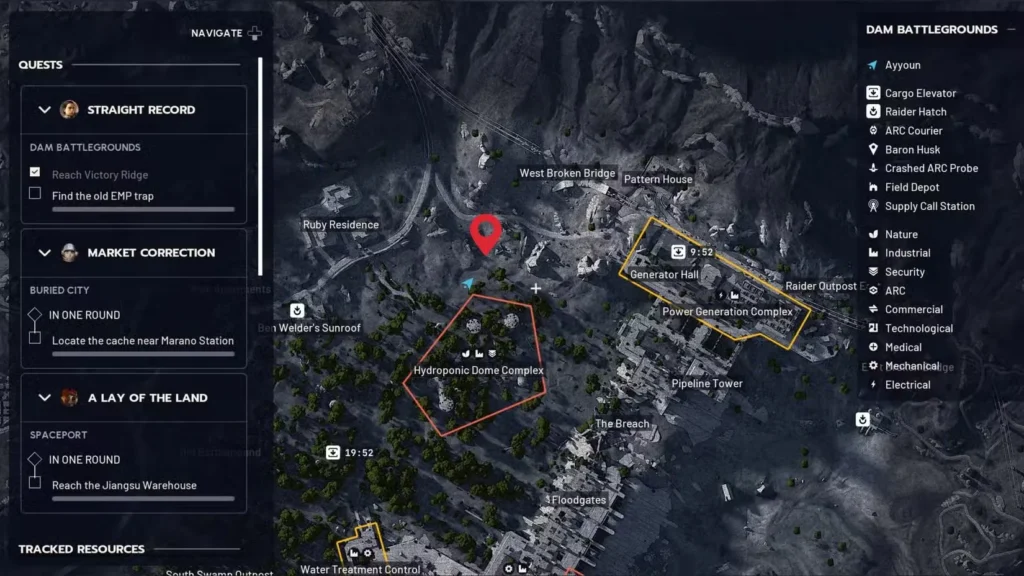
Victory Ridge sits in the northwestern section of Dam Battlegrounds, positioned between two marked POIs that serve as your navigational anchors.
Primary Landmarks:
- West Broken Bridge – Western reference point
- Ruby Residence – Eastern reference point
- Victory Ridge – Unmarked zone between them
Map Coordinates:
While there’s no in-game coordinate system, think of Dam Battlegrounds as a grid:
- Victory Ridge occupies the northwestern quadrant
- Slightly inland from the western map border
- North of the main dam structure
- West of central residential areas
Step-by-Step Route from Each Spawn Point
From Southern Spawns:
- Deploy to Dam Battlegrounds
- Open map and identify West Broken Bridge (marked POI on western side)
- Navigate north and west toward the bridge area
- Before reaching the bridge, scan for Ruby Residence (northeastern reference)
- Victory Ridge lies between these two landmarks
- Look for debris trails and electrical infrastructure
Travel Time: 3-5 minutes depending on spawn location
From Northern Spawns:
- You’re already in the correct general area
- Orient yourself using West Broken Bridge and Ruby Residence
- Head toward the space between these POIs
- Victory Ridge should be within 1-2 minutes travel
From Central/Eastern Spawns:
- Head west from central Dam Battlegrounds
- Pass through or around residential areas
- Look for West Broken Bridge appearing on your western horizon
- Approach the area between the bridge and Ruby Residence
Visual Landmarks to Identify Victory Ridge
Once you’re in the general vicinity, look for these distinctive features:
Primary Indicators:
Debris Field:
- Scattered wreckage and abandoned equipment
- More concentrated than random map debris
- Creates a “something happened here” atmosphere
- Follows a rough path through the area
Electrical Infrastructure:
- Power lines running through the zone
- Electrical poles (some damaged, some intact)
- Yellow-glowing electrical components
- Active electrical cables (visual distinctiveness)
Terrain Features:
- Gentle hillside elevation changes
- Broken-down house structures
- Road or path running through area
- Natural valley or depression between hills
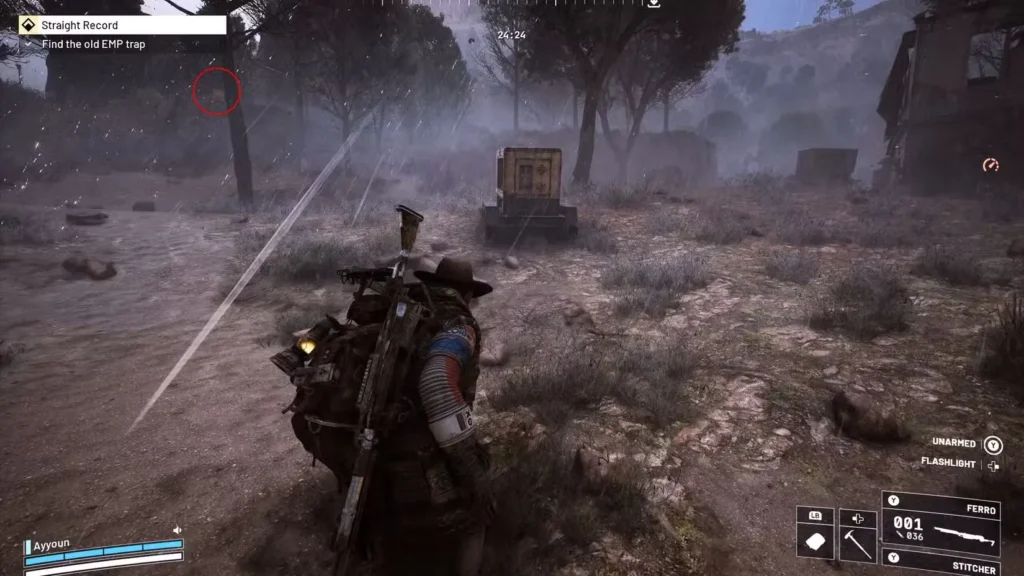
The Confirmation Sign:
You’ll know you’ve found Victory Ridge when you spot an electrical pole with yellow glow—this is the Old EMP Trap itself and confirms you’re in the right location.
Common Victory Ridge Navigation Mistakes to Avoid
Mistake #1: Going Too Far West
- Problem: Reaching West Broken Bridge itself instead of the between-space
- Solution: Victory Ridge is BETWEEN bridges and residence, not at either
Mistake #2: Confusing Similar Areas
- Problem: Other electrical infrastructure exists elsewhere on map
- Solution: Verify position between West Broken Bridge and Ruby Residence
Mistake #3: Searching Marked POIs
- Problem: Looking inside Ruby Residence or at the bridge structure
- Solution: Victory Ridge is the unmarked zone between them
Mistake #4: Not Using Debris Trail
- Problem: Wandering aimlessly in the general area
- Solution: Follow the debris field—it leads to the EMP trap
How to Disable the Old EMP Trap (3-Switch Puzzle Solution)
EMP Trap Puzzle Mechanics Explained
The Old EMP Trap isn’t simply disabled through a single interaction. Instead, you must deactivate three power switches in the surrounding area that supply power to the trap. Only after all three switches are disabled can you shut down the trap itself.
Puzzle Structure:
- Find and interact with Old EMP Trap (initiates puzzle)
- Locate and disable Power Switch #1
- Locate and disable Power Switch #2
- Locate and disable Power Switch #3
- Return to Old EMP Trap for final deactivation
Power Switch Characteristics:
- Small yellow electrical boxes
- Distinctive glowing appearance
- Interaction prompt when approached
- Each switch has unique location
Quest Log Updates:
Your quest tracker updates as you progress:
- After initial EMP interaction: “Find power switches”
- After each switch: “X/3 power switches disabled”
- After all three: “Return to EMP trap”
Step 1: Interact with the Old EMP Trap to Start
Locating the EMP Trap:
- Arrive at Victory Ridge using navigation guide above
- Follow the debris trail through the area
- Look for electrical pole with yellow glow
- Identify the Old EMP Trap (attached to or near the pole)
Visual Description:
- Electrical pole standing prominently
- Yellow/gold electrical glow or sparking
- Distinctive from surrounding environment
- May have cables running to/from it
Initial Interaction:
- Approach the Old EMP Trap
- Interaction prompt appears (“Examine” or “Interact”)
- Activate the interaction
- Puzzle initiates – quest log updates to find power switches
What Happens:
- The trap remains active (you can’t disable it yet)
- Quest objective changes to finding three power switches
- The trap’s location serves as your central reference point
- All three switches are relatively near the trap
Strategic Note: Remember the EMP trap’s exact location—you’ll return here after finding all switches.
Power Switch #1 Location: Hillside Switch (Climb Generator)
The first power switch is the closest to the EMP trap, making it the logical starting point.
Location Description:
- Position: Nearby hill relative to the EMP pole
- Direction: Slight elevation gain from trap location
- Distance: Very close (30-50 meters maximum)
Step-by-Step Directions:
- From the Old EMP Trap, face the nearby hillside
- Identify the elevated terrain (gentle slope upward)
- Navigate up the hill (walking, no climbing required)
- Scan the hilltop area for yellow electrical glow
- Locate the first Power Switch box
Visual Identification:
- Small yellow/gold electrical box
- Mounted on structure or free-standing
- Distinctive glow makes it visible from moderate distance
- Clear interaction prompt when close
Interaction Process:
- Approach the Power Switch
- Interaction prompt appears (“Deactivate” or “Turn Off”)
- Complete the interaction
- Switch powers down (glow may dim or disappear)
- Quest log updates: “1/3 power switches disabled”
Common Issues:
- If you can’t find it, you’re likely on the wrong hill—return to EMP trap and re-orient
- The “nearby” hill is the one most visually connected to the trap
- Look for the yellow glow—it’s your primary navigation tool
Power Switch #2 Location: Destroyed House Back Room
The second switch requires more complex navigation involving a destroyed building structure.
Location Description:
- Position: Broken-down house structure near Victory Ridge
- Access Method: Requires climbing via generator outside
- Floor: Second floor interior, hidden in back room
Step-by-Step Directions:
- From Power Switch #1, descend the hill
- Return toward the EMP trap area (use it as reference)
- Look for the destroyed house structure nearby
- Approach the house from the outside
Identifying the Destroyed House:
- Partially collapsed building
- Two-story structure (or was, before damage)
- Generator equipment outside the building
- Obvious structural damage and debris
Accessing the Second Floor:
- Locate the generator outside the house
- Large industrial equipment
- Positioned against or near the house exterior
- Acts as a step/platform
- Climb onto the generator
- Jump or climb interaction
- Generator provides elevation to reach second floor
- From generator, access the second floor
- May require another jump/climb
- Entry point into upper level
- Damaged wall or opening provides access
Finding Power Switch #2:
- Once inside the second floor area
- Navigate through the damaged interior
- Head toward the back of the structure
- Locate a room in the rear section
- Power Switch #2 is inside this back room
Visual Clues:
- Yellow electrical glow visible inside
- Small electrical box similar to Switch #1
- May be mounted on wall or floor-standing
Interaction Process:
- Approach Power Switch #2
- Activate interaction prompt
- Switch powers down
- Quest log updates: “2/3 power switches disabled”
Navigation Challenges:
This is the most complex switch to reach:
- Multi-step access (generator → second floor → back room)
- Easy to miss the generator climbing mechanic
- Interior navigation through damaged structure
- “Hidden” placement in back room requires thorough searching
Pro Tip: If you can’t find the back room, systematically check every accessible area on the second floor. The yellow glow provides visual confirmation you’re close.
Power Switch #3 Location: Follow the Electrical Cable
The final switch uses a clever environmental navigation clue—following an electrical cable.
Location Description:
- Position: South of the EMP trap
- Navigation Method: Follow fallen electrical cable along road
- Distinctive Feature: Cable visually leads directly to switch
Step-by-Step Directions:
- Return to the Old EMP Trap (your central reference point)
- Face south (away from hills and house)
- Identify the road running through Victory Ridge
- Look for an electrical pole along this road
- Notice the electrical cable fallen from pole to ground
The Cable Trail:
This is the quest’s navigation assistance:
- Electrical cable lies on the ground
- Runs from pole toward the switch location
- Creates a visible path to follow
- Eliminates guessing—just follow the cable
Following the Cable:
- Start at the pole with fallen cable
- Walk alongside the cable as it runs along the road
- Continue following until the cable leads to its destination
- Power Switch #3 is at the cable’s end
Visual Identification:
- Yellow electrical box (consistent with previous switches)
- Cable physically connects to or terminates near the switch
- Located along the road on the southern side
- May be slightly off the road itself
Interaction Process:
- Approach Power Switch #3
- Activate interaction prompt
- Switch powers down
- Quest log updates: “3/3 power switches disabled”
Why This Design Is Clever:
The fallen cable mechanic teaches environmental awareness—the game world provides navigation clues if you observe your surroundings. This switch is actually the easiest to find once you notice the cable, despite being farthest from the trap.
Final Step: Return and Disable the Old EMP Trap
With all three power switches deactivated, you can now complete the quest objective.
Return to the EMP Trap:
- Navigate back to the central electrical pole with yellow glow
- The Old EMP Trap should still be visible/accessible
- Approach the trap for final interaction
Final Deactivation:
- Interaction prompt appears (may say “Disable” or “Deactivate”)
- Complete the interaction
- EMP Trap powers down completely
- Quest completion notification
- Quest log confirms: “Straight Record – Complete”
Visual/Audio Feedback:
- EMP trap may stop glowing
- Electrical sounds cease
- Possible animation of shutdown
- Clear confirmation the puzzle is solved
What Happens if You Try Before All Switches:
If you attempt to disable the trap before finding all three switches:
- Interaction won’t complete the deactivation
- Quest log reminds you switches remain active
- Must find remaining switches first
- No penalty—just returns you to switch-hunting
How to Extract and Complete Straight Record Quest
Safe Extraction Routes from Victory Ridge
Extraction Strategy:
- Quest objectives complete – no need to linger
- Head to nearest extraction point
- Victory Ridge is relatively isolated – low player traffic
- Extract safely back to Speranza
Nearest Extraction Points:
From Victory Ridge in northwestern Dam Battlegrounds:
- Western Return Points – Closest options
- Northern extraction zones – Also nearby
- Check map for active Return Points
Safety Considerations:
Victory Ridge’s isolation works in your favor:
- Low player traffic (not a loot hotspot)
- Minimal ARC presence in immediate area
- Quick quest completion reduces exposure time
- Most players don’t know Victory Ridge exists
Threat Level: Low – this is one of the safer quests for extraction
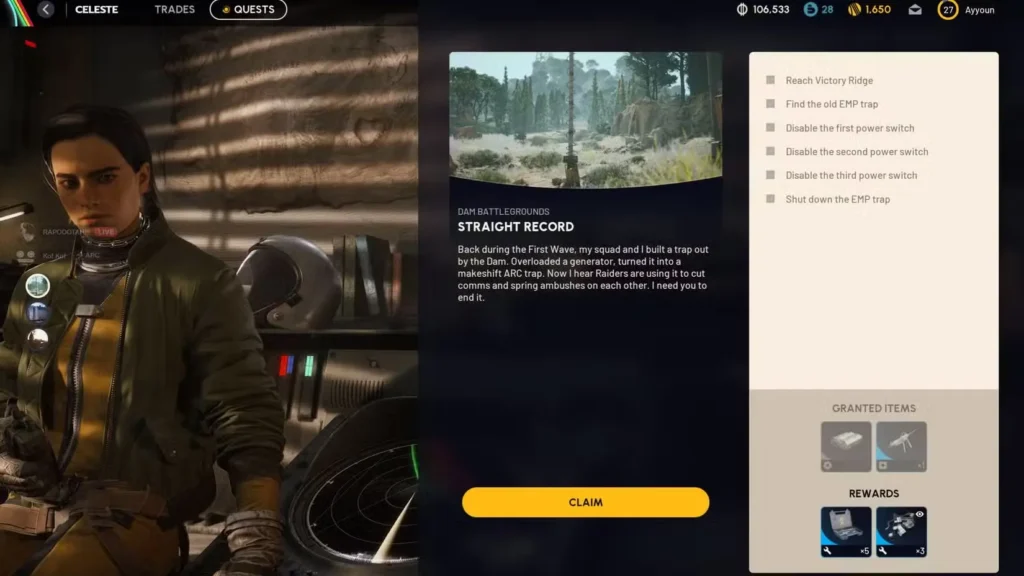
How to Claim Your Straight Record Rewards
Back in Speranza:
- Navigate to Traders/Vendors tab
- Select Tian Wen
- Complete “Straight Record” quest
- Receive rewards:
- 5x Medium Gun Parts
- 3x Advanced Mechanical Components
Immediate Reward Uses:
Medium Gun Parts:
- Weapon modifications at Gunsmith
- Attachment crafting requirements
- Weapon upgrade materials
- Trade value if excess
Advanced Mechanical Components:
- Workbench upgrades (higher tiers)
- Advanced equipment crafting
- High-tier item requirements
- Valuable for progression systems
Stockpiling Strategy:
These materials are constantly needed:
- Don’t sell unless desperate for coins
- Accumulate reserves for future crafting
- Prioritize workbench upgrades first
- Save some for unexpected crafting needs
Straight Record Quest Troubleshooting (7 Common Problems Solved)
Problem #1: Can’t Find Victory Ridge on the Map
Problem: Wandering Dam Battlegrounds unable to locate the unmarked area
Solution:
- Use West Broken Bridge and Ruby Residence as anchors
- Victory Ridge is BETWEEN them, not at either location
- Look for debris field and electrical infrastructure
- Northwestern Dam Battlegrounds quadrant
- Follow roads connecting the two marked POIs
Problem #2: Found Victory Ridge but EMP Trap is Missing
Problem: In the general area but don’t see the glowing electrical pole
Solution:
- Look for the most prominent electrical pole
- Yellow/gold glow is distinctive
- Follow debris trail toward electrical infrastructure
- Pole should be clearly visible once you’re actually in Victory Ridge proper
- May need to explore small radius (100-meter circle)
Problem #3: Can’t Locate Power Switch #1 (Hillside)
Problem: Hillside switch seems invisible
Solution:
- “Nearby hill” means within sight of EMP trap
- Face each direction from trap and scan hillsides
- Yellow glow is your primary indicator
- Don’t go too far—it’s close to the trap
- Try climbing every small elevation near trap
Problem #4: Generator Climbing Not Working (Fix)
Problem: Can’t figure out how to reach destroyed house’s second floor
Solution:
- Generator must be climbed first (acts as step)
- Jump onto generator, then jump to second floor access
- Look for openings in damaged wall at generator height
- May require positioning on specific side of generator
- Try different angles and jump combinations
Problem #5: Can’t Find the Back Room in Destroyed House
Problem: On second floor but Power Switch #2 isn’t visible
Solution:
- “Back room” means farther from your entry point
- Check every accessible area systematically
- Yellow glow guides you—get close and look around corners
- May be in a smaller room off main second floor space
- Try entering from different angles
Problem #6: Electrical Cable is Hard to See (Visual Guide)
Problem: Can’t identify which cable to follow for Switch #3
Solution:
- Look for pole with cable fallen TO THE GROUND (not suspended)
- Cable should be lying on or near the road surface
- Physical trail on ground, not just hanging cable
- South of EMP trap specifically
- Only one cable should be clearly fallen and followable
Problem #7: All Switches Active but EMP Trap Won’t Disable
Problem: All three switches off but EMP trap won’t deactivate
Solution:
- Verify quest log shows “3/3 switches disabled”
- Try moving away and returning to trap
- Ensure you’re interacting with trap itself, not just the pole
- Look for changed interaction prompt
- Worst case: extract and redeploy (progress may save)
Advanced Straight Record Quest Strategies (Save Time)
Most Efficient Route for Straight Record Quest
Optimal Switch Order:
- Start at EMP trap (initial interaction)
- Power Switch #1 first (closest – hillside)
- Power Switch #2 second (destroyed house)
- Power Switch #3 third (cable following)
- Return to trap (final deactivation)
Why This Order:
- Minimizes backtracking
- Natural progression outward from trap
- Switch #3’s cable is easiest to spot after seeing other switches
- Logical navigation flow
Time Estimate: 10-15 minutes total from entering Victory Ridge to quest completion
Speed Run Strategy (Under 10 Minutes)
For players familiar with locations:
- Deploy knowing exact Victory Ridge position
- Sprint directly to EMP trap (minimal scouting)
- Memorized switch locations enable direct pathing
- Complete all three switches in 5 minutes
- Quick trap deactivation and extraction
Requirements:
- Perfect location knowledge
- Memorized switch positions
- Confidence in navigation
- Previous successful completion
First-Timer Approach (Beginner-Friendly)
For cautious completion:
- Take time finding Victory Ridge (no rush)
- Screenshot or mark EMP trap location mentally
- Thoroughly explore each switch area
- Follow directions step-by-step
- Don’t stress about efficiency on first attempt
Philosophy: Understanding the quest beats speed. First completion teaches you for future runs.
Squad Coordination Tips for Straight Record
Team Benefits:
- Split searching: One player per switch simultaneously
- Communication: Call out switch locations found
- Security: One player guards while others search
- Shared knowledge: Everyone learns locations together
Limitation: Quest completion only counts for player who interacts with final trap
How to Combine Straight Record with Other ARC Raiders Quests
Best Quests to Stack with Straight Record
Victory Ridge’s location in northwestern Dam Battlegrounds positions it near several other quest zones:
Nearby Quests:
- Ruby Residence area quests
- Northwestern residential zone objectives
- Other Tian Wen missions on this map
Strategy: Complete Straight Record alongside other northwestern objectives to maximize raid efficiency.
Victory Ridge Loot Opportunities (Bonus Rewards)
While Victory Ridge isn’t a loot hotspot:
- Destroyed house may contain standard containers
- Area around EMP trap sometimes has misc items
- Don’t expect high-value loot
- Consider it a quest-only location
Recommendation: Don’t plan Victory Ridge for loot farming—it’s quest-focused.
Other Tian Wen Quests in Dam Battlegrounds
Progression Path:
Complete these in sequence for optimal rewards:
- The Right Tool – Early weapons
- Broken Monument – Scrap Yard mission
- Straight Record – Technical puzzle (this quest)
- Marked for Death – Combat attachments
- Additional advanced Tian Wen quests
Each completion unlocks better rewards and continues her storyline.
Final Tips for Straight Record Quest Success
The Straight Record quest exemplifies ARC Raiders’ environmental storytelling and navigation challenges. By making Victory Ridge unmarked, the developers force players to navigate like actual survivors—using landmarks, terrain features, and observational skills rather than GPS waypoints. The EMP trap puzzle adds mechanical interaction beyond simple “go here, collect this” objectives.
For players frustrated by the lack of waypoint markers, remember: this is intentional design. The quest teaches map reading and environmental awareness—skills that transfer to every other activity in the game. Once you’ve found Victory Ridge and disabled that first EMP trap, subsequent completions become trivially easy. The learning curve is the challenge, not the execution.
The rewards—Medium Gun Parts and Advanced Mechanical Components—represent solid progression materials that maintain value throughout your entire playthrough. While not flashy like new weapons, these components are the infrastructure of improvement, enabling the upgrades that make future content more manageable.
Whether you complete this solo in 15 focused minutes or take 30 minutes exploring with a squad, the satisfaction of solving the unmarked location puzzle and successfully deactivating all three switches makes Straight Record one of the more memorable quest experiences in Tian Wen’s campaign.
Available Now: PlayStation | Xbox | Official Site
Did Victory Ridge’s unmarked location frustrate you or feel like a fun navigation challenge? Share your Straight Record completion stories and power switch hunting strategies in the comments!