Master all Recon challenges in Battlefield 6 to unlock C4, Tracer Darts, and exclusive skins. Complete guide with strategies, tips, and optimal game modes.
Why Recon Challenges Matter More Than You Think
In Battlefield 6, class restrictions have loosened considerably—you can run around with an SMG as a Recon or slap on a sniper rifle as Assault. But here’s the catch: some of the most game-changing equipment is still locked behind class-specific challenges, and Recon has some of the most impactful unlocks in the entire game.
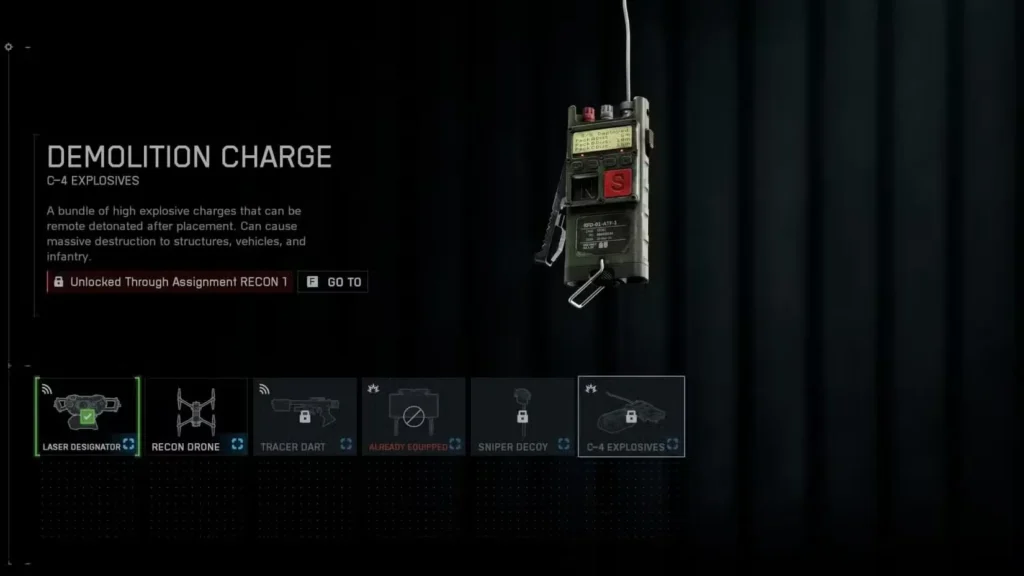
We’re talking about C4 explosives—arguably one of the most versatile tools in Battlefield’s sandbox. Want to ambush tanks? C4. Need to clear a building? C4. Feeling creative with vehicle takedowns? You guessed it—C4. But you won’t get access to it until you complete Recon 1.
Beyond the practical unlocks, these challenges push you to actually use Recon’s intelligence-gathering role properly, which makes you a better teammate and a more well-rounded player.
The Rank 20 Requirement
Before you can even start chipping away at these challenges, you need to hit Rank 20 in multiplayer. It’s five ranks earlier than weapon challenges (which unlock at Rank 23), but it’s still a barrier that keeps beginners from rushing into specialized progression.
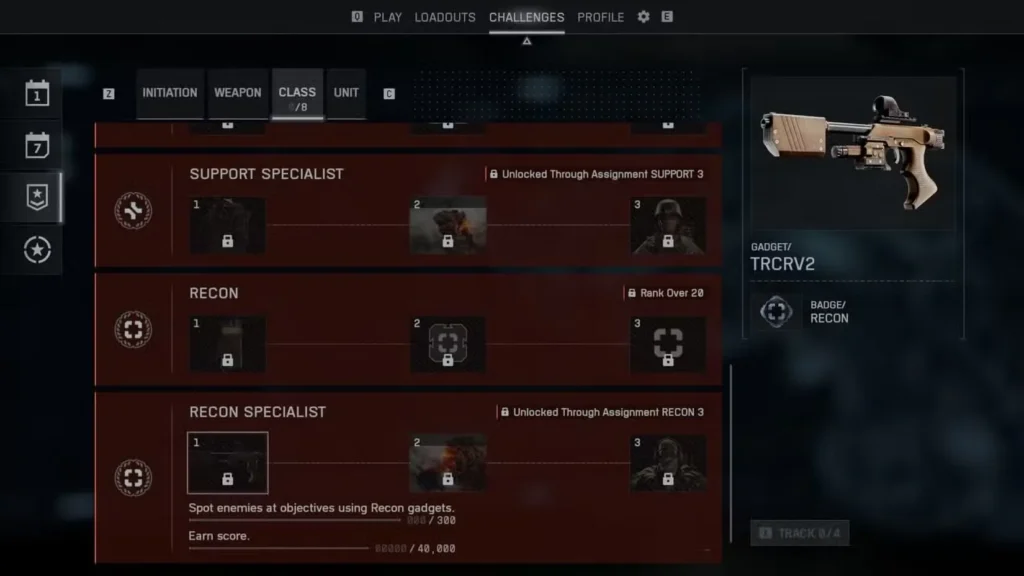
Once you’ve crossed that threshold, navigate to Main Menu > Challenges > Assignments > Class to track your Recon progress.
Recon Class Challenges (The Foundation)
These three challenges must be completed before you can access the Specialist tier. Let’s break down what you’re facing:
Recon 1: Unlocking C4 Explosives
Requirements:
- Spot 250 enemies in objective areas using Recon gadgets
- Earn 10,000 score
Reward: C4 Explosives
Strategy Breakdown:
This challenge is all about gadget placement and patience. Here’s the smart approach:
- Motion Sensors are your best friend – Place them on high-traffic objectives, especially choke points where enemies funnel through
- Objective areas only – Spots outside objectives don’t count, so focus your gadgets on capture points
- Prioritize contested objectives – Placing sensors on the active frontline objectives yields far more spots than backline flags
- Passive progress – You don’t need to be camping near your sensors; let them do the work while you play normally
Best Game Mode: Conquest on large maps. Multiple objectives mean multiple sensor placements, and the constant back-and-forth over flags ensures steady spot generation.
The 10,000 score requirement will complete itself naturally as you play Recon, so don’t stress about it separately.
Recon 2: Spec Ops Training Path
Requirements:
- Get 50 headshot kills beyond 150 meters as Recon
Reward: Spec Ops Training Path
The Reality: This is essentially a mini version of the Deadeye challenges. Fifty headshots at 150+ meters isn’t a casual ask—it requires genuine sniping skill and the right battlefield conditions.
Tips for Success:
- Use the Range Finder attachment – Automatically zeros your scope and eliminates guesswork
- Pick wide-open maps – Liberation Peak, Operation Firestorm, or any map with long sightlines
- Play Conquest, not Breakthrough – You need distance, and Breakthrough often forces closer engagements
- Target enemy snipers first – They’re typically stationary and at proper distances
- Be patient – Forcing shots leads to misses; wait for clean opportunities
If you’re struggling with long-range accuracy, the Deadeye challenges guide has detailed sniping tips that apply here too.
Recon 3: Decoy Master
Requirements:
- Trick 30 enemies into shooting your Sniper Decoy
Reward: Head Count Player Card Icon + Dead Eye Character Patch
How Sniper Decoys Work:
The Sniper Decoy is a deployable gadget that creates a fake “sniper glint” to bait enemy players into revealing their position. When enemies shoot it, you get credit toward this challenge.
Placement Strategy:
- Mimic real sniper positions – Place decoys where actual snipers would set up (hilltops, building windows, ruins)
- Use high-traffic sightlines – Areas where enemy snipers naturally scan for threats
- Deploy during active firefights – Enemies are more trigger-happy when combat is chaotic
- Multiple decoys – You can place several; spread them across different angles
- Check back periodically – Decoys can sit for a while before someone finally shoots them
Pro Tip: This challenge sounds gimmicky, but it’s actually quite easy if you’re strategic. Place decoys at the start of rounds when everyone’s scanning for threats, and let them work passively while you focus on other objectives.
Recon Specialist Challenges (Advanced Tier)
Once you’ve completed the foundational three, you unlock the Specialist challenges. These are more demanding and require deeper understanding of Recon’s support role.
Recon Specialist 1: TRCRV2 Tracer Dart
Requirements:
- Spot 300 enemies at objectives using Recon gadgets
- Earn 40,000 score
Reward: TRCRV2 Tracer Dart
What Changed: This is basically Recon 1 on steroids. More spots required, more score needed, but the strategy remains identical—just keep those Motion Sensors on active objectives.
Efficiency Tips:
- Sensor uptime is everything – Destroyed sensors don’t spot enemies; check them periodically and redeploy as needed
- Coordinate with your squad – If your squad is pushing an objective, place sensors there for maximum spot generation
- Don’t neglect score – 40,000 score is significant; play the objectives, assist teammates, and use your Recon gadgets liberally
Recon Specialist 2: Team Player Challenge
Requirements:
- Laser Designate targets that sustain 2,000 damage
- Mark 25 vehicles using the Tracer Dart
Reward: Recon Mission Player Card Background
The Dependency Problem:
Here’s where things get frustrating—your success depends on your teammates actually following through. You can perfectly laser designate a tank, but if no one shoots it, you get nothing.
How to Maximize Success:
- Play with a squad – Communicate via voice chat or text; coordinated teams complete this exponentially faster
- Target high-value vehicles – Designate tanks and helicopters that are actively threatening your team (teammates are more likely to shoot obvious threats)
- Use the Tracer Dart liberally – Mark every vehicle you see; even if they don’t get destroyed, you get credit for the mark
- Play vehicle-heavy modes – Conquest and Breakthrough on maps with lots of armor
- Be persistent – Some matches your team will ignore designations; others they’ll obliterate everything you mark
Reality Check: This is probably the most annoying Specialist challenge because it’s largely outside your control. Be patient and remember that marking 25 vehicles is purely about tagging, not destroying.
Recon Specialist 3: The Final Boss
Requirements:
- Get 10 headshot kills beyond 200 meters as Recon in a single match
- Deal 3,000 damage with Demolition Charges or Anti-Personnel Mines
Reward: Rain Wrapped Character Skin (NATO) + Dead Sight Character Skin (Pax Armata) + Silent Strike Player Card Title
Why This Is Brutal:
Ten headshots beyond 200 meters in a single match is legitimately difficult. You need:
- A map with appropriate sightlines
- Enemies who don’t ragequit after you dome them repeatedly
- Enough time in the match to reach 10 kills
- Consistent accuracy under pressure
Strategy for the Headshot Requirement:
- Play Conquest on massive maps – You need time (long matches) and space (200+ meter engagements)
- Focus entirely on sniping – Forget objectives temporarily; this challenge demands full attention
- Target enemy Recon players – They’re stationary and at proper distances
- Don’t tilt after 7-8 kills – The pressure to get those final headshots can cause rushed, missed shots
The Damage Requirement:
This one’s actually easy by comparison. C4 and Anti-Personnel Mines rack up damage quickly:
- C4 on vehicles – A single tank kill can give you 500+ damage
- Mine clusters near vehicle spawns – Guaranteed damage when enemies roll out
- Defend chokepoints with mines – Infantry stepping on mines counts too
For more explosive strategies, check out the Danger Close challenges guide.
Best Game Modes and Maps for Recon Challenges
For Spotting Challenges (Recon 1 & Specialist 1):
- Conquest on any large map – Multiple objectives = multiple sensor placements
- Breakthrough (defense) – Attackers funnel into predictable areas
For Long-Range Headshots (Recon 2 & Specialist 3):
- Conquest on Liberation Peak – Wide-open terrain with minimal cover
- Operation Firestorm – Classic long-sightline map
- Avoid close-quarters maps entirely – You need space
For Vehicle-Related Challenges (Specialist 2):
- Conquest with heavy armor presence
- Breakthrough on vehicle-heavy maps
- Squad up for best results
Essential Recon Loadout for Challenge Completion
Gadget Priority:
For Spotting Challenges:
- Primary Gadget: Motion Sensor (mandatory)
- Secondary Gadget: Sniper Decoy (if working on Recon 3) or Laser Designator (for Specialist 2)
For Combat Challenges:
- Primary Gadget: C4 or Anti-Personnel Mines (once unlocked)
- Secondary Gadget: Laser Designator or Spawn Beacon
Weapon Setup for Long-Range Challenges:
- Weapon: High-damage sniper rifle
- Optic: 8x-12x scope for 200+ meter engagements
- Barrel: Extended barrel for bullet velocity
- Attachment: Range Finder (non-negotiable for precision work)
For comprehensive weapon recommendations, see the complete weapons list guide.
Time Investment Reality Check
Let’s be honest about how long these challenges take:
Recon 1-3 (Foundation Tier):
- Recon 1: 3-5 hours (mostly passive with good sensor placement)
- Recon 2: 5-8 hours (depends heavily on sniping skill)
- Recon 3: 1-2 hours (easiest if you’re strategic with decoy placement)
Total Foundation Tier: ~10-15 hours
Specialist Tier:
- Specialist 1: 5-7 hours (more of the same from Recon 1)
- Specialist 2: 4-8 hours (teammate-dependent; frustration may vary)
- Specialist 3: 8-15 hours (that 10-headshot-in-one-match requirement is brutal)
Total Specialist Tier: ~17-30 hours
Grand Total: Expect to invest 30-45 hours to fully complete all Recon challenges. It’s a significant grind, but the unlocks and cosmetics are worth it if you enjoy the Recon playstyle.
Common Mistakes to Avoid
Mistake #1: Placing sensors in bad locations
Random sensor placement in low-traffic areas wastes time. Always prioritize active, contested objectives.
Mistake #2: Forcing long-range shots
Patience is critical for headshot challenges. Rushed shots miss, and misses waste time you could spend waiting for clean opportunities.
Mistake #3: Solo grinding vehicle challenges
Specialist 2 is exponentially easier with a coordinated squad. Don’t suffer alone.
Mistake #4: Ignoring the Sniper Decoy challenge
It’s the easiest challenge if you do it passively from the start. Don’t leave it for last.
Mistake #5: Playing close-quarters modes for long-range challenges
Obvious, but people do it anyway. Pick the right maps for the right challenges.
Are These Challenges Worth Completing?
Absolutely, especially for C4.
Even if you’re not a dedicated Recon player, C4 is universally useful across all classes. It’s one of the most versatile tools in Battlefield 6, and having it unlocked opens up countless tactical options.
The Tracer Dart is situational but incredibly powerful in vehicle-heavy matches. The cosmetic rewards are nice bonuses for players who enjoy showing off their dedication.
If you plan to main Recon or want to be a well-rounded player with all tools available, these challenges are essential. The long-range headshot requirements will also make you a significantly better sniper, which translates to easier completion of the Deadeye challenges.
Official Resources and Community
Connect with the Battlefield 6 community and official channels:
- Official EA Battlefield 6 Page
- Battlefield 6 on Steam
- PlayStation Store – Battlefield 6
- Epic Games Store – Battlefield 6
- Battlefield 6 Reddit Community
Embrace the Recon Grind
Recon challenges are some of the most varied in Battlefield 6, demanding everything from passive gadget placement to clutch long-range sniping. They’ll test your patience, precision, and teamwork—but they’ll also make you a more complete player.
Start with the foundation tier to unlock that crucial C4, then decide if you want to push for the Specialist rewards. The cosmetics are cool, but C4 alone makes the initial grind worthwhile.
Now get out there, plant those sensors, and start stacking headshots. Those exclusive skins aren’t going to unlock themselves.