Ashes of the Damned is easily one of the most intense zombie experiences in Black Ops 7—and if you’re going in unprepared, you’re probably respawning faster than you’d like. I’ve spent considerable time grinding through this map, and the difference between a solid loadout and just “winging it” is absolutely night and day. This guide breaks down exactly what you need to equip to handle both the easter egg steps and that brutal final boss encounter.
The key isn’t just picking random weapons and hoping for the best. Every attachment, every perk, and every piece of equipment serves a specific purpose during the Ashes of the Damned boss fight. Let’s walk through the setup that actually works.
Weapon Setup: Your Primary Arsenal
Why the M15 MOD 0 Matters
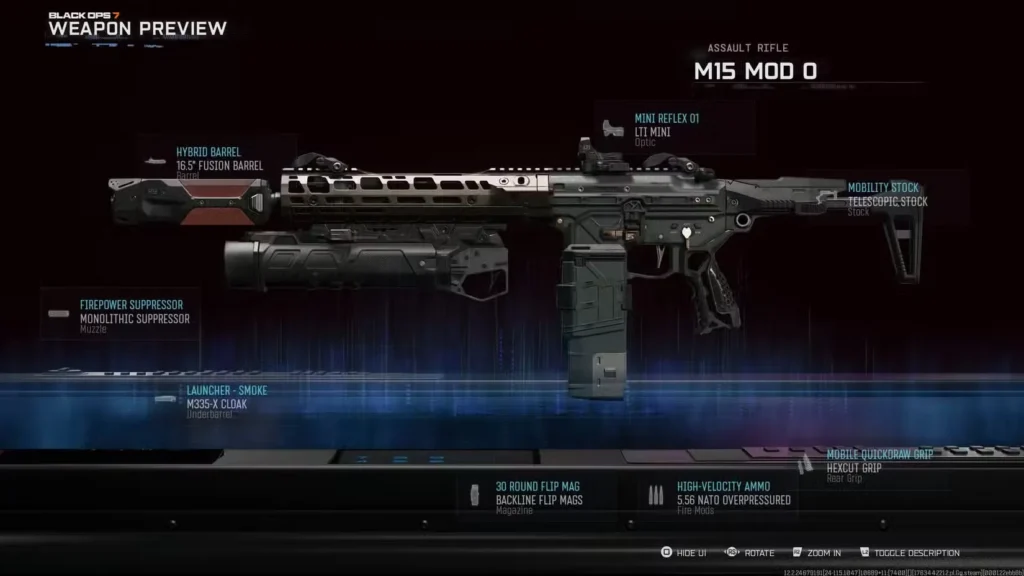
The M15 MOD 0 is an underrated workhorse in Ashes of the Damned. Yes, it’s technically an early-game assault rifle, but don’t sleep on it—this is exactly why many experienced players stick with it throughout the map. The beauty of this weapon is accessibility combined with raw effectiveness once you layer on the right attachments.
Build Code: A01-2KGEJ-YVLPG-YD11
Here’s the attachment breakdown and why each one pulls its weight:
| Attachment | Slot | Why You Need It |
|---|---|---|
| Monolith Suppressor | Muzzle | Boosts damage range + bullet velocity and gives extra salvage per kill — giga efficiency |
| 16.5″ Fusion Barrel | Barrel | Extends effective range and keeps your rounds moving fast |
| M335-X Cloak | Underbarrel | Clutch for boss fights — smoke grenades let you cloak while fixing Ol’ Tessie |
| Backline Flip Mags | Magazine | Faster reloads = fewer panic moments and better uptime |
| Hexcut Grip | Rear Grip | Speed boosts to ADS + movement actions — stay snappy |
| Telescopic Stock | Stock | Better hipfire + improved strafing mobility — movement is life |
| 5.56 NATO Overpressured | Fire Mods | Pushes bullet velocity even higher for peak lethality |
The M335-X Cloak is non-negotiable. During the boss fight, Ol’ Tessie explodes repeatedly, and you’ll be frantically repairing it while surrounded. Those smoke grenades give you breathing room that you simply can’t get otherwise.
The Secondary: Necrofluid Gauntlet
Your secondary weapon choice isn’t a traditional gun—it’s the Necrofluid Gauntlet, and it’s absolutely broken in the best way possible. This wonder weapon deals obscene damage and includes a health-siphoning mechanic that triggers on melee strikes, reloads, and alternate fire. In regular rounds, this thing can carry you through solo.
However—and this is important—don’t get tempted to venture far from Ol’ Tessie during the boss arena. The Gauntlet is backup; your rifle is the workhorse. Your job is repair, survive, and manage the immediate area.
Check out our full breakdown on best weapons for Zombies to understand other options at your disposal.
Perks: Your Survival Backbone
Five perks stand out above the rest for Ashes of the Damned. This isn’t about grabbing every perk available—it’s about maximizing what keeps you alive.
The Essential Five:
- Jugger-Nog – Extra health is foundational. Pair this with proper augments and your effective health pool becomes substantial
- Quick Revive – Works overtime here, speeding up both healing and revival
- Speed Cola – Armor application and reload speed matter more than you’d think during chaotic moments
- Stamin-Up – Movement speed is survival. You need to reposition quickly around Ol’ Tessie
- Melee Macchiato – Boosts melee damage significantly, which matters if you’re using the Necrofluid Gauntlet

Perk Augments: The Game Changers
Augments separate average players from those who consistently win. Here’s where to invest:
Jugger-Nog Augments:

- Iron Core – Additional health pool when armor plates break
- Durable Plates – Extends how long your armor actually lasts before shattering
Quick Revive Augments:
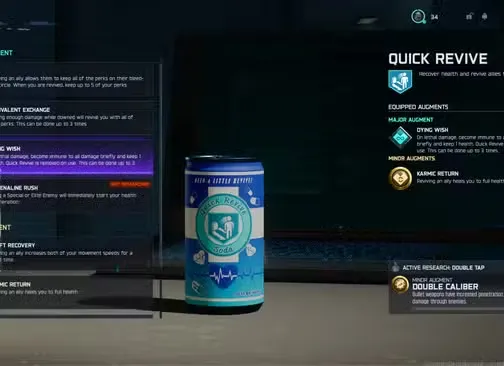
- Dying Wish – Grants temporary invulnerability when you’d otherwise take lethal damage (you lose the perk but keep your life and other perks)
- Karmic Return – Reviving allies restores your health to full in co-op scenarios
Pro tip: Dying Wish is incredibly clutch. It essentially gives you a second chance during the boss fight’s most chaotic moments. Treat it as a get-out-of-jail-free card.
For a deeper dive into perk strategy, check out our complete perk tier lists to understand the meta better.
Equipment: Your Lifeline in Tight Spots
Tactical Equipment: Cymbal Monkey
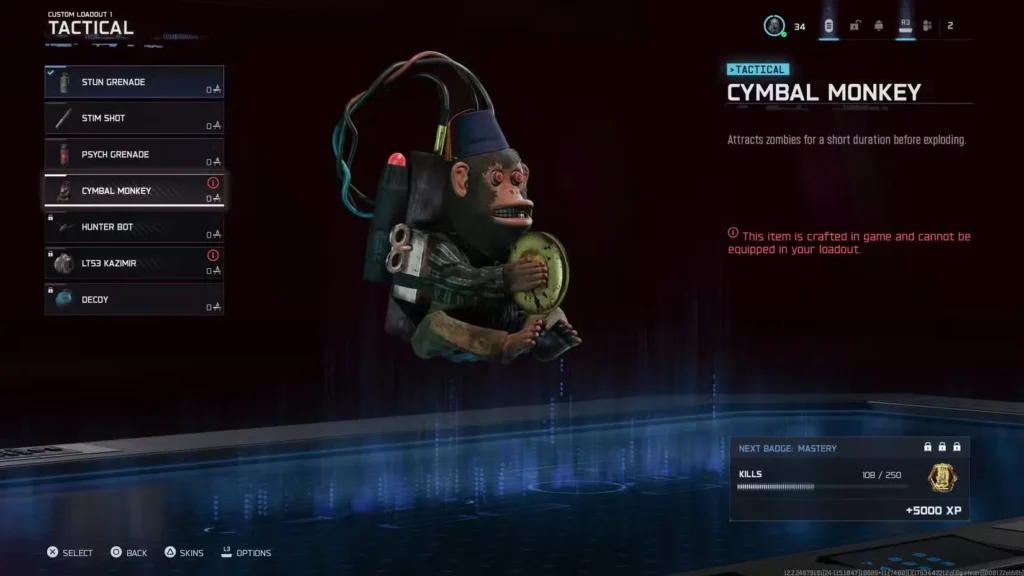
Cymbal Monkey is your MVP here. Unlike the slower LT53 Kazimir, these wind up faster and unlock at Level 24, costing only 1,000 Salvage to craft. You can carry two stacks, and they recharge with Max Ammo pickups—meaning you’ll rarely be without one.
Why it matters: During multiple easter egg steps and the boss fight, you’re confined to small areas while hordes surround you. Cymbal Monkey distracts zombies, giving you precious seconds to repair Ol’ Tessie or execute critical steps.
Lethal Equipment
Honestly? Lethal equipment isn’t essential for Ashes of the Damned unless you’re pursuing a specific side quest. The Combat Axe is required for one easter egg step, but there’s a free one at Reba’s Diner (Exit 115), so you don’t need to carry one.
Field Upgrade: Aether Shroud Is King
There’s really only one choice here that makes sense: Aether Shroud.
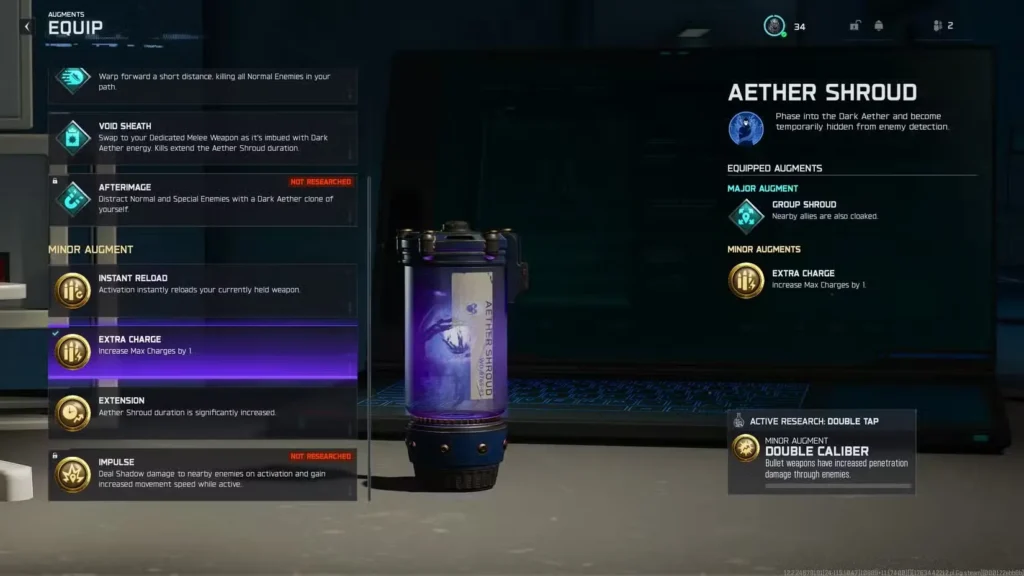
Here’s why it’s non-negotiable: You become invisible. Completely invisible. Zombies, elites, and even the boss ignore you entirely while it’s active. For a fight centered around managing one objective (repairing Ol’ Tessie) while avoiding damage, invisibility is worth its weight in gold.
Aether Shroud Augments
Minor Augment:
- Extra Charge – Increases your total charges from 1 to 2, giving you two solid opportunities to cloak during the boss fight
Major Augment (Choose Based on Playstyle):
- Group Shroud (Co-Op) – Cloaks nearby allies simultaneously, making group survival much easier
- Burst Dash (Solo) – Warps you forward while clearing normal enemies in your path—perfect for repositioning when things get overwhelming
The Extension augment can be useful too if you want your cloak to last longer, but Extra Charge gives you more total usage, which is typically better.
GobbleGums: Optional But Powerful
GobbleGums aren’t essential for completing Ashes of the Damned, but they’re honestly game-changers if you have them available. Think of them as insurance policies.

For Early Game:
- Gift Card – Grants 30,000 Essence on Round 1. This is enough to open every door, grab several Pack-a-Punch upgrades, and snag perks early. Early prep = more time for easter egg steps before difficulty spikes
For the Boss Fight:
- Perkaholic (Solo) – Instantly grants all available perks
- Near Death Experience (Co-Op) – Allows revives with perks intact for up to 3 minutes or 5 revives
- Power Keg – Activates a full Power-Up, meaning free Aether Shroud usage
- Shields Up – Refills armor and makes it twice as durable for 3 minutes—clutch when you’re low on resources
The typical boss fight stack: Power Keg + Shields Up + Perkaholic (solo) or Near Death Experience (co-op).
Putting It All Together: Execution Tips
Here’s how to actually use this loadout effectively:
Early Rounds (1-5): Prioritize opening doors, purchasing perks (especially Jugger-Nog and Quick Revive), and gathering essence. Use Gift Card if you have it to accelerate this process.
Mid Game (Rounds 6-10): Farm essence to grab remaining perks and apply augments. Start working through easter egg steps if you’re pursuing them. Level up your weapon to unlock key attachments, particularly the M335-X Cloak.
Boss Fight: Keep Ol’ Tessie in view. When it’s not exploding and needs repair, toggle Aether Shroud, rush in with your M15, and apply repairs. Use Cymbal Monkey to distract zombies while you work. Don’t venture far from the objective. Stay alive longer than the boss survives—that’s the entire strategy.
Level Up Your Ashes Skills
This loadout is foundational, but mastering Ashes of the Damned goes deeper. Check out these complementary guides:
- Complete Ashes of the Damned Walkthrough – Step-by-step easter egg instructions
- Ashes of the Damned Main Easter Egg Guide – In-depth boss mechanics
- Best Field Upgrades for Zombies – Explore other Field Upgrade options
- All Perk Locations in Ashes – Find every perk machine on the map
- Pack-a-Punch Guide – Maximize weapon upgrades
Final Thoughts
Ashes of the Damned is challenging, but it’s not unbeatable. The loadout in this guide isn’t theory-crafted—it’s tested and refined through countless runs. The M15 MOD 0 with the M335-X Cloak, solid perk augments, and Aether Shroud create a foundation that handles both survival and objective completion.
The real skill comes down to positioning and managing that cooldown timer on your Field Upgrade. Stay disciplined, don’t panic-spend essence, and you’ll survive what Ashes throws at you.
Good luck out there. You’ve got this.