Ashes of the Damned is the biggest launch Zombies map Black Ops 7 has ever delivered, and that size comes with complexity. After running this map dozens of times—both successful high-round attempts and embarrassing early deaths—I’ve developed a reliable route that maximizes your survival chances while efficiently managing Essence and Salvage spending.
This isn’t just a random list of things to do. This is a tested progression path that ensures you’re properly equipped before each difficulty spike, with clear explanations of why you’re going to each location in a specific order. Whether you’re a Zombies beginner or a veteran looking to optimize your setup route, this walkthrough will get you combat-ready before the map throws its biggest threats at you.
Understanding the Map’s Resource Economy
Before we jump into the step-by-step guide, let’s establish the foundation of smart resource management in Ashes of the Damned:
Essence (Points): Your primary currency for doors, Perks, Pack-a-Punch, and Armor upgrades
Salvage: Used for weapon rarity upgrades, Ammo Mods, and Field Upgrades
Critical Kill Bonus:
Standard zombie kill: 90 Essence
Critical Kill (headshot): 115 Essence
That 25-point difference per kill adds up fast. Over 50 early-round kills, you’re talking about an extra 1,250 Essence—enough to skip an entire farming session. Always prioritize headshots in the first few rounds.
Round 1-3: Janus Towers Plaza – Get T.E.D.D. and Ol’ Tessie
Your First Priority: Free T.E.D.D. and Activate the Vehicle
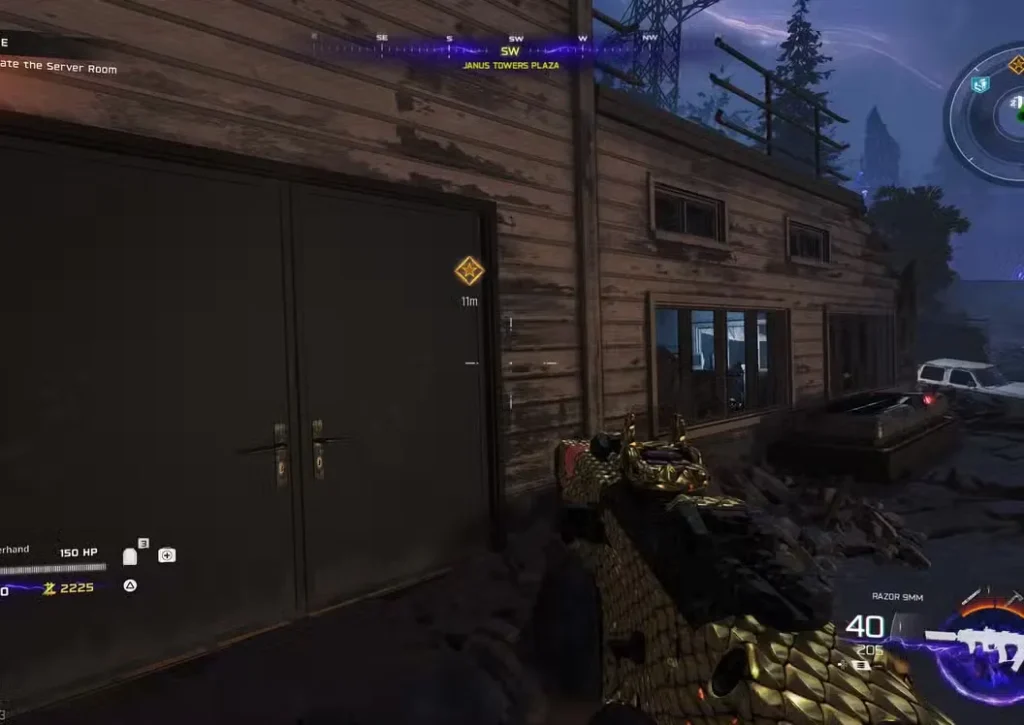
Spawn location: Janus Towers Plaza
Essence target: 1,250
Key objective: Unlock Server Room, retrieve T.E.D.D., activate Ol’ Tessie
Start by clearing zombies with knife kills until Round 2, then switch to headshots with your starting weapon. The goal is reaching 1,250 Essence as quickly as possible while practicing your accuracy.
Step-by-step:
- Farm headshots around spawn until you have 1,250 Essence (approximately 11-12 critical kills)
- Head south from Janus Towers Plaza to the Server Room door
- Purchase the door for 1,250 Essence
- Enter the Server Room and face southwest
- Locate the floor grate and melee it open
- Pick up T.E.D.D.’s Head from inside the grate
- Exit and approach Ol’ Tessie (the truck outside)
- Interact with Ol’ Tessie to install T.E.D.D. and activate the vehicle
Why this matters:
Ol’ Tessie isn’t just transportation—she’s your mobile Pack-a-Punch station later, a source of free Essence/Salvage from Dark Aether plants, and your safest method of traversing the fog-covered areas between major locations. Getting her operational by Round 3 is non-negotiable for efficient progression.
Pro tip: While farming these early kills, practice headshot accuracy. Poor aim here means you’ll arrive at later objectives under-funded and vulnerable. If you’re struggling with headshots, check our easy headshot guide for targeting tips.
Round 3-7: Vandorn Farm – Power Activation and Armor Upgrades
The Best Early Training Spot for Resource Farming
Essence target: 5,000+ before leaving
Key objectives: Activate power, purchase Tier 2 Armor, farm Salvage
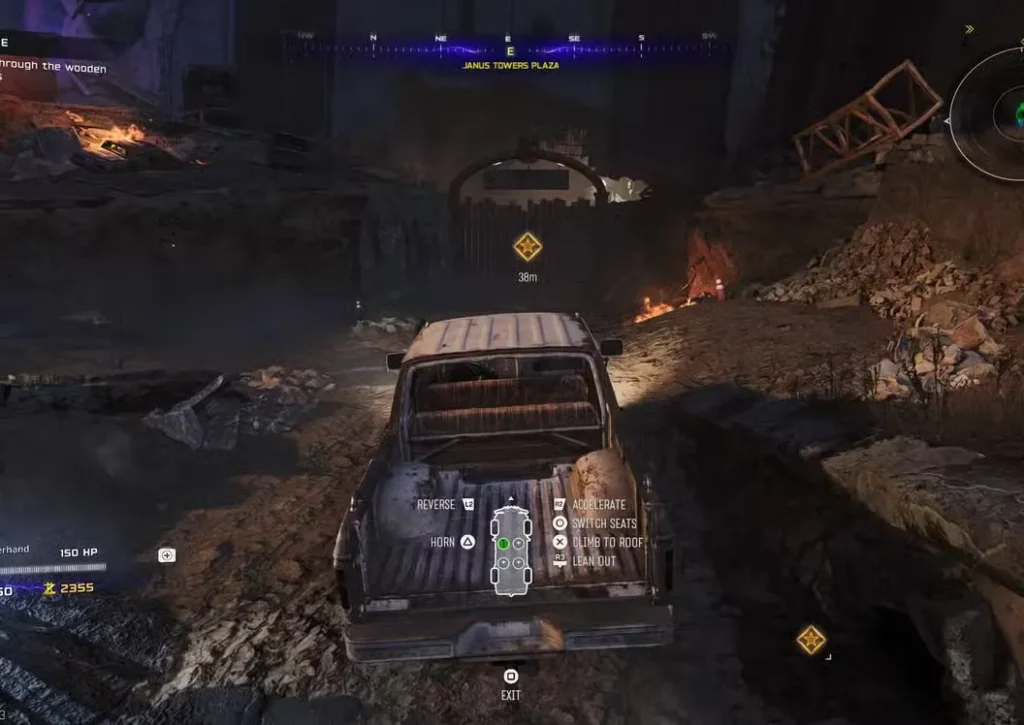
With Ol’ Tessie operational, it’s time to leave spawn and establish a proper base of operations.
Navigation:
- Enter Ol’ Tessie’s driver seat (RT/R2 to accelerate, left stick to steer)
- Head east from Janus Towers Plaza
- Drive through wooden barriers blocking the path
- Navigate through fog toward Vandorn Farm (stay on the road)
- Hit green Dark Aether plants for healing, Essence, and Salvage
- Avoid red plants (they damage Ol’ Tessie)
At Vandorn Farm:
Power Pump Activation:
- Locate the Power Pump on the north side of the farm
- Shoot all glowing bulbs within 30 seconds (aim carefully)
- Destroy the final bulb that appears on top of the pump
Opening the Barn:
- Head south and purchase the Barn door for 1,750 Essence
- Go upstairs in the Barn
- Flip the power switch to activate Vandorn Farm’s amenities
Critical purchase:
Before leaving this area, save up for Tier 2 Armor at the Garage (4,000 Essence). This doubles your effective health pool and is essential for surviving the journey to Ashwood.
Why Vandorn Farm Is Your Training Ground
This location has become my go-to farming spot for several reasons:
- Open layout with clear sightlines
- Easy training routes around the barn and garage
- Quick access to The Arsenal for weapon upgrades
- Multiple Perk locations for future purchases
- Safe positioning relative to spawn points
Don’t rush to leave. Stay until you have: ✅ Tier 2 Armor equipped (4,000 Essence)
✅ At least 5,000 Essence banked
✅ Some Salvage accumulated (from plants and drops)
Check out our best training spots guide for advanced kiting strategies in this area.
Round 7-9: Ashwood – Pack-a-Punch and Essential Perks
Unlocking Your Most Important Upgrade Station
Essence target: 10,000+ for purchases
Key objectives: Activate Ashwood power, install Pack-a-Punch on Ol’ Tessie, purchase core Perks
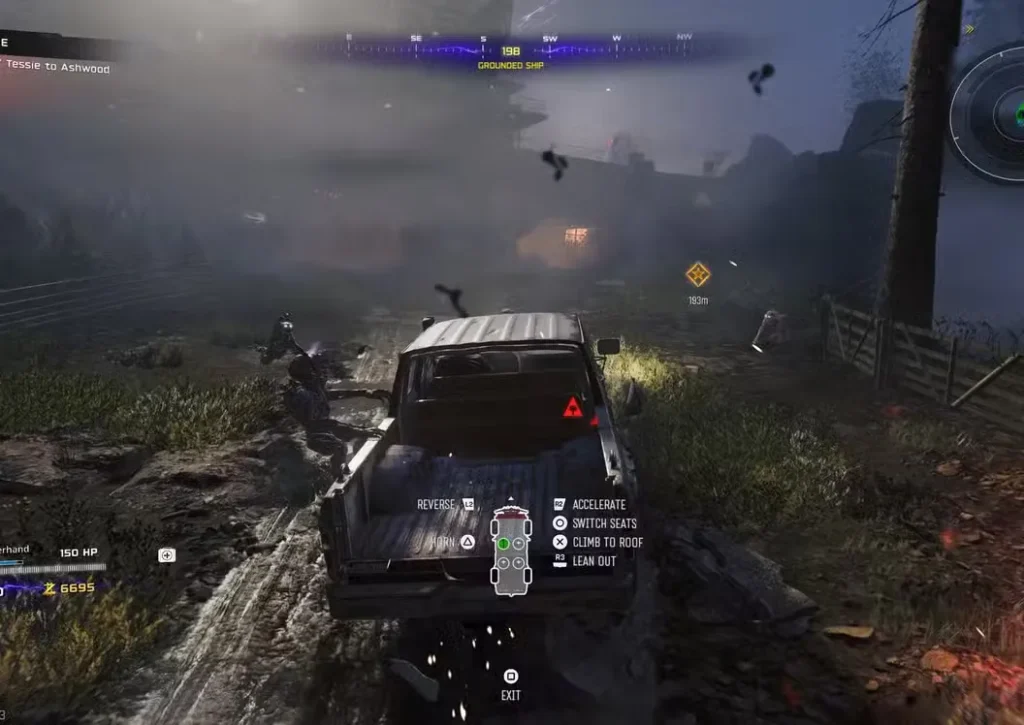
By Round 7, you should be ready to make the journey to Ashwood—the map’s central hub and home to your most critical upgrade: Pack-a-Punch.
Navigation to Ashwood:
- Enter Ol’ Tessie at Vandorn Farm
- Head south through the newly opened gate
- Drive through the Grounded Ship (follow the linear path)
- Collect green plants for Essence, Salvage, and vehicle health
- Arrive at Ashwood and park near the locked garage
Opening Ashwood’s Upper Area:
- Look east for a vertical zipline
- Take the zipline upward to upper Ashwood
- Turn right and purchase the Market Square door (1,000 Essence)
- Continue and purchase the Judgement Square door (1,750 Essence)
- Access Ashwood Bridge area
Power Pump Activation (Ashwood Bridge):
- Locate the Power Pump at Ashwood Bridge
- Shoot all bulbs within 30 seconds (same as before)
- Flip the power switch after destroying all bulbs
This opens the garage where you parked Ol’ Tessie.
Installing Pack-a-Punch:
- Drive Ol’ Tessie into the opened garage
- Locate the Pack-a-Punch Machine on the west wall workstation
- Interact to install it on Ol’ Tessie’s rear platform
- Test it out by Pack-a-Punching your primary weapon (5,000 Essence)
Why this changes everything:
Pack-a-Punch transforms your damage output from “struggling at Round 15” to “comfortably clearing Round 25+.” The installation on Ol’ Tessie means you can Pack-a-Punch anywhere on the map, making this single upgrade worth the entire journey.
Critical Perk Purchases in Ashwood
With Pack-a-Punch active and your weapon upgraded, invest in these essential Perks:
1. Jugger-Nog (5,500 Essence)
Location: The Ruby Rabbit (downstairs, north wall)
Effect: Increased maximum health
Take the zipline to Ashwood Bridge, enter The Ruby Rabbit, and head downstairs. Jugger-Nog is mandatory—it’s the difference between surviving three hits versus one hit in higher rounds.
2. Vulture Aid (3,000 Essence) – Optional but Recommended
Location: Market Square
Effect: Increased item drops from zombies (Essence, Salvage, Equipment)
This Perk accelerates your resource accumulation dramatically. The extra Salvage drops specifically help you afford weapon rarity upgrades faster, while additional Essence means more Perks sooner. If you’re on a tight Essence budget, you can skip this and grab it later, but I’ve found it pays for itself within a few rounds.
Your loadout at this stage:
- ✅ Pack-a-Punch Tier 1 weapon
- ✅ Tier 2 Armor
- ✅ Uncommon weapon rarity (from The Arsenal, 500 Salvage)
- ✅ Jugger-Nog Perk
- ✅ Vulture Aid Perk (optional)
Head to The Arsenal in Judgement Square and spend 500 Salvage on the Uncommon Tier weapon upgrade. This stacks with Pack-a-Punch for noticeable damage improvements.
For more information on maximizing your Salvage farming efficiency, check our dedicated guide.
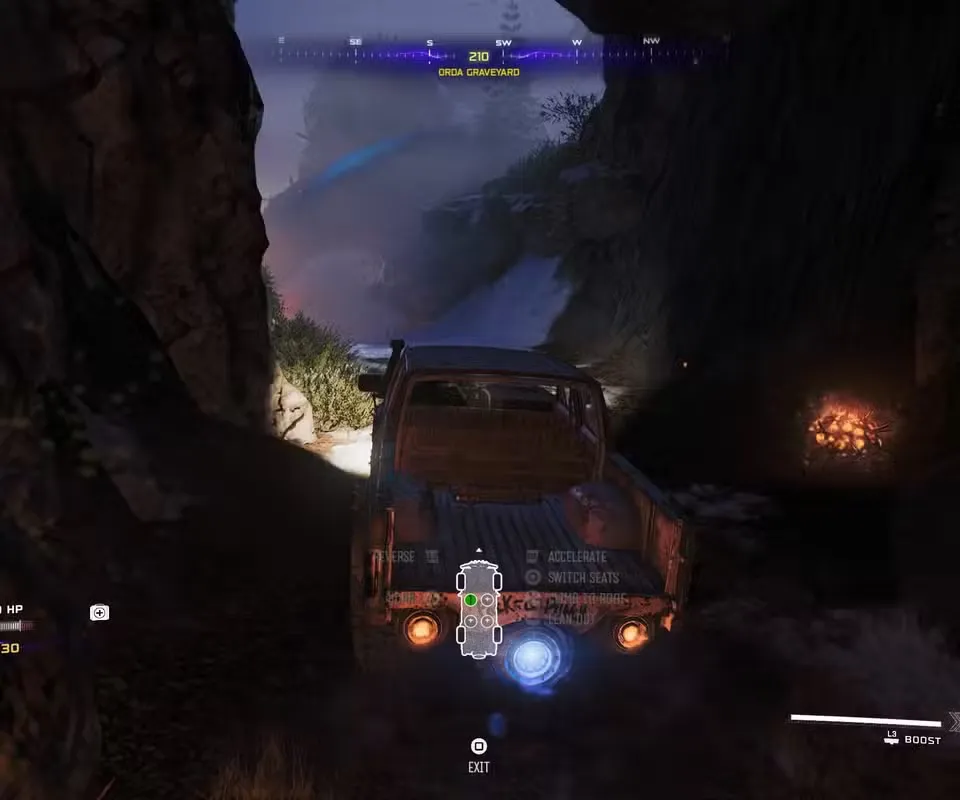
Round 10-12: Exit 115 – Defensive Perks and Armor Tier 3
Expanding Your Perk Collection
Essence target: 10,000+ for Tier 3 Armor
Key objectives: Deadshot Daiquiri, Tier 3 Armor upgrade
Leave Ashwood via Ol’ Tessie and head southwest through the Orda Graveyard to reach Exit 115.
At Exit 115:
- Purchase the southwest locked door at McDougal’s Service Station (500 Essence)
- Grab Deadshot Daiquiri inside the station
- Farm zombie kills in this area’s spacious layout
Why Exit 115 for farming:
This location features long sightlines and wide avenues perfect for training zombies. The open spaces give you room to maneuver while lining up the headshots that Deadshot Daiquiri now makes easier.
Critical upgrade:
Save 10,000 Essence and purchase Tier 3 Armor from any Armor Station. This should be your priority before moving to the next area. Tier 3 Armor provides substantial protection for the upcoming challenges.
Remember: Replate your armor consistently. Vulture Aid will drop armor plates from zombies, but you need to manually apply them during breaks in combat.
Round 12-14: Blackwater Lake – Utility Perks
Completing Your Core Perk Loadout
Essence target: 2,000+
Key objectives: Speed Cola, Quick Revive
From Exit 115, take Ol’ Tessie back to Ashwood, then head northwest through the Lost Cabins to reach Blackwater Lake.
At Blackwater Lake:
Power Activation:
- Locate and activate the Power Pump (same bulb-shooting process)
- This powers the Cabin’s amenities
Perk Purchases:
- Purchase Cabin entry for 1,750 Essence
- Head upstairs to find Speed Cola
- Purchase Speed Cola for 3,000 Essence
Speed Cola benefits:
- Faster reload speeds
- Quicker armor plate application
- Reduced equipment use time
These improvements become critical as zombie density increases in later rounds.
Return to Spawn for Final Core Perk:
Drive Ol’ Tessie back to Janus Towers Plaza and purchase Quick Revive in the Server Room (2,500 Essence). This Perk accelerates health regeneration, keeping you in fights longer.
Your complete core Perk loadout:
- Jugger-Nog (Health)
- Speed Cola (Reload/Armor)
- Deadshot Daiquiri (Accuracy)
- Quick Revive (Regeneration)
- Vulture Aid (Resource drops) – Optional
For details on all Perk locations across the map, see our comprehensive guide.
Round 14-16: T.E.D.D. Tasks and Ammo Mod Preparation
Free Upgrades and Elite Enemy Preparation
Salvage target: 500+ for Ammo Mod
Key objectives: Complete T.E.D.D. Tasks, purchase Napalm Burst
Starting around Round 14, you’ll see notifications: “A T.E.D.D. Task Has Appeared” along with a location marker.
What are T.E.D.D. Tasks:
- Cost approximately 500 Essence to activate
- Require completing brief challenges (kill zombies with specific methods)
- Reward generous Essence and Salvage
- Grant free weapon rarity upgrades
- Provide a free Perk (doesn’t count toward cost scaling)
Always prioritize T.E.D.D. Tasks. The free Perk alone justifies the time investment, and the Salvage rewards accelerate your weapon progression significantly.
Essential Purchase: Napalm Burst Ammo Mod
By this point, your Salvage accumulation from plants, Vulture Aid, and T.E.D.D. Tasks should exceed 500. Head to any Arsenal Machine (I recommend returning to Vandorn Farm for safe farming) and purchase Ammo Mod: Napalm Burst (500 Salvage).
Why Napalm Burst:
This Ammo Mod is devastatingly effective against Zursa (zombie bears) and other Elite Enemies. The fire damage over time melts through their health pools, especially when combined with Pack-a-Punch and higher weapon rarities.
For a complete breakdown of all Ammo Mod options, check our tier list guide.
Round 16+: Zursa Encounter and High-Round Strategy
Your First Major Boss Challenge
Round 16 marks the appearance of Zursa-1—an Elite Enemy zombie bear that’s significantly tougher than anything you’ve faced so far.
Zursa Combat Strategy:
Your arsenal:
- Pack-a-Punch Tier 1+ weapon
- Rare or higher weapon rarity
- Napalm Burst Ammo Mod
- Tier 3 Armor
- Full Perk loadout
Targeting priority:
- Glowing weak spots on Zursa’s body (shoot these first)
- Head shots for maximum damage
- Maintain distance while kiting in circles
Recommended location:
Fight Zursa at Vandorn Farm or Exit 115 where you have maximum maneuvering space. Tight corridors = death sentence.
The combination of Pack-a-Punch, Napalm Burst, and focused weak-spot shooting should eliminate Zursa relatively quickly. If you’re undergeared, retreat and train regular zombies until Zursa loses interest, then re-engage on your terms.
For detailed Zursa killing strategies, including advanced tactics, see our full guide.
Post-Round 16: Ongoing Progression Goals
With your core setup complete, focus on these ongoing objectives:
Weapon Upgrades
- Pack-a-Punch Tier 2 (15,000 Essence)
- Pack-a-Punch Tier 3 (30,000 Essence)
- Legendary weapon rarity (1,500+ Salvage)
Additional Perks
Purchase remaining Perks scattered across the map:
- PhD Flopper (explosive immunity)
- Stamin-Up (movement speed)
- Elemental Pop (random Ammo Mod procs)
- Deadwire/Brain Rot/Cryofreeze alternatives
See our complete Perk guide for all locations.
Augment Research
Unlock and apply augments to enhance:
- Perks (best Perk augments)
- Field Upgrades (best Field Upgrade augments)
- Ammo Mods (best Ammo Mod augments)
Resource Management
- Farm Essence at high-efficiency training spots
- Collect Salvage through Vulture Aid, plants, and T.E.D.D. Tasks
- Complete objectives for bonus rewards
Equipment Optimization
- Equip best Lethal Equipment
- Use best Tactical Equipment
- Consider setting custom wall buys for weapon flexibility
Advanced Tips for High Rounds
Loadout customization:
If you’re pushing for Round 50+, your starting loadout matters. Bring weapons that Pack-a-Punch well and consider your best weapon builds before launching into Ashes of the Damned.
Gobblegum strategy:
Use Gobblegums strategically during difficult rounds or when attempting risky objectives. Save your best ones for emergency situations.
Exfil planning:
If you’re ready to extract, understand the Exfil mechanics and coordinate with teammates. Failed Exfils waste all your progress.
Legacy HUD:
Prefer classic Zombies UI? Learn how to create the legacy Zombies HUD for nostalgic gameplay.
Common Mistakes to Avoid
❌ Rushing to Ashwood too early: Arriving at Pack-a-Punch without enough Essence means you can’t afford the upgrade, wasting the journey.
❌ Skipping Armor upgrades: Tier 1 Armor won’t protect you past Round 10. Always prioritize Tier 2 before leaving Vandorn Farm.
❌ Ignoring T.E.D.D. Tasks: Free Perks and Salvage are too valuable to skip. Always detour for these.
❌ Poor Essence management: Don’t buy every door you see. Follow the efficient route outlined above.
❌ Fighting Zursa unprepared: Without Pack-a-Punch and Napalm Burst, Zursa becomes a resource drain that can down you quickly.
❌ Neglecting Salvage farming: Hit those green plants while driving! The accumulated Salvage makes weapon rarity upgrades much faster.
Solo vs. Squad Considerations
Solo players:
- Farm more conservatively at Vandorn Farm before advancing
- Consider grabbing Quick Revive earlier for self-revive capability
- Focus on high-damage weapons since you’re handling all eliminations
- Use training routes that keep zombie spawns predictable
Squad play:
- Coordinate door purchases to split Essence costs
- Designate roles (one player farms Salvage, others focus Essence)
- Communicate T.E.D.D. Task locations for group completion
- Revive fallen teammates immediately—letting them bleed out wastes resources
Quick Reference Checklist
Round 1-3:
- ☐ Farm 1,250 Essence with headshots
- ☐ Open Server Room
- ☐ Free T.E.D.D. from floor grate
- ☐ Activate Ol’ Tessie
Round 3-7:
- ☐ Drive to Vandorn Farm
- ☐ Activate power (shoot bulbs)
- ☐ Open Barn and flip power switch
- ☐ Purchase Tier 2 Armor (4,000 Essence)
- ☐ Farm to 5,000+ Essence
Round 7-9:
- ☐ Drive to Ashwood
- ☐ Open Market Square and Judgement Square
- ☐ Activate Ashwood Bridge power
- ☐ Install Pack-a-Punch on Ol’ Tessie
- ☐ Pack-a-Punch your weapon (5,000 Essence)
- ☐ Purchase Jugger-Nog (5,500 Essence)
- ☐ Purchase Vulture Aid (3,000 Essence) – Optional
- ☐ Upgrade to Uncommon weapon rarity (500 Salvage)
Round 10-12:
- ☐ Drive to Exit 115
- ☐ Purchase Deadshot Daiquiri
- ☐ Farm for Tier 3 Armor (10,000 Essence)
Round 12-14:
- ☐ Drive to Blackwater Lake
- ☐ Activate power
- ☐ Purchase Speed Cola
- ☐ Return to spawn for Quick Revive
Round 14-16:
- ☐ Complete T.E.D.D. Tasks when available
- ☐ Purchase Napalm Burst Ammo Mod (500 Salvage)
- ☐ Prepare for Zursa encounter
Round 16+:
- ☐ Defeat Zursa-1
- ☐ Continue upgrading Pack-a-Punch tiers
- ☐ Purchase remaining Perks
- ☐ Maximize weapon rarity
Expand Your Zombies Knowledge
Master every aspect of Black Ops 7 Zombies:
- Complete Perk Locations on Ashes of the Damned
- Pack-a-Punch Guide for Ashes of the Damned
- All Wall Buy Locations
- Best Training Spots Ranked
- How to Farm Essence Efficiently
- Complete T.E.D.D. Tasks Guide
For general Zombies strategy and mechanics:
Join the community on Reddit or Discord to share your high-round strategies and find teammates.
For official updates, visit the Call of Duty: Black Ops 7 website or check the Wikipedia page.
Final Thoughts: This route prioritizes survival and efficiency over speed. You could rush Pack-a-Punch earlier, but arriving undergeared often means going down and losing all that progress. Follow this walkthrough, and by Round 16, you’ll have the firepower, protection, and Perks needed to push for high rounds comfortably. Good luck surviving Ashes of the Damned!