Music Easter eggs have become a beloved Treyarch tradition in Black Ops Zombies, and Ashes of the Damned continues this legacy with “Turn to Ashes” by Kevin Sherwood featuring Elena Siegman. After hunting down these headphones across multiple playthroughs—sometimes while being chased by zombie hordes—I can confirm this is one of the easier Easter eggs to complete, though the locations require some specific knowledge to find efficiently.
This guide provides exact locations for all three Mister Peeks Headphones, optimal routes for quick completion, and everything you need to know about triggering this nostalgic side quest.
Music Easter Egg Overview
Easter Egg Name: Turn to Ashes (unofficial community name)
Objective: Find and interact with 3 Mister Peeks Headphones
Locations: Janus Towers Plaza, Ashwood, Exit 115
Difficulty: Easy (no combat requirements)
Time Required: 5-10 minutes once you know locations
Song Details:
- Title: “Turn to Ashes”
- Artist: Kevin Sherwood featuring Elena Siegman
- Duration: Full-length track (3-4 minutes)
- Style: Metal/rock with dramatic vocals (classic Zombies aesthetic)
Rewards:
- 🎵 Unlocks Easter egg song for duration of match
- 🏆 Completion satisfaction (no XP/cosmetic rewards)
- 📜 Continues Treyarch’s musical Easter egg tradition
Why complete it:
Beyond the auditory experience, music Easter eggs represent Zombies’ personality and community tradition. Longtime fans expect these hidden songs, and discovering them adds atmosphere to your high-round attempts.
Prerequisites: What You Need
Map Access Requirements
Minimal progression needed:
- ✅ Access to Janus Towers Plaza (spawn area—immediate)
- ✅ Progression to Ashwood (requires Ol’ Tessie activation)
- ✅ Access to Exit 115 (requires map progression)
Recommended completion timing:
Round 10-15 when you’ve naturally progressed through all three areas during standard gameplay.
Can you rush it earlier?
Yes, but you’ll need to spend Essence opening doors specifically for this Easter egg rather than optimal survival routes. Not recommended for first-time playthroughs.
No Combat/Loadout Requirements
Great news: This Easter egg requires zero combat prowess.
You don’t need:
- ❌ Specific weapons
- ❌ Pack-a-Punch
- ❌ Perks
- ❌ Equipment
- ❌ Klaus or companions
All you need: Ability to navigate to three locations and press interact button.
Solo vs. squad:
Equally easy in both scenarios. Squad members can split up to find headphones faster, but solo players have no disadvantage since locations are fixed.
Complete Step-by-Step Guide
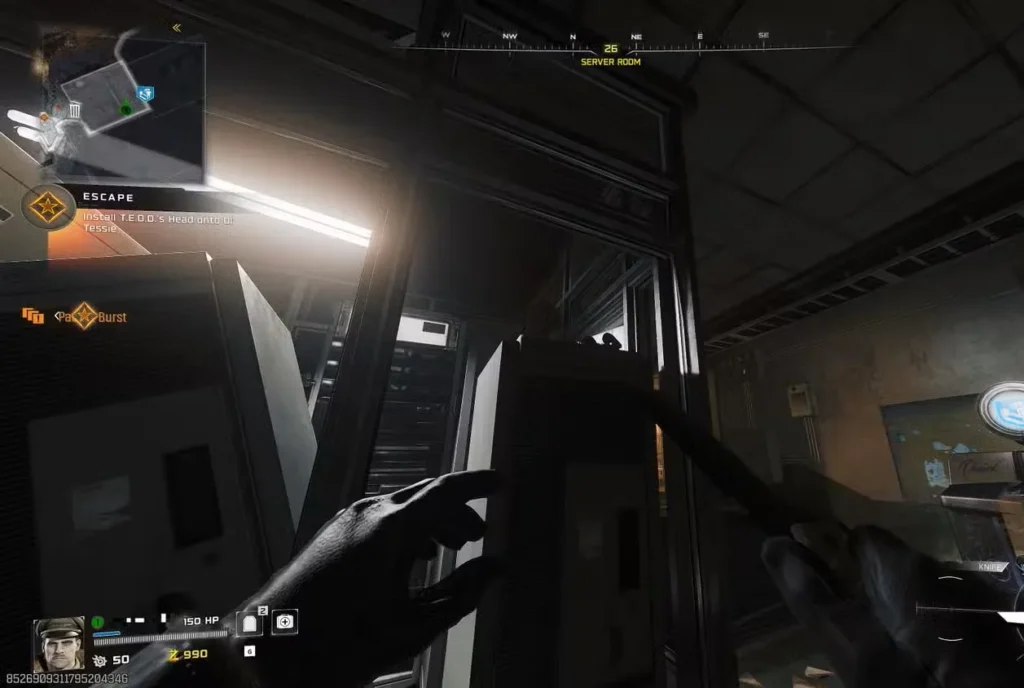
Step 1: Mister Peeks Headphone #1 – Server Room (Janus Towers Plaza)
Location: Janus Towers Plaza (spawn area), Server Room
Door Cost: 1,250 Essence
Accessibility: Available from Round 1 onward
Navigation to Server Room
From spawn (Janus Towers Plaza):
- Head south from your spawn point
- Locate the Server Room door (same room where you free T.E.D.D. for Ol’ Tessie)
- Purchase door if you haven’t already (1,250 Essence)
- Enter Server Room
Landmark identification:
This is the same room you visit during early map progression to retrieve T.E.D.D.’s head from the floor grate. Quick Revive Perk Machine is located inside.
Exact Headphone Location
Inside Server Room:
- Face the Quick Revive Perk Machine (located on wall)
- Look at the server rack directly in front of Quick Revive
- Locate Mister Peeks Headphone wedged between server components
Visual description:
The headphone is a small, glowing object embedded in the server rack. It’s purple/blue in color and stands out against the metallic server equipment.
Interaction:
- Approach the headphone until interact prompt appears
- Hold interact button (Square/X/F depending on platform)
- Audio cue plays confirming activation (short musical note)
Confirmation:
You’ll hear a brief musical chime when successfully activated. The headphone may glow brighter or disappear after interaction.
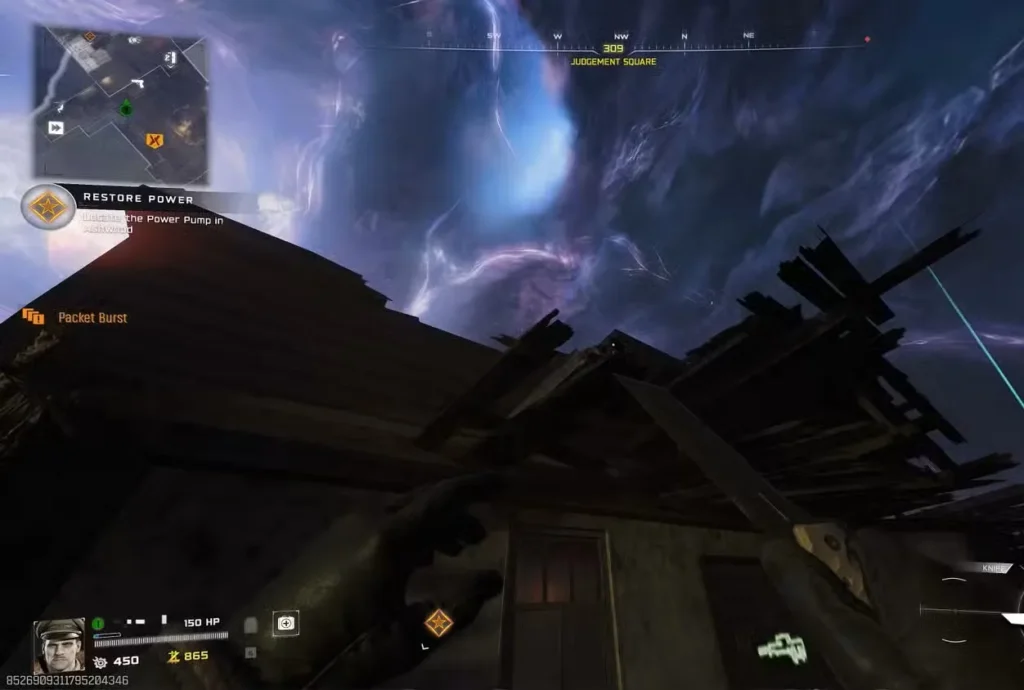
Step 2: Mister Peeks Headphone #2 – Judgement Square (Ashwood)
Location: Ashwood, Judgement Square (eastern section)
Accessibility: Requires progression to Ashwood and opening upper areas
Navigation to Ashwood Judgement Square
Route from spawn:
- Progress through early map (activate Ol’ Tessie, reach Ashwood)
- Drive Ol’ Tessie to Ashwood or travel on foot
- Take eastern zipline upward to upper Ashwood sections
- Navigate to Judgement Square (follow signs/landmarks)
- Locate VS Recon wall-buy on eastern side
For detailed Ashwood navigation, see our complete walkthrough.
Exact Headphone Location
At Judgement Square:
- Find the VS Recon wall-buy (weapon purchase location on wall)
- Stand near the wall-buy
- Position yourself slightly left of the wall-buy
- Look upward toward the destroyed roofline
- Locate Mister Peeks Headphone on damaged roof structure
Visual description:
The headphone sits on exposed roof beams or structural damage above the VS Recon position. It’s elevated and requires looking up at approximately 45-60 degree angle.
Common mistake:
Players often look at eye level or scan the ground. The headphone is above you on the destroyed roof—make sure to look UP.
Interaction:
- Aim at the headphone (crosshair targeting)
- Hold interact button when prompt appears
- Audio cue confirms second activation
Visual confirmation:
The headphone should sparkle or emit particles when you’re looking at it from the correct angle, making it easier to spot.
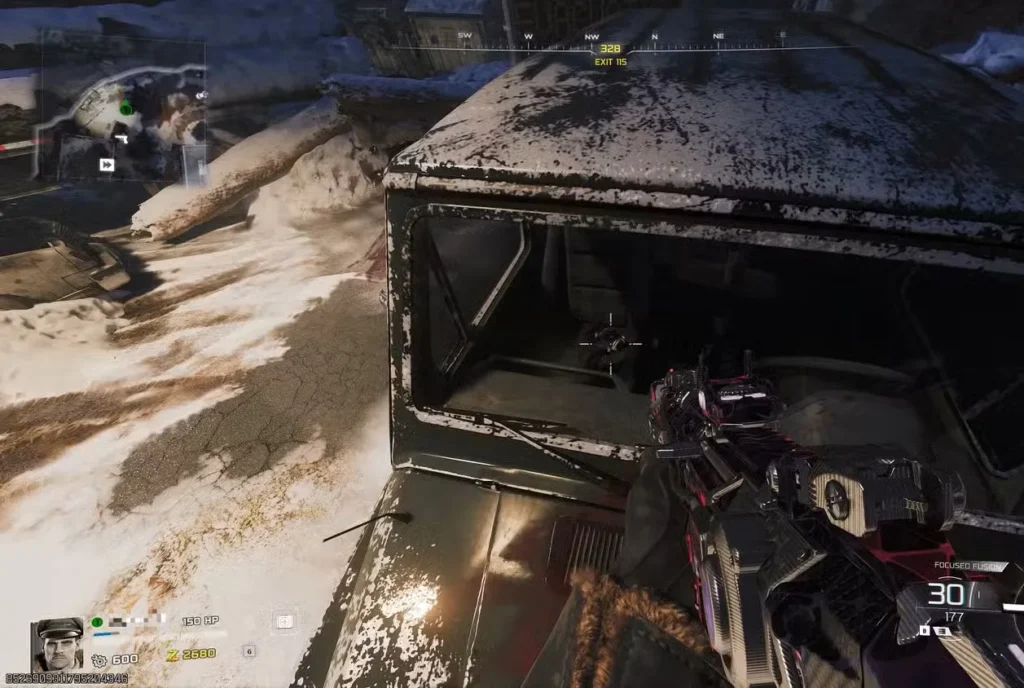
Step 3: Mister Peeks Headphone #3 – Exit 115
Location: Exit 115, inside truck (western side of area)
Accessibility: Requires progression to Exit 115
Navigation to Exit 115
Route from spawn/Ashwood:
- Drive Ol’ Tessie southwest from Ashwood
- Travel through Orda Graveyard connecting area
- Arrive at Exit 115 location
- Park and proceed on foot
Alternative route:
Can be accessed from other connecting paths depending on your map progression. Exit 115 is the location with Deadshot Daiquiri Perk.
Exact Headphone Location
At Exit 115:
- Navigate to western side of Exit 115 area
- Locate the abandoned truck (civilian vehicle, not military)
- Approach the truck from front
- Jump onto the hood/bonnet of the truck
- Look down into front passenger seat
- Locate Mister Peeks Headphone inside vehicle cabin
Visual description:
The headphone rests on the passenger seat, visible through the windshield when standing on the hood. It glows with the same purple/blue coloring as previous headphones.
Access method:
You must physically jump onto the truck’s hood to get proper angle and interaction prompt. Standing beside the truck won’t work—elevation is required.
Interaction:
- Stand on hood looking down into cabin
- Aim at headphone through windshield
- Hold interact button when prompt appears
- Final audio cue confirms completion
Step 4: Song Activation
Automatic trigger:
Upon interacting with the third and final headphone, “Turn to Ashes” immediately begins playing.
What happens:
- ♪ Song starts playing across entire map
- 🔊 All players hear it (if in squad)
- ⏱️ Plays full duration (3-4 minutes)
- 🎵 Cannot be skipped once started
Audio experience:
The song plays over the ambient game audio. You’ll still hear zombie sounds, gunfire, and other effects—the music is layered on top.
Post-song:
Once the song concludes, normal ambient audio resumes. The Easter egg is complete and cannot be repeated in the same match.
Optimal Route for Quick Completion
For players wanting to complete this Easter egg efficiently:
Speedrun route (earliest possible completion):
Round 1-3:
- Start at spawn (Janus Towers Plaza)
- Farm 1,250 Essence for Server Room door
- Collect Headphone #1 in Server Room (2 minutes)
Round 4-7: 4. Continue standard progression (activate Ol’ Tessie, reach Vandorn Farm) 5. Progress to Ashwood and activate power 6. Take zipline to upper Ashwood sections 7. Navigate to Judgement Square 8. Collect Headphone #2 at VS Recon location (1-2 minutes)
Round 8-10: 9. Drive to Exit 115 via Ol’ Tessie 10. Locate western truck 11. Collect Headphone #3 inside truck (1 minute) 12. Song triggers immediately
Total time investment: 10-15 minutes integrated into normal progression
Integration tip:
Don’t make special trips solely for headphones. Collect them naturally as you progress through the map for power activation, Perk purchases, and Pack-a-Punch setup.
Troubleshooting Common Issues
“I can’t find Headphone #1 in Server Room”
Solution:
Face Quick Revive Perk Machine, then look at the server rack directly in front of it (between you and the Perk). The headphone is wedged in the servers at approximately chest height.
Still can’t find it?
Look for purple/blue glow. Move around the server rack scanning all angles—it may be partially obscured by server components.
“Headphone #2 isn’t visible at Judgement Square”
Solution:
You’re likely not looking high enough. The headphone is on the destroyed roof above the VS Recon wall-buy, not at ground level.
Positioning:
- Stand directly at VS Recon wall-buy
- Step 2-3 feet to the left
- Look UP at 45+ degree angle
- Scan the damaged roof structure
“I can’t interact with Headphone #3 in the truck”
Solution:
You must jump ONTO the truck’s hood to get proper line of sight through the windshield.
Steps:
- Approach truck from front
- Jump onto hood (bonnet)
- Look down into passenger seat
- Interaction prompt should appear
Alternative angle:
Try jumping on the truck from different sides if windshield angle isn’t working. Some players report side windows providing better interact prompts.
“The song didn’t play after third headphone”
Verification checklist:
- ☐ Did you interact with ALL THREE headphones? (not just look at them)
- ☐ Did you receive audio cues for each interaction?
- ☐ Are you certain you activated them in the same match? (doesn’t carry between matches)
If verified yes to all:
This may be a bug. Try replaying the match and activating all three again. Report to Treyarch if problem persists.
Music Easter Egg Tradition in Black Ops Zombies
Historical Context
Why music Easter eggs exist:
Treyarch has included hidden songs in Zombies maps since World at War (2008). These Easter eggs:
- Celebrate the mode’s personality and culture
- Provide atmospheric enhancement
- Reward exploration and curiosity
- Feature artists tied to Zombies identity (Kevin Sherwood, Elena Siegman)
Notable previous tracks:
- “115” (Kino der Toten)
- “Abracadavre” (Ascension)
- “Shepherd of Fire” (Origins)
- “Dead Again” (Revelations)
Turn to Ashes significance:
Continues the collaboration between Kevin Sherwood (composer) and Elena Siegman (vocalist)—the duo responsible for many iconic Zombies tracks. Their distinctive metal/rock sound has become synonymous with the mode.
Community Reception
Player response to music Easter eggs:
- ✅ Positive tradition – Expected in every map
- ✅ Atmospheric enhancement – Songs fit Zombies themes
- ✅ Community bonding – Shared discovery experience
- ✅ YouTube content – “All music Easter eggs” compilation videos
“Turn to Ashes” reception:
Early community feedback suggests the track fits Ashes of the Damned’s apocalyptic themes while maintaining the high-energy sound fans expect.
Does the Song Provide Any Advantages?
Gameplay benefits: None
No mechanical advantages:
- ❌ Does not buff weapons
- ❌ Does not slow zombies
- ❌ Does not provide XP boost
- ❌ Does not grant resources
Pure atmospheric reward:
The Easter egg exists solely for:
- Auditory experience
- Community tradition
- Exploration incentive
- Personal satisfaction
Is it worth doing?
If you appreciate Zombies culture and enjoy the musical tracks, absolutely. If you’re purely efficiency-focused on high rounds, it’s optional fluff—but harmless to complete since locations are on natural progression routes.
Combining with Other Easter Eggs
Music Easter eggs can be completed alongside other side quests:
Efficient Easter egg route:
Early rounds:
- Music Headphone #1 (Server Room—Round 2-3)
- Progress to Ashwood
- Free Klaus (Ashwood Sheriff’s Office—Round 10-12)
Mid rounds: 4. Music Headphone #2 (Judgement Square—Round 8-10) 5. Travel to Exit 115 6. Music Headphone #3 (Exit 115 truck—Round 10-12) 7. Song triggers
Later rounds: 8. Visit Blackwater Lake 9. Mr. Peeks Axe Throwing (Toolshed—Round 12-15) 10. Good Soldiers Trophy (if playing as Dempsey—Round 12-15)
Main Quest: 11. Begin Wonder Weapon quest (Round 15+) 12. Proceed to Main Easter Egg (Round 20+)
Integration strategy:
Complete side Easter eggs during natural map progression. Don’t backtrack specifically for music headphones—collect them as you pass through each area.
Frequently Asked Questions
Q: Can I complete the music Easter egg solo?
A: Yes. All three headphones are accessible in solo play with no difficulty increase.
Q: Do I need Klaus/Wonder Weapon/Pack-a-Punch for music Easter egg?
A: No. The Easter egg requires only map access—no combat capabilities needed.
Q: Can the song be replayed in the same match?
A: No. Once activated, it plays once and cannot be retriggered until you start a new match.
Q: Do all squad members need to interact with headphones?
A: No. One player interacting activates for entire squad. However, multiple players can interact for fun.
Q: Does the Easter egg progress save between matches?
A: No. Headphone interactions reset each match. You must complete all three in one session.
Q: Can I turn off the music if I don’t like it?
A: Only by adjusting your game’s music volume settings (affects all music). The song will play its full duration once triggered.
Q: Is there an achievement/trophy for completing music Easter egg?
A: No. This is a hidden Easter egg with no formal recognition beyond the song itself.
Q: Will the song affect my gameplay or distract me?
A: Minimally. The music plays over ambient audio but doesn’t override critical sound cues (zombie sounds, footsteps, etc.). Most players enjoy the atmosphere.
Quick Reference: Music Easter Egg Checklist
Headphone #1 – Server Room (Janus Towers Plaza):
- ☐ Purchase Server Room door (1,250 Essence)
- ☐ Face Quick Revive Perk Machine
- ☐ Look at server rack in front of Quick Revive
- ☐ Interact with wedged Mister Peeks Headphone
- ☐ Confirm audio cue
Headphone #2 – Judgement Square (Ashwood):
- ☐ Progress to Ashwood (activate Ol’ Tessie, reach location)
- ☐ Take eastern zipline to upper Ashwood
- ☐ Navigate to Judgement Square area
- ☐ Find VS Recon wall-buy
- ☐ Stand left of wall-buy, look UP at destroyed roof
- ☐ Interact with headphone on roof structure
- ☐ Confirm audio cue
Headphone #3 – Exit 115:
- ☐ Progress to Exit 115 location
- ☐ Navigate to western side of area
- ☐ Locate abandoned truck (civilian vehicle)
- ☐ Jump onto truck hood/bonnet
- ☐ Look down into front passenger seat
- ☐ Interact with headphone inside cabin
- ☐ Confirm audio cue
Song activation:
- ☐ “Turn to Ashes” begins playing automatically
- ☐ Enjoy full song duration (3-4 minutes)
- ☐ Easter egg complete!
Expand Your Zombies Knowledge
Ashes of the Damned Easter eggs:
Map progression:
Wonder Weapon & main quest:
Optimization:
General Zombies:
Campaign content:
Join the Black Ops 7 community on Reddit or Discord to discuss Easter egg discoveries and share your favorite Zombies tracks.
For official updates, visit the Call of Duty: Black Ops 7 website or check the Wikipedia page.
Final Thoughts: The Ashes of the Damned music Easter egg represents everything great about Treyarch’s approach to Zombies—hidden content that rewards exploration without punishing those who skip it. “Turn to Ashes” continues the franchise’s musical tradition while providing a moment of atmosphere in the chaos of survival. Whether you’re a longtime fan who expects these songs or a newcomer curious about the community’s traditions, taking 10 minutes to collect three headphones adds a memorable touch to your Ashes of the Damned experience. Load in, follow this guide, and let Kevin Sherwood and Elena Siegman’s latest collaboration soundtrack your undead massacre