Ammo Mods are the secret sauce that transforms your weapons from “decent zombie killers” into “elemental death machines” in Black Ops 7 Zombies. These special ammunition types add elemental damage effects to your bullets—electricity, fire, ice, toxic, shadow—and they become absolutely essential for taking down Special and Elite zombies on high rounds.
But here’s the game-changer: just like Perks and Field Upgrades, every Ammo Mod in Black Ops 7 can be enhanced with Augments that dramatically alter how they function. The right Augment combination can turn a mediocre Ammo Mod into your most powerful tool for survival.
Black Ops 7 launches with 6 Ammo Mods available (with Light Mend and Shatter Blast confirmed for later updates), and I’ve tested every Augment to find the optimal builds for each one. Whether you’re training zombies on Ashes of the Damned, hunting Elite enemies, or pushing for round 100+, these Ammo Mod Augments will maximize your damage output.
How Ammo Mod Augments Work
Before diving into specific builds, here’s what you need to know:
The Basics:
- Each Ammo Mod has 1 Major Augment slot and 1 Minor Augment slot
- Major Augments fundamentally change the Ammo Mod’s effect or add new functionality
- Minor Augments provide supporting buffs like increased damage, activation chance, or duration
- Ammo Mods are applied to Pack-a-Punched weapons at Ammo Mod stations
- Each bullet has a chance to trigger the Ammo Mod effect
Coming Later:
- Light Mend and Shatter Blast are confirmed but not available at launch
- These will be added in future updates with their own Augment options
Why Ammo Mods Matter: On high rounds (30+), Normal zombies become bullet sponges, and Special/Elite enemies require massive amounts of damage. Ammo Mods provide crowd control, additional damage, and utility that raw weapon damage alone can’t match.
1. Dead Wire: Best Augments for Electric Chain Damage
What Dead Wire Does: Bullets deal Electric damage. Each bullet has a chance to stun a Normal or Special Enemy, causing them to generate an electric damage field.
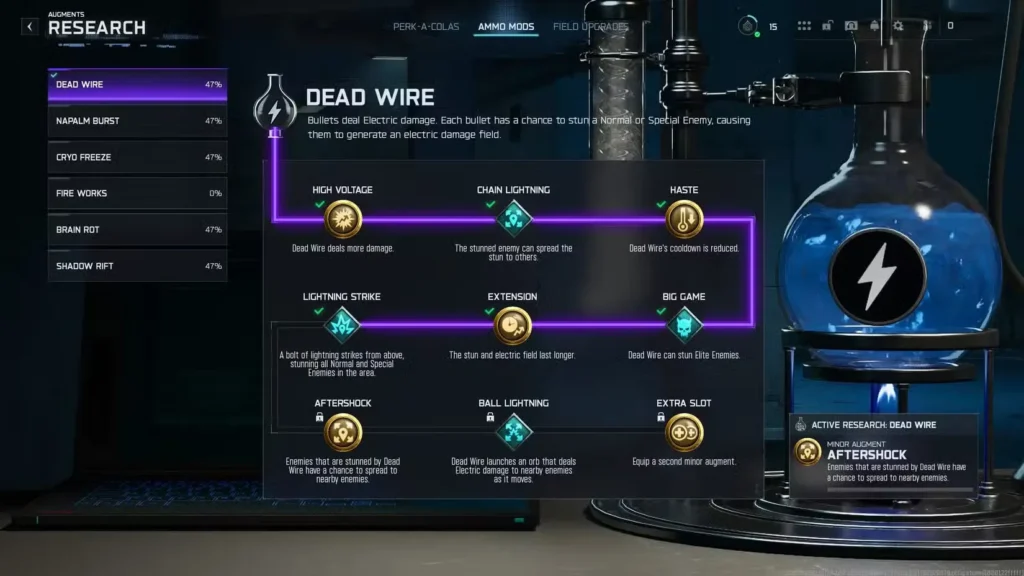
Recommended Augments
| Augment Type | Augment Name | Effect |
|---|---|---|
| Major | Ball Lightning | Activating Dead Wire launches an orb that zaps nearby enemies as it moves |
| Minor | High Voltage | Dead Wire deals increased damage |
Why This Build Works:
Dead Wire has been a fan-favorite Ammo Mod since Black Ops 3, and it remains one of the most reliable options in Black Ops 7. The base effect creates an electric field that damages nearby zombies, but Ball Lightning takes it to another level.
With Ball Lightning, activating Dead Wire spawns an autonomous orb that moves around your zombie train, dealing electric damage to everything it touches. Think of it as a mini electric companion that hunts zombies independently while you focus on training and shooting.
High Voltage is straightforward but effective—it simply increases Dead Wire’s damage output. On high rounds where zombies have more health, this extra damage becomes crucial for maintaining kill efficiency.
Why not the other Minor Augments? The alternative options stun zombies, which sounds useful but actually disrupts your zombie train. When you’re training, you want zombies in predictable patterns—random stuns break that pattern and can get you cornered.
Best Use Cases:
- Training large zombie hordes
- High-round consistency (Dead Wire never falls off)
- Weapons with high fire rates (more chances to proc)
- Dealing with multiple Special enemies simultaneously
Weapon synergy: Dead Wire works exceptionally well with LMGs, assault rifles, and SMGs—anything with a large magazine and high fire rate maximizes your proc chances.
Best For: All playstyles, high rounds, consistent elemental damage
2. Cryo Freeze: Best Augments for Crowd Control
What Cryo Freeze Does: Bullets deal Frost damage. Each bullet has a chance to slow a Normal or Special Enemy and increase the damage they receive.
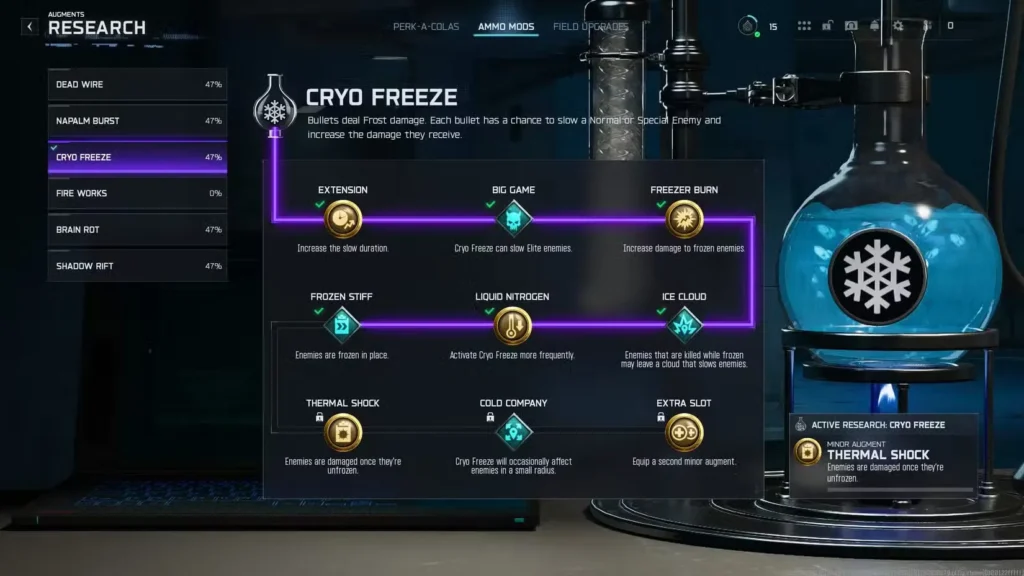
Recommended Augments
| Augment Type | Augment Name | Effect |
|---|---|---|
| Major | Ice Cloud | Enemies killed while frozen may leave a slowing cloud (with a cooldown to reduce spawn rate) |
| Minor | Liquid Nitrogen | Greatly increases your Cryo Freeze activation chance |
Why This Build Works:
Cryo Freeze is the ultimate crowd control Ammo Mod, and these Augments maximize its slowing potential. The base effect already slows and increases damage taken, but the real power comes from the Augments.
Ice Cloud was so powerful it got nerfed with a cooldown system, but it’s still incredibly useful. When you kill frozen zombies, they leave behind slowing clouds that reduce enemy movement speed in the area. On high rounds where zombies sprint at ridiculous speeds, these clouds create safe zones where you can focus fire without getting overwhelmed.
Liquid Nitrogen significantly increases your Cryo Freeze activation chance, meaning more zombies get frozen more often. This is critical because Cryo Freeze’s power scales with how frequently it procs—more procs mean more slows, more damage buffs, and more Ice Clouds.
Strategic value: The damage increase on frozen enemies makes Cryo Freeze excellent for boss fights and Elite zombies. Freeze them, then unload with maximum damage while they’re slowed.
Best Use Cases:
- High-round training when zombies move too fast
- Boss fights and Elite enemy encounters
- Creating safe zones with Ice Cloud clusters
- Increasing damage output on priority targets
Weapon synergy: Works best with high-capacity weapons that can consistently trigger the effect. Pair with sniper loadouts for massive damage on frozen Elite enemies.
Best For: Defensive players, high-round survival, boss fights, crowd control
3. Fire Works: Best Augments for Explosive Damage
What Fire Works Does: Each bullet that hits a Normal or Special Enemy has a chance to launch fireworks that target enemies.
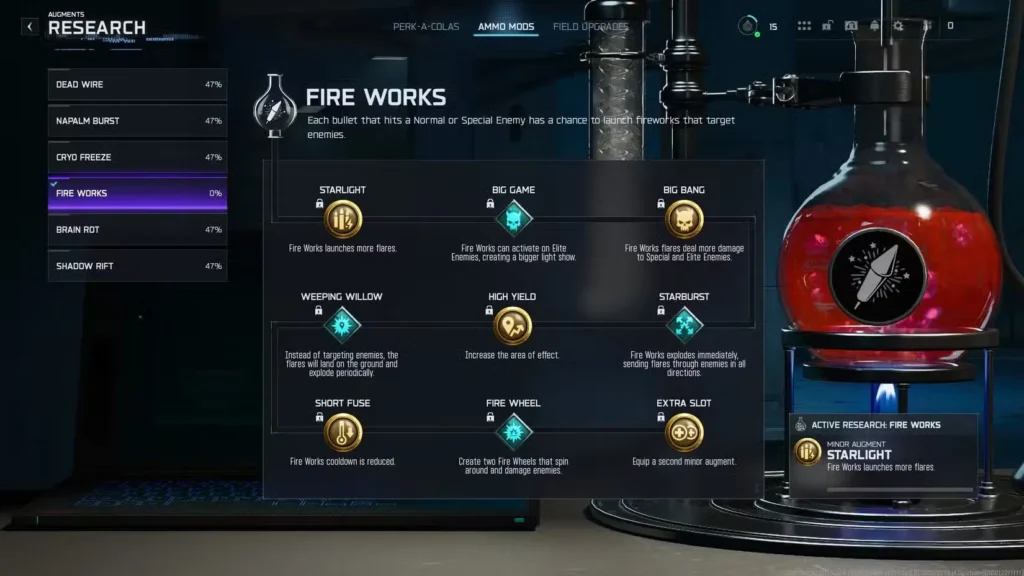
Recommended Augments
| Augment Type | Augment Name | Effect |
|---|---|---|
| Major | Starburst | Fire Works explodes instantly, firing flares through enemies in all directions |
| Minor | High Yield | Increases the area of effect |
Why This Build Works:
Fire Works is Black Ops 7’s returning Ammo Mod from Black Ops 3, and it’s as visually spectacular as it is deadly. The aerial fireworks display isn’t just for show—it deals massive explosive damage to everything in range.
Starburst removes Fire Works’ delay by making it explode immediately and send flares in all directions. Base Fire Works has a slight activation delay that can let zombies close the gap, but Starburst eliminates that problem entirely. The instant explosion with omnidirectional flares means maximum damage with no reaction time needed.
High Yield increases the area of effect, turning Fire Works into a true screen-clearing ability. The larger radius ensures no zombie escapes the explosive light show, which is perfect for high-density situations.
Power level: Fire Works is arguably the strongest Ammo Mod in the game right now. The damage output is absurd, and these Augments push it into “borderline broken” territory. Any Minor Augment works here because the base + Starburst combo is already so powerful.
Best Use Cases:
- Clearing massive zombie hordes instantly
- High-round training with maximum kill efficiency
- Emergency crowd clear when overwhelmed
- Dealing with multiple Special enemies at once
Weapon synergy: Fire Works shines on any weapon, but high-capacity ARs and LMGs that can trigger it frequently turn you into a walking artillery strike.
Best For: Aggressive players, high-round efficiency, maximum damage output
4. Napalm Burst: Best Augments for Damage Over Time
What Napalm Burst Does: Bullets deal Fire damage. Each bullet has a chance to apply a burn effect on Normal and Special Enemies, dealing damage over time.
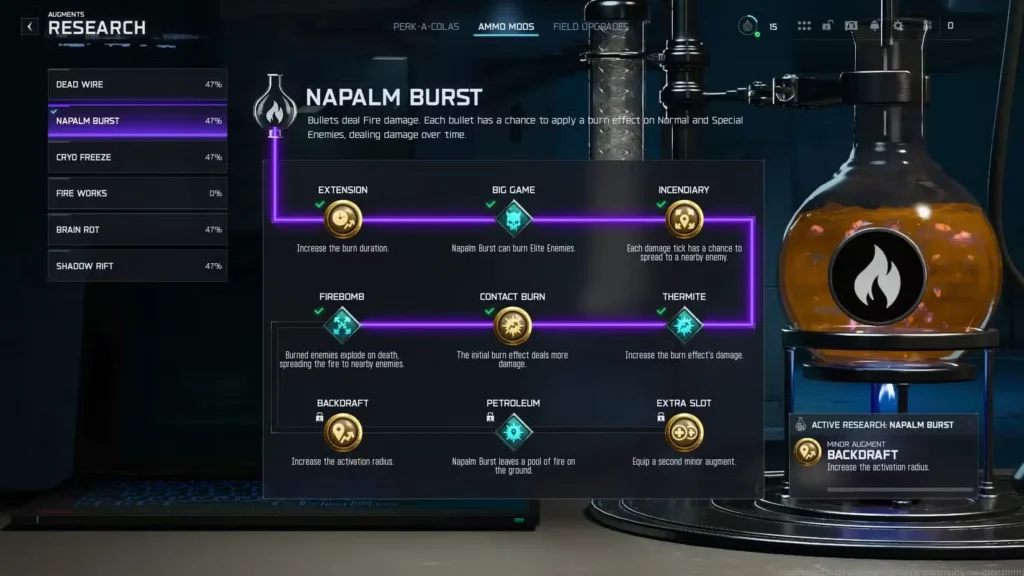
Recommended Augments
| Augment Type | Augment Name | Effect |
|---|---|---|
| Major | Big Game | Napalm Burst can burn Elite Enemies |
| Minor | Contact Burn | The initial burn effect deals increased damage |
Why This Build Works:
Napalm Burst is a specialized Ammo Mod that excels in specific situations, particularly against Zursa (the zombie bears) on Ashes of the Damned. These Elite enemies are extremely weak to fire damage, making Napalm Burst their natural counter.
Big Game is essential because base Napalm Burst can’t affect Elite enemies—only Normal and Special zombies. This Augment removes that restriction, allowing you to burn Elite enemies like Zursa into charred corpses. Without Big Game, Napalm Burst loses most of its value on high rounds.
Contact Burn increases the initial burn damage, which frontloads your damage output. Rather than waiting for damage-over-time to tick, you deal more upfront damage immediately upon application. This is crucial for quickly burning down Elite enemies before they become threats.
Zursa hunting strategy: Equip Napalm Burst with these Augments specifically for maps where Zursa spawn frequently. The fire damage melts them before they can close distance and maul you.
Best Use Cases:
- Hunting Zursa (zombie bears) on Ashes of the Damned
- Dealing with Elite enemies weak to fire
- Damage-over-time playstyles
- Softening up Special enemies while focusing elsewhere
Weapon synergy: Works on any weapon, but shotguns and high-damage-per-shot weapons maximize the Contact Burn upfront damage.
Best For: Elite enemy hunting, Zursa encounters, specialized builds
5. Shadow Rift: Best Augments for Crowd Manipulation
What Shadow Rift Does: Bullets deal Shadow damage. Each bullet has a chance to spawn a black hole on a Normal or Special Enemy, warping away those nearby and dropping some from the air at lethal speed.
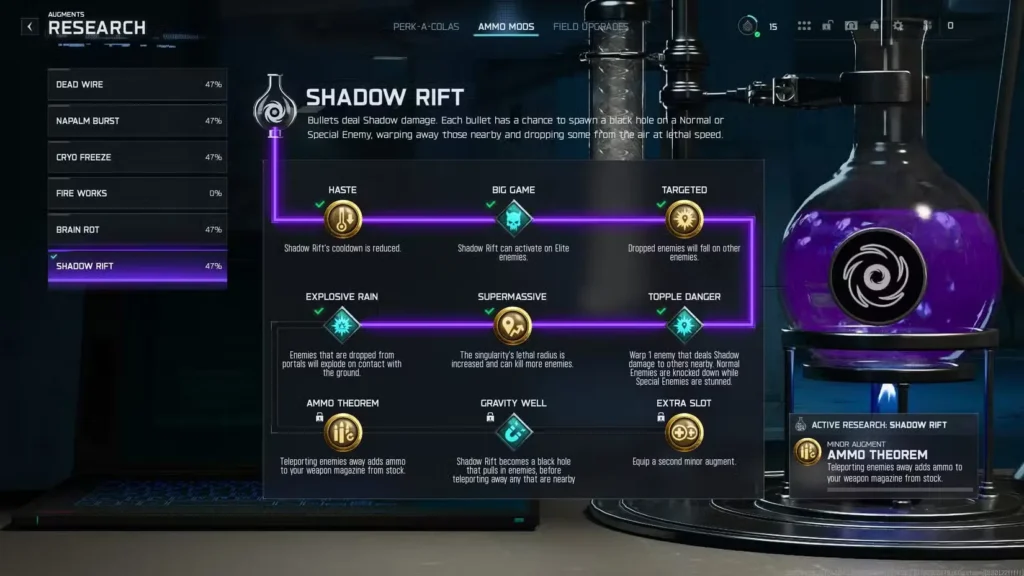
Recommended Augments
| Augment Type | Augment Name | Effect |
|---|---|---|
| Major | Gravity Well | Shadow Rift turns into a black hole that pulls enemies in before teleporting away survivors |
| Minor | Ammo Theorem | Teleporting enemies away adds ammo to your weapon’s magazine from stock |
Why This Build Works:
Shadow Rift is one of the most unique Ammo Mods in Black Ops history, and with the right Augments, it becomes a crowd control powerhouse that also solves ammo problems.
Gravity Well transforms Shadow Rift into a mini-Kazimir device. Instead of just teleporting zombies away randomly, it creates a black hole that pulls in nearby enemies before warping them out. This acts as both crowd control (sucking zombies into one spot) and enemy removal (teleporting them away).
The pull effect is crucial because it groups scattered zombies together, making them easier to manage. Then the teleport removes them from the battlefield entirely, giving you breathing room.
Ammo Theorem is the cherry on top—every time you teleport enemies away, you gain ammo directly into your magazine from your reserve stock. This essentially gives you free ammo just for using your Ammo Mod, which is incredible for sustaining damage output without reloading.
Practical benefit: You can keep shooting almost indefinitely as long as Shadow Rift keeps proccing. The self-sustaining ammo loop makes this build perfect for extended firefights.
Best Use Cases:
- Thinning out overwhelming zombie hordes
- Ammo conservation on high rounds
- Emergency crowd control when cornered
- Grouping scattered zombies for efficient kills
Weapon synergy: High fire rate weapons maximize proc chances, and the ammo return keeps you shooting without reload downtime.
Best For: Ammo conservation, crowd control, unique playstyles
6. Brain Rot: Best Augments for Zombie Allies
What Brain Rot Does: Bullets deal Toxic damage. Each bullet has a chance to temporarily turn a Normal or Special Enemy into an ally.
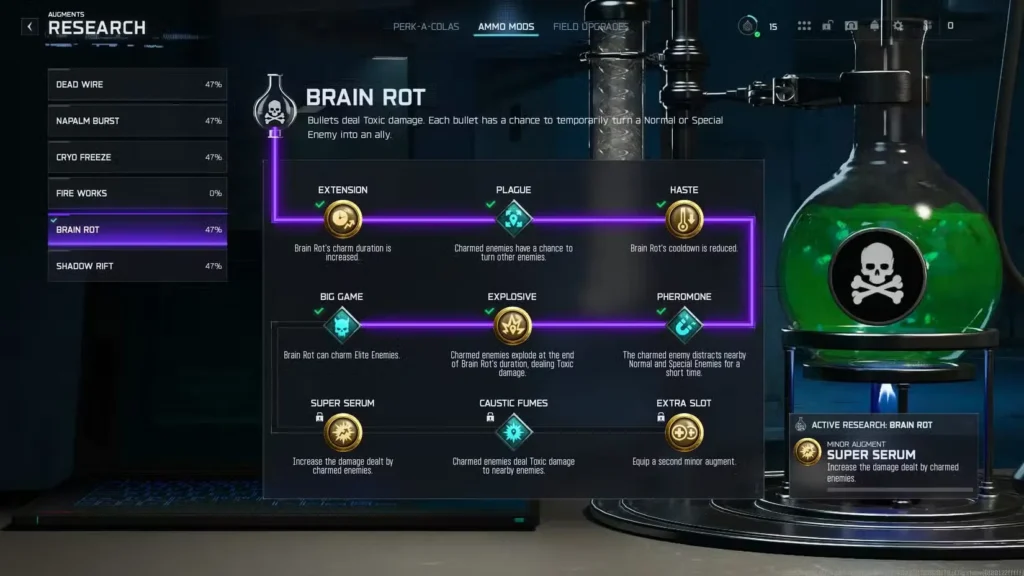
Recommended Augments
| Augment Type | Augment Name | Effect |
|---|---|---|
| Major | Pheromone | The charmed enemy distracts nearby Normal and Special Enemies briefly |
| Minor | Extension | Increases the duration of Brain Rot |
Why This Build Works:
Brain Rot is the most entertaining Ammo Mod in the game—turning zombies into temporary allies that attack their former comrades. It’s not the highest DPS option, but with proper Augments, it becomes a powerful utility tool.
Pheromone is the key Augment here. It makes your charmed zombie act as a distraction beacon for nearby Normal and Special enemies (not Elites). Essentially, your turned zombie becomes a mobile Monkey Bomb that also deals damage instead of just exploding.
This distraction effect is incredibly valuable on high rounds when you need breathing room. While zombies are attacking your charmed ally, you can focus on Elite enemies, reload safely, or reposition your train.
Extension increases Brain Rot’s duration, keeping your zombie ally active longer. The longer the duration, the more distraction and damage they provide. More time means more value from each proc.
Important limitation: Brain Rot won’t turn the last zombie of a round into an ally. This prevents it from interfering with round progression.
Best Use Cases:
- Creating distractions during chaotic high rounds
- Drawing aggro away from downed teammates
- Buying time to complete objectives
- Dealing with Special enemies while focusing on Elites
Weapon synergy: Any weapon works, but high fire rate weapons trigger Brain Rot more frequently, giving you more zombie allies throughout your run.
Best For: Utility players, co-op support, creative strategies, distraction-based tactics
Ammo Mod Priority for Different Situations
Not sure which Ammo Mod to use? Here’s my recommendation based on situation and playstyle:
High-Round General Use:
- Fire Works (Starburst + High Yield) – Highest damage output
- Dead Wire (Ball Lightning + High Voltage) – Most consistent
- Cryo Freeze (Ice Cloud + Liquid Nitrogen) – Best crowd control
Elite Enemy Hunting:
- Napalm Burst (Big Game + Contact Burn) – Specifically for Zursa and fire-weak Elites
- Cryo Freeze (Ice Cloud + Liquid Nitrogen) – Damage buff on frozen targets
- Dead Wire (Ball Lightning + High Voltage) – Reliable damage
Ammo Conservation:
- Shadow Rift (Gravity Well + Ammo Theorem) – Self-sustaining ammo
- Brain Rot (Pheromone + Extension) – Allies do the work for you
- Dead Wire (Ball Lightning + High Voltage) – Efficient kills per bullet
Crowd Control:
- Cryo Freeze (Ice Cloud + Liquid Nitrogen) – Maximum slowing
- Shadow Rift (Gravity Well + Ammo Theorem) – Removes enemies entirely
- Brain Rot (Pheromone + Extension) – Distracts hordes
Solo High Rounds:
- Fire Works (Starburst + High Yield) – Screen-clearing power
- Dead Wire (Ball Lightning + High Voltage) – Consistency
- Cryo Freeze (Ice Cloud + Liquid Nitrogen) – Safety
Ammo Mod Synergies with Perks and Field Upgrades
Maximize your effectiveness by pairing Ammo Mods with complementary abilities:
Fire Works + Frenzied Guard:
- Explosive damage while invincible from Frenzied Guard
- Clear massive hordes with zero risk
- Perfect for aggressive high-round training
Cryo Freeze + Deadshot Daiquiri (Dead First):
- Freeze enemies for damage buff
- Double critical damage on frozen full-health enemies
- Massive burst damage on Elite enemies
Dead Wire + Double Tap (Double Dealer):
- High fire rate increases Dead Wire procs
- Double damage every 4th bullet stacks with electric damage
- Maximum DPS combination
Shadow Rift + Speed Cola (Classic Formula):
- Ammo Theorem refills magazine constantly
- Classic Formula speeds up any remaining reloads
- Near-infinite shooting uptime
Brain Rot + Toxic Growth:
- Charmed zombies distract while Toxic Growth slows
- Double crowd control for maximum safety
- Perfect for defensive playstyles
For complete optimization, check out:
- Best Perk Augments Guide
- Best Field Upgrade Augments Guide
- All Perk Locations on Ashes of the Damned
Tips for Using Ammo Mods Effectively
Applying Ammo Mods:
- Ammo Mods are applied at Ammo Mod stations after Pack-a-Punching your weapon
- You can only have one Ammo Mod active per weapon at a time
- Check Pack-a-Punch locations to access Ammo Mod stations
Activation Mechanics:
- Each bullet has a chance to trigger the Ammo Mod effect
- Higher fire rates = more activation chances = more consistent effects
- Some Ammo Mods have internal cooldowns to prevent abuse
Augment Strategy:
- Change Augments between matches to suit your strategy
- Test different combinations to find your preferred playstyle
- Some Augments become more valuable on higher rounds
Weapon Choice Matters:
- High fire rate weapons maximize proc chances (SMGs, ARs, LMGs)
- High damage weapons benefit most from Cryo Freeze’s damage buff
- Large magazines reduce downtime between procs
Coming Soon: Light Mend & Shatter Blast
Two additional Ammo Mods are confirmed but not available at launch:
Light Mend:
- Expected to be a support/healing Ammo Mod based on the name
- Could potentially heal players or allies when activated
- Augments and full mechanics to be revealed post-launch
Shatter Blast:
- Presumably an explosive/burst damage Ammo Mod
- May involve shattering enemies or area-of-effect blasts
- Full details coming with future updates
I’ll update this guide once these Ammo Mods are released with complete Augment recommendations and synergy details.
Master Your Ammo Mods
Ammo Mods are non-negotiable for high-round success in Black Ops 7 Zombies. The right Ammo Mod with optimal Augments transforms your weapons from basic guns into elemental destruction machines capable of carrying you to round 100 and beyond.
My personal recommendations? Fire Works with Starburst + High Yield is currently the strongest all-around option—it clears hordes faster than any other Ammo Mod and works in almost every situation. If Fire Works gets nerfed (which honestly wouldn’t surprise me given how powerful it is), Dead Wire with Ball Lightning + High Voltage is your next best choice for consistent, reliable damage.
For specialized builds, Napalm Burst absolutely dominates Zursa encounters on Ashes of the Damned, and Cryo Freeze provides unmatched crowd control for defensive playstyles. Shadow Rift with Ammo Theorem is perfect if you hate reloading, and Brain Rot with Pheromone is just fun chaos.
As you progress through levels and Prestige ranks, you’ll unlock more Augments and discover even more creative combinations. But these core builds will carry you through the vast majority of Zombies content.
Now go apply those Ammo Mods and show those undead hordes what elemental damage really means.
Related Guides: