Field Upgrades in Black Ops 7 Zombies are your panic button, your lifeline, and sometimes your ticket to clutching an impossible situation. These rechargeable abilities charge up as you slay the undead, and when activated, they can turn the tide of battle—whether you need to go invisible, heal your team, or lock down an entire area with deadly vines.
But here’s the thing: just like Perk-a-Colas, Field Upgrades can be customized with Augments that dramatically change how they function. The difference between a mediocre Field Upgrade and a game-breaking one often comes down to choosing the right Major and Minor Augments.
Black Ops 7 launches with 6 Field Upgrades at launch (with Mister Peeks and Tesla Storm coming later), and I’ve tested every Augment combination to find the absolute best builds for each one. Whether you’re playing solo or co-op, training zombies on Ashes of the Damned, or pushing for high rounds, these Augment recommendations will keep you alive when everything else fails.
How Field Upgrade Augments Work
Before diving into specific builds, here’s what you need to know:
The Basics:
- Each Field Upgrade has 1 Major Augment slot and 1 Minor Augment slot
- Major Augments fundamentally change how the Field Upgrade functions
- Minor Augments provide supporting buffs that enhance effectiveness
- Field Upgrades charge by killing zombies and dealing damage
- Some Field Upgrades have multiple Major Augment options for different playstyles
Coming Later:
- Mister Peeks and Tesla Storm are confirmed but not available at launch
- These will be added in future updates with their own Augment options
Unlocking Field Upgrades: Field Upgrades unlock as you level up. Check your complete level unlock guide to see when each Field Upgrade becomes available.
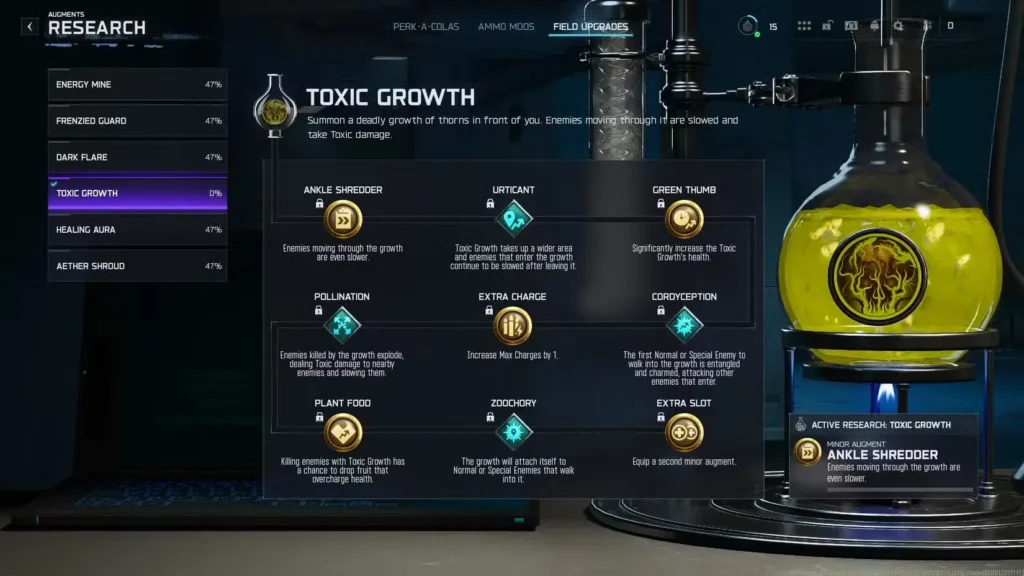
1. Toxic Growth: Best Augments for Area Denial
What Toxic Growth Does: Summon a deadly growth of thorns in front of you. Enemies moving through it are slowed and take Toxic damage.
Recommended Augments
| Augment Type | Augment Name | Effect |
|---|---|---|
| Major | Urticant | Toxic Growth covers a wider area, and enemies stay slowed even after leaving the growth |
| Minor | Ankle Shredder | Enemies moving through the growth are slowed even more |
Why This Build Works:
Toxic Growth is your go-to defensive Field Upgrade for controlling space and protecting choke points. The base version is already solid, but Urticant takes it from “useful” to “completely broken.”
Here’s why: Urticant increases the width of Toxic Growth, covering more area and blocking more paths. But the real game-changer is the persistent slow effect—zombies that pass through continue being slowed even after they leave the growth. This means you’re not just blocking one spot; you’re creating a zone that debuffs every enemy that enters.
Ankle Shredder doubles down on the slow, making zombies crawl through the vines at a glacial pace. Combine these two, and you can lock down entire sections of Ashes of the Damned while you reposition, reload, or revive teammates.
Best Use Cases:
- Blocking doorways and spawn points during objective completion
- Creating safe zones for reviving downed teammates
- Buying time to reload or heal during high-round trains
- Protecting camping spots in tight areas
Pro tip: Place Toxic Growth at the entrance to your train route. Zombies will get slowed as they spawn, giving you permanent breathing room throughout the round.
Best For: Defensive players, camping strategies, objective-based gameplay
2. Dark Flare: Best Augments for Team Support or Solo DPS
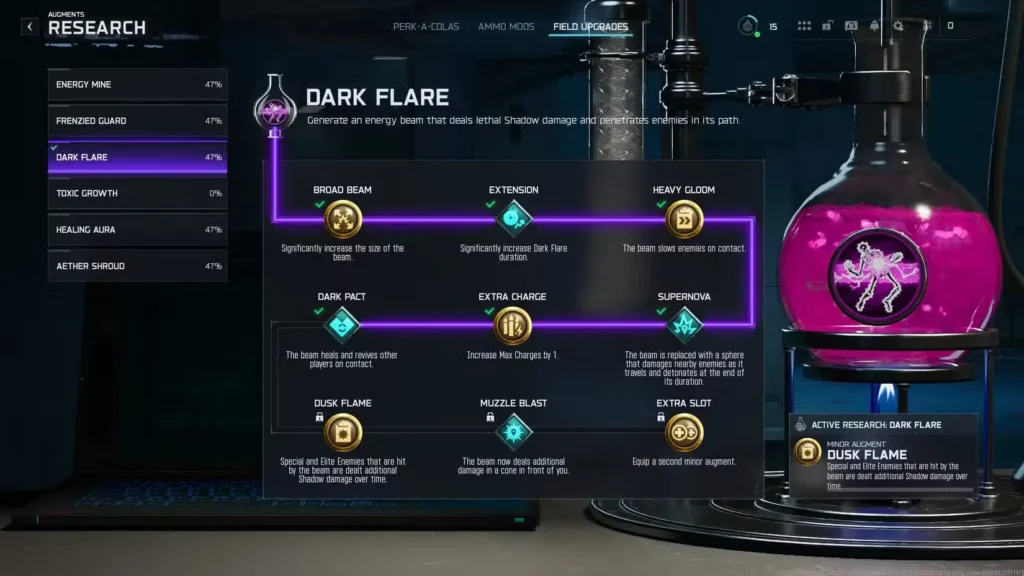
What Dark Flare Does: Generate an energy beam that deals lethal Shadow damage and penetrates enemies in its path.
Recommended Augments (Choose Based on Playstyle)
Co-Op Build:
| Augment Type | Augment Name | Effect |
|---|---|---|
| Major | Dark Pact | Beam heals and revives other players on contact with increased revive speed |
| Minor | Heavy Gloom | The beam slows enemies on contact |
Solo Build:
| Augment Type | Augment Name | Effect |
|---|---|---|
| Major | Supernova | Beam becomes a traveling sphere that damages nearby enemies and detonates at the end |
| Minor | Heavy Gloom | The beam slows enemies on contact |
Why These Builds Work:
Dark Flare is unique because it has two viable Major Augments depending on whether you’re playing solo or co-op.
For Co-Op: Dark Pact transforms Dark Flare into a support tool that heals and revives teammates on contact. The increased revive speed means you can clutch-save downed allies from across the room without putting yourself in danger. It’s situational but incredibly powerful when someone goes down in a bad spot.
For Solo: Supernova solves Dark Flare’s biggest weakness—you don’t have to stand still channeling the beam anymore. Instead, it becomes an autonomous sphere that travels on its own path, dealing damage and detonating at the end. This lets you keep moving while your Field Upgrade does work.
Heavy Gloom is universal for both builds because slowing enemies on contact makes the beam (or sphere) significantly more effective at controlling crowds.
Best Use Cases:
- Dark Pact: Emergency revives in co-op, clutch saves, healing multiple teammates simultaneously
- Supernova: Solo high rounds, maintaining mobility during Field Upgrade activation, area denial
Best For: Co-op support players (Dark Pact) or solo players who need mobility (Supernova)
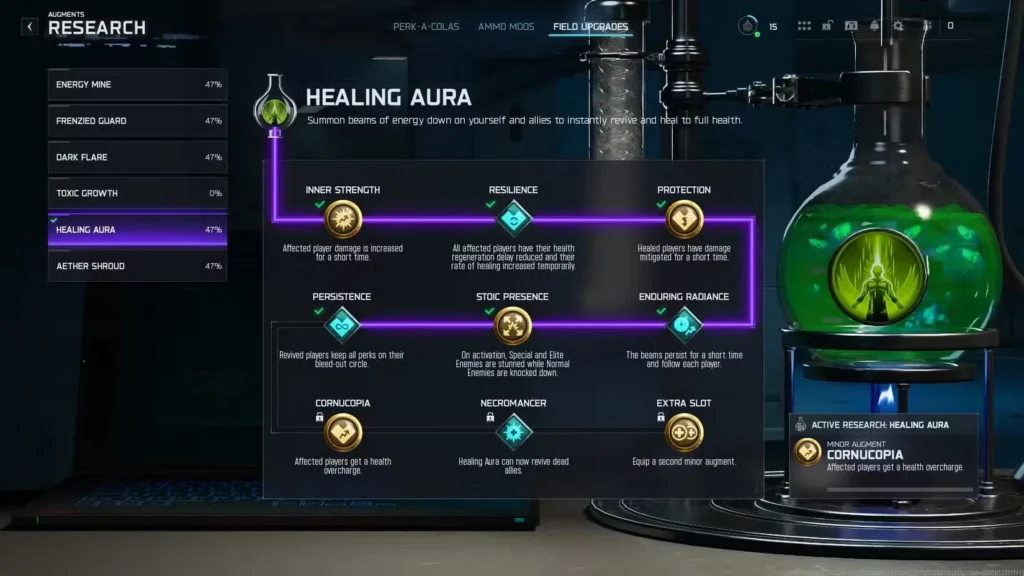
3. Healing Aura: Best Augments for Squad Revival
What Healing Aura Does: Heal all nearby players immediately.
Recommended Augments
| Augment Type | Augment Name | Effect |
|---|---|---|
| Major | Necromancer | Healing Aura can now revive dead allies |
| Minor | Stoic Presence | On activation, Specials/Elites are stunned and Normals are knocked down |
Why This Build Works:
Let’s be honest—Healing Aura is basically useless for solo players. But in co-op? With the right Augments, it becomes one of the most clutch Field Upgrades in the game.
Necromancer is the star here. It lets Healing Aura revive dead allies, which is absolutely massive on a large map like Ashes of the Damned where teammates might go down far away from the squad. One activation can bring back multiple downed players simultaneously, potentially saving a failed run.
Stoic Presence adds defensive utility by stunning Special and Elite enemies while knocking down Normal zombies. This gives your entire team breathing room when you activate Healing Aura, preventing you from getting overwhelmed while revives are happening.
Best Use Cases:
- Mass revives when multiple teammates are down
- Emergency crowd control in overwhelming situations
- Buying time for the squad to regroup and recover
- Clutching final-round objectives when the team is struggling
Important note: If you’re playing solo, skip Healing Aura entirely. Use Aether Shroud or Frenzied Guard instead—they’ll serve you much better.
Best For: Co-op squads, support-focused players, large maps with spread-out teams
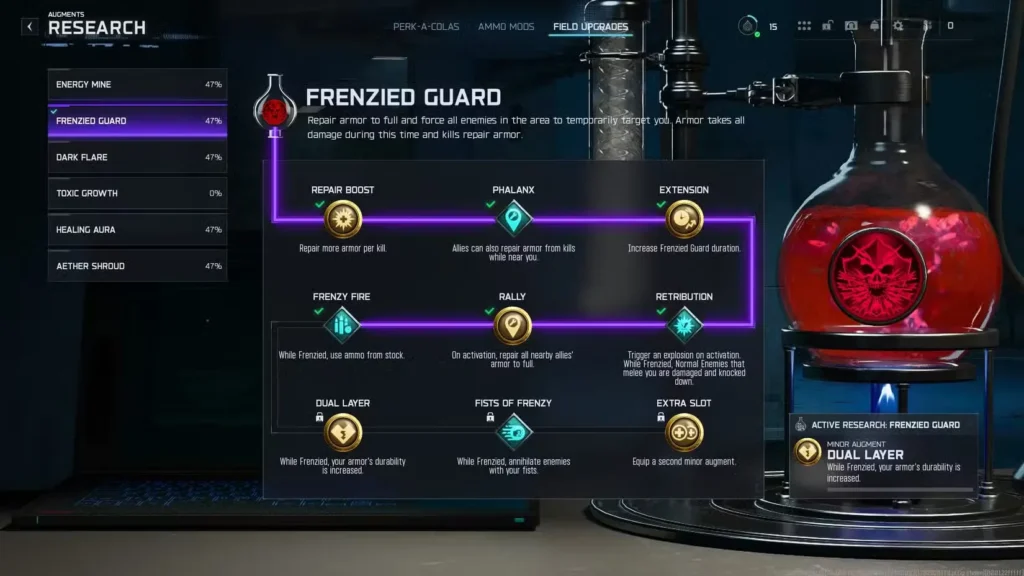
4. Frenzied Guard: Best Augments for Tank Mode
What Frenzied Guard Does: Repair armor to full and force all enemies in the area to temporarily target you. Armor takes all damage during this time, and kills repair your armor.
Recommended Augments
| Augment Type | Augment Name | Effect |
|---|---|---|
| Major | Frenzy Fire | Uses ammo directly from stock — no reloading needed |
| Minor | Dual Layer | While Frenzied Guard is active, armor durability is increased |
Why This Build Works:
Frenzied Guard is arguably the best Field Upgrade in the game for aggressive players, and these Augments make it absolutely insane.
Here’s what makes base Frenzied Guard strong: it repairs your armor to full, makes all enemies target you, and channels all damage to your armor instead of health. Plus, every kill repairs your armor, creating a self-sustaining loop where you’re practically unkillable if you keep getting eliminations.
Now add Frenzy Fire to the mix. This Major Augment makes you draw ammo from your reserve stock instead of your magazine, meaning you never have to reload while Frenzied Guard is active. You can just hold down the trigger and mow through zombie hordes without interruption.
Dual Layer is the cherry on top—it increases your armor durability while Frenzied Guard is active, making you even tankier. Between the armor repair on kills, increased durability, and no reloading, you become an invincible killing machine for the duration.
Best Use Cases:
- Getting cornered or overwhelmed by zombie hordes
- Aggressive training and pushing high rounds
- Buying time for teammates to revive or reposition
- Clutching difficult objectives under pressure
Synergy tip: Combine Frenzied Guard with Jugger-Nog’s Turtle Shell and Durable Plates Augments for maximum tankiness. You’ll be practically impossible to kill.
Best For: Aggressive players, solo high rounds, clutch situations, tank builds
5. Energy Mine: Best Augments for Multi-Detonation
What Energy Mine Does: Create a mine of pure energy that detonates three times.
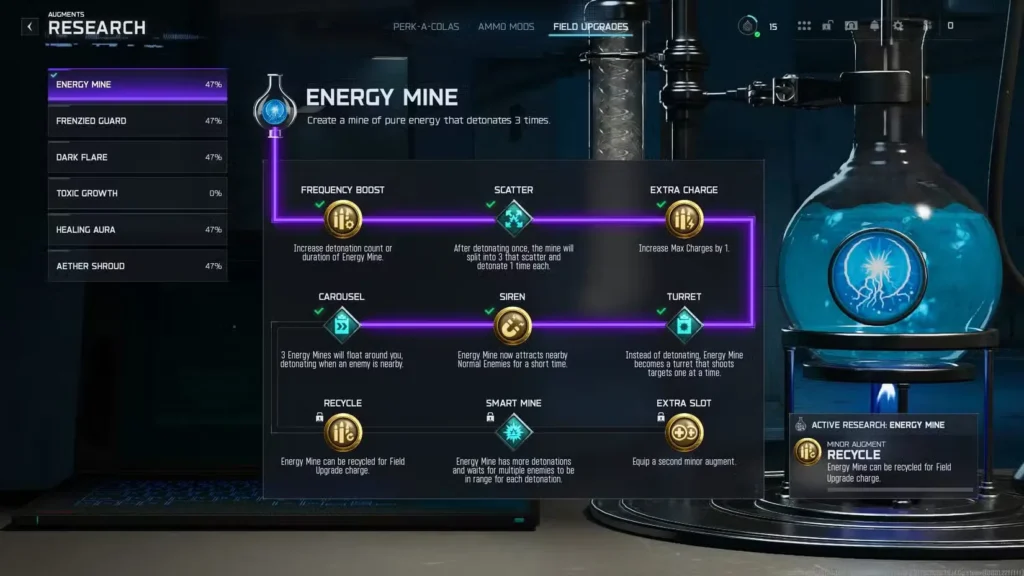
Recommended Augments
| Augment Type | Augment Name | Effect |
|---|---|---|
| Major | Smart Mine | Energy Mine gains more detonations and waits for multiple enemies before each detonation |
| Minor | Frequency Boost | Increases Energy Mine’s detonation count and duration |
Why This Build Works:
Base Energy Mine is… underwhelming. Three small explosions that you have to manually place doesn’t sound impressive, and honestly, it isn’t. But with the right Augments, it becomes a legitimate trap tool.
Smart Mine is crucial because it adds intelligence to your Energy Mine. Instead of detonating randomly, it waits until multiple enemies are in range before triggering each explosion. This maximizes damage and ensures you’re not wasting detonations on single stragglers.
Frequency Boost stacks on even more detonations and extends the duration, meaning your Energy Mine stays active longer and deals more total damage. Together, these Augments turn Energy Mine from “lackluster” to “actually useful for area denial.”
Best Use Cases:
- Setting traps at spawn points before starting rounds
- Blocking pathways during objective completion
- Creating passive damage zones while training
- Stalling Elite zombies in tight corridors
Real talk: Even with optimal Augments, Energy Mine is probably the weakest Field Upgrade at launch. It’s functional, but most players will get more value from Frenzied Guard, Aether Shroud, or Toxic Growth.
Best For: Trap-focused playstyles, camping strategies, players who enjoy passive zone control
6. Aether Shroud: Best Augments for Invisibility
What Aether Shroud Does: Phase into the Dark Aether and become temporarily hidden from enemy detection.
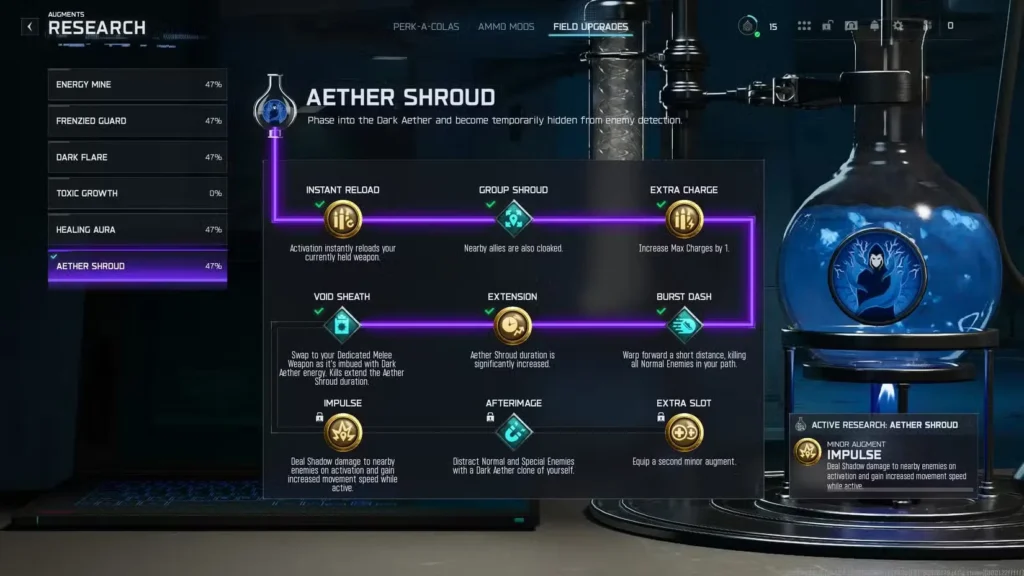
Recommended Augments (Choose Based on Playstyle)
Co-Op Build:
| Augment Type | Augment Name | Effect |
|---|---|---|
| Major | Group Shroud | Nearby players are cloaked as well |
| Minor | Extra Charge | Increase maximum charges by one |
Solo Build:
| Augment Type | Augment Name | Effect |
|---|---|---|
| Major | Burst Dash | Warp forward a short distance, killing all Normal Enemies you pass through |
| Minor | Extra Charge | Increase maximum charges by one |
Why These Builds Work:
Aether Shroud is one of the most essential Field Upgrades in Zombies, and it’s been a crutch ability since its introduction in Cold War. Turning invisible on demand is invaluable for clutch moments, and the right Augments make it even better.
For Co-Op: Group Shroud extends invisibility to nearby teammates, which is incredibly powerful for coordinated plays. Your entire squad can go invisible simultaneously to revive fallen teammates, reposition during chaotic rounds, or safely complete objectives without zombie interference.
For Solo: Burst Dash turns Aether Shroud into an offensive escape tool. You warp forward a short distance, instantly killing all Normal zombies in your path. This is perfect for creating distance when you’re cornered or need to break through a horde quickly.
Extra Charge is universal for both builds. Having two charges of Aether Shroud instead of one means you can use it more liberally without worrying about being caught without it when you really need it. This is especially valuable on high rounds where one mistake can end your run.
Best Use Cases:
- Group Shroud: Mass revives, coordinated objective completion, squad repositioning
- Burst Dash: Emergency escapes, breaking through hordes, creating distance from Special enemies
- Both: Recovering health, catching a breather during intense rounds, clutching impossible situations
Pro tip: Aether Shroud unlocks at Level 48, making it one of the later unlocks. Once you have it, it’s hard to justify using anything else for most playstyles.
Best For: All playstyles (universally useful), clutch escapes, high-round survival, emergency revives
Field Upgrade Priority for Different Playstyles
Not sure which Field Upgrade to use? Here’s my recommendation based on how you play:
Solo High Rounds:
- Frenzied Guard (Frenzy Fire + Dual Layer) – Tankiness and no-reload sustain
- Aether Shroud (Burst Dash + Extra Charge) – Emergency escapes and clutch saves
- Toxic Growth (Urticant + Ankle Shredder) – Area control for training
Co-Op Squad Play:
- Aether Shroud (Group Shroud + Extra Charge) – Team invisibility for revives
- Healing Aura (Necromancer + Stoic Presence) – Mass revive and crowd control
- Dark Flare (Dark Pact + Heavy Gloom) – Support healing and revival
Aggressive Training:
- Frenzied Guard (Frenzy Fire + Dual Layer) – Unkillable during activation
- Aether Shroud (Burst Dash + Extra Charge) – Emergency resets
- Dark Flare (Supernova + Heavy Gloom) – Mobile damage output
Defensive Camping:
- Toxic Growth (Urticant + Ankle Shredder) – Lock down spawn points
- Energy Mine (Smart Mine + Frequency Boost) – Passive trap damage
- Frenzied Guard (Frenzy Fire + Dual Layer) – Break out when overwhelmed
Optimal Field Upgrade + Perk Synergies
Maximize your effectiveness by pairing Field Upgrades with complementary perks:
Frenzied Guard + Jugger-Nog (Turtle Shell + Durable Plates):
- Combined tankiness makes you nearly invincible
- Armor durability stacks for absurd damage mitigation
- Perfect for aggressive high-round play
Aether Shroud + Quick Revive (Equivalent Exchange + Slow Death):
- Aether Shroud for escape, Quick Revive for self-revive safety net
- Double lifeline for clutch situations
- Essential combo for solo high rounds
Toxic Growth + Stamin-Up (Guns Up + Footwork):
- Slow zombies with Toxic Growth, outrun them with Stamin-Up
- Perfect for maintaining train control
- Shoot while sprinting to clear slowed enemies
Healing Aura + PhD Flopper (DR RAM + Tribologist):
- Healing Aura for team recovery, PhD for mobility
- Knock down zombies while moving to revive teammates
- Excellent co-op support build
For complete perk optimization, check out the full Perk Augment guide and all perk locations on Ashes of the Damned.
Tips for Using Field Upgrades Effectively
Charge Management:
- Field Upgrades charge by killing zombies and dealing damage
- Save your charge for critical moments rather than using it immediately
- Higher-tier kills (Special/Elite enemies) grant more charge
- Consider running Extra Charge on Aether Shroud to have two available
Timing Your Activation:
- Don’t waste Field Upgrades on low-pressure situations
- Save them for emergencies, boss fights, or objective completions
- In co-op, communicate with your team before using Healing Aura or Group Shroud
- Use Frenzied Guard when cornered, not when you’re comfortably training
Augment Flexibility:
- You can change Augments between matches
- Test different combinations to find what suits your playstyle
- Co-op builds differ significantly from solo builds—adjust accordingly
- Some Augments become more valuable on higher rounds
Coming Soon: Mister Peeks & Tesla Storm
Two additional Field Upgrades are confirmed but not available at launch:
Mister Peeks:
- Expected to be a support/utility Field Upgrade
- Details on functionality and Augments coming post-launch
- Likely tied to seasonal content or updates
Tesla Storm:
- Presumably an offensive Field Upgrade based on the name
- May involve electrical damage or chain effects
- Augments and mechanics to be revealed upon release
I’ll update this guide once these Field Upgrades are available with full Augment recommendations.
Master Your Field Upgrades
Field Upgrades are your clutch factor in Black Ops 7 Zombies, and choosing the right Augments transforms them from basic abilities into game-winning tools. Whether you’re soloing high rounds with Frenzied Guard’s invincibility, clutching team saves with Aether Shroud’s Group Shroud, or locking down entire areas with Toxic Growth, these Augment builds will keep you alive when everything else fails.
My personal recommendations? Start with Frenzied Guard for solo play—it’s the most forgiving and powerful option for learning high-round strategies. Once you’re comfortable, experiment with Aether Shroud for maximum clutch potential. And if you’re playing co-op, don’t sleep on Group Shroud—it’s one of the most broken team abilities in Zombies history.
As you progress through Prestige ranks and unlock more Augments, you’ll find even more creative combinations. But these core builds will carry you through the vast majority of situations on Ashes of the Damned and beyond.
Now go activate those Field Upgrades and show those zombies who’s boss.
Related Guides: