If you’ve been grinding Black Ops 7 Zombies, you’ve probably noticed that Perk-a-Colas aren’t just the same old vending machine purchases anymore. Treyarch introduced Augments—a game-changing system that lets you customize each perk with additional abilities tailored to your playstyle.
Think of Augments as steroids for your perks. Every Perk-a-Cola in Black Ops 7 can be enhanced with one Major Augment (the big power boost) and one Minor Augment (the supporting buff). Choose the right combinations, and you’ll turn standard perks into survival powerhouses that can carry you through high rounds without breaking a sweat.
I’ve tested all 12 perks and their Augments extensively, and I’m breaking down the absolute best combinations for each one. Whether you’re training zombies, rushing Pack-a-Punch, or just trying to survive past round 30, these Augment builds will keep you alive longer.
How Perk Augments Work in Black Ops 7
Before we dive into specific builds, here’s what you need to know about the Augment system:
The Basics:
- Black Ops 7 launches with 12 Perk-a-Colas total (11 returning classics + 1 brand new)
- Each perk has multiple Major Augments (game-changing abilities) and Minor Augments (smaller buffs)
- You can equip 1 Major + 1 Minor Augment per perk
- Augments unlock through progression (check your level unlock guide for details)
- Augments are accessed through Augment Research, which unlocks at Level 11
Why Augments Matter: Perk-a-Colas have always been essential in Zombies, but Augments take them from “helpful” to “absolutely broken” in the best way possible. The right Augment can completely change how a perk functions—turning Quick Revive into a self-revive machine or making PhD Flopper clear entire zombie hordes just by sprinting.
1. Wisp Tea: Best Augments for Companion Support
What Wisp Tea Does: Summons a companion wisp every 2 minutes after killing zombies. The wisp attacks enemies or supports you depending on your Augment choices.

Recommended Augments
| Augment Type | Augment Name | Effect |
|---|---|---|
| Major | Mask of Benevolence | The Maiden does not attack but will periodically heal you |
| Minor | Haste | Decrease the cooldown before a Wisp can be summoned |
Why This Build Works:
Wisp Tea is all about versatility, but I strongly recommend Mask of Benevolence for your Major Augment. Here’s why: when you’re training zombies in high rounds, the last thing you need is a wisp randomly killing stragglers and messing up your horde formation.
With Mask of Benevolence, the Maiden becomes a healing support that doesn’t interfere with your zombie train—it just keeps you topped off on health. Pair this with Haste to reduce the cooldown, and you’ll have healing support available more frequently.
Best For: Solo players, high-round runs, conservative playstyles
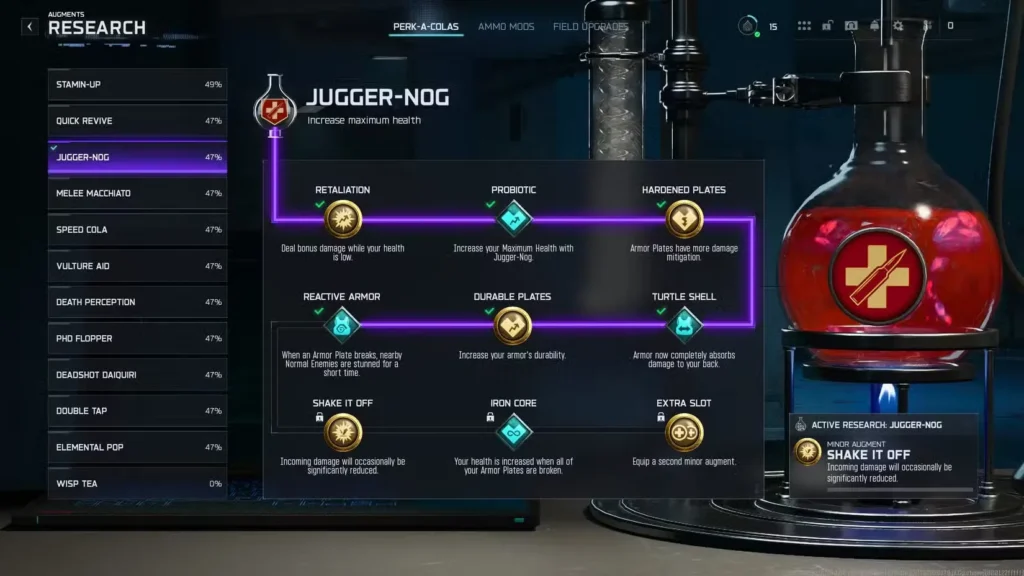
2. Jugger-Nog: Best Augments for Maximum Survivability
What Jugger-Nog Does: Increases your maximum health—the classic zombie survival staple since World at War.
Recommended Augments
| Augment Type | Augment Name | Effect |
|---|---|---|
| Major | Turtle Shell | Armor acts as a shield on your back, fully absorbing rear damage while keeping normal mitigation up front |
| Minor | Durable Plates | Increase armor durability |
Why This Build Works:
Jugger-Nog has always been the first perk you buy, and these Augments make it even more essential. Turtle Shell is absolutely cracked—it makes your back armor completely absorb rear damage while keeping front damage mitigation normal. This is basically like having the classic zombie shield permanently attached to your back.
When you’re running trains (which you should be on high rounds), most damage comes from behind when zombies catch up. Turtle Shell negates that entirely. Add Durable Plates to increase your armor durability, and you become significantly harder to kill.
Pro tip: Combine Turtle Shell with Death Perception’s Sixth Sense for even more rear protection. You’ll be practically invincible from behind.
Best For: All playstyles, essential for high rounds, training zombies
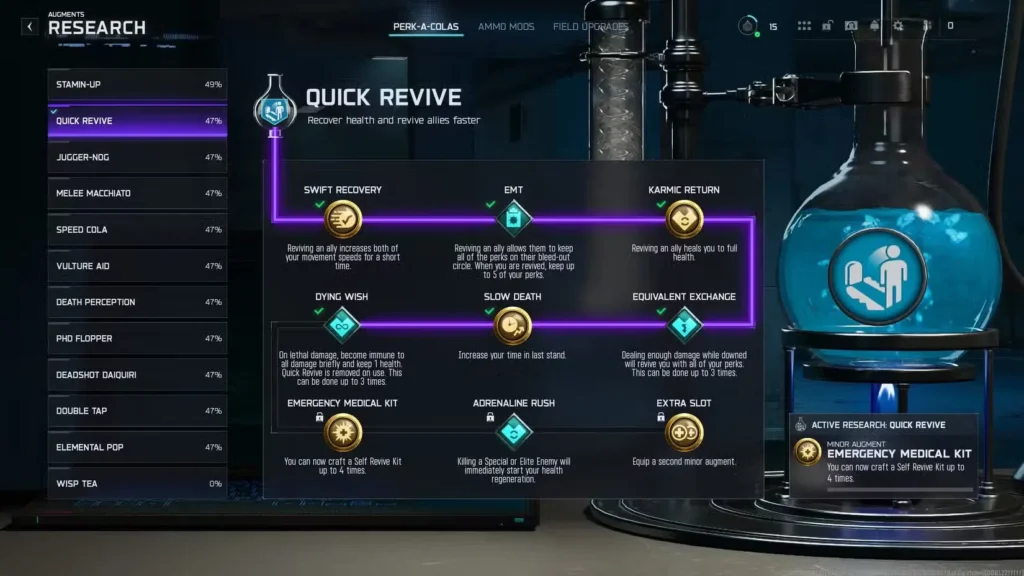
3. Quick Revive: Best Augments for Self-Revive Power
What Quick Revive Does: Recover health faster and revive allies faster. In solo, it gives you extra down opportunities.
Recommended Augments
| Augment Type | Augment Name | Effect |
|---|---|---|
| Major | Equivalent Exchange | If you have Quick Revive while downed, killing an enemy revives you (up to 3 times). Quick Revive isn’t consumed, and you keep all Perks if you secure a kill while downed. |
| Minor | Slow Death | Increase your time in last stand. |
Why This Build Works:
Let me be clear: Equivalent Exchange is one of the most overpowered Augments in the entire game. This is basically Dying Wish on steroids. When you go down, you can get back up by killing a single zombie, and you keep Quick Revive plus ALL your perks. You can do this three times.
Think about that for a second. Three guaranteed get-out-of-jail-free cards that don’t even consume your perk. It’s absolutely bonkers for solo high-round runs.
Slow Death extends your last stand time, giving you more room to secure that zombie kill for Equivalent Exchange or giving your teammates more time to revive you in co-op.
Best For: Solo players, high-round attempts, aggressive playstyles
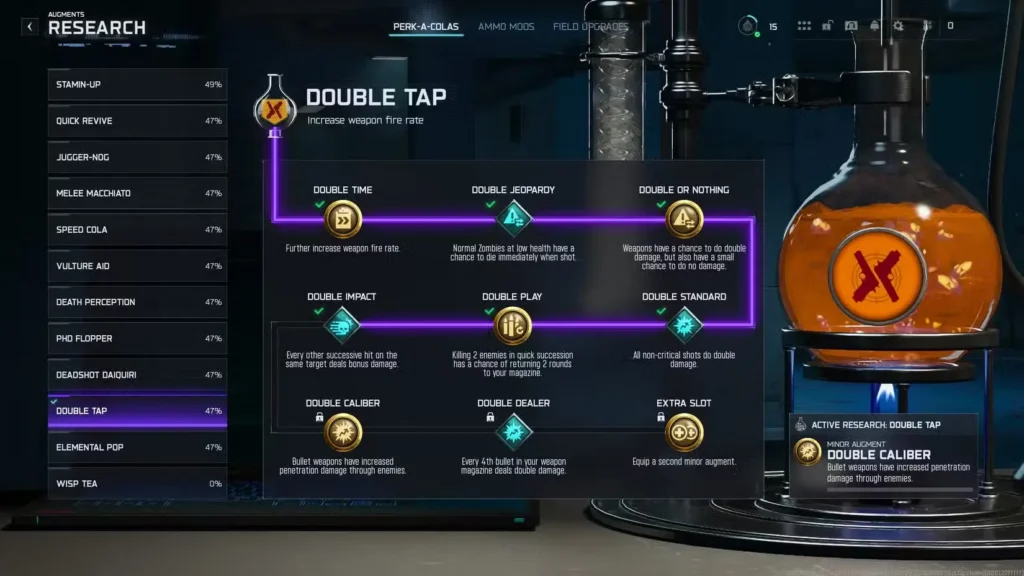
4. Double Tap: Best Augments for Damage Output
What Double Tap Does: Increases weapon fire rate—more bullets downrange means more dead zombies.
Recommended Augments
| Augment Type | Augment Name | Effect |
|---|---|---|
| Major | Double Dealer | Every fourth bullet in your magazine deals double damage |
| Minor | Double Down | Bullet weapons gain increased penetration damage through enemies |
Why This Build Works:
Double Tap already boosts your fire rate, but Double Dealer takes your damage to another level. Every fourth bullet deals double damage, which means every magazine is consistently hitting harder. This works on literally any gun with 4+ bullets, making it universally useful.
Pair this with Double Down for increased penetration damage, and your bullets will tear through zombie hordes like paper. This combination is especially deadly with LMGs, assault rifles, or any weapon with high magazine capacity.
Weapon synergy: This build shines with the best sniper loadouts or any high-capacity weapon where that fourth bullet bonus triggers constantly.
Best For: DPS builds, training zombies, weapons with large magazines
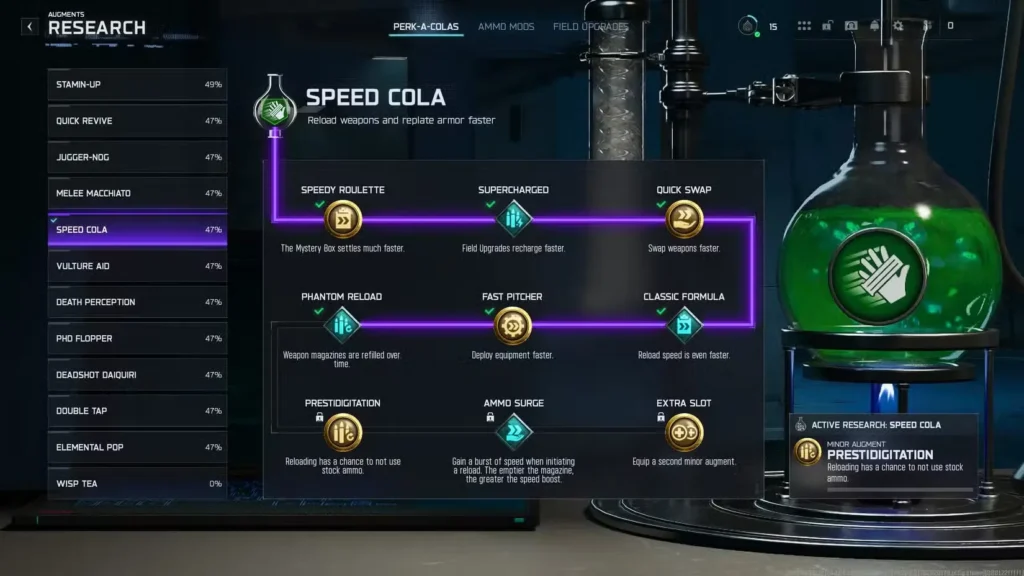
5. Speed Cola: Best Augments for Combat Efficiency
What Speed Cola Does: Reload weapons and replate armor 30% faster—keeps you in the fight longer.
Recommended Augments
| Augment Type | Augment Name | Effect |
|---|---|---|
| Major | Classic Formula | Reload speed is even faster |
| Minor | Quick Swap | Swap weapons faster |
Why This Build Works:
Speed Cola is already excellent for keeping downtime minimal, but Classic Formula pushes reload speed even further. You’ll practically never have an empty magazine—reloads are nearly instant with this combination.
Quick Swap complements this perfectly by letting you switch between weapons faster. If you’re running an LMG as your primary and need to quick-swap to your secondary for emergency situations, this build ensures zero delay.
Best For: Aggressive players, dual-wielding strategies, high-fire-rate weapons
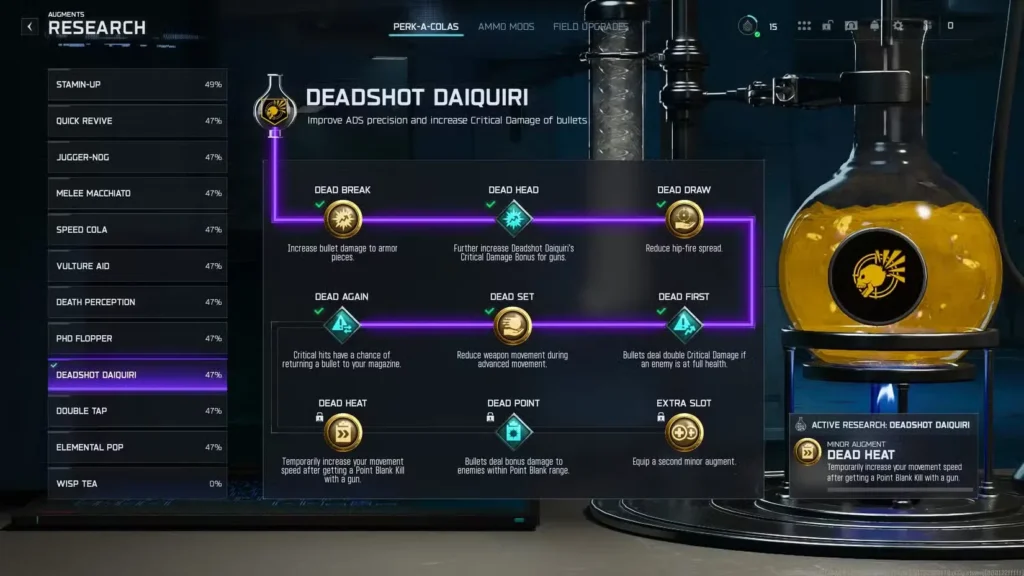
6. Deadshot Daiquiri: Best Augments for Precision Damage
What Deadshot Daiquiri Does: Improves ADS precision and increases critical damage—headshots become significantly more lethal.
Recommended Augments
| Augment Type | Augment Name | Effect |
|---|---|---|
| Major | Dead First | Bullets deal double Critical Damage if the enemy is at full health |
| Minor | Dead Heat | Temporarily increases movement speed after getting a Point-Blank kill |
Why This Build Works:
If you’re running shotguns or sniper rifles, Dead First is absolutely mandatory. Double critical damage on the first shot means instant kills on Elite zombies and Special enemies, even on higher rounds. The first bullet dealing double headshot damage is devastating.
Dead Heat is the perfect Minor Augment because point-blank kills (which happen constantly with shotguns or aggressive play) give you temporary movement speed boosts. This keeps you mobile and lets you reposition quickly after securing kills.
Build synergy: This setup is god-tier for shotgun users training zombies. Get in close, delete an enemy with double crit damage, then zoom away with the movement speed boost.
Best For: Shotgun builds, sniper rifles, precision players, Elite zombie hunting
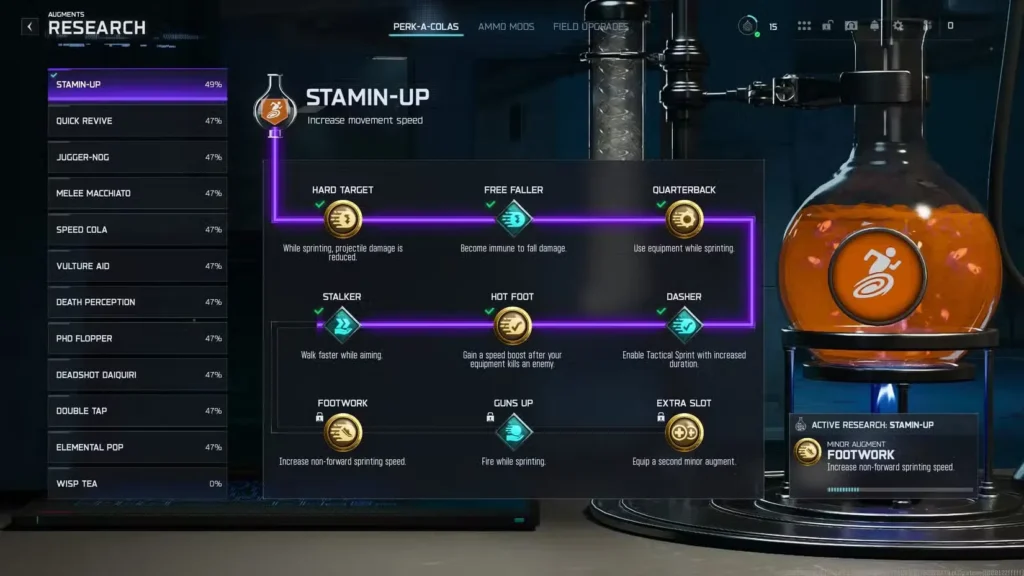
7. Stamin-Up: Best Augments for Maximum Mobility
What Stamin-Up Does: Increases movement speed and sprint duration—stay ahead of the horde.
Recommended Augments
| Augment Type | Augment Name | Effect |
|---|---|---|
| Major | Guns Up | Fire while sprinting |
| Minor | Footwork | Increase non-forward sprinting speed |
Why This Build Works:
Stamin-Up is all about mobility, and Guns Up takes it to the next level by letting you shoot while sprinting. No more stopping to fire—you can kite zombies while laying down fire simultaneously. It’s incredibly fun and surprisingly effective for maintaining pressure on hordes.
Footwork increases your strafing and non-forward sprint speed, which is crucial when you’re circling a horde or repositioning during training. Combine these two, and you become an incredibly mobile death machine.
Best For: Training zombies, aggressive playstyles, run-and-gun strategies
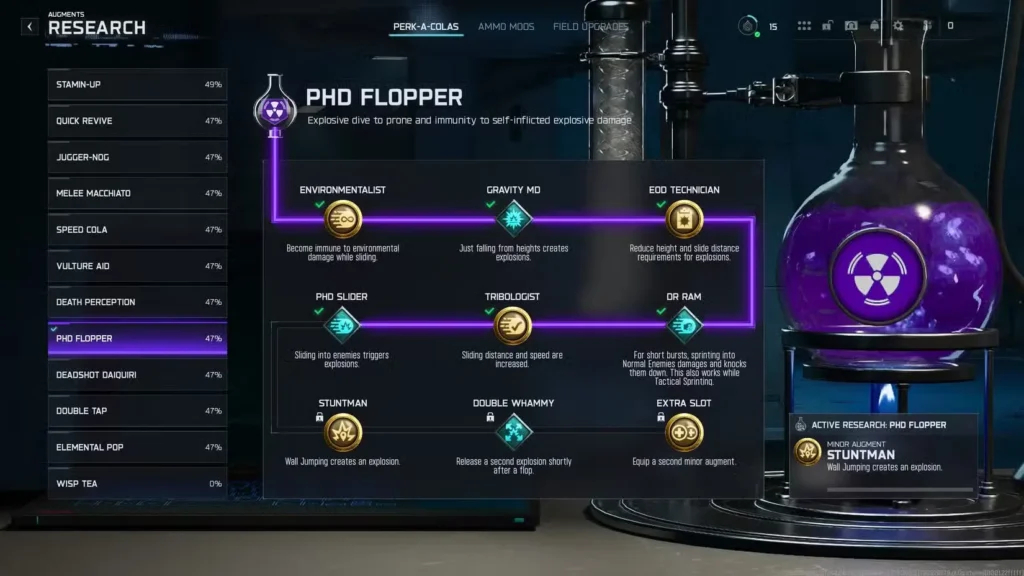
8. PhD Flopper: Best Augments for Explosive Immunity
What PhD Flopper Does: Explosive dive to prone and immunity to self-inflicted explosive damage—classic PhD goodness.
Recommended Augments
| Augment Type | Augment Name | Effect |
|---|---|---|
| Major | DR RAM | For short bursts, sprinting into Normal Enemies damages and knocks them down (works with Tactical Sprint too) |
| Minor | Tribologist | Sliding distance and speed are increased |
Why This Build Works:
PhD Flopper’s explosive dives are fun, but DR RAM is where this perk gets practical. Sprinting into zombies knocks them down and damages them, which is clutch when a zombie spawns directly in your path and threatens to break your train.
I can’t count how many times I’ve died because a zombie spawned right in front of me while I was sprinting. DR RAM eliminates that problem—you just bulldoze through them.
Tribologist increases slide distance and speed, keeping you mobile and agile. The combination of knocking down zombies on sprint and sliding faster makes this build incredibly satisfying for movement-focused gameplay.
Best For: Speed runners, training zombies, avoiding spawn-blocking zombies
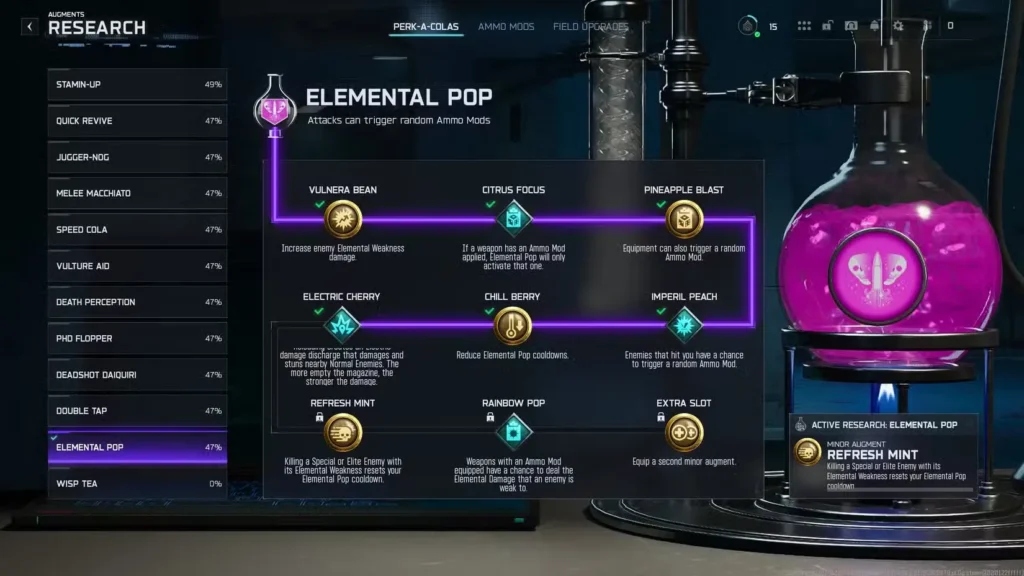
9. Elemental Pop: Best Augments for Ammo Mod Damage
What Elemental Pop Does: Attacks can trigger random Ammo Mods—adds elemental variety to your damage output.
Recommended Augments
| Augment Type | Augment Name | Effect |
|---|---|---|
| Major | Rainbow Pop | Weapons with an Ammo Mod have a chance to deal the elemental damage an enemy is weak to |
| Minor | Vulnera Bean | Increase enemy elemental weakness damage |
Why This Build Works:
Elemental Pop is inherently random, which can be frustrating. Rainbow Pop mitigates this by increasing the chance that you’ll trigger the correct elemental damage for whatever enemy you’re facing. This makes the perk far more consistent and reliable.
Vulnera Bean doubles down by increasing the damage dealt to enemies when you hit their elemental weakness. Together, these Augments turn Elemental Pop from “fun but random” into “legitimately powerful elemental damage source.”
Best For: Players using Ammo Mods, high-round Elite zombie encounters
10. Melee Macchiato: Best Augments for Melee Builds
What Melee Macchiato Does: Replaces weapon gun butt with a deadly punch—turns melee into a viable strategy.
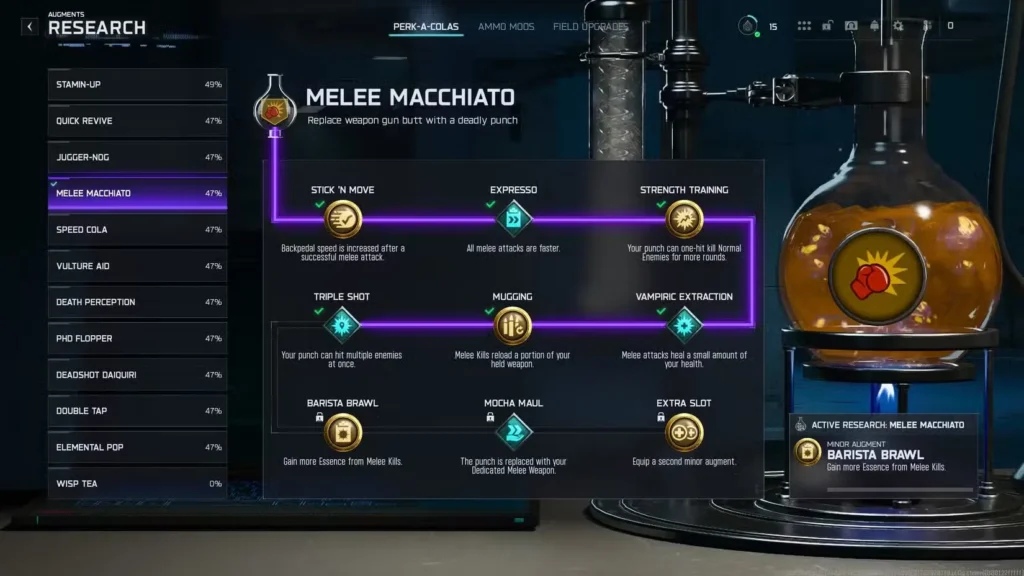
Recommended Augments
| Augment Type | Augment Name | Effect |
|---|---|---|
| Major | Expresso | All melee attacks are faster |
| Minor | Stick ‘n Move | Backpedal speed increases after landing a successful melee attack |
Why This Build Works:
Melee builds are tricky in Zombies because you’re constantly trading hits with enemies. Expresso solves this by making all melee attacks significantly faster, letting you strike multiple times before zombies can retaliate.
Stick ‘n Move complements this perfectly by increasing your backpedal speed after landing a melee hit. This lets you strike, retreat, and maintain your zombie train without getting cornered.
Melee build tip: Combine this with the Flatline MK.II melee weapon (unlocks at Level 49) for a genuinely viable melee-focused playstyle.
Best For: Melee weapon builds, challenge runs, close-quarters combat
11. Vulture Aid: Best Augments for Loot and Armor
What Vulture Aid Does: Increases the variety and commonness of loot dropped by enemies, including Armor Plates.
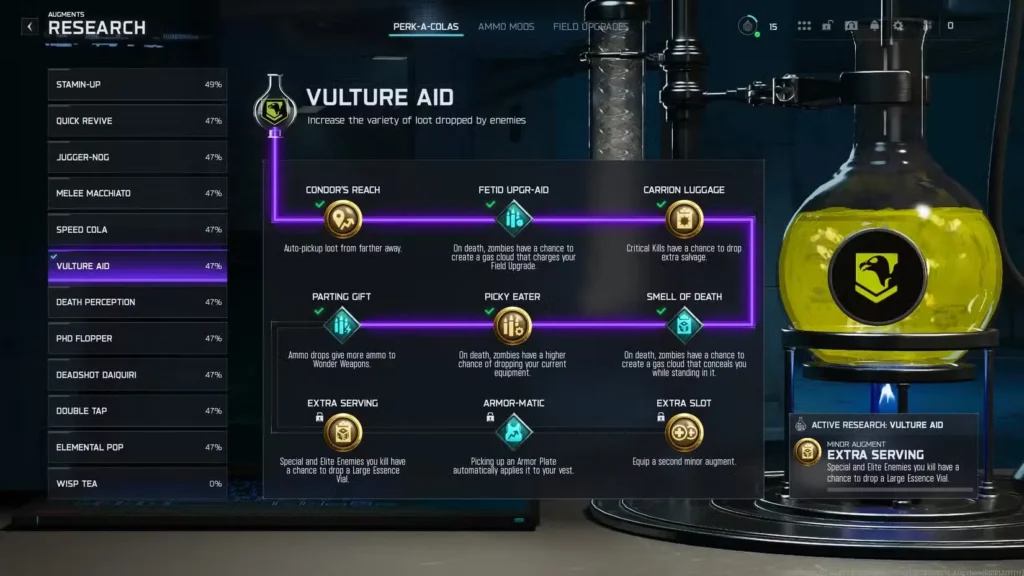
Recommended Augments
| Augment Type | Augment Name | Effect |
|---|---|---|
| Major | Armor-matic | Picking up an Armor Plate automatically applies it to your vest |
| Minor | Condor’s Reach | Auto-pick up loot from further away |
Why This Build Works:
Vulture Aid isn’t the flashiest perk, but these Augments make it surprisingly useful. Armor-matic is a massive quality-of-life improvement—you’ll never have to manually apply Armor Plates again. They automatically equip the moment you pick them up.
Condor’s Reach extends your auto-pickup range, meaning you’ll scoop up loot without even trying. Combine these two, and you’ll always have full armor without ever thinking about it.
Best For: Casual players, quality-of-life improvements, high-round survival
12. Death Perception: Best Augments for Awareness
What Death Perception Does: Obscured enemies are outlined—helps you track zombie positions through walls and obstacles.
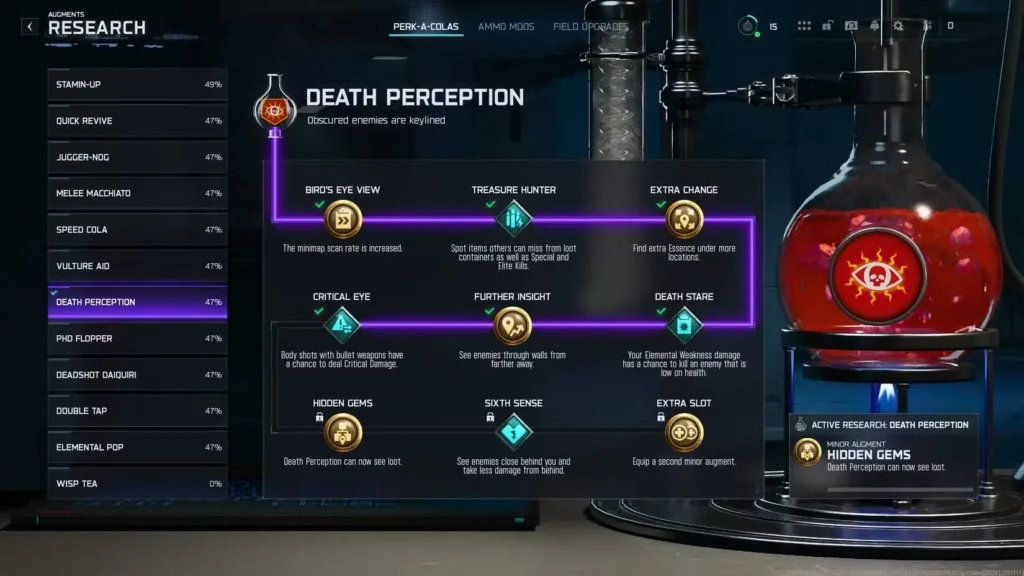
Recommended Augments
| Augment Type | Augment Name | Effect |
|---|---|---|
| Major | Sixth Sense | See enemies close behind you and take reduced damage from behind |
| Minor | Bird’s Eye View | Increases the minimap’s scan rate |
Why This Build Works:
Death Perception isn’t essential, but Sixth Sense makes it worth considering by reducing damage taken from behind. This stacks beautifully with Jugger-Nog’s Turtle Shell—combine both, and rear attacks become almost negligible.
Bird’s Eye View increases your minimap scan rate, essentially giving you a permanent mini-UAV. You’ll see more enemies on your minimap more frequently, which helps with situational awareness during chaotic high-round scenarios.
Best For: Defensive builds, stacking with Jugger-Nog’s Turtle Shell, awareness-focused players
Optimal Perk Loadout for High Rounds
If you want the absolute best survival setup for pushing high rounds, here’s my recommended perk priority:
Essential Four Perks:
- Jugger-Nog (Turtle Shell + Durable Plates) – Non-negotiable survivability
- Quick Revive (Equivalent Exchange + Slow Death) – Three guaranteed revives
- Speed Cola (Classic Formula + Quick Swap) – Combat efficiency
- Stamin-Up (Guns Up + Footwork) – Mobility for training
Additional Perks for Full Build:
- PhD Flopper (DR RAM + Tribologist) – Spawn protection and mobility
- Deadshot Daiquiri (Dead First + Dead Heat) – Damage output
- Double Tap (Double Dealer + Double Down) – Raw DPS increase
- Death Perception (Sixth Sense + Bird’s Eye View) – Stacks with Jugger-Nog
This loadout focuses on survival, mobility, and damage output—the holy trinity of high-round Zombies gameplay. As you progress through Prestige ranks, you’ll unlock more Augments to experiment with different combinations.
Tips for Unlocking and Using Augments
Unlocking Augments:
- Augment Research unlocks at Level 11
- Additional Augments unlock as you level up and progress
- Check your level unlock guide to see when specific Augments become available
Using Augments Effectively:
- Experiment with different combinations to match your playstyle
- Major Augments change core perk functionality—choose based on your strategy
- Minor Augments are smaller buffs but still impactful
- You can change Augments between matches, so don’t be afraid to test different builds
Synergy Tips:
- Stack defensive Augments (Jugger-Nog + Death Perception) for tanky builds
- Combine mobility Augments (Stamin-Up + PhD Flopper) for speed-focused gameplay
- Pair damage Augments (Double Tap + Deadshot) for DPS-focused loadouts
Build Your Perfect Zombie Slayer
Augments have transformed how Perk-a-Colas work in Black Ops 7 Zombies, and honestly? It’s one of the best additions Treyarch has made to the mode. Every perk feels meaningfully enhanced, and the ability to customize them to your playstyle adds a layer of depth that keeps the gameplay fresh.
Whether you’re running trains on Ashes of the Damned, pushing for high rounds, or just trying to survive casual matches with friends, the right Augment combinations will give you a massive advantage. Quick Revive’s Equivalent Exchange alone is worth the price of admission—it’s genuinely that powerful.
My advice? Start with the essentials (Jugger-Nog, Quick Revive, Speed Cola, Stamin-Up), optimize their Augments, then expand your loadout based on what you need. If you’re struggling with mobility, grab PhD Flopper. Need more damage? Double Tap and Deadshot have you covered.
Now get out there and start experimenting. Those high rounds aren’t going to survive themselves.
Related Guides: