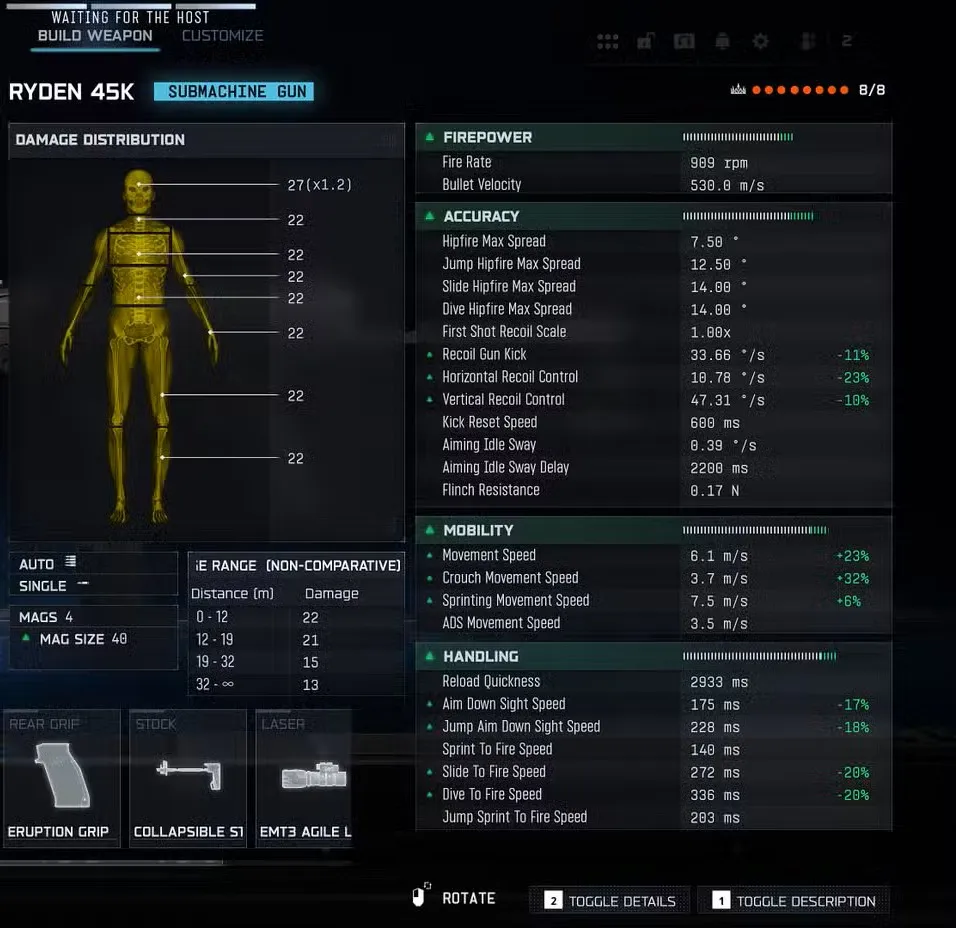
The Ryden 45K doesn’t mess around. With a blistering 909 rounds per minute fire rate—the second fastest in Black Ops 7—this SMG is designed for one purpose: melting opponents before they can react in close-quarters combat. If you thrive in the chaos of tight corridors, contested objectives, and aggressive flanking routes, the Ryden 45K might be your new best friend.
But here’s the catch: all that fire rate comes with recoil challenges that can turn a laser beam into a spray-and-pray disaster if you don’t build it correctly. I’m going to show you exactly how to harness the Ryden 45K’s incredible TTK potential while managing its quirks to create a weapon that dominates its intended range.
Why the Ryden 45K Stands Out
Before we dive into attachments, let’s understand what makes this SMG special in Black Ops 7’s weapon ecosystem.
The Fire Rate Advantage
909 RPM translates to roughly 15 bullets per second. In practical terms, this means the Ryden 45K dumps its magazine faster than almost any other weapon in the game. Within its optimal range (0-10 meters), this fire rate creates an incredibly fast time-to-kill that rivals even the most meta SMG options.
What This Means in Gameplay:
- You win face-to-face gunfights against slower-firing weapons
- Spray accuracy matters less when you’re landing 6+ shots instantly
- Magazine empties quickly—ammo management becomes critical
- Missing even a few bullets still leaves enough to secure the kill
The Damage Profile
The Ryden 45K features middle-of-the-pack damage per bullet that compensates with sheer volume of fire. While individual shots don’t hit particularly hard, the cumulative damage over that 909 RPM fire rate creates competitive TTK numbers within its effective range.
Damage Falloff:
- 0-10 meters: Optimal TTK, weapon shines brightest
- 10-15 meters: Still competitive but less dominant
- 15-25 meters: Usable but inconsistent
- 25+ meters: Severe falloff, avoid these engagements
This damage profile makes the Ryden 45K a specialist weapon—incredible at its job but requiring smart positioning.
Mobility and Handling
The Ryden 45K is naturally snappy and fast, offering excellent base mobility stats typical of the SMG class. Sprint-to-fire times are quick, ADS speed is responsive, and movement speed while ADSing remains high. This mobility is crucial since you need to constantly position yourself within your optimal engagement range.
The Recoil Challenge
Here’s where things get interesting. The Ryden 45K has two recoil characteristics you need to manage:
Vertical Kick: Moderate upward recoil that pulls your aim progressively higher as you hold the trigger. This is manageable and can be compensated with attachments.
Horizontal Shake: The real challenge—side-to-side recoil that creates randomness in your bullet spread. This cannot be completely eliminated, only reduced to manageable levels.
The good news? With proper attachment selection, you can control the vertical kick effectively and mitigate enough horizontal shake to keep the weapon competitive.

The Optimal Ryden 45K Loadout
After extensive testing across various maps and game modes, here’s the build that maximizes the Ryden 45K’s strengths while minimizing its weaknesses.
Core 5-Attachment Build
Optic: Lethal Tools ELO
The ELO sight provides a clean, unobstructed sight picture that’s perfect for tracking fast-moving targets in close-quarters chaos. The Ryden 45K’s iron sights are functional, but the ELO eliminates any visual clutter that might slow down target acquisition.
Why This Works:
- Minimal screen obstruction for peripheral awareness
- Fast target acquisition in hectic CQB scenarios
- Clean sight picture helps with recoil tracking
- Better for snap-shooting and quick target switches
Alternative: If you prefer iron sights and want to save an attachment slot, the Ryden 45K’s base sights are adequate. Use that slot for an extra Gunfighter attachment instead.
Muzzle: Bowen .45 Suppressor
Staying off the minimap is crucial in Black Ops 7, especially for aggressive flanking SMG players. The Bowen suppressor keeps you hidden while providing a minor range extension that helps push your effective range slightly beyond the base 10 meters.
Benefits:
- No minimap ping when firing (critical for flanking)
- Slight damage range extension
- Maintains stealth for multi-kill opportunities
- Prevents enemies from tracking your position via gunfire
Trade-off: Minor reduction to bullet velocity, but at SMG ranges, this is negligible.
Underbarrel: Flowguard Foregrip
This is your primary recoil control attachment. The Flowguard Foregrip significantly reduces both vertical kick and horizontal shake, making sustained fire dramatically more accurate.
Impact on Gameplay:
- Easier to stay on target during full-auto bursts
- Extends effective range by improving accuracy
- Reduces the skill floor for controlling the weapon
- More bullets land on target = faster actual TTK
The Flowguard Foregrip is non-negotiable for this build. Without it, the Ryden 45K becomes frustratingly inconsistent beyond point-blank range.
Magazine: Torch Extended Mag
With a fire rate of 909 RPM, you burn through ammo at an alarming rate. The standard magazine will barely handle two kills before running dry, which is unacceptable for aggressive play.
Extended Mag Benefits:
- More bullets per engagement
- Reduced reload frequency
- Chain multiple kills without downtime
- Less vulnerable to third-party attacks during reloads
Important: Even with extended mags, trigger discipline matters. Controlled bursts conserve ammo and maintain accuracy better than holding down the trigger mindlessly.
Laser: EMT3 Agile Laser
The Agile Laser improves your sprint-to-fire speed and hip-fire accuracy—both critical stats for aggressive SMG play. The faster you can get shots on target after sprinting, the more first-shot advantages you’ll secure.
Why This Matters:
- Win sprint-out gunfights (common in CQB)
- Better hip-fire for extreme close-range scenarios
- Improved mobility while ADSing
- Faster target engagement when rounding corners
Downside: Visible laser gives away your position if enemies see it. In practice, this rarely matters since you’re moving constantly and engagements happen too quickly for opponents to react to the laser.
Gunfighter Wildcard Additions
If you’re running the Gunfighter wildcard (highly recommended for the Ryden 45K), add these three attachments:
Fire Mods: Recoil Sync Unit
The Recoil Sync Unit further smooths out recoil patterns, eliminating most of the remaining vertical climb. Combined with the Flowguard Foregrip, this makes the Ryden 45K feel almost laser-accurate within its effective range.
Rear Grip: Eruption Grip
Faster ADS speed and improved sprint-to-fire times stack with the Agile Laser, making your weapon handling incredibly snappy. Every millisecond improvement to these stats translates to more won gunfights.
Stock: Collapsible Stock
Increased strafe speed while ADSing makes you a harder target during gunfights. Movement is king in Black Ops 7, and the Collapsible Stock lets you dance around opponents while maintaining accuracy.
Full 8-Attachment Performance:
With all eight attachments equipped, the Ryden 45K transforms into a finely-tuned close-quarters weapon that:
- Maintains incredible fire rate and TTK
- Controls recoil effectively within 15 meters
- Handles like a dream with minimal input lag
- Sustains fire long enough for multi-kills
- Stays hidden on the minimap while flanking
What This Build Actually Delivers
Let’s break down the tangible benefits you’re getting:
Improved Accuracy and Control
- Vertical recoil reduction: Flowguard + Recoil Sync eliminate most upward climb
- Horizontal stabilization: Manageable side-to-side movement
- Clean sight picture: ELO sight speeds up target acquisition
- Extended accuracy range: Recoil control pushes viable range to ~15 meters
Enhanced Handling and Mobility
- Lightning-fast ADS: Agile Laser + Eruption Grip combination
- Improved sprint-to-fire: React faster when caught sprinting
- Better strafe speed: Harder to hit during gunfights
- Maintained movement speed: Navigate the map efficiently
Stealth and Sustainability
- No minimap pings: Bowen Suppressor keeps flanks hidden
- Extended magazine: Chain kills without reloading
- Slight range extension: Suppressor bonus damage range
- Hip-fire capability: Emergency close-range option
Damage Range Optimization
While the Ryden 45K won’t compete at medium range regardless of attachments, this build pushes its viable engagement distance to approximately 15 meters comfortably, with usability extending to 20-25 meters if necessary.
Complete Class Setup
A weapon is only as effective as the class supporting it. Here’s the optimal setup around the Ryden 45K:
Combat Specialty and Perks
Recommended Specialty: Enforcer
The Enforcer Combat Specialty synergizes perfectly with the Ryden 45K’s aggressive playstyle. After each kill, you gain buffs to movement speed and health regeneration—exactly what you need when chain-fragging through enemy positions.
Perk Setup (Red/Enforcer):
- Perk 1: Gung Ho – Shoot while sprinting and sliding for ultimate aggression
- Perk 2: Assassin – See enemy health bars and earn bonus score for eliminating damaged enemies
- Perk 3: Dexterity – Faster weapon handling across all actions
This full-red perk loadout activates Enforcer while providing maximum mobility and aggression support.
Alternative: Scout Specialty
If you prefer a hybrid approach, mix red and blue perks for the Scout Combat Specialty, which keeps you hidden from minimaps after kills. This pairs well with the suppressed Ryden 45K for sustained stealth.
Scout Setup:
- 2 Red Perks (Gung Ho + one other Enforcer perk)
- 1 Blue Perk (Ghost or Ninja for additional stealth)
Secondary Weapon
Since the Ryden 45K struggles beyond 25 meters, your secondary should cover that weakness:
Option 1: Overkill with AR/Marksman Rifle
Run the Overkill wildcard to carry a medium-to-long range primary. The M8A1 Marksman Rifle is perfect—it dominates exactly where the Ryden 45K falls off.
Option 2: Launcher
For objective modes, a launcher handles scorestreaks while the Ryden 45K handles players. You sacrifice long-range capability but gain utility.
Option 3: Pistol Backup
A fast-switching pistol like the Coda 9 gives you an emergency option if you run the Ryden 45K dry mid-fight. Check our pistol builds guide for optimization.
Equipment Loadout
Lethal: Semtex or Frag Grenade
Both work well for aggressive play:
- Semtex: Stick to surfaces for guaranteed area denial
- Frag: Cook and throw for precise kills
Tactical: Stun Grenade
Stuns are clutch for clearing rooms and pushing entrenched enemies. The slowing effect guarantees kills even against opponents who would normally outgun you.
Field Upgrade
Trophy System (Objective Modes)
Protects you and teammates from explosive spam when holding objectives. Essential for Hardpoint and Domination.
Assault Pack (Slayer Modes)
Resupply ammo and equipment mid-game. The Ryden 45K burns through ammo quickly, so an Assault Pack extends your uptime significantly.
Playstyle and Strategy
Having the right attachments is half the battle. Here’s how to actually use the Ryden 45K effectively:
Engagement Distance Management
The Golden Rule: Stay within 15 meters whenever possible.
Ideal Engagement Zones:
- Building interiors and room-to-room combat
- Objective capture points (Hardpoint hills, Domination flags)
- Flanking routes through tight corridors
- Close-quarters sections of larger maps
Zones to Avoid:
- Long open lanes (you’ll get demolished by ARs)
- Sniper sightlines
- Open objective approaches without cover
- Any engagement requiring sustained fire beyond 20 meters
Movement Patterns
The Ryden 45K rewards constant, unpredictable movement:
Core Techniques:
- Aggressive Flanking: Use speed to access enemy spawns and flank positions
- Slide-Shooting: Gung Ho lets you fire while sliding—abuse this around corners
- Jump-Shotting: Break enemy aim tracking with vertical movement
- Strafe-Fighting: Use the Collapsible Stock’s strafe speed during gunfights
Map Flow Understanding:
Learn where enemies naturally congregate and approach from unexpected angles. The Ryden 45K excels at punishing grouped enemies because your fire rate lets you eliminate multiple targets before they can react.
Target Priority
With limited effective range and fast ammo consumption, target selection matters:
High Priority:
- Isolated enemies within 10 meters (guaranteed kills)
- Enemies focused on teammates (free kills from flanks)
- Objective players (defending/capturing flags, sitting in Hardpoint)
Low Priority: 4. Enemies beyond 20 meters (avoid unless necessary) 5. Snipers at range (disengage immediately) 6. Multiple enemies if you’re below half magazine (reload first)
Recoil Management Techniques
Even with recoil-reducing attachments, proper technique matters:
Burst Fire for Extended Range: Beyond 10 meters, tap-fire in 5-7 round bursts rather than holding the trigger. This maintains accuracy while still leveraging your fire rate advantage.
Aim Center-Mass: The vertical recoil will naturally climb toward headshots. Starting at center-mass ensures more bullets land even as recoil climbs.
Anticipate Horizontal Shake: Slight left-right correction during sustained fire compensates for the horizontal component that attachments can’t eliminate.
Best Game Modes for the Ryden 45K
S-Tier (Perfect Fit)
Hardpoint: Constant close-quarters combat around hills. The Ryden 45K dominates these chaotic objective fights.
Team Deathmatch (Small Maps): Maps like Nuketown, Combine, or other CQB-focused arenas are Ryden 45K paradise.
Kill Confirmed: Fast-paced mode rewards aggressive play and constant movement—exactly the Ryden 45K’s strength.
A-Tier (Very Good)
Domination: Flag capture points create predictable close-range engagements. Works best on smaller maps.
Control: Attack/defend objectives funnel enemies into close quarters where you excel.
B-Tier (Situational)
Search and Destroy: One life means you need to be more cautious, which contradicts the weapon’s aggressive nature. Viable but not optimal.
Team Deathmatch (Large Maps): Too many long-range engagements where you’re at a disadvantage. Requires perfect positioning to succeed.
Map-Specific Strategies
Small Maps (Nuketown, Combine, etc.)
Strategy: Pure aggression. Sprint through high-traffic areas, pre-aim corners, and chain kills.
Hot Spots:
- Building interiors
- Capture points
- Connecting corridors between spawns
Loadout Adjustment: None needed—this is your playground.
Medium Maps (Raid, Standoff, etc.)
Strategy: Control interior spaces and tight zones. Avoid open areas and long sightlines.
Route Planning:
- Use buildings as safe zones
- Rotate through covered paths
- Challenge medium-range fights only from cover
Loadout Adjustment: Consider Overkill for an AR to handle outdoor areas.
Large Maps (Crossroads, Satellite, etc.)
Strategy: Selective engagement. Focus on specific contested zones rather than roaming.
Role Shift:
- Defend rather than attack objectives
- Hold buildings and chokepoints
- Support team rather than solo flanking
Loadout Adjustment: Strongly recommend Overkill—you’ll need a long-range option.
Multiplayer vs. Zombies Performance
Multiplayer Dominance
The Ryden 45K is clearly designed for Multiplayer, where:
- Engagements happen at predictable ranges
- High fire rate creates competitive advantages
- Movement speed and handling matter immensely
- Magazine size is sufficient for typical encounters
Zombies Viability
While not optimal, the Ryden 45K can work in Zombies:
Early Rounds (1-15): High fire rate clears zombies quickly. Ammo consumption is manageable with proper training.
Mid Rounds (16-30): Starts struggling with zombie health pools. Pack-a-Punch becomes mandatory around Round 20.
Late Rounds (31+): Even Pack-a-Punched, the Ryden 45K falls behind dedicated Zombies weapons. The fire rate means constant reloading, which is dangerous when training large hordes.
Zombies Recommendations: If using the Ryden 45K in Zombies:
- Equip Napalm Burst ammo mod for DoT damage
- Pack-a-Punch immediately at Round 15
- Use for T.E.D.D. Tasks requiring rapid elimination
- Pair with salvage farming strategies for upgrades
For serious Zombies play, check our Zursa Bear elimination guide for weapon recommendations better suited to high rounds.
Alternative Attachment Configurations
While the build above is optimal for most players, here are viable alternatives:
Maximum Mobility Build
Swap:
- Remove: ELO Optic
- Add: Lightweight Barrel (faster movement speed)
Use Case: When you value positioning over precision and can work with iron sights.
Extreme Recoil Control Build
Swap:
- Remove: Agile Laser
- Add: Compensator Muzzle (even more recoil reduction)
Use Case: If you struggle with recoil control or want to push effective range to 20+ meters consistently.
Overkill Specialist Build
Concept: Reduce Ryden 45K attachments to 5-6, use remaining slots for secondary weapon optimization.
Trade-off: Less optimized Ryden 45K but more versatile overall loadout.
Countering the Ryden 45K
Since you’ll face this weapon often, here’s how to beat it:
Range Advantage: Keep distance. Beyond 20 meters, the Ryden 45K user is at severe disadvantage.
Pre-Aim Common Paths: The Ryden 45K user MUST push close-quarters zones. Pre-aim these routes and you’ll catch them mid-sprint.
Explosive Spam: The aggressive playstyle required makes Ryden users vulnerable to equipment. Trap doorways and corners.
Headglitch Positions: Hold power positions from cover. The Ryden 45K’s mediocre accuracy struggles against headglitch positions.
Performance Optimization
For a high-fire-rate weapon like the Ryden 45K, stable performance is critical. Frame drops or input lag can mean missing crucial shots in that split-second TTK window.
Check our optimization guide and lag troubleshooting if you’re experiencing performance issues.
Unlock Requirements and Progression
Unlock Level: The Ryden 45K becomes available at a specific level (check your complete unlocks progression).
Attachment Unlocks: You’ll need to level the weapon through use to unlock all recommended attachments. Focus on:
- Flowguard Foregrip (critical recoil control)
- Torch Extended Mag (necessary sustainability)
- Bowen Suppressor (stealth advantage)
- Other attachments in order of preference
Prestige Considerations:
If you’re planning to prestige, the Ryden 45K is worth considering for a permanent unlock token IF you’re a dedicated SMG aggressive player. However, weapons like the M8A1 might deserve priority.
Check our prestige rewards breakdown for comprehensive planning.
Final Verdict: Is the Ryden 45K Worth Using?
The Ryden 45K is a specialist weapon for specialist players. If you:
✅ Love aggressive, in-your-face gameplay
✅ Prefer small maps and close-quarters combat
✅ Have good map awareness and positioning sense
✅ Can manage recoil and burst-fire when needed
✅ Thrive in chaos and multi-kill situations
Then the Ryden 45K will feel like it was designed specifically for you.
However, if you:
❌ Prefer versatile weapons that work at all ranges
❌ Play cautiously or hold back positions
❌ Favor larger maps with longer sightlines
❌ Want a forgiving weapon for learning
Then you’re better off with more versatile options like the Dravec 45 or returning BO2 weapons with broader engagement range.
Wrapping Up
The Ryden 45K represents what makes Black Ops 7 weapon design exciting—specialized tools that excel in specific scenarios rather than boring all-rounders. With 909 RPM and incredible close-range TTK, this SMG rewards players who position aggressively and understand engagement distance management.
Build it right with recoil control, extended mags, and handling improvements, and you’ll have a weapon that absolutely shreds in its element. Pair it with the Enforcer Combat Specialty and aggressive perks, and you become an unstoppable force in close-quarters combat.
Just remember: the Ryden 45K doesn’t forgive poor positioning. Stay in your optimal range, keep moving, and leverage that insane fire rate to chain kills before enemies can react. Do that, and you’ll understand why this weapon has quickly become a favorite among aggressive SMG players.
Now grab your Ryden 45K, find some tight corridors, and show them what 909 RPM feels like up close.
For more Black Ops 7 weapon guides and loadout strategies, explore our content on Combat Specialties, operators and factions, and complete settings optimization.