Dialing In Your Perfect Black Ops 7 Setup
Call of Duty: Black Ops 7 has officially dropped, and if you’re jumping in fresh from Black Ops 6, you already know the drill—before you dominate in multiplayer or survive the chaos of Ashes of the Damned Zombies, you need to optimize your settings.
Here’s the thing that always surprises new players: default settings are rarely optimal for competitive play. Whether you’re trying to squeeze every frame per second out of your PC, eliminate input lag on controller, or fine-tune your aim sensitivity, the right settings make an absolutely massive difference in your performance.
I’ve seen countless players struggle with inconsistent aim or choppy framerates, only to discover their settings were working against them the entire time. This comprehensive guide covers everything—graphics optimization for maximum FPS, controller and mouse configurations for precise aiming, movement settings that feel responsive, and audio tweaks that help you hear enemies approaching.
Let’s transform your Black Ops 7 experience from “pretty good” to “absolutely dialed in.”
Why Settings Optimization Matters More Than You Think
Before we dive into specific configurations, let’s talk about why this stuff actually matters:
Performance impact:
- Proper graphics settings can mean the difference between 60 FPS and 144+ FPS
- Higher, stable framerates directly improve your reaction time and aim tracking
- Reduced input lag makes your controls feel more responsive
Competitive advantages:
- Optimized sensitivity settings improve aim consistency
- Movement configurations enable faster, more fluid gameplay
- Audio settings help you locate enemies through sound cues
Comfort and longevity:
- Ergonomic control settings reduce hand strain during long sessions
- Visual settings prevent eye fatigue
- Finding your “feel” makes the game more enjoyable overall
The reality is that professional players spend hours tweaking their settings. You don’t need to go that deep, but understanding what each setting does and starting from a solid baseline gives you a significant edge.
Controller Settings: Finding Your Feel
Input Configuration Breakdown
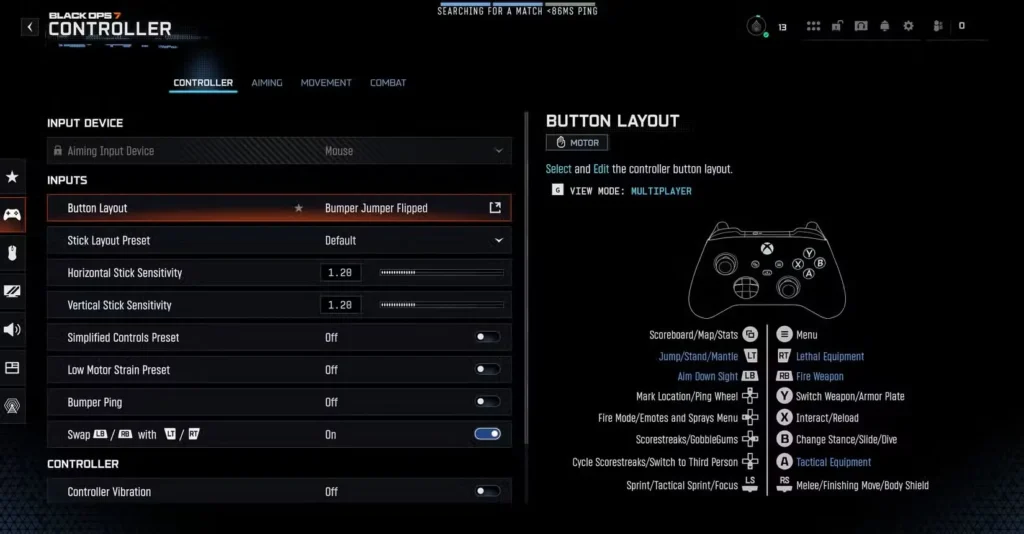
Let’s start with the foundation—your button layout and stick setup. These choices fundamentally shape how you interact with the game.
Button Layout Options:
Your button layout determines which actions map to which buttons. Black Ops 7 offers several presets:
- Bumper Jumper: Jump is mapped to L1/LB, letting you jump while maintaining aim with your right thumb
- Tactical: Crouch/slide moves to R3/RS, enabling drop-shotting without taking your thumb off the stick
- Stick and Move: Jump moves to R3/RS for similar benefits to Bumper Jumper
- Custom: Build your own layout mimicking previous Call of Duty titles you’re comfortable with
My recommendation: If you’re used to a specific layout from previous games, stick with it. Muscle memory is powerful, and forcing yourself to relearn button positions will hurt your performance short-term. However, if you’re new or willing to adapt, Bumper Jumper or Tactical offer competitive advantages by letting you perform actions without compromising aim.
Stick Layout: Keep this on Default unless you have a compelling reason to change it. Inverting sticks or using alternate layouts will confuse your muscle memory if you play other shooters.
Sensitivity: The Most Personal Setting
Horizontal and Vertical Stick Sensitivity:
This is where things get deeply personal. Your ideal sensitivity depends on your playstyle, hand size, grip style, and what you’re used to from other games.
General guidelines:
- Lower sensitivity (4-6): Better for precision aiming, sniper builds, and controlled engagements
- Medium sensitivity (7-9): Balanced for most playstyles, good all-around option
- Higher sensitivity (10-13): Enables faster turns, better for aggressive SMG rushers and close-quarters combat
Finding your sweet spot: Start with medium sensitivity (around 7-8) and adjust incrementally. If you consistently overshoot targets, lower it. If you can’t turn fast enough in close quarters, raise it. Make small adjustments—changing by just one point can feel significantly different.
Pro tip: Your vertical sensitivity can be slightly lower than horizontal (try 1-2 points less). You mostly turn left/right but need precise vertical control for headshots.
Critical Controller Tweaks
Controller Vibration: OFF
Turn this off immediately. Vibration feels immersive but introduces micro-movements that throw off your aim. Every competitive player disables this.
Stick Deadzone Settings:
This is huge and often overlooked. Deadzone determines how far you must move the stick before input registers.
- Test Stick Deadzone: Turn this ON first
- Left Stick Min: Set as low as possible without experiencing stick drift (unwanted movement)
- Right Stick Min: Same principle—go as low as your controller allows
Lower deadzones mean more responsive, immediate input. If your character moves or aims without you touching the sticks, raise the deadzone slightly until it stops.
Swap LB/RB with LT/RT:
This depends entirely on your button layout. Some players prefer bumpers for shooting, others prefer triggers. Test both to see what feels more natural for your grip style.
Aiming Settings: Precision Tuning
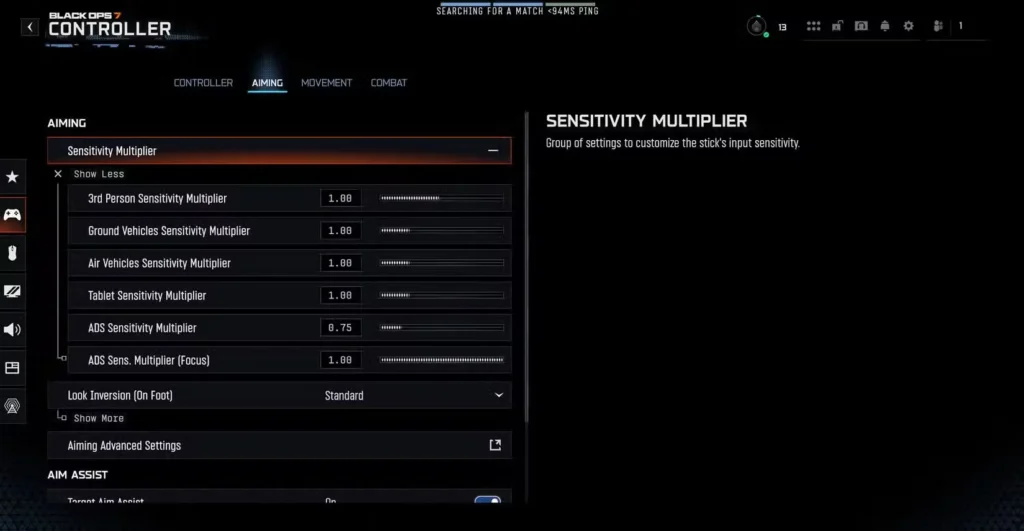
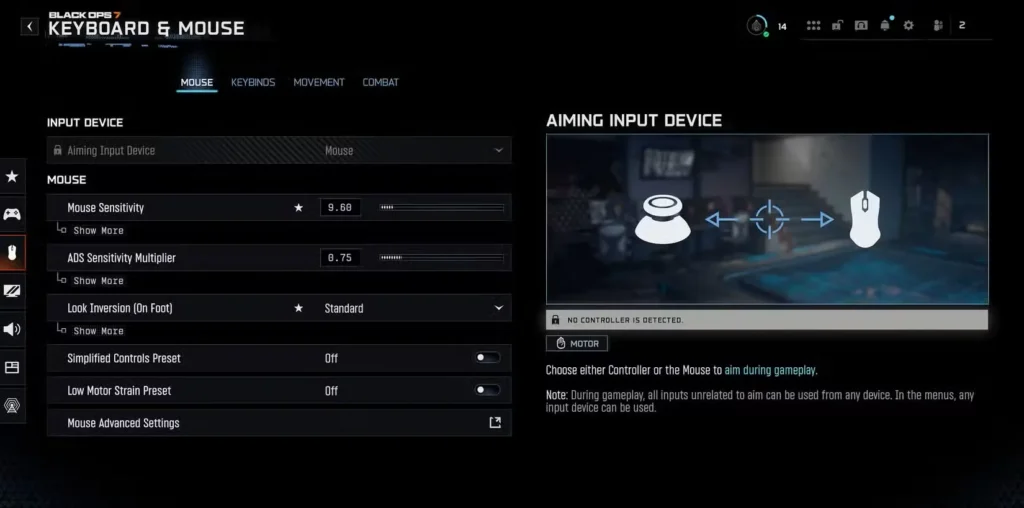
ADS Sensitivity Multiplier
Recommended: 0.75 to 0.85
This controls how much your sensitivity slows down when aiming down sights. Lower values (0.75) give you more precision for those headshot moments. Higher values (0.85) keep your aim feeling snappier and more responsive to quick target switches.
When to adjust:
- Using sniper rifles frequently? Go lower (0.75-0.80) for steadier long-range shots
- Running SMGs aggressively? Go higher (0.80-0.85) to track moving targets better
- Balanced playstyle? Stick to 0.80
Advanced Aiming Configuration
ADS Sensitivity Transition Timing: Instant
This makes the sensitivity change immediate when you ADS rather than gradually ramping. It creates consistency—your muscle memory knows exactly what to expect every time you aim.
Aim Response Curve Type: Dynamic
Dynamic provides a good balance between precise small movements and quick large movements. It accelerates your aim slightly as you push the stick further, giving you control when you need it and speed when you want it.
Target Aim Assist: ON
Unless you’re intentionally playing without aim assist for challenge purposes, keep this enabled. Black Ops 7’s multiplayer is balanced around aim assist being active on controller.
Movement Settings: Speed and Flow
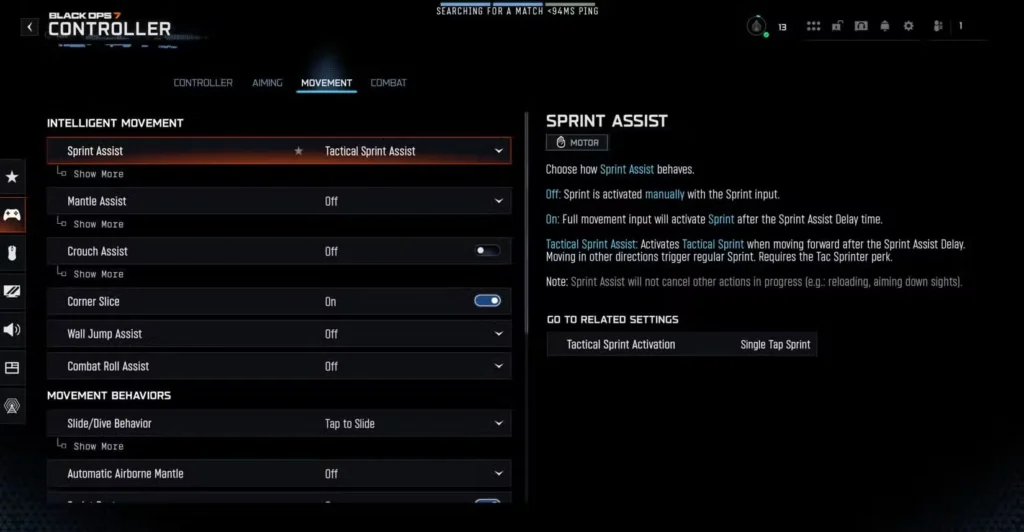
Intelligent Movement Features
Black Ops 7 includes several “assist” features designed to make movement more fluid. Here’s how to configure them:
Sprint Assist Settings:
- Sprint Assist: ON
- Tactical Sprint Assist: ON
- Sprint Assist Delay: 1
- Sprint Assist Sideways: ON
- Sprint Assist Backward: ON
These settings automatically maintain your sprint when moving in various directions. This keeps your movement speed consistent without constantly needing to click the stick.
Assists to Disable:
- Mantle Assist: OFF (prevents unwanted climbing)
- Crouch Assist: OFF (gives you full control over when you crouch)
- Wall Jump Assist: OFF (prevents accidental wall jumps)
- Combat Roll Assist: OFF (you want manual control over this movement)
Movement Behavior Configuration
Slide/Dive Behavior: Tap to Slide
With tap to slide, a quick press of your crouch button while sprinting triggers a slide. This is faster and more responsive than holding the button.
Slide/Dive Activation Delay: Medium
Medium delay prevents accidental slides while still being responsive enough for intentional movement. If you find yourself sliding when you don’t mean to, increase this. If slides feel sluggish, decrease it.
Sprint/Tactical Sprint Behavior: Toggle
Toggle means one click starts sprinting, another click stops it. This is vastly superior to hold for reducing thumb fatigue during long sessions. You’re constantly sprinting in Black Ops 7—don’t make your thumb work harder than necessary.
Corner Slice: ON
This is a game-changer for peeking around corners while maintaining ads. It lets you slice around cover more effectively, exposing less of your body to enemies.
Combat Settings: Action Configuration
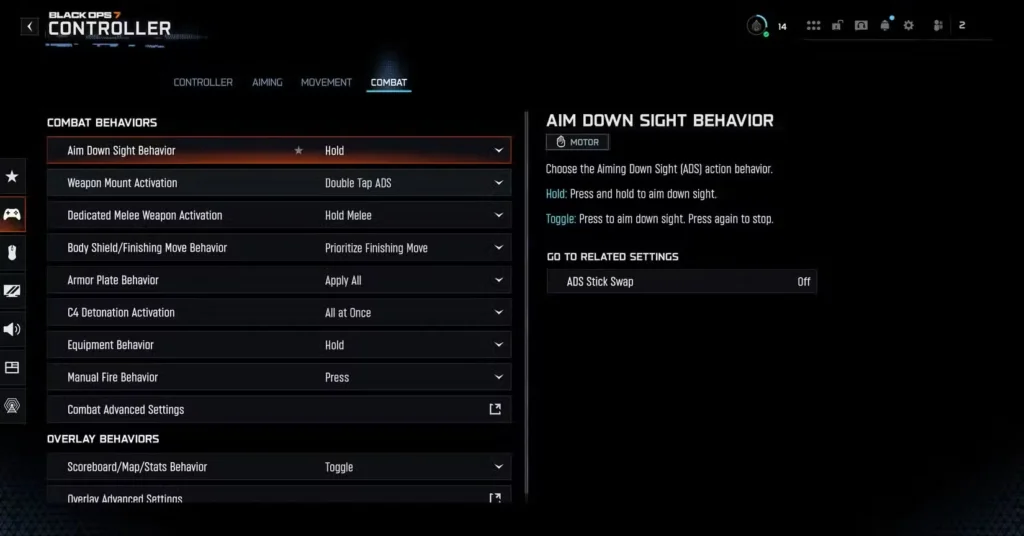
Combat Behavior Essentials
Aim Down Sight Behavior: Hold
Most players prefer hold over toggle. It gives you instant control—release the trigger to return to hip fire immediately. Toggle can create awkward moments where you’re stuck in ADS when you want to move quickly.
Weapon Mount Behavior: Double Tap ADS
Double-tapping your ADS button mounts your weapon on surfaces for reduced recoil. This setting prevents accidental mounts when you’re trying to quick-peek.
Armor Plate Behavior: Apply All
This automatically uses all necessary plates when you activate armor repair. In the heat of battle, you don’t have time to apply plates one by one. This setting maximizes efficiency.
Interact/Reload Behavior: Tap to Reload
Tap to reload is generally better than hold—you’re constantly reloading in Call of Duty, and a quick tap is faster and more natural than holding a button.
Mantle Cancels Reload: ON
This lets you interrupt reloads by mantling over objects. Critical for escaping danger when caught reloading—movement should always take priority over finishing an animation.
Sprint Cancels Reload: OFF
Keep this OFF. Sprint-canceling reloads was a tech in older games, but Black Ops 7 handles reloads efficiently. Having sprint interrupt your reload can be frustrating when you’re trying to reload while repositioning.
Keyboard & Mouse Settings: PC Precision
Mouse Configuration Fundamentals
Mouse Sensitivity: Personal Preference
PC sensitivity is even more variable than controller. Your ideal sensitivity depends on your DPI, mousepad size, and arm vs. wrist aiming style.
Starting points by DPI:
- 400 DPI: 8-12 in-game sensitivity
- 800 DPI: 4-6 in-game sensitivity
- 1600 DPI: 2-3 in-game sensitivity
The goal is finding an eDPI (DPI × sensitivity) that lets you do a comfortable 180-degree turn with one swipe across your mousepad while maintaining precise aim.
ADS Sensitivity Multiplier: 0.75 to 0.85
Same principle as controller—this determines how much slower your aim moves when scoped. Lower for precision weapons like sniper rifles, higher for aggressive play.
Critical Mouse Settings
Mouse Acceleration: 0.00
Turn this completely off. Mouse acceleration makes your cursor speed inconsistent based on how fast you move the mouse. This destroys muscle memory and makes aim unpredictable. Always disable this in any competitive shooter.
Mouse Smoothing: OFF
Mouse smoothing averages your input to reduce jitter, but it introduces input delay. You want raw, immediate input for the most responsive aim possible.
ADS Sensitivity Transition Timing: Instant
Same as controller—instant transition creates consistency. Your muscle memory adapts better when the sensitivity change is immediate and predictable.
3rd Person ADS Correction Type: Precision
For any third-person elements in the game (vehicles, certain modes), precision gives you better control than assist.
Keybinds: Carry Over What Works
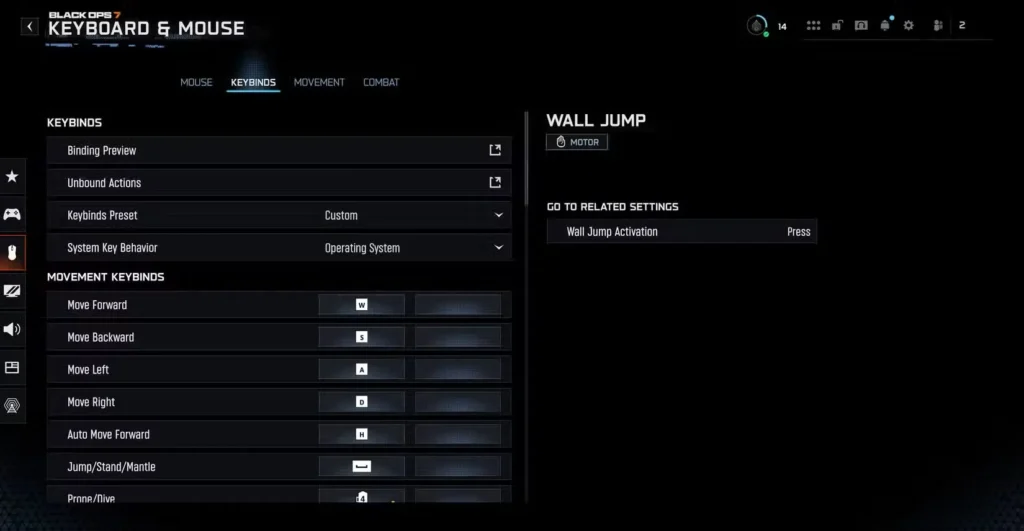
Black Ops 7’s keybind system is flexible, but here’s the golden rule: use what you’re already comfortable with.
If you’ve played previous Call of Duty titles or other shooters like Valorant, Apex Legends, or Counter-Strike, replicate those keybinds as closely as possible. Muscle memory is your greatest asset, and forcing yourself to relearn basic actions will tank your performance initially.
Common keybind principles:
- Keep reload, use, and weapon swap easily accessible (usually R, E/F, and scroll/number keys)
- Bind crouch and prone to comfortable keys you can hit without disrupting WASD movement
- Place tactical and lethal equipment where you can reach them quickly in fights
- Consider binding jump to a mouse side button for better movement control
Graphics Settings: Performance Optimization
Display Configuration
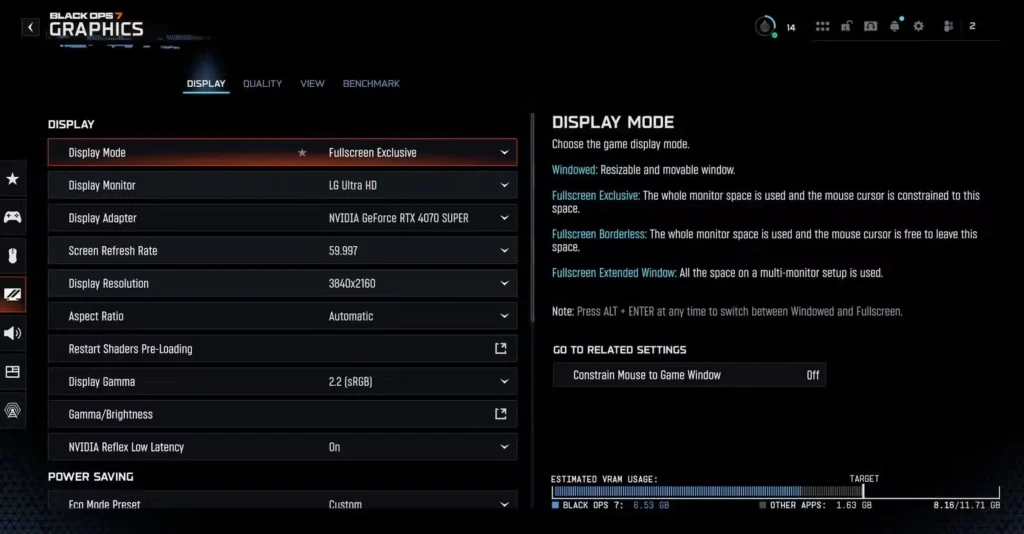
Display Mode: Fullscreen Exclusive
This gives you the lowest possible input lag by letting the game take full control of your display. Fullscreen Borderless is more convenient for alt-tabbing but introduces slight input delay.
Screen Refresh Rate: Match Your Monitor
If you have a 144Hz monitor, set this to 144Hz. Using a lower refresh rate wastes your hardware’s potential. Verify this is correct—sometimes it defaults incorrectly.
Display Resolution: Native Resolution
Always use your monitor’s native resolution for the clearest image. Lowering resolution for FPS gains makes everything blurry and harder to see enemies.
NVIDIA Reflex Low Latency: ON or ON+Boost
If you have an NVIDIA GPU, enable this immediately. It significantly reduces system latency, making your inputs feel more responsive. Use ON for most systems, or ON+Boost if you have thermal headroom and want maximum responsiveness.
V-Sync: OFF (Both Gameplay and Menus)
V-Sync eliminates screen tearing but introduces significant input lag. In competitive shooters, input lag is far worse than occasional tearing. Always disable V-Sync.
Custom Frame Rate Limit: Match Your Monitor’s Refresh Rate
Cap your framerate to match your monitor’s refresh rate (144 FPS for 144Hz, etc.). This prevents your GPU from rendering unnecessary frames, reducing heat and power consumption without impacting smoothness.
Quality Settings: The Performance Balance
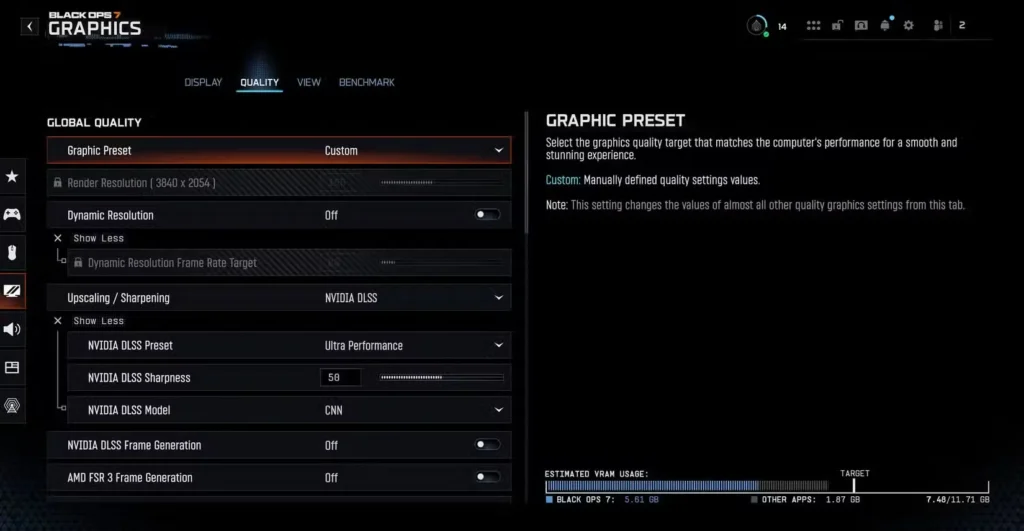
This is where you make critical trade-offs between visual fidelity and framerates. Here’s the philosophy: prioritize settings that help you see enemies clearly while minimizing settings that just make things “prettier.”
Render Resolution: 100%
Keep this at 100% for clear image quality. Lowering this makes everything blurry—if you need more FPS, adjust other settings first.
Dynamic Resolution: OFF
Dynamic resolution automatically lowers quality during intense moments. This creates inconsistent visuals that are distracting. Better to set stable settings that maintain consistent performance.
NVIDIA DLSS or AMD FSR: Use Them Wisely
If you have NVIDIA RTX GPU, DLSS can boost FPS while maintaining good image quality. Start with Quality or Balanced mode.
DLSS Settings:
- Sharpness: 50 (balances clarity without over-sharpening)
- Model: CNN (better quality than Transformer for most scenarios)
- Frame Generation: OFF (can introduce latency in competitive play)
Ray Tracing Reflections: OFF
Ray tracing looks gorgeous but absolutely murders FPS. In competitive multiplayer, you need frames over reflections. Save ray tracing for single-player campaigns where performance matters less.
Details & Textures: What Actually Matters
Texture Resolution: Normal or High
Textures have minimal FPS impact on modern GPUs but significantly affect how clear surfaces look. Use High if your VRAM allows (check VRAM usage in settings), Normal if you’re running close to your limit.
Texture Filter Anisotropic: Normal or High
This makes textures look clearer at angles. Minimal performance cost for noticeable visual improvement—worth keeping at Normal or High.
Depth of Field: OFF
DoF blurs backgrounds when aiming. This looks cinematic but makes spotting distant enemies harder. Always disable in competitive modes.
Particle Resolution: Low
Explosions and effects look slightly worse, but you’ll gain FPS and reduce visual clutter during chaotic fights. Lower is better for competitive clarity.
Shader Quality: Medium or High
Shaders affect overall visual quality significantly. Medium offers the best balance—High if your GPU can handle it without dropping below your target FPS.
Shadow & Lighting: Heavy Performance Impact
Shadows are notoriously demanding. Here’s how to balance them:
Shadow Quality: Normal
Normal shadows look decent while saving significant GPU resources. Low makes shadows too blocky and distracting, High/Ultra tanks FPS for minimal visual gain.
Screen Space Shadows: High
These are less demanding than traditional shadows but add depth to scenes. Keep at High for good visuals without heavy cost.
Occlusion and Screen Space Lighting: Ultra
This affects ambient lighting and makes environments look more realistic. The performance impact is reasonable, and Ultra provides noticeably better lighting than lower settings.
Screen Space Reflections: OFF or Normal
Reflections look nice but can be distracting and cost frames. OFF is best for pure performance, Normal if you want a bit more visual polish without major FPS loss.
Environment Settings
Terrain Quality: Medium or High
Terrain affects how detailed the ground and landscape appear. Medium is sufficient for most systems—High if you have GPU headroom.
Volumetric Quality: High
This controls fog, smoke, and atmospheric effects. High maintains good visual quality while avoiding the massive performance hit of Ultra.
Water Quality: All
Water doesn’t appear enough in most maps to justify lowering this. Keep it at All for complete water rendering when you do encounter it.
View Settings: FOV and Motion
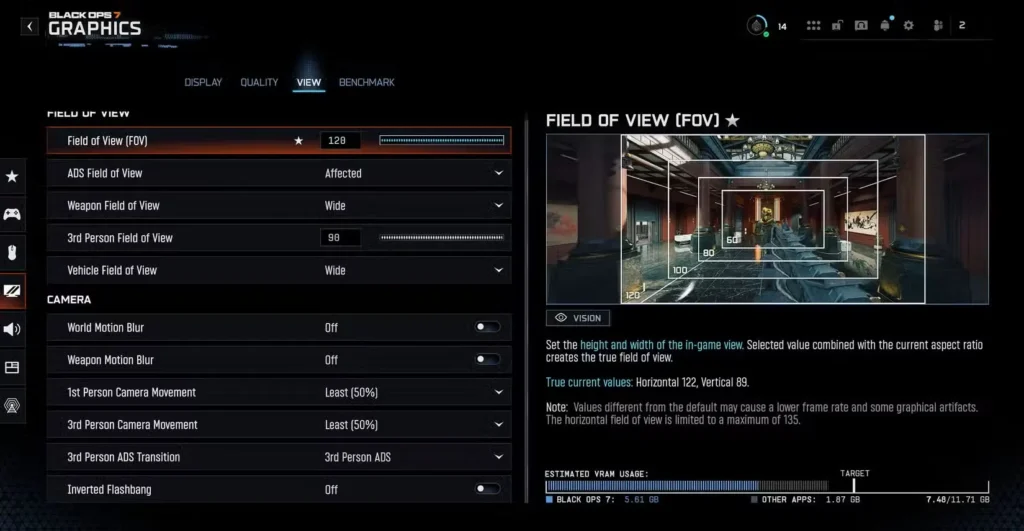
Field of View Configuration
Field of View: 120
FOV determines how much you see on screen. 120 is the maximum and highly recommended for competitive play—you see more of your surroundings, giving you better situational awareness.
Trade-off: Higher FOV can make targets appear slightly smaller at distance, but the awareness advantage outweighs this drawback.
ADS Field of View: Affected
This maintains your FOV when aiming down sights. Some players prefer Independent (which zooms more when ADS), but Affected provides better consistency for most people.
Weapon Field of View: Wide
Wide reduces how much screen space your weapon takes up, giving you a clearer view of the battlefield. This is particularly helpful with larger weapons like LMGs.
Camera Settings
World Motion Blur: OFF Weapon Motion Blur: OFF
Motion blur makes fast movement look cinematic but makes tracking enemies significantly harder. It blurs your vision during the exact moments you need maximum clarity. Always disable both types.
1st Person Camera Movement: Least (50%) 3rd Person Camera Movement: Least (50%)
These control camera bob and sway. Minimum settings create a more stable, predictable camera that’s easier on your eyes during long sessions and doesn’t interfere with aim.
Audio Settings: Competitive Sound

Volume Balance
Master Game Volume: 100 Effects Volume: 100 Dialogue Volume: 80
Effects volume at maximum ensures you hear critical audio cues—footsteps, gunshots, equipment. Dialogue at 80 prevents callouts from drowning out gameplay sounds while keeping them audible.
Music Volumes: Personal Preference
Gameplay and cinematic music are subjective. Many competitive players lower or mute music entirely to focus on tactical audio cues. Experiment to find what helps you concentrate.
Audio Configuration
Speaker Output: Stereo
Even if you have a surround sound setup, Stereo often provides better directional audio in competitive games. The game’s positional audio is optimized for stereo headphones.
Enhanced Headphone Mode: OFF
This attempts to simulate surround sound but can muddy the audio. Black Ops 7’s native stereo mixing is already excellent for positional awareness.
Audio Mix: Treyarch Mix
This is the developer’s intended audio balance. It emphasizes gameplay-critical sounds like footsteps and gunshots while keeping other sounds present but not overwhelming.
Reduce Tinnitus Sound: ON
This reduces the ringing effect after explosions and flashbangs. The effect is realistic but can be genuinely painful for extended play sessions, especially at higher volumes. Enable this for comfort without losing competitive information.
Platform-Specific Optimization Tips
Console Players (PlayStation/Xbox)
- Prioritize performance mode over quality mode for higher framerates
- Use wired controllers to eliminate wireless input lag
- Enable game mode on your TV to reduce display processing lag
- Consider disabling HDR if it introduces noticeable input lag on your display
PC Players
- Update GPU drivers specifically for Black Ops 7 optimization
- Close background applications consuming CPU/RAM during gameplay
- Monitor your temperatures—thermal throttling tanks performance
- Consider a 1080p competitive monitor if you’re running below 144 FPS at higher resolutions
Testing Your Settings: The Practice Process
Don’t just copy these settings and jump straight into ranked. Take time to test and adjust:
Initial testing phase:
- Start with these settings as your baseline
- Play 3-5 casual matches to get a feel
- Note anything that feels off—sensitivity too high? FPS drops in certain areas?
Incremental adjustment:
- Change ONE setting at a time
- Play 1-2 matches after each change
- Evaluate whether that change improved your experience
Sensitivity refinement:
- Practice in a private match or firing range
- Test tracking moving targets and flicking between static targets
- Adjust by small increments (1 point at a time) until it feels right
Settings Are Personal
Here’s the reality: these settings provide an optimized starting point, but your perfect configuration will be unique to you. Your hardware, playstyle, physical setup, and personal preferences all factor into what works best.
The key is understanding why these settings are recommended so you can make informed adjustments. Lower sensitivity gives precision but costs speed. Higher FOV improves awareness but makes distant targets smaller. Every setting involves trade-offs.
Black Ops 7 offers the franchise’s most comprehensive settings options yet, from the sprawling Zombies experience to the fastest multiplayer action the series has seen. Taking an hour to properly configure everything before grinding will pay dividends in your performance and enjoyment.
Don’t be afraid to revisit and tweak settings periodically as you develop your skills and playstyle. What works for you at 20 hours played might need adjustment at 100 hours as you develop better muscle memory and game sense.
Now get out there, dial in those settings, and dominate the battlefield!