Salvage is the lifeblood of your Black Ops 7 Zombies survival strategy. Without it, you’re stuck with base-level weapons, no ammo mods, and zero support items—essentially a sitting duck by Round 20. The problem? Black Ops 7’s Zombies economy is significantly tighter than previous iterations, meaning salvage is both harder to acquire and more critical to your success.
I’m going to break down every viable salvage farming method, rank them by efficiency, and show you how to optimize your loadout and strategy to maximize salvage income. Whether you’re trying to fully upgrade weapons for high-round attempts or just want consistent access to ammo mods, this guide has you covered.
Why Salvage Matters More Than Ever
Let’s start with reality: Black Ops 7 Zombies has a more demanding economy than Black Ops 6 or Cold War. Salvage costs for essential upgrades have increased while drop rates feel tighter. This creates a resource management challenge that can make or break your runs.
What Salvage Is Used For:
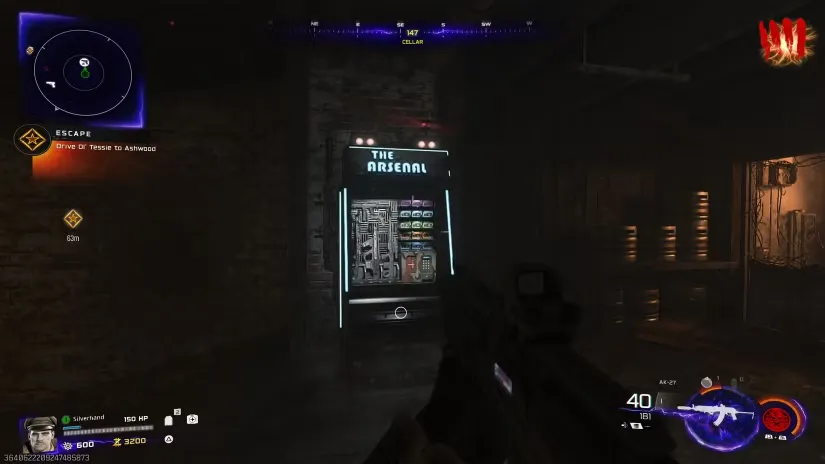
- Weapon rarity upgrades at The Arsenal (750 to 9,500 salvage per tier)
- Ammo mods at The Arsenal (500 salvage each)
- Scorestreaks at Crafting Tables (various costs)
- Lethal and Tactical equipment at Crafting Tables (various costs)
To put this in perspective: upgrading a single weapon from Common to Legendary costs 16,750 total salvage. Add an ammo mod (500), and you’re looking at over 17,000 salvage for one fully kitted weapon. If you want multiple loadout options or need to replace lost equipment, those numbers multiply quickly.
The Bottom Line: Efficient salvage farming isn’t optional—it’s mandatory for high-round survival and Easter egg completion.
Understanding Salvage Drop Mechanics
Before we dive into farming methods, understanding how salvage drops work helps you optimize your approach.
Base Drop Rates:
- Regular zombies have a low chance to drop salvage
- Elite enemies (like Zursa Bears) have higher salvage drop rates
- Critical kills (headshots and weak point hits) increase drop chances
- Higher rounds don’t necessarily mean more salvage per kill
What This Means: You can’t just mindlessly kill zombies and expect to swim in salvage. You need deliberate strategies that stack multiple salvage-boosting factors simultaneously.
The Four Best Salvage Farming Methods
Let me rank these methods from most to least effective, with detailed breakdowns of each.
1. Suppressor Attachment (Essential – Always Active)
Effectiveness Rating: S-Tier
Setup Required: Weapon with suppressor attached in loadout
Ongoing Cost: None (permanent passive bonus)
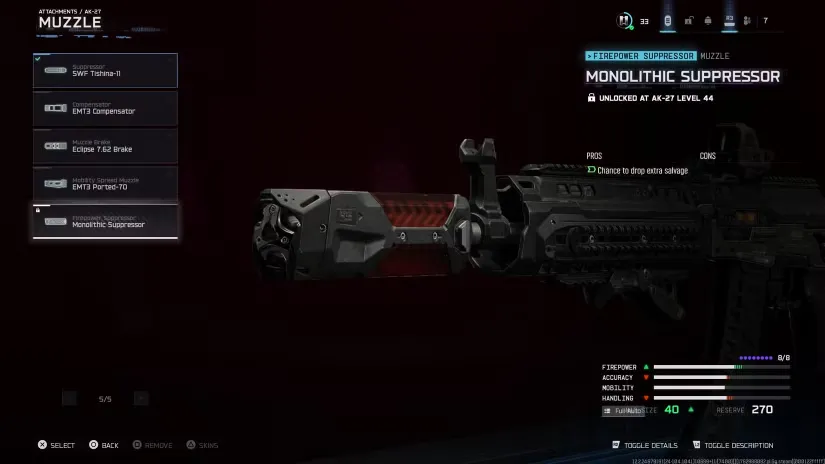
This is the single most important salvage farming method because it works passively on every single kill you make throughout the entire match.
How It Works: Suppressors aren’t just for stealth—they have a hidden perk in Zombies that increases salvage drop rates from eliminated enemies. Every zombie you kill with a suppressed weapon has a higher chance to drop salvage compared to unsuppressed weapons.
Implementation:
- Enter your Zombies loadout menu
- Select your primary weapon
- Open Gunsmith
- Equip any suppressor in the Muzzle slot
- Repeat for all loadout weapons
Suppressor Unlock Requirements: Different suppressors unlock at different weapon levels. Some weapons get suppressors as early as Level 2, while others require Level 18+. Grind weapon XP in Multiplayer or Zombies to unlock suppressors for your preferred weapons.
Pro Tips:
- Equip suppressors on EVERY weapon in your loadout, including secondaries
- The suppressor type doesn’t matter—they all provide the salvage boost
- This bonus stacks with other salvage-boosting methods
- Works on all weapon types except launchers and melee weapons
Why S-Tier: Zero ongoing cost, works on every kill, requires no active gameplay changes. This is literally free money on every zombie you eliminate.
2. Vulture Aid + Carrion Luggage Augment (High Priority Early Game)
Effectiveness Rating: S-Tier
Setup Required: Purchase Vulture Aid perk, unlock Carrion Luggage augment
Ongoing Cost: 2,500+ Essence for perk (price increases with perk count)
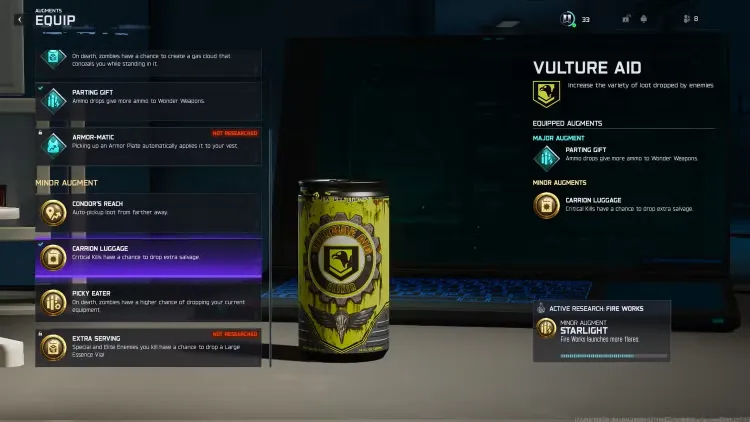
Vulture Aid fundamentally changes your salvage income by increasing overall loot quality and quantity, while the Carrion Luggage augment specifically boosts salvage from critical kills.
How It Works:
Base Vulture Aid Effect:
- Increases variety and frequency of enemy drops
- Higher salvage drop rates from all zombie types
- Improves overall loot quality across the board
Carrion Luggage Augment (Minor Augment):
- Further increases salvage drops specifically from critical kills
- Critical kills = headshots and weak point eliminations
- Stacks multiplicatively with base Vulture Aid effect
Vulture Aid Location on Ashes of the Damned: You’ll find the Vulture Aid perk machine in Ashwood, in the upper east area of the landmark, specifically in the Market Square location. Check our complete perk locations guide for a visual map.
Augment Unlock Process: The Carrion Luggage augment requires progression through the Augment Research system. Prioritize unlocking this early—it’s one of the most impactful Minor Augments for general Zombies play.
For complete augment recommendations, see our best perk augments guide.
Optimal Strategy:
- Purchase Vulture Aid as your first or second perk (rounds 5-10)
- Focus exclusively on headshots after acquiring it
- Use weapons with good headshot multipliers (rifles, marksman rifles)
- Combine with suppressor weapons for stacked bonuses
- Consider making it permanent so you never lose it
Synergy Builds:
- Pair with Deadshot Daiquiri for automatic headshot aim assist
- Use precision weapons like the M8A1 or tactical rifles
- Combine with Dead Wire ammo mod for consistent critical damage
Why S-Tier: Massive increase to salvage income that only requires purchasing one perk and playing slightly more accurately. The critical kill focus naturally improves your overall efficiency anyway.
3. T.E.D.D. Tasks (Consistent Mid-Game Income)
Effectiveness Rating: A-Tier
Setup Required: None (tasks spawn automatically)
Ongoing Cost: 500 Essence per task activation

T.E.D.D. Tasks are timed objective challenges that spawn regularly and provide guaranteed reward chests—often containing substantial salvage amounts.
How It Works:
Spawn Pattern:
- First task appears after Round 9
- Subsequent tasks spawn approximately every 4 rounds
- Random location on the map (marked on minimap and HUD)
- Visible as a swirling portal in the sky
Task Structure:
- Costs 500 Essence to activate
- Objective-based challenges (kill X zombies with Y method, defend locations, etc.)
- Performance ranks: Bronze, Silver, Gold, Legendary
- Better performance = better rewards
Reward Tiers:
- Bronze/Silver: Small salvage amounts, basic loot
- Gold: Moderate salvage, good loot
- Legendary: Large salvage amounts, Mystery Perks, weapon upgrade tools
Optimal Strategy:
- Always activate T.E.D.D. Tasks when they appear (500 Essence is negligible)
- Aim for Legendary rank every time for maximum rewards
- Have Pack-a-Punched weapons ready (Pack-a-Punch guide)
- Use Field Upgrades strategically during difficult waves
- Coordinate with teammates in co-op for easier completions
Task Types and Tips:
Elimination Tasks:
- Kill X number of zombies within the task area
- Use explosive weapons or ammo mods for efficiency
- Train zombies into groups before engaging
Defense Tasks:
- Protect a location from zombie attacks
- Set up early with equipment and scorestreaks
- Use chokepoints to funnel enemies
Equipment Tasks:
- Eliminate zombies using specific equipment or methods
- Stock up on required items before starting
- Lethal equipment from Crafting Tables helps
Why A-Tier: Guaranteed salvage rewards with predictable spawn patterns. The only downside is the 4-round wait between tasks and the time investment required for completion. Still absolutely worth doing every single time.
4. Dark Aether Plants (Map-Specific Method)
Effectiveness Rating: B-Tier
Setup Required: Know plant locations, access to Ol’ Tessie or Fumigator
Ongoing Cost: Time investment, some risk
Dark Aether Plants are a unique salvage source on Ashes of the Damned that requires specific knowledge and execution.
Method 1: Ol’ Tessie Transit Plants
How It Works: When traveling between map zones using Ol’ Tessie (the transit vehicle), you’ll pass through dangerous “in-between” areas with heightened zombie aggression. During these transitions, Dark Aether Plants appear along the roadway.
Execution:
- Board Ol’ Tessie at any transit station
- During transit, watch for glowing plants along the route
- Drive directly into plants to destroy them
- Collect drops: Salvage, Essence, or Ol’ Tessie HP restoration
Pros:
- Passive farming during necessary map traversal
- Occasionally restores Ol’ Tessie health (double benefit)
- Zero additional risk beyond normal transit
Cons:
- Limited plants per transit route
- Must wait for Ol’ Tessie cooldowns
- Drops are RNG (not guaranteed salvage)
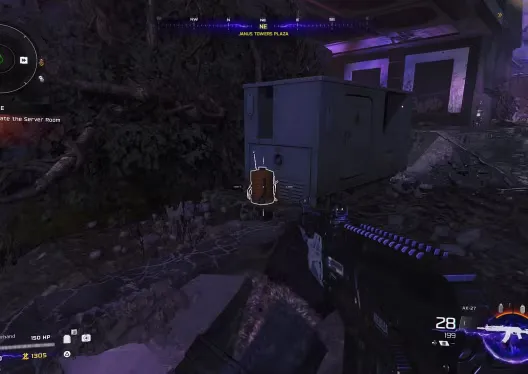
Method 2: Fumigator Plant Growing
How It Works: The Fumigator is a special equipment piece that lets you cultivate Dark Aether Plants, which attract zombies and eventually explode, dropping loot.
Execution:
- Locate the Fumigator in central map locations
- Look for the white outline marker
- Identifiable by its orange canister appearance
- Multiple spawn points across the map
- Pick up the Fumigator (interact button)
- Find green plants (primarily around Janus Towers Plaza)
- Interact with plants using Fumigator to start growth
- Defend growing plants from purple-eyed zombies
- Zombies will specifically attack the growing plants
- Kill zombies before they destroy the plants
- Plants take time to fully mature
- Collect drops when plants explode after full growth
- Salvage (most common)
- Essence
- Occasionally higher-tier loot
Pros:
- Farmable on demand (not time-gated)
- Provides combat opportunities for additional XP and drops
- Multiple plant locations for repeated farming
Cons:
- Requires active defense (can’t multitask)
- Purple-eyed zombies are aggressive and dangerous
- Time-consuming compared to other methods
- Fumigator locations can be inconvenient
Why B-Tier: While both plant methods provide salvage, they’re less efficient than passive suppressor bonuses or the guaranteed rewards from T.E.D.D. Tasks. However, they’re still worth incorporating when convenient—especially Ol’ Tessie plants since you’re traveling anyway.
Comprehensive Salvage Farming Strategy
The most efficient approach combines all four methods simultaneously:
Pre-Game Setup (Loadout)
Essential:
- ✅ Primary weapon with suppressor equipped
- ✅ Secondary weapon with suppressor equipped
- ✅ Weapon choices that facilitate headshots (ARs, Marksman Rifles, Tactical Rifles)
Optimal Weapons:
- M8A1: Burst fire precision (loadout guide)
- Dravec 45: Accurate SMG with suppressor (build guide)
- Any sniper: Natural headshot weapon (sniper builds)
Early Game (Rounds 1-10)
Round 1-5:
- Focus on Essence generation for first perk purchase
- Every kill should be a headshot (practice accuracy)
- Suppressor bonus already working passively
Round 5-7: 4. Purchase Vulture Aid ASAP (Market Square, Ashwood) 5. Continue prioritizing headshots exclusively 6. Start collecting salvage from enhanced drops
Round 8-10: 7. Upgrade weapon rarity to Uncommon (750 salvage) 8. Continue headshot-focused gameplay 9. Prepare for first T.E.D.D. Task after Round 9
Mid Game (Rounds 11-25)
Every 4 Rounds:
- Complete T.E.D.D. Tasks for guaranteed salvage
- Aim for Legendary rank on every task
- Bank salvage for major upgrades
Ongoing:
- Maintain headshot discipline with Vulture Aid active
- Use Ol’ Tessie for transit and hit plants opportunistically
- Upgrade weapon rarity progressively (Uncommon → Rare → Epic)
- Purchase ammo mod at Round 15-20 (500 salvage)
Priority Purchases:
- First weapon to Rare rarity (2,000 salvage)
- Ammo mod for primary weapon (500 salvage)
- Additional perks as needed
- Second weapon rarity upgrades
Late Game (Rounds 26+)
Focus:
- Farm salvage for Legendary weapon upgrades (9,500 each)
- Complete every T.E.D.D. Task without exception
- Consider Fumigator plants if salvage income is insufficient
- Maintain Vulture Aid permanently to survive downs
High Round Optimization:
- Multiple weapons at Legendary rarity
- All weapons with appropriate ammo mods
- Full equipment and scorestreak availability
- Salvage income continues through suppressors + Vulture Aid
Salvage Cost Breakdown and Planning
Understanding exactly what you need helps you plan your farming:
Weapon Rarity Upgrade Costs
Rarity TierIndividual CostCumulative TotalUncommon750750Rare2,0002,750Epic4,5007,250Legendary9,50016,750
Important Note: These costs are PER WEAPON. If you want two fully upgraded weapons, you’re looking at 33,500 total salvage.
Ammo Mod Costs
- Any Ammo Mod: 500 salvage each
- Must be purchased at The Arsenal (found in every major location)
For ammo mod recommendations against specific enemies, see our best ammo mod augments guide.
Equipment and Scorestreak Costs
Costs vary by item type:
- Basic Lethal/Tactical: 250-500 salvage
- Advanced Equipment: 750-1,000 salvage
- Scorestreaks: 1,000-2,500 salvage depending on power level
Realistic Salvage Timeline
Here’s approximately when you can afford major upgrades with optimal farming:
- Round 10: First Uncommon upgrade (750 total)
- Round 15: Rare upgrade + ammo mod (3,250 total)
- Round 20: Epic upgrade (7,750 total)
- Round 30: First Legendary upgrade (17,250 total)
- Round 40+: Multiple Legendary weapons, full loadout
These numbers assume you’re executing all farming methods consistently.
Arsenal Machine Locations
The Arsenal is where you spend salvage on weapon upgrades and ammo mods. There’s at least one Arsenal machine in every major landmark on Ashes of the Damned:
- Ashwood (central area)
- Janus Towers Plaza (multiple machines)
- Other major zones throughout the map
Look for the distinctive blue weapon-themed machine icon on your minimap.
Advanced Salvage Optimization
Perk Synergies
Beyond Vulture Aid, other perks enhance your salvage farming efficiency:
Speed Cola:
- Faster reloads = more time shooting = more kills = more salvage
- Less downtime means higher kill-per-minute rate
Stamin-Up:
- Faster movement between objectives and zones
- Efficient T.E.D.D. Task completion
- Quick repositioning for plant defense
Deadshot Daiquiri:
- Automatic headshot aim assist
- Maximizes Carrion Luggage augment benefit
- Requires less precise aim for critical kills
GobbleGum Support
Certain GobbleGums can boost salvage farming:
Wealth Inspector (if available): Increases salvage drop rates for a limited time—pop this during T.E.D.D. Tasks or high-kill windows.
Shopping Free (if available): Reduces purchase costs temporarily—use strategically for expensive upgrades.
Co-op Considerations
Advantages:
- Split T.E.D.D. Task objectives for faster completion
- One player can handle Fumigator plants while others farm kills
- Shared task rewards benefit entire team
- Revives preserve Vulture Aid perk if made permanent
Disadvantages:
- Salvage drops aren’t shared (each player needs their own)
- Competition for critical kills can reduce individual income
- Coordinating strategies requires communication
Co-op Strategy: Designate roles—one player focuses on Fumigator plants and tasks while others maximize kill-based salvage farming.
Common Salvage Farming Mistakes
Not Equipping Suppressors: This is the #1 mistake. Suppressors are FREE passive income that many players ignore completely.
Delaying Vulture Aid Purchase: Every round you wait is salvage you’re leaving on the table. Buy it early (Round 5-7) for maximum benefit.
Ignoring T.E.D.D. Tasks: 500 Essence cost is trivial compared to salvage rewards. Complete every single task.
Body Shots Over Headshots: With Vulture Aid + Carrion Luggage, headshots generate significantly more salvage. Accuracy pays.
Upgrading Too Many Weapons Too Early: Focus on getting ONE weapon fully upgraded before spreading salvage across multiple weapons.
Skipping Ammo Mods: 500 salvage for an ammo mod seems expensive early, but the damage increase is worth it by Round 15-20.
Poor Salvage Prioritization: Legendary rarity on your primary weapon is more valuable than Epic on three different weapons.
Salvage vs. Essence Management
Remember that salvage and Essence are separate currencies with different uses:
Essence:
- Perk purchases
- Pack-a-Punch upgrades
- Door unlocks
- Mystery Box spins
Salvage:
- Weapon rarity at Arsenal
- Ammo mods at Arsenal
- Equipment at Crafting Tables
- Scorestreaks at Crafting Tables
You need BOTH to succeed. Efficient players balance farming both currencies—don’t starve your Essence income while focusing on salvage.
When Salvage Farming Becomes Critical
Certain objectives demand substantial salvage investments:
Main Easter Egg Attempts
The Easter egg boss fight benefits enormously from:
- Multiple Legendary-tier weapons
- Optimal ammo mods with augments
- Full equipment loadout
- Scorestreak availability
Budget at least 30,000+ salvage for a serious Easter egg attempt.
High Round Pushes (50+)
Rounds 50+ require:
- All weapons at Legendary rarity
- Multiple ammo mod options
- Constant equipment replacement
- Emergency scorestreaks
Maintaining this requires continuous salvage generation through all methods.
Speed Runs and Challenges
Community challenges often require specific loadouts that demand salvage investment for optimal completion times.
Performance and Technical Considerations
Salvage farming in long sessions can strain your system. Ensure optimal performance with our settings guide and lag fixes.
Integration with Overall Zombies Strategy
Salvage farming isn’t isolated—it integrates with your complete Zombies approach:
- Complements exfil strategies (better weapons = easier exfils)
- Supports beginner progression (faster power curve)
- Enables specialized builds (ammo mod experimentation)
- Facilitates prestige planning (efficient progression)
Final Thoughts: Making Every Kill Count
Salvage farming in Black Ops 7 Zombies isn’t about grinding endlessly—it’s about maximizing efficiency on every single zombie elimination. The difference between struggling at Round 25 and comfortably reaching Round 50+ often comes down to resource management, and salvage sits at the heart of that economy.
The Four-Pillar Approach:
✅ Suppressors on all loadout weapons (passive, always-on income)
✅ Vulture Aid + Carrion Luggage (headshot-focused active farming)
✅ Complete every T.E.D.D. Task (guaranteed chunk rewards)
✅ Opportunistic plant farming (bonus income when convenient)
Implement all four simultaneously, and you’ll never struggle with salvage shortages. Your weapons will progress through rarity tiers smoothly, you’ll always have ammo mods available, and you’ll maintain equipment stocks through even the most challenging rounds.
The beautiful part? These methods compound. Suppressed headshots with Vulture Aid active generate salvage while you complete T.E.D.D. Tasks that reward more salvage, allowing you to upgrade weapons that kill faster, generating more salvage per minute in a virtuous cycle.
Now get into Ashes of the Damned and start building that salvage stockpile. Your fully upgraded, ammo-modded, Legendary-tier arsenal awaits.
For more Black Ops 7 Zombies optimization, check out our guides on permanent perks, Zursa Bear elimination, and complete level unlocks.Retry