Klaus, the beloved robotic companion from Black Ops Cold War, returns in Ashes of the Damned—and he’s just as deadly as ever. After freeing Klaus across multiple runs and learning the hard way what “coming prepared” actually means, I can tell you this isn’t a casual side quest. The Uber Klaus boss fight demands proper loadout preparation, and the activation sequence has specific requirements that aren’t immediately obvious.
This guide will walk you through every step of unlocking Klaus as a permanent ally, including optimal timing, boss fight strategies, and how to maximize his combat effectiveness once freed.
Klaus Overview: Why He’s Worth Freeing
Companion Type: Permanent robotic ally
Unlock Location: Ashwood Sheriff’s Office
Difficulty: Medium (requires boss fight)
Time Investment: 15-25 minutes from start
Klaus’s Combat Capabilities:
- 🤖 Tier 2 Pack-a-Punch weapon built-in
- 🎯 Autonomous targeting of zombies
- 💪 Elite Enemy combat support (helps with bosses)
- 🛡️ Zombie magnet (they ignore him while attacking)
- 🚫 Never kills final zombie (preserves rounds for farming)
Why free Klaus:
Unlike temporary Scorestreaks that expire quickly, Klaus remains active indefinitely (with periodic recharge breaks). He essentially functions as an additional squad member, providing constant fire support and crowd control throughout your entire match.
For high-round attempts, Easter egg hunts, or general survival, Klaus dramatically increases your chances of success—especially in solo play where you lack teammate support.
Prerequisites: What You Need Before Starting
1. Map Progression Requirements
Must complete before attempting:
- ✅ Activate Ol’ Tessie (driveable vehicle)
- ✅ Progress to Vandorn Farm OR Blackwater Lake
- ✅ Complete at least one Power Pump activation
- ✅ Unlock Ashwood area and upper sections
If you haven’t completed these steps, follow our complete Ashes of the Damned walkthrough for optimal progression routing.
2. Recommended Round Window
Optimal attempt: Round 12-18
Why this timing:
- Early enough that Uber Klaus fight is manageable
- Late enough that you have proper equipment/Perks
- Salvage availability for Stun Grenades (250 each)
- Balanced zombie density during activation sequence
Can you do it earlier? Technically yes, but Round 10+ ensures you have necessary resources and firepower.
3. Required Loadout Preparation
Minimum requirements for success:
Weapons:
- Primary: Pack-a-Punch Tier 1 minimum (Tier 2 recommended)
- Weapon Rarity: Rare or higher (Epic/Legendary ideal)
- Ammo Mod: Napalm Burst (Uber Klaus weakness—500 Salvage)
Defensive Setup:
- Armor: Tier 2 minimum (Tier 3 strongly recommended)
- Perks: Jugger-Nog (mandatory), Quick Revive (solo), Speed Cola (helpful)
Resources:
- Salvage: At least 1,250 total (250 per Stun Grenade × 4, plus Ammo Mod if needed)
- Essence: 5,000+ for purchases and emergency Armor/ammo
Field Upgrade:
Aether Shroud (emergency escape) or Frenzied Guard (aggressive tanking)
Pro tip: Don’t attempt this undergeared. Uber Klaus punishes unprepared players mercilessly. If you’re not comfortable with your current loadout, farm a few more rounds before triggering the fight.
Step-by-Step Guide: Freeing Klaus
Step 1: Locate Klaus in Ashwood Sheriff’s Office
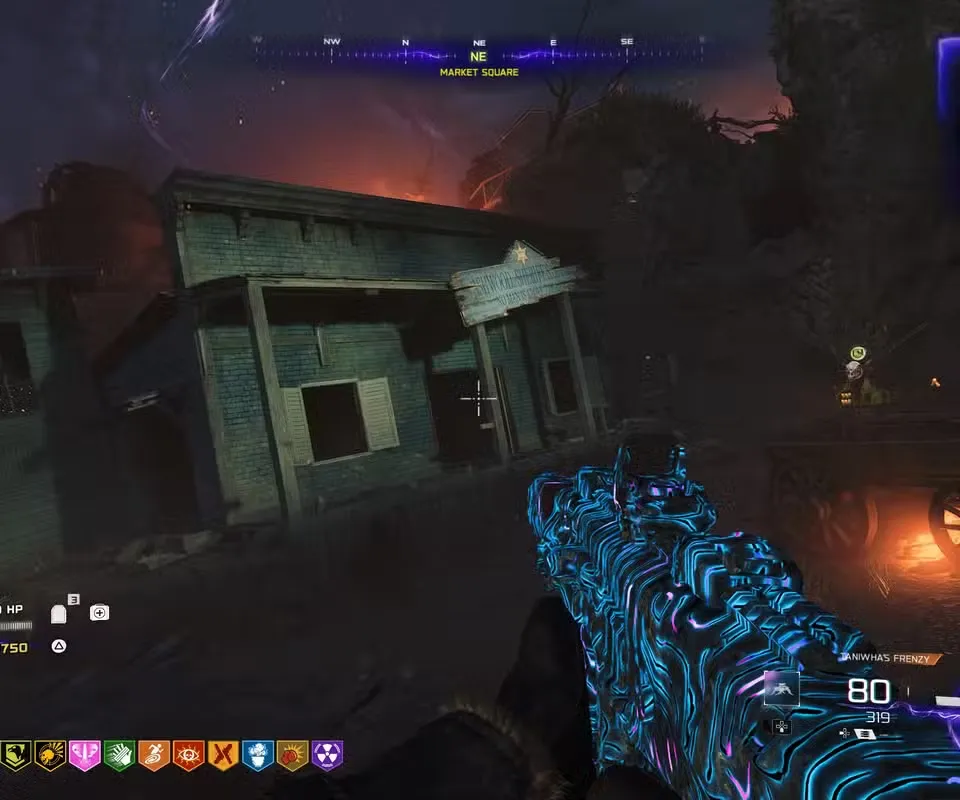
Location: Ashwood Sheriff’s Office (locked building in upper Ashwood)
Navigation from Ashwood entrance:
- Take the east zipline upward to upper Ashwood sections
- Navigate to Market Square (where Vulture Aid Perk is located)
- Look for the Sheriff’s Office building left of Vulture Aid
- Purchase the door if you haven’t already (typically 1,000-1,750 Essence)
Inside the Sheriff’s Office:
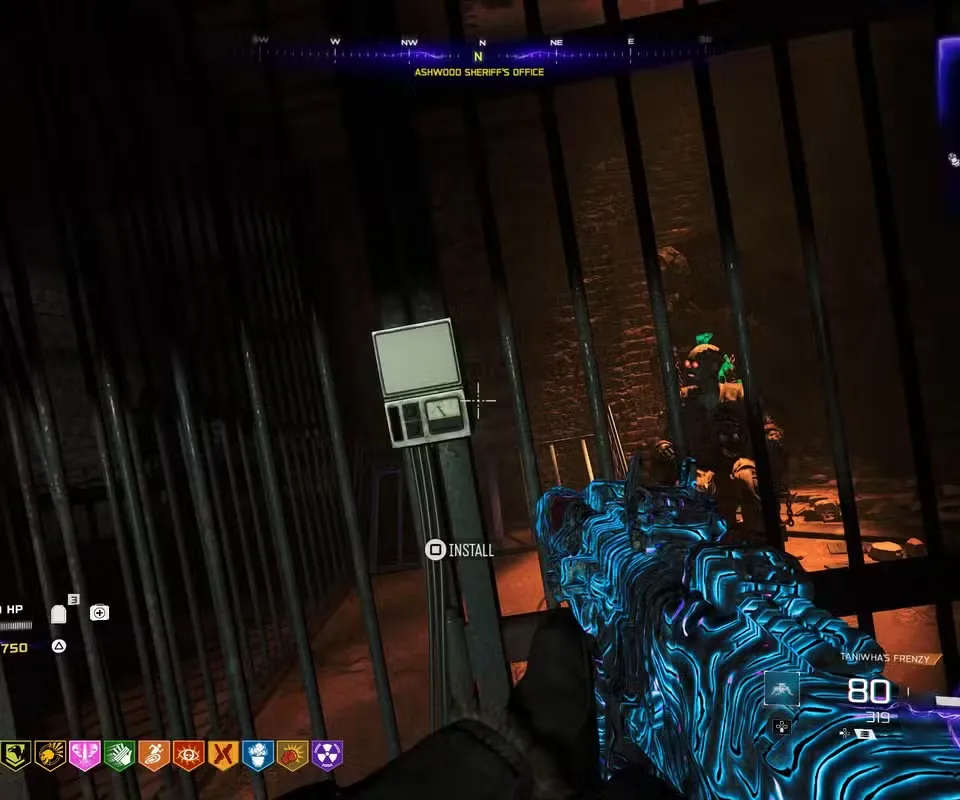
- Klaus is imprisoned in a jail cell
- Visible through the bars but inaccessible
- Terminal on left side of cell (you’ll use this later)
Why visit now: Confirming Klaus’s location before starting the boss fight prevents confusion later. You need to know exactly where to return after defeating Uber Klaus.
Step 2: Return to Janus Towers Plaza (Spawn Area)
Objective: Trigger the Uber Klaus boss fight
After locating Klaus in Ashwood, head back to spawn:
Navigation:
- Leave Ashwood via Ol’ Tessie or on foot
- Return to Janus Towers Plaza (spawn location)
- Head west toward the Blackwater Lake gate entrance
Important: Don’t go through the gate to Blackwater Lake. Stop just before it.
Step 3: Trigger the Uber Klaus Boss Fight
Trigger location: West of spawn, near the Blackwater Lake gate (before entering the tunnel)
What happens:
- Approach the western gate area near Blackwater Lake entrance
- Uber Klaus bursts from a crate automatically (no interaction needed)
- Boss fight begins immediately
Visual cue: Large mechanical Klaus enemy emerges from environmental crate with dramatic entrance. Impossible to miss once triggered.
No turning back: Once Uber Klaus spawns, you’re committed to the fight. Make sure you’re ready before approaching this area.
Step 4: Defeat Uber Klaus (Boss Fight Strategy)
Enemy Type: Elite Enemy (boss-tier threat)
Difficulty: Medium-Hard (depending on preparation)
Weak Points: Shoulder pylons (glowing weak spots)
Primary Weakness: Napalm Burst Ammo Mod
Combat Strategy Breakdown
Phase 1 – Initial Engagement (0-50% health):
Uber Klaus will aggressively pursue you with both close-range melee attacks and ranged projectiles.
Your priorities:
- Maintain distance – Don’t let him corner you
- Target shoulder pylons – Shoot the glowing weak spots on his shoulders
- Activate Napalm Burst if equipped (massive damage over time)
- Train ambient zombies away from the fight area
Movement strategy:
Use the open space near spawn to kite Klaus in circles. He’s fast but predictable—maintain a medium distance where you can shoot weak points while avoiding his attacks.
Phase 2 – Aggressive Pursuit (50-25% health):
Uber Klaus becomes more aggressive, closing distance faster and increasing attack frequency.
Adaptation tactics:
- Use Field Upgrades if overwhelmed (Aether Shroud for escape, Frenzied Guard for tanking)
- Prioritize shoulder pylon shots – These deal critical damage
- Manage ambient zombies – Don’t get trapped between Klaus and hordes
- Replate armor during breathing room moments
Phase 3 – Final Stand (25-0% health):
Klaus may employ desperate attacks. Stay focused and finish the fight.
Final push:
- Continue targeting weak points
- Don’t get greedy with damage—survival is priority
- Use remaining resources (equipment, Field Upgrade cooldowns)
Optimal Weapon Loadouts for Uber Klaus
Best weapon types:
- Assault Rifles – M15 MOD 0 or M8A1 with Napalm Burst
- LMGs – High magazine capacity for sustained pylon damage
- Tactical Rifles – Precision shots to weak points
Avoid:
- Shotguns – Range limitations make Klaus fights difficult
- Melee weapons – Klaus’s close-range damage is lethal
- Underleveled weapons – Without Pack-a-Punch, damage output is insufficient
Ammo Mod priority:
Napalm Burst > Brain Rot > Cryofreeze. Fire damage exploits Klaus’s mechanical nature for bonus damage.
Emergency Tactics
If you’re struggling:
Defensive approach:
- Focus entirely on survival over damage
- Use Ol’ Tessie as mobile cover (drive around while shooting)
- Call in Scorestreaks like Hand Cannon or Disciple Injection
- Retreat to safer areas if current location is compromised
Squad advantages:
- Teammates can split Klaus’s attention
- Coordinated focus fire on pylons
- Revive safety if someone goes down
Solo survival:
- Play more conservatively
- Prioritize positioning over damage
- Use all available resources without hesitation
Step 5: Collect the Stabilizer Chip
Drop location: Uber Klaus drops the Stabilizer Chip upon defeat
What to do:
- Approach Uber Klaus’s defeated body
- Pick up the Stabilizer Chip (automatic when approached)
- Check inventory confirmation (you should see notification)
Visual confirmation: The chip glows and is clearly visible near Klaus’s remains. Don’t leave the area without collecting it.
If you don’t see the chip: Walk around Uber Klaus’s body—sometimes items drop slightly to the side rather than directly underneath.
Step 6: Return to Ashwood Sheriff’s Office
Objective: Install the Stabilizer Chip in Klaus’s cell terminal
Navigation back to Ashwood:
- Drive Ol’ Tessie or travel on foot back to Ashwood
- Take the east zipline up to upper sections
- Enter the Sheriff’s Office where Klaus is imprisoned
- Approach the jail cell bars
At the cell terminal:
- Look for the terminal on the left side of Klaus’s cell
- Interact to install the Stabilizer Chip
- Read the message: “Update Requires Restart”
What this means: Klaus needs to be “rebooted” using Stun Grenades. The terminal installation alone isn’t sufficient.
Step 7: Craft Stun Grenades at Crafting Table
Requirement: At least 3 Stun Grenades (recommended: craft 4-5 for safety margin)
Stun Grenade specifications:
- Cost: 250 Salvage each
- Craft location: Crafting Table (multiple locations—Ashwood has one)
- Purpose: “Restart” Klaus by stunning him
Where to find Crafting Tables:
- Ashwood (convenient—near Sheriff’s Office)
- Vandorn Farm
- Other major locations
Salvage check:
You need 1,000-1,250 Salvage total (4-5 grenades). If you’re short, farm zombies for drops or collect Salvage from plants while driving Ol’ Tessie.
Pro tip: Craft 5 Stun Grenades instead of the minimum 3. Having extra attempts prevents frustration if you miss or bounce grenades out of the cell.
Step 8: Stun Klaus to Activate Him
Objective: Throw 3+ Stun Grenades at Klaus inside his cell
Critical requirements: ✅ Grenades must land INSIDE the cell (near Klaus)
✅ They cannot bounce out of the cell
✅ You need at least 3 successful stuns
✅ Stars appear above Klaus’s head when properly stunned
Throwing Technique
Positioning:
- Stand directly in front of the cell bars
- Aim toward Klaus’s sitting position (center of cell)
- Throw underhanded (don’t aim high—grenades will bounce off ceiling)
Throw strategy:
- First grenade: Test throw to judge bounce physics
- Subsequent grenades: Adjust based on first attempt
- Aim low: Better to land short than overshoot and bounce out
Visual confirmation:
When Klaus is successfully stunned, cartoon stars appear above his head (like classic “dazed” animation). This confirms the stun counted toward the requirement.
Common mistakes:
❌ Throwing too hard – Grenades bounce off back wall and exit cell
❌ Aiming too high – Grenades hit ceiling and deflect out
❌ Standing too far – Reduces accuracy and control
❌ Rushing throws – Take your time between grenades
Success indicator:
After the 3rd successful stun (or more if you threw extras), Klaus will reboot, power up, and fly out of the cell.
Step 9: Klaus Activation & Troubleshooting
What should happen: After 3+ successful stuns, Klaus immediately powers up and exits the cell, joining you as an active companion.
If Klaus doesn’t activate:
Troubleshooting checklist:
- Did you install the Stabilizer Chip? (Check terminal—message should say “Update Requires Restart”)
- Did 3+ grenades actually stun him? (Stars above head confirm proper stuns)
- Did grenades bounce out of cell? (They must land inside—try again with better throws)
Still not working?
Solution: Progress to the next round and return to Klaus’s cell. Sometimes the activation trigger needs a round transition. Throw additional Stun Grenades after the round changes.
Patience tip: Don’t panic if Klaus doesn’t immediately activate. Verify your grenade throws actually landed in the cell (you should have seen stars), then progress one round and try 1-2 more grenades.

How Klaus Works: Mechanics & Commands
Basic Functionality
Once freed, Klaus operates as an autonomous companion with player control options:
Automatic behavior:
- Follows you throughout the map
- Engages zombies automatically with built-in weapon
- Targets Elite Enemies and bosses
- Ignored by zombies (they attack you, not Klaus)
Player commands:
Ping Command (Up on D-Pad):
Orders Klaus to move to your targeted location. Use this to:
- Position Klaus ahead of you for forward pressure
- Send Klaus to defend specific areas
- Reposition Klaus away from danger zones
Stomp Command (L1/LB):
Klaus flies to targeted location and performs a thunderous ground stomp, dealing AoE damage to nearby zombies. This functions as an active ability with cooldown.
Stomp applications:
- Clear grouped zombies quickly
- Emergency crowd control when overwhelmed
- Damage Elite Enemies (Zursa bears, etc.)
Klaus Combat Statistics
Weapon: Tier 2 Pack-a-Punch equivalent firepower
Targeting: Autonomous (attacks nearest threats)
Health Pool: Limited (survives 1-2 full rounds typically)
Recharge Time: Short cooldown after health depletes
Damage output:
Klaus’s built-in weapon hits harder than most player weapons at the same Pack-a-Punch tier. He’s especially effective against:
- Normal zombie hordes
- Special enemies (Manglers, etc.)
- Elite Enemies (provides support fire on Zursa)
Survivability:
Klaus will eventually take too much damage and fly away to recharge. This isn’t permanent—after a brief cooldown period, you can recall him.
Recalling Klaus After Deactivation
When Klaus’s health depletes:
- He flies away from the battlefield
- Enters recharge cooldown period (1-2 rounds typically)
- Becomes recallable via L1/LB command
Recall mechanic:
Press L1/LB when Klaus is recharged. He’ll return to combat immediately.
Trade-off:
You sacrifice your Tactical Equipment slot when Klaus is active. This means no Stun Grenades, Smoke Grenades, etc., while Klaus is deployed.
Is it worth it? Absolutely. Klaus’s combat support far exceeds the value of occasional tactical equipment usage, especially in high rounds.
Klaus’s Best Features
1. Never kills final zombie:
Klaus intelligently stops attacking when only one zombie remains in a round. This is huge for:
- Essence farming between rounds
- Setting up training routes
- Purchasing Perks/equipment safely
- Armor replating without pressure
2. Zombie aggro control:
Zombies ignore Klaus entirely, meaning:
- He provides constant DPS without drawing fire
- You remain the primary target (predictable zombie behavior)
- Klaus can attack freely without defensive concerns
3. Tier 2 Pack-a-Punch damage:
Klaus’s weapon hits hard enough to remain relevant even in high rounds (30+), though effectiveness diminishes compared to your Pack-a-Punch Tier 3 weapons.
4. Autonomous operation:
Set Klaus’s position and forget about him—he handles himself. This is particularly valuable in solo play where you lack teammate support.
Strategic Applications for Klaus
High-Round Survival (Round 30+)
Why Klaus matters:
At extreme rounds, having consistent additional firepower makes the difference between surviving and going down. Klaus essentially increases your effective DPS by 30-50%.
Best practices:
- Position Klaus ahead of you during training routes (he clears stragglers)
- Use stomp command on grouped hordes for burst damage
- Let Klaus handle flanks while you focus forward threats
Easter Egg Hunts
Klaus advantages:
- Provides security during objective completion
- Handles ambient zombies while you focus on puzzles
- Supports during boss encounters
- Never kills final zombie (lets you complete steps safely)
When attempting main Easter eggs: Klaus is borderline mandatory for solo players. The extra firepower and crowd control are invaluable.
Solo Play vs. Squad Play
Solo (Most Valuable):
Klaus compensates for lack of teammates, providing:
- Constant fire support
- Crowd control assistance
- Safety net during risky moments
Squad (Still Useful):
Even with teammates, Klaus adds:
- Additional DPS for faster clears
- Extra target for zombie AI (even though they ignore him, his presence spreads the battlefield)
- Emergency support during team downs
Verdict: Klaus is essential for solo, valuable for squads.
Optimizing Your Klaus Strategy
Best Loadout Synergies
Perks that complement Klaus:
Vulture Aid – Klaus’s kills drop bonus loot for you
Speed Cola – Faster armor replating while Klaus covers you
Deadshot Daiquiri – You handle precision shots while Klaus clears crowds
PhD Flopper – Use explosives freely without worrying about Klaus’s position
Field Upgrades:
- Aether Shroud – Emergency escapes while Klaus continues fighting
- Frenzied Guard – Aggressive tanking with Klaus as DPS support
- Healing Aura – Heal while Klaus provides cover fire
Weapon Roles with Klaus Active
Your weapons should focus on:
- Elite Enemy elimination (Klaus helps but you’re primary DPS)
- Precision damage (let Klaus handle basic crowd control)
- Long-range threats (Klaus is better close-medium range)
Avoid:
Don’t waste time competing with Klaus for basic zombie kills. Let him handle ambient threats while you focus on high-priority targets.
Common Mistakes to Avoid
❌ Attempting Uber Klaus fight undergeared
Come with Pack-a-Punch Tier 1 minimum, Tier 2 Armor, and Napalm Burst. Don’t rush this.
❌ Bouncing Stun Grenades out of Klaus’s cell
Throw carefully and aim low. Watch that first grenade to judge the bounce physics.
❌ Crafting only 3 Stun Grenades
Craft 4-5 for safety. Better to have extras than fail because one bounced wrong.
❌ Ignoring Klaus’s position
Use Up D-Pad to position him strategically instead of letting him wander randomly.
❌ Forgetting Klaus recharges
When he flies away, he’s not gone permanently. Recall him with L1/LB after cooldown.
❌ Sacrificing tactical equipment unnecessarily
If your playstyle heavily relies on tacticals, consider whether Klaus is worth the trade-off (usually yes, but situational).
Klaus vs. Other Companion Options
Klaus vs. Scorestreaks:
Scorestreak advantages:
- Don’t replace tactical equipment
- Some have higher burst damage (Hand Cannon, Disciple Injection)
- Cheaper/faster to acquire
Klaus advantages:
- Permanent until health depletes (much longer duration)
- Reusable every 1-2 rounds (Scorestreaks need Salvage re-purchase)
- Never kills final zombie (Scorestreaks don’t have this intelligence)
- No Salvage cost after initial unlock
Verdict: Klaus is superior for sustained matches. Scorestreaks better for short-term bursts.
Frequently Asked Questions
Q: Can I free Klaus in co-op?
A: Yes. Klaus functions as a team asset—all players benefit from his presence. Only one player needs to complete the unlock sequence.
Q: Does Klaus stay if I go down?
A: Yes. Klaus remains active even if you’re downed or die. He’ll continue fighting until his health depletes naturally.
Q: Can I have Klaus and Scorestreaks active simultaneously?
A: Yes. Klaus doesn’t prevent Scorestreak usage. Run both for maximum firepower.
Q: What if I miss the Stabilizer Chip?
A: It remains where Uber Klaus died. Return to spawn area and collect it—it doesn’t despawn.
Q: Do I need to free Klaus every match?
A: Yes. Klaus unlock progress doesn’t carry between matches. You must complete the sequence each game.
Q: Is Napalm Burst mandatory for Uber Klaus?
A: No, but highly recommended. It’s his primary weakness and significantly speeds up the fight. You can win without it—it’s just harder.
Quick Reference: Klaus Unlock Checklist
Preparation phase:
- ☐ Progress to Ashwood (unlock upper areas)
- ☐ Pack-a-Punch weapon to Tier 1+
- ☐ Purchase Tier 2+ Armor
- ☐ Acquire Napalm Burst Ammo Mod (500 Salvage)
- ☐ Purchase Jugger-Nog Perk minimum
- ☐ Accumulate 1,250+ Salvage for Stun Grenades
Step-by-step execution:
- ☐ Locate Klaus in Ashwood Sheriff’s Office (confirm location)
- ☐ Return to Janus Towers Plaza (spawn area)
- ☐ Head west toward Blackwater Lake gate
- ☐ Trigger Uber Klaus boss fight (emerges from crate)
- ☐ Defeat Uber Klaus (shoot shoulder pylons with Napalm Burst)
- ☐ Collect Stabilizer Chip from Uber Klaus’s body
- ☐ Return to Ashwood Sheriff’s Office
- ☐ Install Stabilizer Chip in cell terminal
- ☐ Craft 4-5 Stun Grenades at Crafting Table (250 Salvage each)
- ☐ Throw 3+ Stun Grenades into Klaus’s cell (must land inside)
- ☐ Verify stars appear above Klaus’s head (successful stuns)
- ☐ Klaus activates and joins you as companion
Klaus commands:
- ☐ Up D-Pad: Ping Klaus to location
- ☐ L1/LB: Klaus stomp attack (AoE damage)
- ☐ L1/LB (after deactivation): Recall Klaus when recharged
Expand Your Zombies Knowledge
Ashes of the Damned guides:
Easter eggs & secrets:
Combat optimization:
Resource farming:
General Zombies:
Join the Black Ops 7 community on Reddit or Discord to share your Klaus strategies and high-round achievements.
For official updates, visit the Call of Duty: Black Ops 7 website or check the Wikipedia page.
Final Thoughts: Klaus represents one of Ashes of the Damned’s most rewarding unlocks—a permanent companion who dramatically improves your survival odds without requiring per-match Salvage investments like Scorestreaks. The Uber Klaus boss fight can be intimidating, but with proper preparation (Pack-a-Punch, Napalm Burst, Tier 2+ Armor), it’s entirely manageable. Free Klaus early in your match, and you’ll have a robotic ally supporting you through every subsequent round. His intelligence (never killing final zombies) and autonomous combat support make him invaluable for both casual survival and serious high-round attempts.