The Foundation of Zombies Camo Grinding
If you’re chasing the ultimate camo in Black Ops 7 Zombies, you’ll need to rack up 1,000 Critical Kills—and that’s just the beginning. This requirement appears across multiple camo challenges and mastery grinds, making it one of the most important skills to develop early.
The good news? Once you understand what Critical Kills actually are and how the game mechanics work, hitting that 1,000-kill milestone becomes surprisingly manageable. It’s still a grind (this is Call of Duty, after all), but it’s a much easier grind when you know the optimal approach.
What Are Critical Kills in Black Ops 7?
Critical Kills are elimination achieved by landing the final shot on a zombie’s critical hit zone—which is always the head. Simple as that. Headshot the zombie for the killing blow, and you’ve got yourself a Critical Kill.
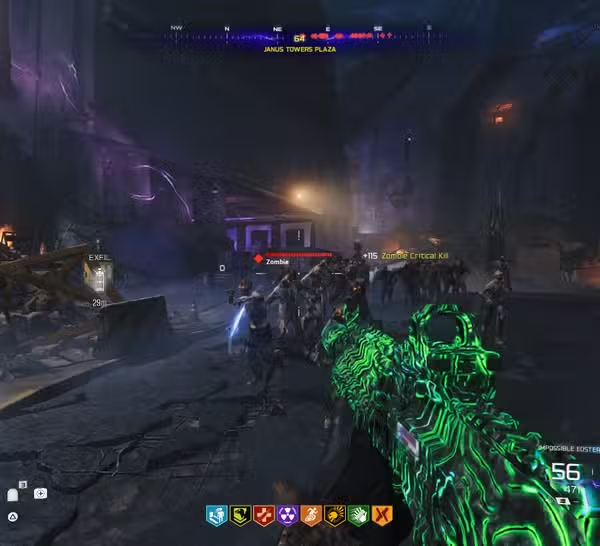
You’ll know you’ve scored one when you see the yellow HUD notification: “+115 Zombie Critical Kill”. Notice that number? Critical Kills don’t just unlock camos—they also reward more Essence than standard body shots (115 vs 90), making them essential for economy management too.
Key facts about Critical Kills:
- Works with any weapon type: Guns, melee weapons, even lethal equipment that can headshot
- Only the final blow matters: Damage the body all you want, but that last shot needs to hit the head
- Consistent across all modes: Whether you’re in Ashes of the Damned, Survival, or any other Zombies experience
- Stacks with other challenges: You can work on Critical Kills while simultaneously completing weapon-specific camos and other objectives

Best Perks and Augments for Critical Kills
The right perk setup dramatically reduces the skill requirement for consistent headshots. Here’s what you should prioritize:
Deadshot Daiquiri (Essential)
Deadshot Daiquiri is the single most important perk for Critical Kill farming. When you aim down sights (ADS), your crosshair automatically snaps to the zombie’s head rather than center mass. This eliminates the guesswork and makes headshots nearly automatic.
Base benefits:
- Auto-aim locks to head when ADSing
- Increased critical hit damage across all weapons
- Makes hipfire headshots easier with tighter spread
Dead First Major Augment (Game-Changer):
Pair Deadshot with the Dead First Major Augment, and you’ll deal double critical hit damage to zombies at full health. This is huge for two reasons:
- One-shot potential: Lower-round zombies die instantly to headshots, speeding up your kill count
- Higher round viability: Even in rounds 20+, that doubled damage keeps headshots effective longer
Where to get it: Check all perk locations on your map, or prioritize Deadshot in your permanent perk progression. See our perk augment guide for unlock requirements.
Supporting Perks
While Deadshot is mandatory, these perks enhance your Critical Kill farming:
Speed Cola: Faster reload means less downtime between headshot strings. Critical when training large hordes.
Elemental Pop: Random damage type application can help weaken zombies, making headshot kills more consistent on higher rounds.
Stamin-Up: Mobility is key for positioning yourself for clean headshots, especially when training zombies in tight spaces.
Best Weapon Attachments for Critical Kills
Your weapon build matters just as much as your perks. Here’s how to optimize your custom loadout for maximum headshot efficiency:
Damage Barrel (Priority #1)
Almost every weapon in Black Ops 7 has a Damage Barrel attachment option in the gunsmith. These barrels specifically increase the headshot multiplier, meaning your critical hits deal significantly more damage.
Why it matters: Higher headshot multipliers mean fewer shots required to kill, which is crucial when pushing into higher rounds where zombie health pools explode.
Alternative if no Damage Barrel exists: Look for Long Barrel attachments that boost damage range. Extended range keeps your headshots lethal at distance.
Other Essential Attachments
Optics with clear reticles: Red dots or holographic sights with minimal obstruction. You need to see heads clearly. Avoid heavy scopes unless you’re running a sniper build.
Recoil control attachments: Stocks, grips, or muzzles that reduce vertical recoil keep your aim steady on heads during sustained fire. Check our weapon-specific guides for optimal attachment combos.
Extended magazines: More ammo means longer headshot chains without reloading. Pair with Speed Cola for maximum uptime.
Fast ADS attachments: Faster aim-down-sight speed lets you snap to zombies’ heads quicker, especially important for point-blank situations.
Best Maps and Strategies for Farming Critical Kills
Location matters when you’re grinding out 1,000 headshots. Here’s where to focus your efforts:
Vandorn Farm (Recommended for Efficiency)
Why it’s ideal:
- Compact map design: Everything you need is within sprinting distance
- Simple training routes: Smaller spaces make herding zombies easier
- Fast rounds: You can cycle through early rounds quickly for maximum kills per hour
- All essentials available: Perks, Pack-a-Punch, and wall-buy weapons in close proximity
Vandorn Farm’s tighter layout forces zombies into predictable paths, making it easier to line up headshots consistently. You’re not wasting time running across massive open areas—you’re farming kills efficiently.
Ashes of the Damned (Alternative)
Ashes of the Damned works fine for Critical Kill farming, especially if you’re also working on other objectives or T.E.D.D. Tasks. However, the map’s large size means more downtime between zombie encounters.
Best if: You’re multitasking challenges or prefer the variety of a larger map with multiple training spots.
Skip if: You just want to maximize Critical Kills per hour—stick with Vandorn Farm.
Critical Kill Farming Strategy (Step-by-Step)
Here’s the optimal approach for grinding out those 1,000 Critical Kills:
Phase 1: Setup (Rounds 1-5)
- Farm Essence efficiently with starter weapon headshots (you’re already practicing!)
- Prioritize buying Deadshot Daiquiri as your first perk—don’t buy anything else until you have it
- Open routes to Pack-a-Punch and important wall-buy locations
- Purchase or acquire your preferred weapon from Mystery Box or wall-buys with your custom builds equipped
Phase 2: Core Farming (Rounds 6-15)
This is your sweet spot for Critical Kill farming:
Train zombies into groups: Don’t kill them individually. Let 10-15 zombies follow you, then turn and line up headshots on the grouped horde. More zombies bunched together = more consecutive headshots = faster progress.
Use Deadshot ADS: When the horde is grouped, ADS and let Deadshot guide your aim. Sweep across the zombie heads smoothly—your crosshair will magnetize to each one.
Activate Combat Specialties: Use your special abilities to create space or enhance damage when needed.
Manage ammo: Buy ammo from your weapon’s wall-buy location, or use Salvage to craft more. Never let yourself run completely dry.
Watch for Double Points: If you see the Double Points power-up, grab it and go into overdrive—you’ll be rewarded 230 Essence per Critical Kill instead of 115.
Phase 3: Advanced Rounds (16+)
Pack-a-Punch your weapon once zombie health increases. Upgraded weapons maintain one-shot headshot potential longer.
Add more perks: Speed Cola for reload speed, additional augments for survivability.
Consider Ammo Mods: Brain Rot or Dead Wire can help weaken zombies, making headshot kills easier on tanky enemies.
Exfil when you hit your goal: No point pushing to round 40 if you’ve already maxed your Critical Kills. Extract, restart, repeat.
Additional Tips for Faster Progress
Track your progress: Pay attention to your camo challenge screen so you know exactly how many Critical Kills you still need. Don’t waste time grinding past your goal.
Weapon variety: Different weapons have different headshot hitboxes and multipliers. Assault rifles, SMGs, and pistols often feel easiest for consistent headshots.
Solo vs. co-op: Solo play gives you ALL the zombie kills. In co-op, kills are split among players, slowing your individual progress. Solo is faster for pure camo grinding.
Don’t overthink it: You’re going to be playing Zombies extensively anyway. If you naturally go for headshots, you’ll hit 1,000 Critical Kills through normal gameplay without dedicated farming sessions.
Optimize your settings: Make sure your game settings are dialed in for maximum performance. Frame drops during critical moments can cost you headshots.
Use legacy weapons: Some returning weapons from Black Ops 2 have exceptional headshot multipliers. Experiment with different guns to find what feels best.
Common Mistakes to Avoid
Skipping Deadshot Daiquiri: Trying to farm Critical Kills without Deadshot is like running a marathon in flip-flops. Just buy the perk.
Body-shot habits: Break the habit immediately. Every body-shot kill is a missed Critical Kill opportunity AND less Essence earned.
Wrong map choice: Spending hours on Ashes of the Damned when Vandorn Farm would cut your grinding time in half.
Neglecting weapon attachments: A properly built weapon with damage barrel and recoil control makes an enormous difference. Use the gunsmith.
Pushing too high too fast: Rounds 1-15 are optimal for Critical Kill farming. Staying in that range and extracting to restart is more efficient than pushing to round 30+.
What Comes After Critical Kills?
Once you’ve conquered the 1,000 Critical Kill milestone, you’ll unlock additional camo tiers with new challenges like:
- Longshot kills
- Point-blank eliminations
- Specific zombie type kills (like Zursa Bears)
- Equipment-based challenges
The skills you develop farming Critical Kills—training zombies, managing economy, optimizing loadouts—transfer directly to these later challenges. You’re not just grinding camos; you’re mastering Zombies fundamentals.
Final Thoughts: Make Every Shot Count
Critical Kills are the backbone of Zombies mastery in Black Ops 7. Whether you’re grinding camos, farming Essence efficiently, or just trying to survive higher rounds, headshots should become second nature.
The 1,000-kill requirement seems massive at first, but spread across multiple sessions, it’s completely achievable. Use Vandorn Farm for focused grinding, equip Deadshot Daiquiri with Dead First augment, build your weapons with damage barrels, and let that yellow “+115 Zombie Critical Kill” notification become your favorite sight in the game.
Before you know it, you’ll have your camo unlocked and a headshot percentage your teammates will envy. Now get in there and start clicking heads.
More Black Ops 7 Zombies Resources
- Complete leveling and unlock guide
- Prestige rewards overview
- Should you prestige?
- Best permanent unlock choices
- All operators and factions
- Field upgrade augments
- How to use emotes and sprays
- Twitch Drop rewards
External Links: