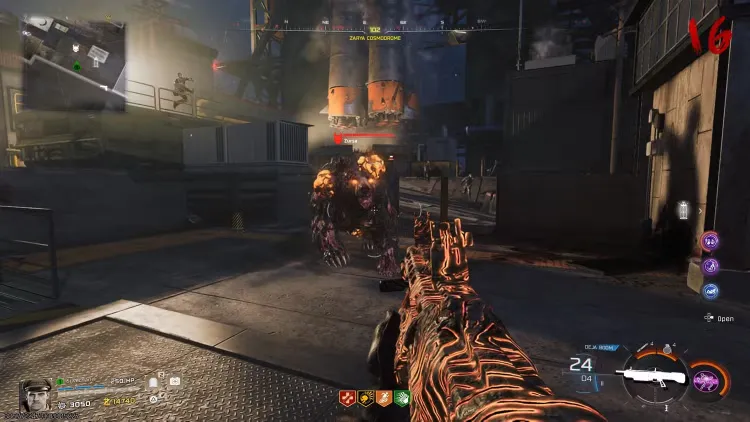
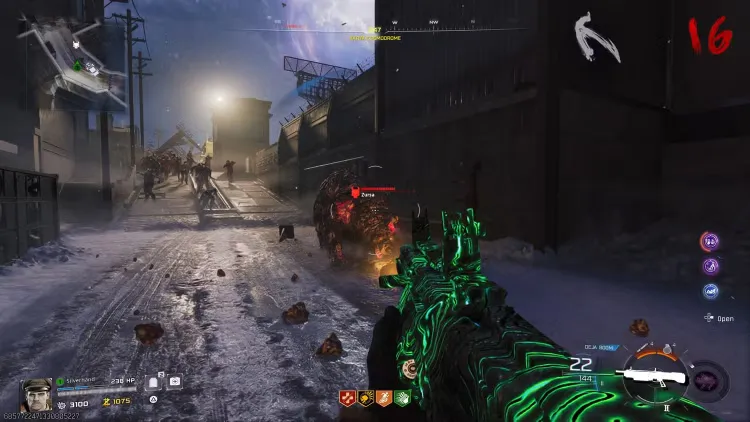
Few things in Black Ops 7 Zombies inspire panic quite like hearing that distinctive roar echo across Ashes of the Damned. The Zursa—massive, aggressive zombie bears that serve as the map’s elite enemy type—can absolutely ruin your day if you’re not prepared. These Dark Aether monstrosities hit hard, move fast, and soak up damage like a sponge.
But here’s the good news: with the right loadout and strategy, Zursa Bears go from terrifying threats to manageable obstacles. I’m going to break down exactly how to handle these beasts efficiently, including the specific ammo mods that turn them into experience points instead of run-ending nightmares.
Understanding the Zursa Threat
Before we get into counter-strategies, let’s talk about what makes Zursa Bears so dangerous in the first place.
Zursa Characteristics:
- High health pool: These aren’t regular zombies—they tank significant damage before going down
- Aggressive movement: Zursa Bears sprint at players relentlessly, making them hard to kite
- Heavy melee damage: A direct hit can shred through your armor and health instantly
- Spawn timing: They appear in later rounds when you’re already dealing with hordes of regular zombies
- Multiple spawn potential: Sometimes you’ll face more than one simultaneously
The combination of speed, durability, and damage makes Zursa one of the most challenging regular enemies in Black Ops 7 Zombies. Unlike some elite enemies that are slow and predictable, Zursa forces you to stay mobile while maintaining accurate fire on specific weak points.
Why You Can’t Ignore Them:
Trying to run past a Zursa or avoid the encounter entirely rarely works. They’ll chase you across the map, and if you’re cornered with a horde while a Zursa is closing in, you’re probably getting downed. Learning to eliminate them quickly is essential for high-round survival and successful Easter egg attempts.
The Best Ammo Mods Against Zursa
This is where the game-changer comes in. Not all ammo mods are created equal when it comes to elite enemies, and Zursa Bears have specific vulnerabilities you can exploit.
Napalm Burst: The Top Choice
Unlock Requirement: Level 35
Cost: 500 Salvage at The Arsenal
Napalm Burst is your number one option for melting Zursa Bears. This ammo mod sets enemies on fire, dealing continuous damage over time that stacks beautifully with your bullet damage. Against high-health enemies like Zursa, that burn damage adds up incredibly fast.
Why Napalm Burst Works:
- Damage over time stacking: Each hit refreshes the burn, constantly damaging the Zursa
- Area denial: The fire spreads to nearby zombies, helping with crowd control
- Consistent DPS: Even if you miss a few shots, the burn keeps working
- Visual feedback: You can see the Zursa burning, confirming your ammo mod is active
The continuous damage means you don’t need to maintain perfect accuracy—land enough hits to keep the burn going, and the Zursa’s health melts away even as you deal with surrounding threats.
Brain Rot: The Alternative Option
Unlock Requirement: Level 51
Cost: 500 Salvage at The Arsenal
Brain Rot offers a different but equally effective approach. While it also deals bonus damage to elite enemies, its real value comes from the occasional mind-control effect.
Why Brain Rot Works:
- Mind control chance: Can temporarily turn the Zursa into an ally
- Elite damage bonus: Direct damage increase against Zursa-type enemies
- Tactical advantage: A controlled Zursa fights for you, eliminating nearby zombies
- Breathing room: Even when it doesn’t control, the damage bonus helps
The mind control aspect is particularly clutch in high-pressure situations. Having a Zursa temporarily fighting on your side completely changes the dynamic of an encounter, giving you precious seconds to reposition or eliminate surrounding threats.
The Major Augment: Big Game
Both Napalm Burst and Brain Rot benefit massively from the Big Game augment, which increases damage specifically against elite enemies. This is non-negotiable if you’re serious about taking down Zursa efficiently.
Big Game Benefits:
- Significant damage multiplier against Zursa
- Stacks with base ammo mod effects
- Makes Brain Rot charm effects more likely
- Reduces time-to-kill substantially
Unlocking and equipping Big Game should be a priority in your augment research progression. Check our best ammo mod augments guide for complete details on optimizing your ammo mod builds.
Early Game Workaround: Elemental Pop
Here’s the problem: Napalm Burst doesn’t unlock until Level 35, and Brain Rot is locked behind Level 51. If you’re facing Zursa Bears before hitting those milestones, you need a backup plan.
Enter Elemental Pop:
This perk randomly applies different ammo mod effects when you fire, including Napalm Burst and Brain Rot even if you haven’t unlocked them yet. While it’s inconsistent (you can’t control which effect procs), it’s infinitely better than having no ammo mod at all.
Elemental Pop Strategy:
- Purchase it as one of your first perks when Zursa start appearing
- Spray sustained fire to trigger multiple ammo mod procs
- Hope for Napalm Burst or Brain Rot effects against Zursa
- Consider making it permanent so you never lose it
Find Elemental Pop at its dedicated perk machine—check our perk locations guide if you’re having trouble locating it.
The RNG nature of Elemental Pop means it’s not ideal for consistent Zursa elimination, but it’s a viable bridge until you unlock the proper ammo mods.
Optimal Weapon Choices for Zursa Bears
Your ammo mod matters, but the weapon you attach it to matters just as much. Zursa fights require specific weapon characteristics to be effective.
Best Weapon Classes
Assault Rifles: The sweet spot for Zursa encounters. Good range lets you engage safely, decent fire rate allows for sustained ammo mod application, and accuracy helps with weak point targeting.
Top AR Picks:
- M8A1: Burst fire for precise weak point hits (loadout guide here)
- XM4: Reliable full-auto with excellent handling
- AK-47: High damage per shot, good for burst damage windows
Light Machine Guns: The large magazine capacity shines in extended Zursa fights. You can maintain sustained fire without reloading, keeping your ammo mod effects active continuously.
Top LMG Picks:
- RPD: Balanced stats with manageable recoil
- Stoner 63: Excellent accuracy for weak point targeting
- M60: Maximum damage per bullet for heavy hitting
Tactical Rifles: For players with good aim, tactical rifles offer precision damage on Zursa weak points while maintaining safe distance.
Top Tactical Rifle Picks:
- DMR 14: Fast semi-auto for quick weak point targeting
- Type 63: Great balance of power and fire rate
- M16: Burst fire precision at range
Weapons to Avoid
Shotguns (mostly): While shotguns can work, they require you to be dangerously close to Zursa. Unless you have a specific close-range strategy with maximum armor, the risk usually outweighs the reward.
SMGs: Similar issue—most SMGs need close range to be effective, putting you in Zursa’s optimal attack range. The exception is if you’re using a longer-range SMG build like the Dravec 45 with range-extending attachments.
Sniper Rifles (situational): Bolt-action snipers have limited utility against Zursa due to slow fire rate. You’ll land devastating headshots, but the time between shots leaves you vulnerable. Semi-auto snipers fare better.
Pack-a-Punch and Rarity Upgrades
This cannot be overstated: your weapon must be Pack-a-Punched to deal with Zursa effectively in later rounds.
Pack-a-Punch Tiers
Black Ops 7 features multiple Pack-a-Punch tiers, each dramatically increasing your damage output:
- Tier 1 (5,000 Essence): Basic damage increase and bonus effects
- Tier 2 (15,000 Essence): Significant damage multiplier
- Tier 3 (30,000 Essence): Maximum damage potential
Against Zursa in high rounds (30+), you’ll want at least Tier 2 Pack-a-Punch. Tier 3 is ideal but expensive—save it for your primary Zursa-killing weapon.
Our Pack-a-Punch location guide shows you how to access the machine on Ashes of the Damned.
Rarity Upgrades
Don’t sleep on weapon rarity upgrades at The Arsenal. Each rarity tier (Common → Uncommon → Rare → Epic → Legendary) increases base damage substantially.
Rarity Upgrade Costs:
- Common to Uncommon: Low salvage cost
- Uncommon to Rare: Medium salvage cost
- Rare to Epic: High salvage cost
- Epic to Legendary: Very high salvage cost
Focus on getting your main weapon to at least Rare or Epic before spending Essence on Pack-a-Punch tiers. The combination of high rarity + Pack-a-Punch + proper ammo mod creates a Zursa-melting machine.
Critical Weak Points and Combat Strategy
Raw damage isn’t enough—you need to know WHERE to shoot for maximum effectiveness.
Zursa Weak Points
Primary Weak Point: The Head Standard zombie rules apply—headshots deal significantly more damage. The Zursa’s head is your primary target whenever you have a clear shot.
Secondary Weak Points: Glowing Bulbs Zursa Bears have multiple glowing bulbs/pustules around their body. These are secondary weak points that, when destroyed, temporarily stun the Zursa.
The Stun Mechanic: When you shoot and destroy a glowing bulb, the Zursa pauses momentarily and staggers. This gives you a precious window to:
- Reposition to a safer location
- Focus fire on the head for critical damage
- Reload your weapon safely
- Use equipment or field upgrades
Critical Spots Under Bulbs: Beneath each bulb is a red fleshy area that takes extra damage. If you can land shots on these exposed areas after popping a bulb, you’ll deal massive damage.
Combat Flow Pattern
Here’s the optimal engagement sequence:
- Maintain Distance: Keep 10-20 meters between you and the Zursa
- Target Bulbs First: Shoot glowing bulbs to trigger the stun
- Switch to Headshots: During the stun, focus all fire on the head
- Reposition: Use the stun window to create new distance
- Repeat: Continue the bulb-stun-headshot cycle until eliminated
This pattern maximizes your damage while minimizing risk. The key is discipline—don’t just spray at the Zursa’s body. Deliberately target weak points for efficient kills.
Essential Perks and Equipment
Your loadout matters just as much as your weapon choice when facing Zursa.
Must-Have Perks
Stamin-Up (Critical): You MUST be able to outrun Zursa. This perk is non-negotiable for Zursa encounters. The increased sprint speed and duration lets you maintain safe distance while engaging.
Jugger-Nog (Critical): Extra health means you can survive a hit if the Zursa closes distance unexpectedly. Without Jugger-Nog, one swipe can down you instantly in higher rounds.
Speed Cola (Highly Recommended): Faster reloads mean less vulnerable time during Zursa encounters. You’ll be burning through ammo quickly, especially with automatic weapons.
Quick Revive (Solo Essential): If you’re playing solo, Quick Revive’s self-revive capability can save runs where a Zursa catches you off-guard. Make this permanent ASAP.
PhD Flopper (Situational): If you’re using explosives or certain wonder weapons alongside your Zursa-killer, PhD prevents self-damage from splash.
Check our best perk augments guide to maximize your perk effectiveness.
Armor Requirements
Minimum: Tier 2 Armor Tier 1 armor won’t cut it against Zursa in later rounds. Tier 2 provides enough damage mitigation to survive a hit or two while you reposition.
Ideal: Tier 3 Armor Maximum protection lets you play more aggressively and recover from positioning mistakes without getting downed.
Always carry armor plates for mid-fight repairs. A Zursa encounter can shred your armor quickly, especially if regular zombies are hitting you simultaneously.
Equipment Loadout
Lethal: Combat Axes Combat Axes deal devastating damage when thrown at Zursa weak points. Aim for the red areas under bulbs or directly at the head for maximum impact. The damage is substantial enough to be worth the risky throw.
Tactical: Stun Grenades Stun Grenades temporarily freeze the Zursa in place, giving you free damage windows. This is clutch when you’re overwhelmed or need to reload. Always carry stuns for emergency crowd control.
Alternative: Semtex If you prefer explosives, Semtex can deal good damage, but the explosion won’t help with weak point targeting. Stuns are generally more useful for the control they provide.
Advanced Strategies and Tips
Once you’ve mastered the basics, these advanced tactics will make you a Zursa elimination expert.
The Kiting Method
If you’re caught in a bad position with a Zursa and a horde, kiting is your best friend:
- Sprint in large circles to maintain distance from both Zursa and zombies
- Use Stamin-Up’s full duration before stopping to shoot
- Only fire when you have clear sightlines to weak points
- Avoid corners and dead ends at all costs
- Lead the train past known ammo/armor refill locations
Kiting extends fights but keeps you alive. Don’t try to be a hero and stand your ground—mobility is survival against Zursa.
The Chokepoint Method
If you’ve mastered the map layout, you can use narrow passages to your advantage:
- Lure Zursa to a doorway or narrow corridor
- Position yourself at maximum distance on the other side
- Focus fire on the head since the Zursa can’t dodge laterally
- Regular zombies can’t easily flank in tight spaces
- Have an escape route planned if things go wrong
This method is riskier but results in faster kills since the Zursa can’t use its mobility advantage.
The Wonder Weapon Combo
Certain wonder weapons synergize beautifully with anti-Zursa tactics:
- Ray Gun: High damage per shot for weak point bursting
- Jet Gun: Sustained damage stream that works while you maintain distance
- Map-specific wonder weapons: Usually have bonus damage against elites
Pair a wonder weapon with a Napalm Burst assault rifle for maximum flexibility. Use the wonder weapon for burst damage, switch to your AR for ammo mod application.
Field Upgrade Coordination
Your Field Upgrade choice matters in Zursa encounters:
Energy Mine: Place it where you plan to kite the Zursa. When triggered, it deals significant damage and slows the bear.
Healing Aura: Emergency healing when things go wrong. Can save you from a down mid-fight.
Frenzied Guard: Taunt surrounding zombies to attack you while you’re temporarily invulnerable, letting you focus solely on the Zursa.
Check our Field Upgrade augments guide for optimization tips.
Co-op Zursa Strategies
Multiple players completely change the Zursa dynamic. Here’s how to coordinate:
Role Division
Designated Zursa Killer: One player runs the optimized Zursa loadout (Napalm Burst, proper perks, upgraded weapons) and focuses exclusively on the elite.
Horde Control: Other players manage regular zombies, preventing them from overwhelming the Zursa killer.
Support: One player watches the Zursa killer’s back, ready to revive if things go wrong.
Communication is Critical
Call out:
- Zursa spawn locations as soon as you hear the roar
- Weak point destructions so teammates know to capitalize
- When you’re reloading so someone else can provide covering fire
- Armor/health status so support knows when to assist
Focus Fire
When possible, have multiple players focus fire the same weak point simultaneously. The faster you can trigger stuns, the less dangerous the Zursa becomes.
Common Mistakes to Avoid
Standing Still: The fastest way to get downed by a Zursa is to stop moving. Always maintain mobility, even while shooting.
Ignoring Regular Zombies: Focusing solely on the Zursa while regular zombies pile up is a recipe for disaster. Clear immediate threats first.
Wrong Weapon Type: Using your starting pistol or an unupgraded weapon against Zursa wastes time and ammo. Always have your proper Zursa-killer ready.
No Ammo Mod: Fighting Zursa without Napalm Burst or Brain Rot (or at least Elemental Pop) dramatically extends fights and increases risk.
Fighting in Tight Spaces: Unless you’re deliberately using the chokepoint method, avoid fighting Zursa in cramped areas where you can’t maneuver.
Wasting Stuns: Don’t throw stun grenades randomly. Save them for critical moments when you need emergency crowd control.
Level Progression and Preparation
If you haven’t reached Level 35 or 51 yet, here’s how to prepare for eventually facing Zursa effectively:
Priority Unlocks:
- Level 35: Napalm Burst ammo mod
- Level 51: Brain Rot ammo mod (alternative option)
- Augment System: Big Game augment for chosen ammo mod
Practice Without Optimal Loadout: Use Elemental Pop and practice the combat flow patterns. Master positioning, weak point targeting, and kiting even before you have the perfect ammo mod.
Study the Map: Learn Ashes of the Damned’s layout inside and out. Knowing where you can safely kite Zursa makes encounters dramatically easier.
Complete Side Content: Work through GobbleGum unlocks and other progression systems that make you stronger overall.
Integration with Overall Zombies Strategy
Zursa elimination is just one piece of successful Black Ops 7 Zombies gameplay. Here’s how it fits into bigger picture strategies:
For Easter Egg Attempts: Efficiently killing Zursa saves time and resources during quest steps. Don’t let these encounters drain your supplies.
For High Round Pushes: Later rounds spawn multiple Zursa simultaneously. Mastering quick elimination becomes mandatory for round 50+ survival.
For Exfil Success: Zursa often appear during exfiltration sequences. Having your anti-Zursa loadout ready ensures you don’t fail at the last moment.
For General Survival: Even casual Zombies players benefit from efficient Zursa elimination. The faster you handle elites, the more time you have for objectives and resource gathering.
Performance Considerations
Long Zursa fights with lots of particle effects (fire, explosions, ammo mod visuals) can strain your system. If you’re experiencing performance issues:
- Check our optimization guide
- Review lag and stuttering fixes
- Lower particle effect settings in graphics options
- Close background applications during extended sessions
Frame drops during a Zursa encounter can be the difference between life and death, so ensure your system is running smoothly.
Final Thoughts: Turning Fear into Farming
The Zursa Bear goes from “oh god run” to “free points and experience” once you understand the mechanics. The key ingredients are:
✅ Napalm Burst or Brain Rot with Big Game augment
✅ Pack-a-Punched, high-rarity weapon in AR or LMG class
✅ Stamin-Up and Jugger-Nog at minimum
✅ Tier 2+ Armor with plates ready
✅ Stun Grenades for emergency control
✅ Weak point knowledge for efficient damage
Master this setup and the combat flow pattern, and Zursa Bears become just another obstacle rather than a run-ending threat. You’ll actually start looking forward to their spawns because of the resources and experience they provide.
Remember: every skilled Zombies player was once terrified of these bears. The difference between panic and confidence is simply preparation and practice. Equip right, position smart, shoot straight, and those Zursa Bears won’t know what hit them.
Now get back to Ashes of the Damned and show those Dark Aether beasts who’s really at the top of the food chain.
For more Black Ops 7 Zombies strategies, check out our beginner tips guide, complete level unlocks, and prestige rewards breakdown.