Armor plates are your lifeline in Black Ops 7 Zombies. They’re the difference between shrugging off a hit from a zombie horde and getting downed in seconds. But here’s a frustrating problem that most players don’t realize is costing them valuable resources: the default armor plate behavior wastes plates by forcing you to apply them all at once, even when you only need partial repairs.
If you’ve ever noticed that you’re constantly running out of armor plates despite picking them up regularly, or if you’ve watched your plate count drop by three when you only needed one, this guide is going to change your Zombies experience. I’m going to show you exactly how to take manual control of your armor plate application and why this simple settings change is one of the most impactful optimizations you can make.
Understanding the Armor System in Black Ops 7 Zombies
Before we fix the problem, let’s understand how armor actually works in Black Ops 7 Zombies.
Armor Tiers and Durability
Black Ops 7 Zombies features a tiered armor system with three progressive levels:
- Tier 1 Armor: Basic protection, moderate damage mitigation
- Tier 2 Armor: Improved protection, better damage mitigation
- Tier 3 Armor: Maximum protection, best damage mitigation
Each armor tier has a durability meter represented by segmented blocks in your HUD. As you take damage from zombies, your armor absorbs hits and the durability decreases. When armor durability reaches zero, you lose that armor’s protective benefits and start taking health damage directly.
How Armor Plates Work
Armor Plates are consumable items that restore your armor’s durability. Here’s the critical information:
Acquisition Methods:
- Dropped randomly by eliminated zombies
- Purchased from Crafting Tables using Salvage
- Found in loot chests and containers
- Rewarded from T.E.D.D. Tasks
Plate Mechanics:
- Each armor tier has multiple armor segments (typically 3 segments)
- Each armor plate restores one segment of durability
- You can carry a limited number of plates (varies by inventory)
- Applying plates takes time, leaving you vulnerable
The Default Setting Problem
Here’s where most players encounter issues: By default, Black Ops 7 is set to “Apply All” armor plate behavior.
What “Apply All” Does: When you press the armor plate button (Triangle on PlayStation, Y on Xbox, or the keybind on PC), the game automatically starts applying armor plates continuously until either:
- Your armor is fully repaired, OR
- You run out of armor plates
Why This Is Wasteful:
Imagine this scenario:
- You have Tier 3 armor with 3 segments
- You take a few hits and lose one-third of one segment (barely damaged)
- You press the armor button
- The game applies THREE full armor plates, restoring all segments
- You just wasted two armor plates repairing segments that were nearly full
This happens constantly throughout Zombies matches, silently draining your armor plate inventory when you could be conserving them for critical moments.
The Solution: Manual Armor Plate Application
Fortunately, Black Ops 7 includes a setting that fixes this issue completely. By changing your Armor Plate Behavior to “Apply One,” you take complete control over when and how many plates you use.
Step-by-Step: Changing Armor Plate Behavior
Follow these exact steps to enable manual armor plate application:
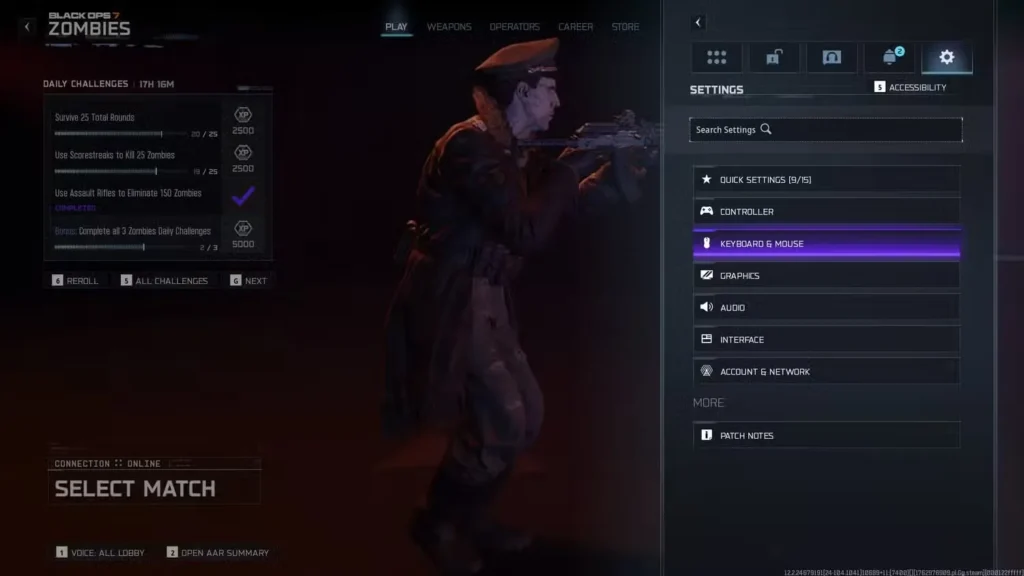
Step 1: Access Settings
- Pause your game (or access settings from the main menu)
- Navigate to Settings
Step 2: Select Input Device Settings
- Choose Controller (if using gamepad)
- OR choose Keyboard & Mouse (if using PC)
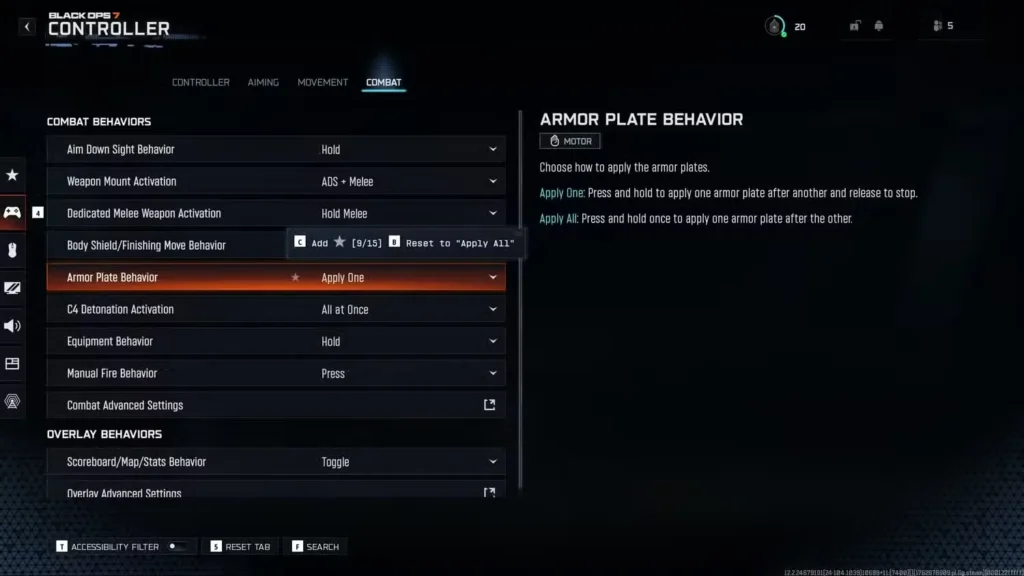
Step 3: Navigate to Combat Settings
- Scroll down to the Combat section
- This contains all combat-related behavior options
Step 4: Locate Armor Plate Behavior
- Under Combat Behaviors, find Armor Plate Behavior
- This setting controls how armor plates are applied
Step 5: Change to Apply One
- Select Armor Plate Behavior
- Change the setting from “Apply All” to “Apply One”
- Confirm your selection
Step 6: Apply and Test
- Save your settings changes
- Test in-game to confirm the new behavior works
How Manual Application Works
With “Apply One” enabled, armor plate application changes completely:
New Behavior:
- Press and hold the armor plate button (Triangle/Y/Keybind)
- One armor plate applies and restores one segment
- Release the button to stop the application process
- Press again if you want to apply another plate
Control Benefits:
- Apply exactly as many plates as you need
- Stop mid-application if threats appear
- Conserve plates for critical moments
- Make strategic decisions about when to fully repair
Why Manual Application is Superior
Let me break down exactly why this setting change is so impactful:
Resource Conservation
Scenario Analysis:
Default “Apply All” Behavior:
- Early round: Take minor damage, auto-apply 3 plates (2 wasted)
- Mid-round: Take moderate damage, auto-apply 2 plates (1 possibly wasted)
- Late round: Out of plates due to constant over-application
“Apply One” Behavior:
- Early round: Take minor damage, apply 1 plate (2 saved)
- Mid-round: Take moderate damage, apply 1-2 plates as needed (0-1 saved)
- Late round: Still have plate reserves due to conservative usage
Total Impact: Over a 30-round game, manual application can save you 15-25 armor plates compared to automatic application. That’s potentially 1,500-2,500 Salvage saved (at 100 Salvage per plate from Crafting Tables).
Tactical Flexibility
Manual application provides strategic advantages:
Situational Control:
- Between rounds: Apply only what’s needed, save rest for combat
- During light combat: Partial repairs while maintaining awareness
- Before boss fights: Ensure you enter with maximum armor AND reserve plates
- Emergency situations: Apply just enough to survive, then reposition
Decision-Making: You can now make informed choices like:
- “I’m only down one segment, I’ll wait for a drop rather than use a plate”
- “I need to conserve plates for the Easter egg boss fight later”
- “I’m at 2.5/3 segments, no need to repair yet”
Salvage Efficiency
Since armor plates can be purchased at Crafting Tables, conserving plates directly saves Salvage that could be spent on more valuable upgrades:
Salvage Priority Comparison:
Without Manual Control:
- Constantly buying armor plates (100-150 Salvage each)
- Less Salvage for weapon rarity upgrades
- Delayed ammo mod purchases
- Equipment shortages
With Manual Control:
- Rarely need to buy plates (drops usually sufficient)
- More Salvage for Legendary weapon upgrades
- Earlier ammo mod access
- Full equipment loadout
The Salvage you save on unnecessary armor plates can mean the difference between reaching Legendary weapon rarity by Round 30 versus Round 40.
Survivability in Critical Moments
Perhaps most importantly, having reserve armor plates when you actually need them can save runs:
Critical Situations:
- Elite enemy encounters: Full armor plus reserves for Zursa Bears or other elites
- Easter egg boss fights: Enter with maximum protection
- High round training: Maintain plate reserves for mistakes
- Down recovery: Have plates ready after being revived
Running out of armor plates at Round 35 because you wasted them throughout the game is a common reason for failed high-round attempts.
Advanced Armor Management Strategies
Once you’ve enabled manual application, here are advanced techniques to maximize efficiency:
The “Two-Segment Rule”
Strategy: Only repair armor when you’ve lost at least two full segments.
Rationale:
- Zombie damage in early-mid rounds rarely requires constant full armor
- Drops happen frequently enough to supplement natural losses
- Conserves plates for when you actually need them
Exception: Before entering known dangerous areas (boss arenas, dense spawn zones), repair to full regardless.
Pre-Combat Preparation
Before Engaging Elites or Objectives:
- Check armor durability
- Repair to full using manual application
- Confirm you have 3-5 reserve plates
- Engage with confidence
This preparation routine prevents mid-combat panic repairs where you might make mistakes.
Post-Down Recovery Protocol
After Being Revived:
- Immediately move to safety
- Check armor status (usually depleted after down)
- Apply plates one at a time while monitoring threats
- Prioritize getting to 2+ segments quickly
- Fully repair once in complete safety
Manual application lets you make these split-second decisions based on immediate danger level.
Round-Based Repair Timing
Optimal Repair Windows:
- Between rounds: Natural pause, safe to repair
- During Max Ammo drops: Brief respite, good repair window
- While teammates cover: Co-op advantage
- After clearing immediate area: Create your own safe windows
Avoid Repairing:
- In the middle of zombie hordes
- While training large groups
- During elite enemy spawns
- When low on reserve plates (unless critical)
Integration with Overall Zombies Strategy
Manual armor plate application integrates with your complete Zombies approach:
Early Game (Rounds 1-15)
Armor Strategy:
- Start with Tier 1 armor (default)
- Apply plates conservatively (drops are frequent)
- Upgrade to Tier 2 around Round 10-12
- Maintain 3+ reserve plates minimum
Plate Sources:
- Rely primarily on zombie drops
- Purchase from Crafting Tables only if desperate
- Save Salvage for weapon upgrades
Mid Game (Rounds 16-30)
Armor Strategy:
- Upgrade to Tier 3 by Round 20 (essential)
- Increase reserve plates to 5+ if possible
- Begin purchasing plates if drops are insufficient
- Use manual application to stretch resources
Plate Management:
- Balance plate usage with Salvage economy
- Prioritize plates before T.E.D.D. Tasks
- Maintain full armor before Easter egg steps
Late Game (Rounds 31+)
Armor Strategy:
- Tier 3 armor is mandatory
- Maintain maximum reserves at all times
- Purchase plates freely (you should have excess Salvage)
- Manual application prevents waste even with abundant resources
Critical Importance: One mistake in late rounds can end your run. Having those extra 10-15 armor plates saved through manual application can mean the difference between Round 50 and Round 35.
Perk Synergies for Armor Longevity
Certain perks complement smart armor management:
Juggernog: More base health means armor takes less relative damage per hit. Essential for everyone.
Quick Revive (Solo): Self-revive capability means you can recover from downs without losing your entire run. Especially valuable when you’ve conserved armor plates for the recovery.
PHD Flopper: Explosion immunity prevents armor damage from environmental sources, conserving durability for zombie hits.
Vulture Aid: Increases drop rates, including armor plates. Pairs perfectly with conservative manual application—you’ll almost never run out.
For complete perk optimization, check our best perk augments guide and permanent perks tutorial.
Common Questions and Troubleshooting
“Won’t manual application slow me down in combat?”
Answer: Initially, yes—there’s a learning curve. However, with practice, manual application becomes second nature and actually makes you more efficient because you:
- Repair proactively between engagements (not reactively during panic)
- Make better decisions about when repair is actually necessary
- Maintain better situational awareness by consciously choosing repair timing
“What if I forget to fully repair before a boss fight?”
Answer: Develop a pre-boss checklist routine:
- ✅ Armor at full (manually applied)
- ✅ Reserve plates stocked (5+ if possible)
- ✅ Weapons Pack-a-Punched and at high rarity
- ✅ Ammo full
- ✅ Equipment ready
- ✅ Perks active
Consistency prevents mistakes.
“Does this setting affect Multiplayer or Warzone?”
Answer: Settings are typically mode-specific in Black Ops 7. However, if you play Warzone or other modes with armor mechanics, check those settings separately. The same “Apply One” philosophy benefits those modes as well.
“Can I change this mid-game?”
Answer: Yes! You can pause and adjust settings at any time during a Zombies match. If you realize you’re wasting plates, change the setting immediately.
Controller vs. Keyboard Differences
The setting location is slightly different depending on input method:
Controller (PlayStation/Xbox): Settings → Controller → Combat → Combat Behaviors → Armor Plate Behavior → Apply One
Keyboard & Mouse (PC): Settings → Keyboard & Mouse → Combat → Combat Behaviors → Armor Plate Behavior → Apply One
Console-Specific Note: On PlayStation, the default button is Triangle (△). On Xbox, it’s Y. Holding these buttons now applies one plate at a time rather than auto-applying all plates.
PC-Specific Note: The default keybind for armor application varies. Check your Combat keybindings to confirm your armor plate key, then follow the same setting change process.
Impact on Co-op vs. Solo Play
Solo Play Benefits
Maximum Impact:
- All resources are yours—wasting plates directly hurts only you
- No teammates to provide covering fire during repairs
- Conservative plate usage extends your survivability
- Solo runs often require reaching higher rounds—every plate matters
Solo Strategy: Be even more conservative with plate application. The inability to be revived by teammates means your armor plate reserves are your last line of defense.
Co-op Benefits
Shared Advantages:
- Teammates can cover you during repairs
- Plate drops are distributed (potentially more total drops)
- Revive safety net reduces pressure
- Can coordinate armor repair timing
Co-op Strategy: Communicate armor status with teammates. If multiple players need repairs, stagger them so someone is always providing cover fire.
Pro Tip: In co-op, having even one player who conserves armor plates through manual application means that player can support teammates by purchasing plates for sharing when others run out.
Performance and Quality-of-Life
This settings change has zero impact on game performance—it’s purely a behavioral modification that gives you control. There’s literally no downside to enabling “Apply One” behavior.
If you’re optimizing your overall Zombies experience, also check our settings and optimization guide and lag troubleshooting for comprehensive improvements.
Training Yourself to Use Manual Application
Week 1: Consciously remind yourself to release the button after each plate Week 2: Develop awareness of how many segments you actually need Week 3: Automatic muscle memory forms—no longer thinking about it Week 4+: Expert-level armor management becomes instinctive
The learning curve is minimal, and the benefits last forever.
Integration with Weapon Loadouts
Your weapon choice affects how often you take damage, which impacts armor usage:
Close-Range Weapons (SMGs like the Ryden 45K):
- More frequent zombie contact
- Higher armor damage over time
- Manual application even more valuable
Long-Range Weapons (Snipers or Marksman Rifles):
- Less zombie contact
- Lower armor damage
- Plates last longer naturally
Versatile Weapons (Dravec 45 or BO2 Classics):
- Moderate zombie contact
- Balanced armor usage
- Manual application optimizes either scenario
Final Thoughts: Small Change, Massive Impact
Changing your Armor Plate Behavior from “Apply All” to “Apply One” is one of those quality-of-life adjustments that seems minor but fundamentally improves your Black Ops 7 Zombies experience. It’s the difference between constantly struggling with armor plate shortages and always having reserves when you actually need them.
The Benefits Recap:
✅ Conserve 15-25 armor plates per match through intelligent usage
✅ Save 1,500-2,500 Salvage that can go toward critical upgrades
✅ Maintain plate reserves for critical moments and emergencies
✅ Improve decision-making through conscious armor management
✅ Extend survivability in high rounds when plates matter most
This isn’t about being cheap with resources—it’s about being smart with them. The plates you save by not over-repairing at Round 10 might be the plates that save your run at Round 45 when you make a mistake training zombies.
Take 30 seconds right now to make this settings change. Your future self, facing down a Zursa Bear at Round 50 with 8 armor plates in reserve instead of zero, will thank you.
For more Black Ops 7 Zombies optimization guides, check out beginner tips and tricks, exfil strategies, and complete level unlocks.