Welcome to Black Ops 7 Zombies—the next chapter in the Dark Aether saga. Whether you’re a franchise veteran returning to round-based Zombies or a complete newcomer wondering why the undead won’t stop chasing you, this guide covers everything you need to know to survive on Ashes of the Damned.
I’ve compiled a mix of beginner-friendly fundamentals and advanced strategies that will take you from “dying on round 5” to “comfortably surviving past round 30.” These aren’t just generic tips—these are specific strategies for Ashes of the Damned’s unique mechanics, including how to use Ol’ Tessie (the wonder vehicle), farm loot from Dark Aether plants, and master zombie training patterns that separate pros from noobs.
Let’s turn you into a zombie-slaying machine.
1. Use Fumigators to Spray Dark Aether Plants for Free Loot
One of Ashes of the Damned’s best-kept secrets is the Fumigator and Dark Aether Plant system—an easy way to farm Essence, Salvage, weapons, and other goodies in the early game.
![Essential Beginner Tips & Tricks for Black Ops 7 Zombies
Welcome to Black Ops 7 Zombies—the next chapter in the Dark Aether saga. Whether you're a franchise veteran returning to round-based Zombies or a complete newcomer wondering why the undead won't stop chasing you, this guide covers everything you need to know to survive on Ashes of the Damned.
I've compiled a mix of beginner-friendly fundamentals and advanced strategies that will take you from "dying on round 5" to "comfortably surviving past round 30." These aren't just generic tips—these are specific strategies for Ashes of the Damned's unique mechanics, including how to use Ol' Tessie (the wonder vehicle), farm loot from Dark Aether plants, and master zombie training patterns that separate pros from noobs.
Let's turn you into a zombie-slaying machine.
1. Use Fumigators to Spray Dark Aether Plants for Free Loot
One of Ashes of the Damned's best-kept secrets is the Fumigator and Dark Aether Plant system—an easy way to farm Essence, Salvage, weapons, and other goodies in the early game.
What Are Fumigators?
Fumigators are orange canisters with white outlines scattered across the map. You'll find them in landmarks like:
Janus Towers Plaza (spawn area)
Vandorn Farm
Blackwater Lake
Various other locations throughout the map
How to Use Fumigators:
Step 1: Locate an orange Fumigator canister (they're hard to miss with the white outline)
Step 2: Interact with it by holding your reload button
Step 3: Find a green Dark Aether Plant (commonly found in Janus Towers Plaza spawn area and upper Ashwood)
Step 4: Approach the plant until the "Spray" prompt appears
Step 5: Spray the plant and defend it from zombies
What Happens When You Spray:
You'll hear a distinctive chirping sound
Zombies will ignore you and attack the plant instead
Defend the plant from zombie attacks
The plant will grow from green to purple
The plant explodes and drops loot
Loot Drops Include:
Essence (points)
Salvage (for weapon rarity upgrades)
Weapons
Equipment
Potentially rare items
Pro Strategy: Use this in early rounds (1-5) when zombies are slow and easy to manage. Spray multiple plants before starting a round, then defend them all for massive early-game resources. This gives you the Essence needed to unlock doors and buy essential perks faster.
Why This Matters: Early Essence and Salvage let you buy Tier 2 Armor, unlock Pack-a-Punch access, and purchase crutch perks before the zombies become overwhelming.
2. Buy Tier 2 Armor Before Perks (Priority #1)
This is arguably the most important tip for beginners: always buy Tier 2 Armor before spending Essence on perks or weapons.
Why Armor Matters More Than Perks:
Essence is your point system in Zombies—you earn it by killing undead and use it to purchase everything from doors to perks. But armor provides more immediate survivability than any single perk, including Jugger-Nog.
Armor Benefits:
Mitigates significantly more damage than base health
Allows you to tank multiple hits before taking health damage
Becomes essential as rounds progress and zombie damage increases
Stacks with Jugger-Nog for maximum tankiness
Where to Find Armor:
Look for Armor stations on walls marked with blue outlines throughout various landmarks. These are hard to miss once you know what to look for.
Cost: Tier 2 Armor costs approximately 4,000 Essence
Why Tier 2 Specifically?
Tier 1 Armor: Basic protection, breaks quickly
Tier 2 Armor: Significantly improved durability and damage mitigation
Tier 3 Armor: Best protection but more expensive and available later
In early rounds (5-15), Tier 2 Armor provides the best cost-to-survival ratio. You'll be able to tank hits that would otherwise down you, giving you time to escape, heal, or fight back.
Recommended Purchase Order:
Tier 2 Armor (first major purchase)
Crutch perks (Jugger-Nog, Quick Revive, Stamin-Up)
Tier 3 Armor upgrade (later rounds)
Additional perks based on playstyle
Pro tip: Armor plates can be found as drops from zombies. Combine purchased Tier 2 Armor with Vulture Aid's Armor-matic Augment for automatic armor plate application.
3. Master Ol' Tessie: Your Survival Vehicle & Mobile Pack-a-Punch
Ol' Tessie is Ashes of the Damned's wonder vehicle—part transportation, part mobile fortress, part Pack-a-Punch machine. Understanding how to use it is essential for survival.
Where to Find Ol' Tessie:
Ol' Tessie spawns in Janus Towers Plaza (the starting area), but it's initially non-functional.
How to Activate Ol' Tessie:
Step 1: Enter the Server Room in Janus Towers Plaza
Step 2: Melee strike the floor to reveal T.E.D.D.'s Head (the AI driver)
Step 3: Pick up T.E.D.D.'s Head
Step 4: Return to Ol' Tessie and interact to install T.E.D.D.
Step 5: Ol' Tessie is now fully operational!
How Ol' Tessie Works:
Transportation:
Ol' Tessie connects all major landmarks across the map
The areas between landmarks are "no man's land" with infinite zombie spawns
Super-strong zombies spawn in these connecting areas
You must use Ol' Tessie to travel safely between landmarks
Breaking Through Barriers:
The east and west areas of Janus Towers Plaza are initially blocked
Drive Ol' Tessie through these barriers to smash them open
This unlocks access to other map areas
Vehicle Durability:
Zombies attack Ol' Tessie while you're inside
The vehicle can be damaged and destroyed
Ol' Tessie auto-repairs when left alone
Reach landmarks quickly to minimize damage
What Happens If Ol' Tessie is Destroyed?
Don't panic if you lose the vehicle:
Respawn Location: Head to Ashwood
Respawn Cost: Approximately 1,000 Essence
Options:
Respawn Ol' Tessie entirely
Teleport directly inside the vehicle
Ol' Tessie as Your Pack-a-Punch Machine:
This is where Ol' Tessie becomes game-changing:
Step 1: Drive Ol' Tessie to Ashwood
Step 2: Install the Pack-a-Punch machine on the back of Ol' Tessie
Step 3: Ol' Tessie gains a boost ability after Pack-a-Punch installation
Step 4: Use Pack-a-Punch freely while on Ol' Tessie
Pack-a-Punch Tiers:
Tier 1: First upgrade (base cost)
Tier 2: Second upgrade (increased cost)
Tier 3: Third upgrade (highest cost, maximum power)
Each tier significantly increases weapon damage, making previously weak guns viable on high rounds.
Pro Strategy: Keep Ol' Tessie near your training area so you can quickly Pack-a-Punch weapons between rounds. Check the Pack-a-Punch guide for detailed Tier costs and locations.
Critical Survival Tip: Never venture between landmarks on foot. The infinite spawning zombies in no man's land will overwhelm you instantly. Always use Ol' Tessie for travel.
4. Focus on Crutch Perks First (Priority Purchase Guide)
With 12 Perk-a-Cola machines scattered across Ashes of the Damned, it's tempting to buy whatever's closest. Don't do this.
Important: Perk prices increase with each one you purchase, so buying the wrong perks early wastes Essence and delays your essential purchases.
The Four Essential Crutch Perks:
1. Jugger-Nog (Priority #1)
Location: Ashwood - Inside The Ruby Rabbit
Effect: Increases maximum health
Why Essential: Base health isn't enough past round 10. Jugger-Nog is non-negotiable for survival.
Best Augments: Turtle Shell (rear damage absorption) + Durable Plates (increased armor durability)
2. Quick Revive (Priority #2)
Location: Janus Towers Plaza - Server Room (east wall)
Effect: Faster health regeneration and faster revive speed
Why Essential: Solo players need this for self-revive capabilities. Co-op players need it for clutch teammate saves.
Best Augments: Equivalent Exchange (self-revive by killing zombies while downed) + Slow Death (extended last stand time)
3. Stamin-Up (Priority #3)
Location: Vandorn Farm - Farmhouse upstairs (southeast wall)
Effect: Increased movement speed and sprint duration
Why Essential: High-round survival depends on mobility. You need to outrun zombie hordes while training.
Best Augments: Guns Up (fire while sprinting) + Footwork (increased strafing speed)
4. Speed Cola (Priority #4)
Location: Blackwater Lake - Cabin upper floor (northwest corner)
Effect: Faster reload and faster armor plating
Why Essential: Downtime = death. Fast reloads and armor plating keep you in the fight longer.
Best Augments: Classic Formula (even faster reloads) + Quick Swap (faster weapon swapping)
Recommended Purchase Order:
Rounds 1-10:
Buy Tier 2 Armor (4,000 Essence)
Buy Jugger-Nog (~2,500 Essence base, increases with each perk)
Buy Quick Revive (~3,500 Essence second perk)
Rounds 11-20:
4. Buy Stamin-Up (~4,500 Essence third perk)
5. Buy Speed Cola (~5,500 Essence fourth perk)
Rounds 20+:
6. Expand to specialized perks based on playstyle:
PhD Flopper for explosive immunity
Double Tap for increased DPS
Deadshot Daiquiri for sniper/shotgun builds
Frenzied Guard [Field Upgrade] for tank mode
Cost Management Tip: Perk prices scale with each purchase, so the order matters. If you buy random perks first, Jugger-Nog might cost 6,000+ Essence instead of 2,500. Always follow the priority order.
For complete perk optimization, check out the best Perk Augments guide and learn how to unlock Augment Research.
5. Use The Arsenal to Upgrade Weapon Rarity with Salvage
Pack-a-Punch isn't the only way to boost weapon damage—The Arsenal provides a parallel upgrade system that's equally important for high-round viability.
What is The Arsenal?
The Arsenal is a machine found throughout various landmarks (you'll hear a loud drill sergeant voice yelling at you—it's impossible to miss). It allows you to upgrade weapon rarity using Salvage.
Weapon Rarity Tiers:
Common (Gray) - Base damage
Uncommon (Green) - Minor damage increase
Rare (Blue) - Moderate damage increase
Epic (Purple) - Significant damage increase
Legendary (Orange) - Maximum damage increase
How to Use The Arsenal:
Step 1: Gather Salvage by:
Killing zombies (drops Salvage)
Using weapons with Suppressors in your loadout (increases Salvage drop rate)
Opening loot containers
Completing objectives
Step 2: Locate an Arsenal machine in any landmark
Step 3: Interact with The Arsenal and select "Upgrade Weapon Rarity"
Step 4: Spend Salvage to increase your weapon's rarity tier
Step 5: Repeat until you reach Legendary (orange) rarity
Why Rarity Upgrades Matter:
Weapon rarity dramatically increases base damage, which stacks multiplicatively with Pack-a-Punch upgrades. The formula looks like this:
Total Damage = (Base Weapon Damage × Rarity Multiplier) × Pack-a-Punch Multiplier
A Legendary weapon with Tier 3 Pack-a-Punch deals significantly more damage than a Common weapon with Tier 3 Pack-a-Punch.
The Arsenal Also Sells Ammo Mods:
After Pack-a-Punching your weapon, return to The Arsenal to purchase Ammo Mods:
Dead Wire: Electric damage with chain effects
Cryo Freeze: Frost damage that slows and increases damage taken
Fire Works: Explosive fireworks (currently the strongest)
Napalm Burst: Fire damage over time (super effective against Zursa zombie bears)
Shadow Rift: Black hole teleportation
Brain Rot: Turn zombies into temporary allies
Ammo Mod Strategy: Choose based on your situation:
General use: Fire Works or Dead Wire
Zursa hunting: Napalm Burst (they're weak to fire)
Crowd control: Cryo Freeze
Ammo conservation: Shadow Rift (Ammo Theorem Augment refills magazine)
Check out the best Ammo Mod Augments guide for optimal builds.
Pro tip: Always upgrade weapon rarity before Pack-a-Punching. Rarity upgrades are cheaper early, and the damage boost makes Pack-a-Punch even more effective.
6. Research Augments for Major Power Increases
Before loading into any Zombies match, visit the Augments menu to research upgrades that fundamentally change how perks, Field Upgrades, and Ammo Mods function.
What Are Augments?
Augments are permanent upgrades that modify abilities:
Major Augments: Change core functionality (e.g., Jugger-Nog's Turtle Shell makes rear armor absorb all damage)
Minor Augments: Provide supporting buffs (e.g., increased duration, activation chance, or damage)
How to Access Augment Research:
Step 1: Reach Level 11 to unlock Augment Research
Step 2: Navigate to Weapons > Augments from the main menu
Step 3: Select a Perk, Ammo Mod, or Field Upgrade to research
Step 4: Play Zombies and earn Augment XP by killing zombies
Step 5: Complete research to unlock the Augment
Step 6: Equip Augments in the Augments menu before matches
Game-Changing Augments to Unlock First:
Quick Revive - Equivalent Exchange (Major):
Self-revive by killing a zombie while downed (up to 3 times)
Keep all perks on revive
Essentially gives you three extra lives per match
Jugger-Nog - Turtle Shell (Major):
Rear damage completely absorbed by armor
Front damage mitigation remains normal
Makes training zombies significantly safer
Frenzied Guard - Frenzy Fire (Major):
No reloading required while active (uses ammo from stock)
Combined with invincibility makes you unkillable during activation
Perfect for emergency escapes
Stamin-Up - Guns Up (Major):
Fire weapons while sprinting
Huge quality-of-life improvement for training
Maintain pressure on zombies while repositioning
Dead Wire - Ball Lightning (Major):
Spawns autonomous electric orb that attacks zombies
Consistent damage without direct player input
Works on all weapon types
For complete details on unlocking all Augments, check the Augment Research unlock guide.
Investment value: Augment Research is a long-term progression system, but the power increases are absolutely worth it. A fully Augmented loadout is exponentially more powerful than base abilities.
7. Master Zombie Training: The Skill That Separates Pros from Beginners
Zombie training is the single most important skill in Black Ops 7 Zombies. Master this, and you'll survive rounds that would otherwise destroy you.
What is Zombie Training?
Zombie training (also called "kiting" or "running trains") is the practice of grouping zombies into a tight horde behind you, then eliminating them all at once. This prevents you from getting surrounded and overwhelmed.
Why Training Matters:
Without Training:
Zombies spawn unpredictably in all directions
You get trapped in corners
Zombies attack from multiple angles
You waste ammo on scattered enemies
You die frequently on rounds 15+
With Training:
You control zombie positioning
Zombies group into predictable patterns
You dictate when and where fights happen
Ammo efficiency increases dramatically
You survive to rounds 30, 50, 100+
How to Train Zombies (Step-by-Step):
Step 1: Let All Zombies Spawn
Don't kill zombies immediately when the round starts
Wait for the entire horde to spawn
This ensures you're training the full group, not fragments
Step 2: Run in Large Circles or Figure-8 Patterns
Find an open area (Ashwood Market Square, Janus Towers Plaza)
Sprint in a large circular or figure-8 pattern
Don't sprint in straight lines—curves prevent zombies from cutting you off
Step 3: Weave Between Zombies
As zombies spawn in front of you, weave between them
Think of the classic Snake game—you're the snake's head, zombies are the body
Don't shoot yet—just keep running and collecting zombies
Step 4: Group the Entire Horde
Continue running until all zombies are grouped into a tight spread behind you
They should form a "train" following your exact path
You are the shepherd, they are your sheep
Step 5: Create Distance
Once grouped, sprint ahead to create separation
Turn around when you have 10-15 meters of space
The zombies should all be in one cluster
Step 6: Eliminate the Horde
Unload on the grouped zombies with your weapon
Use Ammo Mods like Fire Works for maximum efficiency
Activate Field Upgrades like Frenzied Guard if needed
Step 7: Repeat
Once the horde is eliminated, start the process again
Never fight zombies one-by-one or in small groups
Common Training Mistakes Beginners Make:
❌ Killing zombies too early - Fragments the horde, makes training harder
❌ Running in straight lines - Zombies cut you off and corner you
❌ Training in tight spaces - No room to maneuver, easy to get trapped
❌ Not watching spawn points - Zombies spawn behind you unexpectedly
❌ Stopping to reload in the middle of the train - Death sentence on high rounds
Best Training Locations on Ashes of the Damned:
Ashwood Market Square - Large open area, predictable spawns
Janus Towers Plaza - Spawn area, multiple escape routes
Zarya Cosmodrome - Open space underneath the rocket
Vandorn Farm outdoor area - Good for figure-8 patterns
Advanced Training Tips:
Use Stamin-Up: Increased sprint speed makes training significantly easier
Watch Your Six: Zombies can spawn behind you. Use Death Perception's minimap enhancement or frequently glance backward.
Save Ammo: Only shoot when the horde is fully grouped. Shooting scattered zombies wastes bullets.
Use Doorways: Funneling zombies through doorways creates natural choke points for easy eliminations.
Practice Makes Perfect: Your first few training attempts will feel chaotic. Keep practicing—muscle memory develops quickly.
Field Upgrades Save Lives: Keep Aether Shroud or Frenzied Guard charged for emergency escapes when training goes wrong.
8. Additional Beginner Tips for Ashes of the Damned
Manage Your Essence Wisely:
Early Game Priorities (Rounds 1-10):
Unlock essential doors (2,000-4,000 Essence total)
Buy Tier 2 Armor (4,000 Essence)
Purchase Jugger-Nog and Quick Revive
Pack-a-Punch your primary weapon (Tier 1)
Mid Game Priorities (Rounds 11-20):
Unlock remaining landmarks
Purchase Stamin-Up and Speed Cola
Upgrade weapon rarity at The Arsenal
Pack-a-Punch to Tier 2
Buy additional perks based on playstyle
Late Game Priorities (Rounds 20+):
Complete your perk loadout
Pack-a-Punch to Tier 3
Upgrade weapons to Legendary rarity
Purchase Ammo Mods
Maintain armor and ammo supplies
Use Wall Weapons Strategically:
Wall weapons can be repurchased infinitely for ammo:
Identify wall weapons early (marked with weapon outlines)
Buy ammo from walls rather than using Mystery Box points
Check the wall buy locations guide for full map
Understand Special Enemies:
Zursa (Zombie Bears):
Heavily armored, aggressive Elite enemies
Weak to Napalm Burst Ammo Mod
Target weak points (head and limbs) for increased damage
Can down you in 2-3 hits on high rounds
Manglers:
Arm cannon enemies from previous Black Ops games
Destroy their cannon arm first to reduce threat
Headshots deal critical damage after arm destruction
Mimics:
Disguised as loot crates or objects
Attack when you approach
Easy to kill but annoying during trains
Communication in Co-Op:
If playing with teammates:
Call out when buying doors - Don't waste duplicate Essence
Coordinate perk purchases - Spread out to hit multiple perk machines efficiently
Revive priorities - Person with Quick Revive should revive others
Train separately - Don't overlap training routes; causes chaos
Share Ol' Tessie - One person drives, others shoot from the vehicle
Know When to Exfil:
Black Ops 7 includes Exfil mechanics:
Call for extraction when you're ready to end the match
Defend the extraction point from overwhelming hordes
Successfully exfil for bonus XP and rewards
Don't get greedy—exfil if you're low on resources
Final Thoughts: From Beginner to High-Round Survivor
Black Ops 7 Zombies offers incredible depth, and Ashes of the Damned is a sprawling map with tons of mechanics to master. But if you focus on these core fundamentals—buying Tier 2 Armor first, mastering Ol' Tessie, prioritizing crutch perks, and learning to train zombies—you'll survive rounds that once seemed impossible.
Quick Recap:
✅ Use Fumigators on Dark Aether plants for early-game loot
✅ Buy Tier 2 Armor before perks (4,000 Essence priority)
✅ Master Ol' Tessie for transportation and mobile Pack-a-Punch
✅ Purchase crutch perks in order: Jugger-Nog, Quick Revive, Stamin-Up, Speed Cola
✅ Upgrade weapon rarity at The Arsenal with Salvage
✅ Research and equip Augments for massive power increases
✅ Master zombie training to control hordes and survive high rounds
The difference between dying on round 10 and surviving to round 50 isn't raw skill—it's knowledge. Now that you have the knowledge, get out there and put it to practice. Those zombies aren't going to train themselves.
For technical issues affecting gameplay, check the packet burst fix guide to ensure smooth performance.
Related Guides:
All Perk Locations on Ashes of the Damned
Best Perk Augments (All 12 Perks)
Best Field Upgrade Augments
Best Ammo Mod Augments
How to Unlock Augment Research
Pack-a-Punch Location & Guide
Complete Level Unlocks (1-55)
All Prestige Rewards](https://gamingpromax.com/wp-content/uploads/2025/11/fumigator-in-bo7-zombies-1024x725.webp)
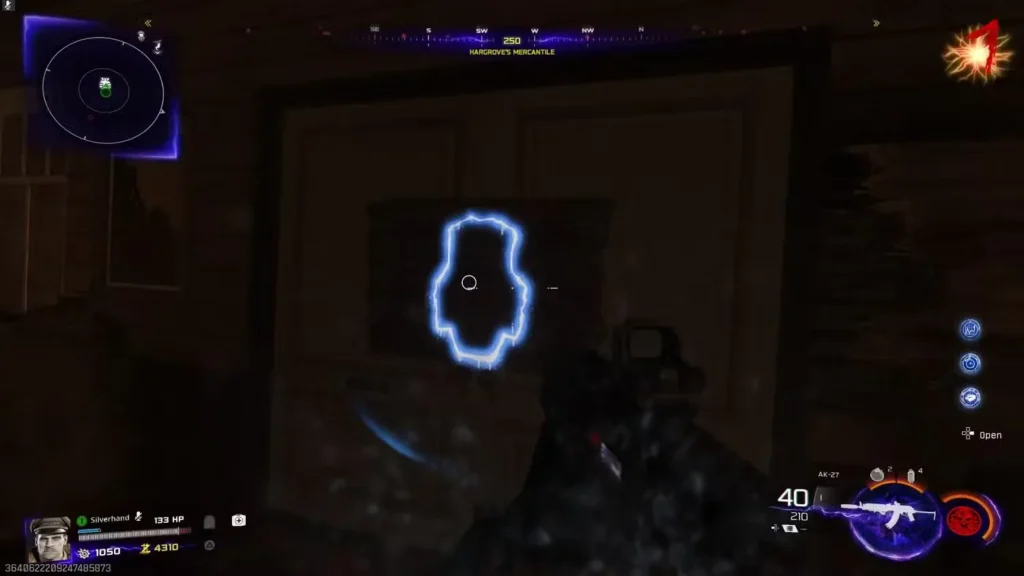
What Are Fumigators?
Fumigators are orange canisters with white outlines scattered across the map. You’ll find them in landmarks like:
- Janus Towers Plaza (spawn area)
- Vandorn Farm
- Blackwater Lake
- Various other locations throughout the map
How to Use Fumigators:
Step 1: Locate an orange Fumigator canister (they’re hard to miss with the white outline)
Step 2: Interact with it by holding your reload button
Step 3: Find a green Dark Aether Plant (commonly found in Janus Towers Plaza spawn area and upper Ashwood)
Step 4: Approach the plant until the “Spray” prompt appears
Step 5: Spray the plant and defend it from zombies
What Happens When You Spray:
- You’ll hear a distinctive chirping sound
- Zombies will ignore you and attack the plant instead
- Defend the plant from zombie attacks
- The plant will grow from green to purple
- The plant explodes and drops loot
Loot Drops Include:
- Essence (points)
- Salvage (for weapon rarity upgrades)
- Weapons
- Equipment
- Potentially rare items
Pro Strategy: Use this in early rounds (1-5) when zombies are slow and easy to manage. Spray multiple plants before starting a round, then defend them all for massive early-game resources. This gives you the Essence needed to unlock doors and buy essential perks faster.
Why This Matters: Early Essence and Salvage let you buy Tier 2 Armor, unlock Pack-a-Punch access, and purchase crutch perks before the zombies become overwhelming.
2. Buy Tier 2 Armor Before Perks (Priority #1)
This is arguably the most important tip for beginners: always buy Tier 2 Armor before spending Essence on perks or weapons.
Why Armor Matters More Than Perks:
Essence is your point system in Zombies—you earn it by killing undead and use it to purchase everything from doors to perks. But armor provides more immediate survivability than any single perk, including Jugger-Nog.
Armor Benefits:
- Mitigates significantly more damage than base health
- Allows you to tank multiple hits before taking health damage
- Becomes essential as rounds progress and zombie damage increases
- Stacks with Jugger-Nog for maximum tankiness
Where to Find Armor:
Look for Armor stations on walls marked with blue outlines throughout various landmarks. These are hard to miss once you know what to look for.
Cost: Tier 2 Armor costs approximately 4,000 Essence
Why Tier 2 Specifically?
- Tier 1 Armor: Basic protection, breaks quickly
- Tier 2 Armor: Significantly improved durability and damage mitigation
- Tier 3 Armor: Best protection but more expensive and available later
In early rounds (5-15), Tier 2 Armor provides the best cost-to-survival ratio. You’ll be able to tank hits that would otherwise down you, giving you time to escape, heal, or fight back.
Recommended Purchase Order:
- Tier 2 Armor (first major purchase)
- Crutch perks (Jugger-Nog, Quick Revive, Stamin-Up)
- Tier 3 Armor upgrade (later rounds)
- Additional perks based on playstyle
Pro tip: Armor plates can be found as drops from zombies. Combine purchased Tier 2 Armor with Vulture Aid’s Armor-matic Augment for automatic armor plate application.
3. Master Ol’ Tessie: Your Survival Vehicle & Mobile Pack-a-Punch
Ol’ Tessie is Ashes of the Damned’s wonder vehicle—part transportation, part mobile fortress, part Pack-a-Punch machine. Understanding how to use it is essential for survival.

Where to Find Ol’ Tessie:
Ol’ Tessie spawns in Janus Towers Plaza (the starting area), but it’s initially non-functional.
How to Activate Ol’ Tessie:
Step 1: Enter the Server Room in Janus Towers Plaza
Step 2: Melee strike the floor to reveal T.E.D.D.’s Head (the AI driver)
Step 3: Pick up T.E.D.D.’s Head
Step 4: Return to Ol’ Tessie and interact to install T.E.D.D.
Step 5: Ol’ Tessie is now fully operational!
How Ol’ Tessie Works:
Transportation:
- Ol’ Tessie connects all major landmarks across the map
- The areas between landmarks are “no man’s land” with infinite zombie spawns
- Super-strong zombies spawn in these connecting areas
- You must use Ol’ Tessie to travel safely between landmarks
Breaking Through Barriers:
- The east and west areas of Janus Towers Plaza are initially blocked
- Drive Ol’ Tessie through these barriers to smash them open
- This unlocks access to other map areas
Vehicle Durability:
- Zombies attack Ol’ Tessie while you’re inside
- The vehicle can be damaged and destroyed
- Ol’ Tessie auto-repairs when left alone
- Reach landmarks quickly to minimize damage
What Happens If Ol’ Tessie is Destroyed?
Don’t panic if you lose the vehicle:
Respawn Location: Head to Ashwood
Respawn Cost: Approximately 1,000 Essence
Options:
- Respawn Ol’ Tessie entirely
- Teleport directly inside the vehicle
Ol’ Tessie as Your Pack-a-Punch Machine:
This is where Ol’ Tessie becomes game-changing:
Step 1: Drive Ol’ Tessie to Ashwood
Step 2: Install the Pack-a-Punch machine on the back of Ol’ Tessie
Step 3: Ol’ Tessie gains a boost ability after Pack-a-Punch installation
Step 4: Use Pack-a-Punch freely while on Ol’ Tessie
Pack-a-Punch Tiers:
- Tier 1: First upgrade (base cost)
- Tier 2: Second upgrade (increased cost)
- Tier 3: Third upgrade (highest cost, maximum power)
Each tier significantly increases weapon damage, making previously weak guns viable on high rounds.
Pro Strategy: Keep Ol’ Tessie near your training area so you can quickly Pack-a-Punch weapons between rounds. Check the Pack-a-Punch guide for detailed Tier costs and locations.
Critical Survival Tip: Never venture between landmarks on foot. The infinite spawning zombies in no man’s land will overwhelm you instantly. Always use Ol’ Tessie for travel.
4. Focus on Crutch Perks First (Priority Purchase Guide)
With 12 Perk-a-Cola machines scattered across Ashes of the Damned, it’s tempting to buy whatever’s closest. Don’t do this.
Important: Perk prices increase with each one you purchase, so buying the wrong perks early wastes Essence and delays your essential purchases.
The Four Essential Crutch Perks:
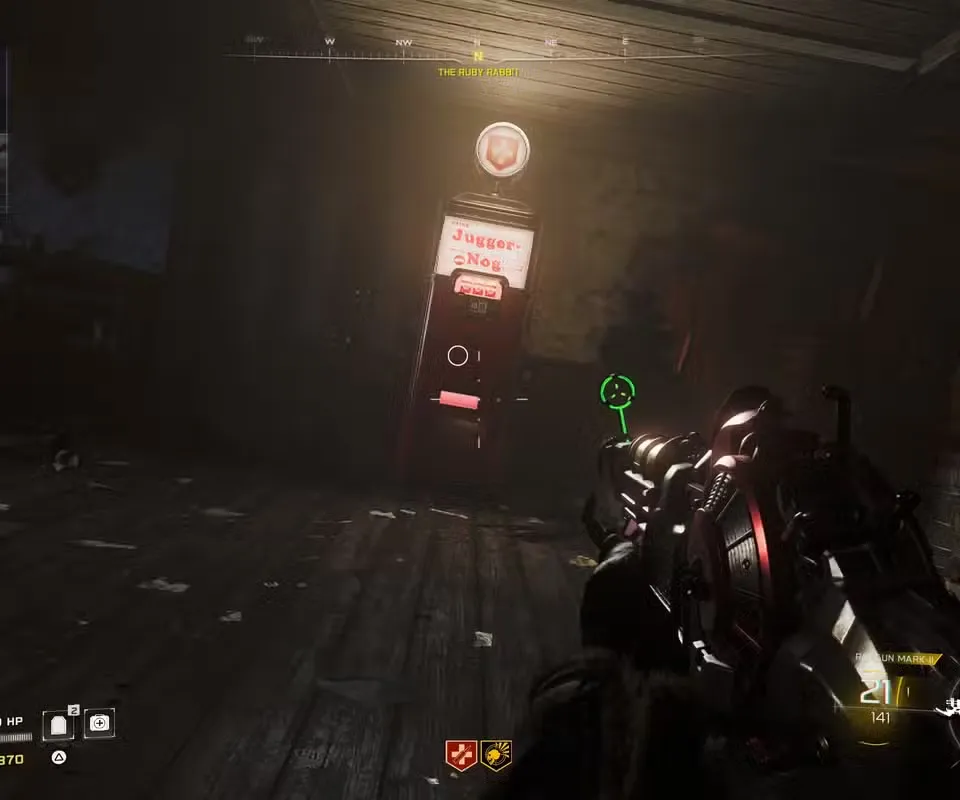
1. Jugger-Nog (Priority #1)
Location: Ashwood – Inside The Ruby Rabbit
Effect: Increases maximum health
Why Essential: Base health isn’t enough past round 10. Jugger-Nog is non-negotiable for survival.
Best Augments: Turtle Shell (rear damage absorption) + Durable Plates (increased armor durability)
2. Quick Revive (Priority #2)
Location: Janus Towers Plaza – Server Room (east wall)
Effect: Faster health regeneration and faster revive speed
Why Essential: Solo players need this for self-revive capabilities. Co-op players need it for clutch teammate saves.
Best Augments: Equivalent Exchange (self-revive by killing zombies while downed) + Slow Death (extended last stand time)
3. Stamin-Up (Priority #3)
Location: Vandorn Farm – Farmhouse upstairs (southeast wall)
Effect: Increased movement speed and sprint duration
Why Essential: High-round survival depends on mobility. You need to outrun zombie hordes while training.
Best Augments: Guns Up (fire while sprinting) + Footwork (increased strafing speed)
4. Speed Cola (Priority #4)
Location: Blackwater Lake – Cabin upper floor (northwest corner)
Effect: Faster reload and faster armor plating
Why Essential: Downtime = death. Fast reloads and armor plating keep you in the fight longer.
Best Augments: Classic Formula (even faster reloads) + Quick Swap (faster weapon swapping)
Recommended Purchase Order:
Rounds 1-10:
- Buy Tier 2 Armor (4,000 Essence)
- Buy Jugger-Nog (~2,500 Essence base, increases with each perk)
- Buy Quick Revive (~3,500 Essence second perk)
Rounds 11-20: 4. Buy Stamin-Up (~4,500 Essence third perk) 5. Buy Speed Cola (~5,500 Essence fourth perk)
Rounds 20+: 6. Expand to specialized perks based on playstyle:
- PhD Flopper for explosive immunity
- Double Tap for increased DPS
- Deadshot Daiquiri for sniper/shotgun builds
- Frenzied Guard [Field Upgrade] for tank mode
Cost Management Tip: Perk prices scale with each purchase, so the order matters. If you buy random perks first, Jugger-Nog might cost 6,000+ Essence instead of 2,500. Always follow the priority order.
For complete perk optimization, check out the best Perk Augments guide and learn how to unlock Augment Research.
5. Use The Arsenal to Upgrade Weapon Rarity with Salvage
Pack-a-Punch isn’t the only way to boost weapon damage—The Arsenal provides a parallel upgrade system that’s equally important for high-round viability.
What is The Arsenal?
The Arsenal is a machine found throughout various landmarks (you’ll hear a loud drill sergeant voice yelling at you—it’s impossible to miss). It allows you to upgrade weapon rarity using Salvage.
Weapon Rarity Tiers:
- Common (Gray) – Base damage
- Uncommon (Green) – Minor damage increase
- Rare (Blue) – Moderate damage increase
- Epic (Purple) – Significant damage increase
- Legendary (Orange) – Maximum damage increase
How to Use The Arsenal:
Step 1: Gather Salvage by:
- Killing zombies (drops Salvage)
- Using weapons with Suppressors in your loadout (increases Salvage drop rate)
- Opening loot containers
- Completing objectives
Step 2: Locate an Arsenal machine in any landmark
Step 3: Interact with The Arsenal and select “Upgrade Weapon Rarity”
Step 4: Spend Salvage to increase your weapon’s rarity tier
Step 5: Repeat until you reach Legendary (orange) rarity
Why Rarity Upgrades Matter:
Weapon rarity dramatically increases base damage, which stacks multiplicatively with Pack-a-Punch upgrades. The formula looks like this:
Total Damage = (Base Weapon Damage × Rarity Multiplier) × Pack-a-Punch Multiplier
A Legendary weapon with Tier 3 Pack-a-Punch deals significantly more damage than a Common weapon with Tier 3 Pack-a-Punch.
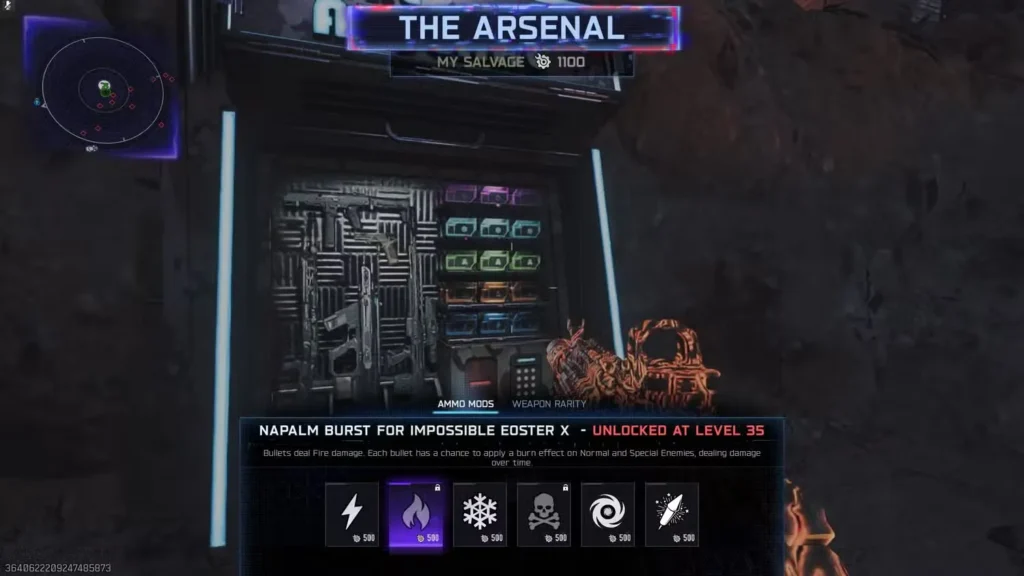
The Arsenal Also Sells Ammo Mods:
After Pack-a-Punching your weapon, return to The Arsenal to purchase Ammo Mods:
- Dead Wire: Electric damage with chain effects
- Cryo Freeze: Frost damage that slows and increases damage taken
- Fire Works: Explosive fireworks (currently the strongest)
- Napalm Burst: Fire damage over time (super effective against Zursa zombie bears)
- Shadow Rift: Black hole teleportation
- Brain Rot: Turn zombies into temporary allies
Ammo Mod Strategy: Choose based on your situation:
- General use: Fire Works or Dead Wire
- Zursa hunting: Napalm Burst (they’re weak to fire)
- Crowd control: Cryo Freeze
- Ammo conservation: Shadow Rift (Ammo Theorem Augment refills magazine)
Check out the best Ammo Mod Augments guide for optimal builds.
Pro tip: Always upgrade weapon rarity before Pack-a-Punching. Rarity upgrades are cheaper early, and the damage boost makes Pack-a-Punch even more effective.For detailed weapon recommendations, check out the best weapons for Zombies guide.
6. Research Augments for Major Power Increases

Before loading into any Zombies match, visit the Augments menu to research upgrades that fundamentally change how perks, Field Upgrades, and Ammo Mods function.
What Are Augments?
Augments are permanent upgrades that modify abilities:
- Major Augments: Change core functionality (e.g., Jugger-Nog’s Turtle Shell makes rear armor absorb all damage)
- Minor Augments: Provide supporting buffs (e.g., increased duration, activation chance, or damage)
How to Access Augment Research:
Step 1: Reach Level 11 to unlock Augment Research
Step 2: Navigate to Weapons > Augments from the main menu
Step 3: Select a Perk, Ammo Mod, or Field Upgrade to research
Step 4: Play Zombies and earn Augment XP by killing zombies
Step 5: Complete research to unlock the Augment
Step 6: Equip Augments in the Augments menu before matches
Game-Changing Augments to Unlock First:
Quick Revive – Equivalent Exchange (Major):
- Self-revive by killing a zombie while downed (up to 3 times)
- Keep all perks on revive
- Essentially gives you three extra lives per match
Jugger-Nog – Turtle Shell (Major):
- Rear damage completely absorbed by armor
- Front damage mitigation remains normal
- Makes training zombies significantly safer
Frenzied Guard – Frenzy Fire (Major):
- No reloading required while active (uses ammo from stock)
- Combined with invincibility makes you unkillable during activation
- Perfect for emergency escapes
Stamin-Up – Guns Up (Major):
- Fire weapons while sprinting
- Huge quality-of-life improvement for training
- Maintain pressure on zombies while repositioning
Dead Wire – Ball Lightning (Major):
- Spawns autonomous electric orb that attacks zombies
- Consistent damage without direct player input
- Works on all weapon types
For complete details on unlocking all Augments, check the Augment Research unlock guide.
Investment value: Augment Research is a long-term progression system, but the power increases are absolutely worth it. A fully Augmented loadout is exponentially more powerful than base abilities.
7. Master Zombie Training: The Skill That Separates Pros from Beginners
Zombie training is the single most important skill in Black Ops 7 Zombies. Master this, and you’ll survive rounds that would otherwise destroy you.
What is Zombie Training?
Zombie training (also called “kiting” or “running trains”) is the practice of grouping zombies into a tight horde behind you, then eliminating them all at once. This prevents you from getting surrounded and overwhelmed.
Why Training Matters:
Without Training:
- Zombies spawn unpredictably in all directions
- You get trapped in corners
- Zombies attack from multiple angles
- You waste ammo on scattered enemies
- You die frequently on rounds 15+
With Training:
- You control zombie positioning
- Zombies group into predictable patterns
- You dictate when and where fights happen
- Ammo efficiency increases dramatically
- You survive to rounds 30, 50, 100+
How to Train Zombies (Step-by-Step):
Step 1: Let All Zombies Spawn
- Don’t kill zombies immediately when the round starts
- Wait for the entire horde to spawn
- This ensures you’re training the full group, not fragments
Step 2: Run in Large Circles or Figure-8 Patterns
- Find an open area (Ashwood Market Square, Janus Towers Plaza)
- Sprint in a large circular or figure-8 pattern
- Don’t sprint in straight lines—curves prevent zombies from cutting you off
Step 3: Weave Between Zombies
- As zombies spawn in front of you, weave between them
- Think of the classic Snake game—you’re the snake’s head, zombies are the body
- Don’t shoot yet—just keep running and collecting zombies
Step 4: Group the Entire Horde
- Continue running until all zombies are grouped into a tight spread behind you
- They should form a “train” following your exact path
- You are the shepherd, they are your sheep
Step 5: Create Distance
- Once grouped, sprint ahead to create separation
- Turn around when you have 10-15 meters of space
- The zombies should all be in one cluster
Step 6: Eliminate the Horde
- Unload on the grouped zombies with your weapon
- Use Ammo Mods like Fire Works for maximum efficiency
- Activate Field Upgrades like Frenzied Guard if needed
Step 7: Repeat
- Once the horde is eliminated, start the process again
- Never fight zombies one-by-one or in small groups
Common Training Mistakes Beginners Make:
❌ Killing zombies too early – Fragments the horde, makes training harder
❌ Running in straight lines – Zombies cut you off and corner you
❌ Training in tight spaces – No room to maneuver, easy to get trapped
❌ Not watching spawn points – Zombies spawn behind you unexpectedly
❌ Stopping to reload in the middle of the train – Death sentence on high rounds
Best Training Locations on Ashes of the Damned:
- Ashwood Market Square – Large open area, predictable spawns
- Janus Towers Plaza – Spawn area, multiple escape routes
- Zarya Cosmodrome – Open space underneath the rocket
- Vandorn Farm outdoor area – Good for figure-8 patterns
For detailed breakdowns of each training spot, check out the best training spots guide.
Advanced Training Tips:
Use Stamin-Up: Increased sprint speed makes training significantly easier
Watch Your Six: Zombies can spawn behind you. Use Death Perception’s minimap enhancement or frequently glance backward.
Save Ammo: Only shoot when the horde is fully grouped. Shooting scattered zombies wastes bullets.
Use Doorways: Funneling zombies through doorways creates natural choke points for easy eliminations.
Practice Makes Perfect: Your first few training attempts will feel chaotic. Keep practicing—muscle memory develops quickly.
Field Upgrades Save Lives: Keep Aether Shroud or Frenzied Guard charged for emergency escapes when training goes wrong.
8. Additional Beginner Tips for Ashes of the Damned
Manage Your Essence Wisely:
Early Game Priorities (Rounds 1-10):
- Unlock essential doors (2,000-4,000 Essence total)
- Buy Tier 2 Armor (4,000 Essence)
- Purchase Jugger-Nog and Quick Revive
- Pack-a-Punch your primary weapon (Tier 1)
Mid Game Priorities (Rounds 11-20):
- Unlock remaining landmarks
- Purchase Stamin-Up and Speed Cola
- Upgrade weapon rarity at The Arsenal
- Pack-a-Punch to Tier 2
- Buy additional perks based on playstyle
Late Game Priorities (Rounds 20+):
- Complete your perk loadout
- Pack-a-Punch to Tier 3
- Upgrade weapons to Legendary rarity
- Purchase Ammo Mods
- Maintain armor and ammo supplies
Use Wall Weapons Strategically:
Wall weapons can be repurchased infinitely for ammo:
- Identify wall weapons early (marked with weapon outlines)
- Buy ammo from walls rather than using Mystery Box points
- Check the wall buy locations guide for full map
Understand Special Enemies:
Zursa (Zombie Bears):
- Heavily armored, aggressive Elite enemies
- Weak to Napalm Burst Ammo Mod
- Target weak points (head and limbs) for increased damage
- Can down you in 2-3 hits on high rounds
Manglers:
- Arm cannon enemies from previous Black Ops games
- Destroy their cannon arm first to reduce threat
- Headshots deal critical damage after arm destruction
Mimics:
- Disguised as loot crates or objects
- Attack when you approach
- Easy to kill but annoying during trains
Communication in Co-Op:
If playing with teammates:
- Call out when buying doors – Don’t waste duplicate Essence
- Coordinate perk purchases – Spread out to hit multiple perk machines efficiently
- Revive priorities – Person with Quick Revive should revive others
- Train separately – Don’t overlap training routes; causes chaos
- Share Ol’ Tessie – One person drives, others shoot from the vehicle
Know When to Exfil:
Black Ops 7 includes Exfil mechanics:
- Call for extraction when you’re ready to end the match
- Defend the extraction point from overwhelming hordes
- Successfully exfil for bonus XP and rewards
- Don’t get greedy—exfil if you’re low on resources
From Beginner to High-Round Survivor
Black Ops 7 Zombies offers incredible depth, and Ashes of the Damned is a sprawling map with tons of mechanics to master. But if you focus on these core fundamentals—buying Tier 2 Armor first, mastering Ol’ Tessie, prioritizing crutch perks, and learning to train zombies—you’ll survive rounds that once seemed impossible.
Quick Recap:
- ✅ Use Fumigators on Dark Aether plants for early-game loot
- ✅ Buy Tier 2 Armor before perks (4,000 Essence priority)
- ✅ Master Ol’ Tessie for transportation and mobile Pack-a-Punch
- ✅ Purchase crutch perks in order: Jugger-Nog, Quick Revive, Stamin-Up, Speed Cola
- ✅ Upgrade weapon rarity at The Arsenal with Salvage
- ✅ Research and equip Augments for massive power increases
- ✅ Master zombie training to control hordes and survive high rounds
The difference between dying on round 10 and surviving to round 50 isn’t raw skill—it’s knowledge. Now that you have the knowledge, get out there and put it to practice. Those zombies aren’t going to train themselves.
For technical issues affecting gameplay, check the packet burst fix guide to ensure smooth performance.
Related Guides: