Borderlands 4 features over 135 legendary weapons and items scattered across its four major regions, each tied to dedicated boss loot pools. If you’re hunting for that perfect legendary shotgun, a god-tier class mod, or a specific elemental SMG, you need to know exactly which boss drops it and where to farm them.
This is the ultimate reference guide for legendary farming in Borderlands 4. We’ve compiled every single legendary item in the game, organized by region and boss, complete with exact locations and availability requirements. Whether you’re farming Idolator Sol for class mods, hunting Shadowpelt for the Slippy fish grenade, or tracking down world drops from Moxxi’s tip jar, this guide has you covered.
What makes this guide different:
- Complete boss roster – All 40+ farmable bosses across Fadefields, Terminus Range, Carcadia Burn, and Dominion
- Availability tracking – Know exactly when each boss becomes farmable during your playthrough
- Loot pool breakdowns – See every legendary a boss can drop before committing to a farm
- Location specifics – Precise map areas, not vague directions
Let’s get hunting for that perfect legendary gear!
How Legendary Farming Works in Borderlands 4
Before diving into the boss list, here’s what you need to know about legendary drops:
Dedicated Drop System
Unlike random world drops, dedicated legendaries have specific bosses that drop them. Each boss has a loot pool of 2-4 legendary items with higher drop rates than finding them randomly in the world.
Key mechanics:
- Boss respawning – After killing a boss once, you can farm them repeatedly by quitting/reloading or fast traveling away
- Scaling – Legendary drops scale to your current level, so farming at max level gives you max-level gear
- Drop rates – Not guaranteed; expect multiple kills to get specific items (typically 10-30% drop chance per legendary)
- Multiple items per boss – Most bosses drop 2-4 different legendaries, making some more efficient farms than others
Farming efficiency tip: Bosses with smaller loot pools (2 legendaries) are better for targeting specific items. Bosses with larger pools (4+ legendaries) take longer to farm for one specific drop.
When Bosses Become Farmable
Most bosses unlock farming after completing specific missions:
Common unlock requirements:
- Main Mission completion – Most Order Bunkers, Auger Mines require story progress
- “Shadow of the Mountain” – Unlocks all Auger Mine bosses
- “One Fell Swoop” – Unlocks all Order Bunker bosses
- Side mission completion – Some unique bosses require specific side quests
- Faction missions – Special bosses tied to Outbounders, Electi faction questlines
- Vault Key Fragments – Primordial Guardian vault bosses require collecting region fragments
Planning your farm: If you see “Available after Main Mission X,” you’ll need to progress the story to that point before farming becomes possible.
The Fadefields: Legendary Boss Locations (13 Bosses)
The Fadefields is Borderlands 4’s starting region and contains 13 farmable bosses dropping 42+ legendary items. This is where you’ll do most of your early-game legendary farming.
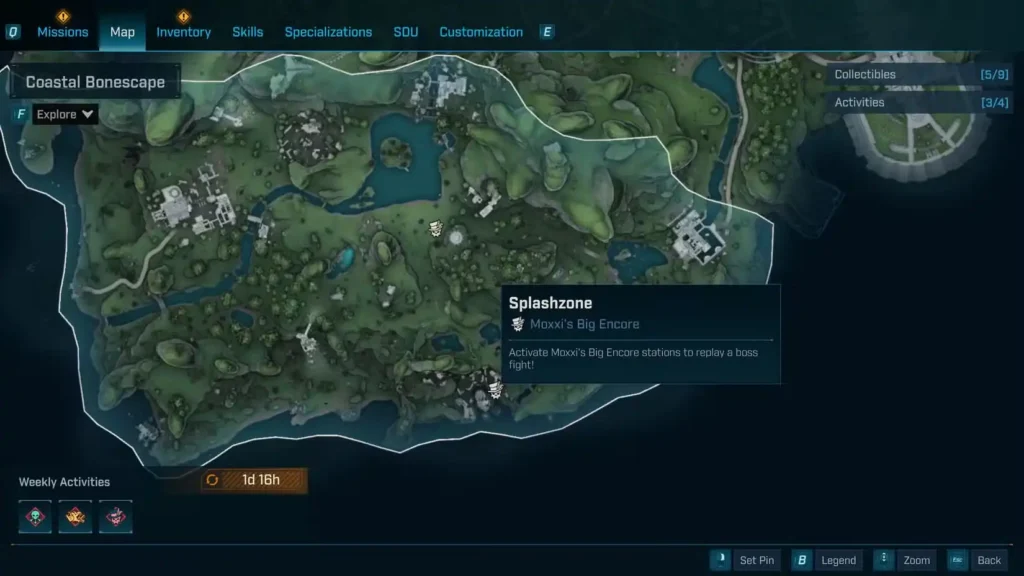
Splashzone – Coastal Bonescape
Location: Riptide Grotto, Coastal Bonescape, Fadefields
Availability: After Main Mission “Recruitment Drive”
Boss Type: Water-based creature encounter
Legendary Drops (3):
| Legendary Type | Notes |
|---|
| Firewerks Shield | Likely fire-themed defensive shield 🔥🛡️ |
| Jelly Grenade | Aquatic/corrosive grenade 💦💣 |
| Lead Balloon Shotgun | Heavy, powerful shotgun 💥🔫 |
Why farm Splashzone:
- Early-game farmable boss (Recruitment Drive is an early mission)
- Only 3 items in loot pool = better odds for specific drops
- Lead Balloon shotgun is excellent for early legendary shotgun builds
Combat notes: Splashzone is an aquatic boss, so bring Shock weapons to deal with any shields and prepare for water-based arena mechanics.
Voraxis the Quake Thresher – Coastal Bonescape
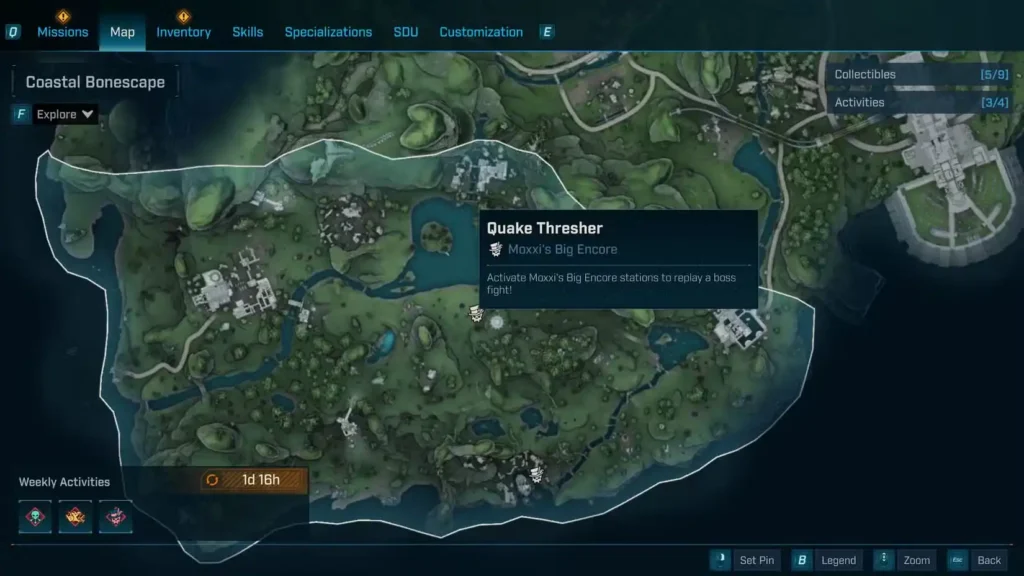
Location: “Timid Kyle’s Neglected Opening” Auger Mine, Coastal Bonescape, Fadefields
Availability: After Main Mission “Shadow of the Mountain”
Boss Type: Thresher variant (large worm-like creature)
Legendary Drops (3):
| Legendary | Type | Notes |
|---|---|---|
| Buoy Grenade | Grenade | Float/water-themed grenade 🌊💣 |
| Darkbeast SMG | SMG | Likely corrosive or dark-elemental 🌑🔫 |
| Potato Thrower IV | Assault Rifle | Explosive projectile AR 🥔💥🔫 |
Why farm Voraxis:
- Accessible after Shadow of the Mountain (mid-early story unlock)
- Darkbeast SMG is a solid legendary for elemental damage builds
- Part of Auger Mine completion
Combat notes: Threshers are weak to Incendiary damage and attack from underground. Stay mobile and watch for burrow animations.
Oppressor – Dissected Plateau
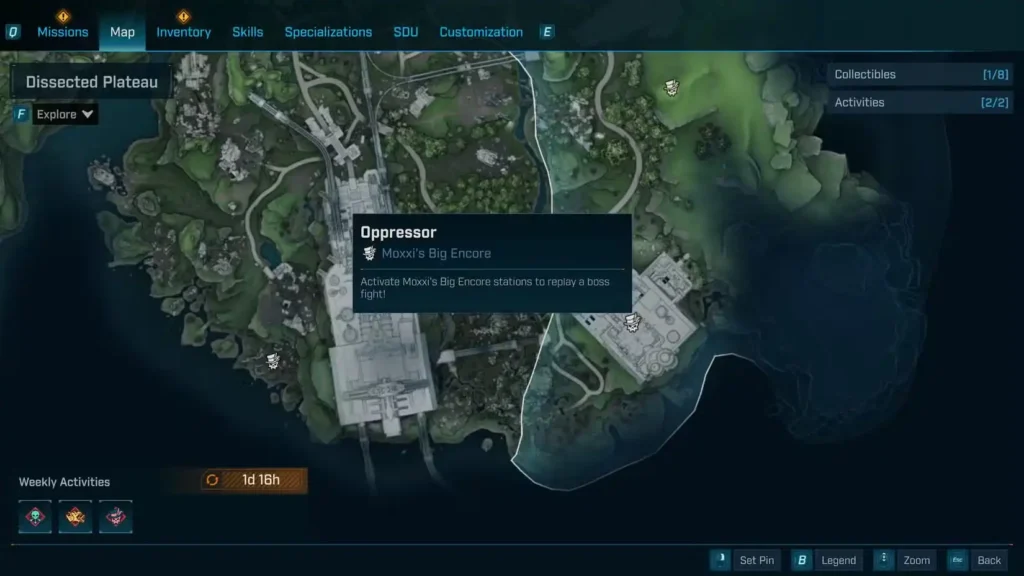
Location: The Killing Floors, Dissected Plateau, Fadefields
Availability: After Main Mission “A Lot to Process” (quest guide)
Boss Type: Heavy armored enemy
Legendary Drops (3):
| Legendary | Type | Notes |
|---|
| Asher’s Rise | Sniper Rifle | Named legendary sniper 🎯🔭 |
| Blood Analyser | Repkit | Health/healing item ❤️🩸 |
| Streamer | Heavy Weapon | Large weapon category 💥🛠️ |
Why farm Oppressor:
- Asher’s Rise sniper is strong for long-range builds
- Streamer heavy weapon good for splash damage builds
- Available after A Lot to Process main mission
Combat notes: Oppressor likely has heavy armor, so bring Corrosive weapons for armor shredding.
Bio-Bulkhead – Dissected Plateau
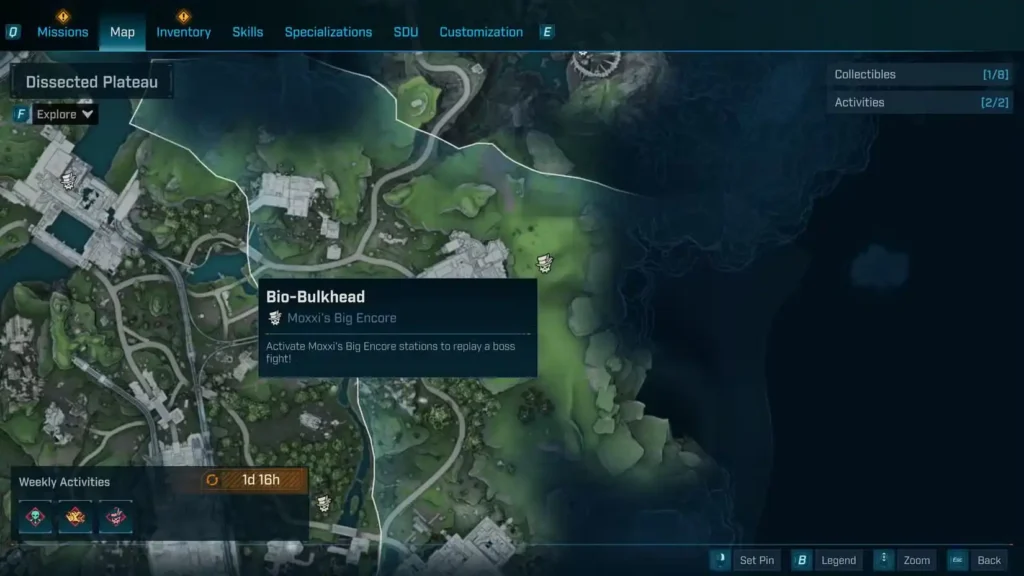
Location: Synthetic Nave, Dissected Plateau, Fadefields
Availability: After Main Mission “One Fell Swoop” (mission guide with bug fixes)
Boss Type: Bio-mechanical construct
Legendary Drops (3):
| Legendary | Type | Notes |
|---|
| Budget Deity | Pistol | Unique legendary pistol 🔫✨ |
| Sho Kunai | Grenade | Kunai/blade-themed grenade 🥷💣 |
| Waterfall | Grenade | Water/splash damage grenade 💦💥 |
Why farm Bio-Bulkhead:
- Two grenades in loot pool = great for grenade-focused builds
- Available after One Fell Swoop (major story milestone)
- Part of Synthetic Nave story location (complete guide)
Combat notes: Bio-mechanical enemies typically have shields + armor. Prepare Shock and Corrosive weapons.
Backhive – Dissected Plateau
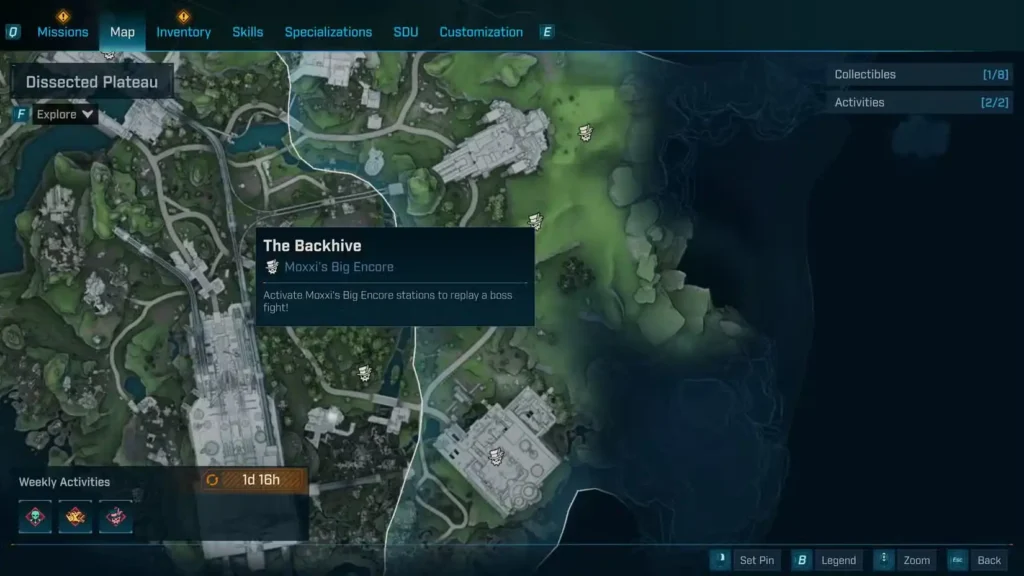
Location: “The Claim” Auger Mine, Dissected Plateau, Fadefields
Availability: After Main Mission “Shadow of the Mountain”
Boss Type: Insect/hive creature
Legendary Drops (3):
| Legendary | Type | Notes |
|---|
| Triple Bypass | Repkit | Healing item |
| Stop Gap | Sniper Rifle | Crowd control sniper |
| Cindershelly | Shield | Fire-themed shield |
Why farm Backhive:
- Stop Gap sniper useful for long-range farming
- Cindershelly shield likely has fire immunity/resistance
- Auger Mine boss = part of Auger exploration
Horace – Hungering Plain
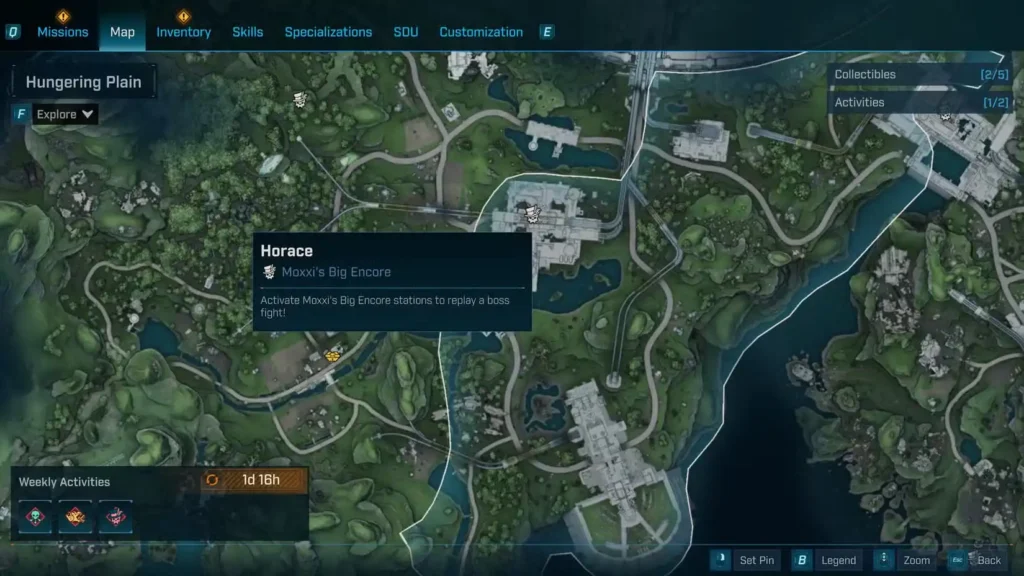
Location: Horace’s Oversight, Hungering Plain, Fadefields
Availability: After Main Mission “Down and Outbound” (mission guide)
Boss Type: Named character boss
Legendary Drops (3):
| Legendary | Type | Notes |
|---|
| Aegon’s Dream | Assault Rifle | Game of Thrones reference (farming guide) |
| Lucky Clover | Pistol | Luck-based legendary pistol |
| Pacemaker | Repkit | Healing item |
Why farm Horace:
- Aegon’s Dream is highly sought-after for pop culture reference and strong stats
- Only 3-item loot pool = efficient farming
- Available after Down and Outbound story mission
Combat notes: Named character bosses often have unique attack patterns. Study his moveset during first encounter.
Sidney Pointylegs – Hungering Plain
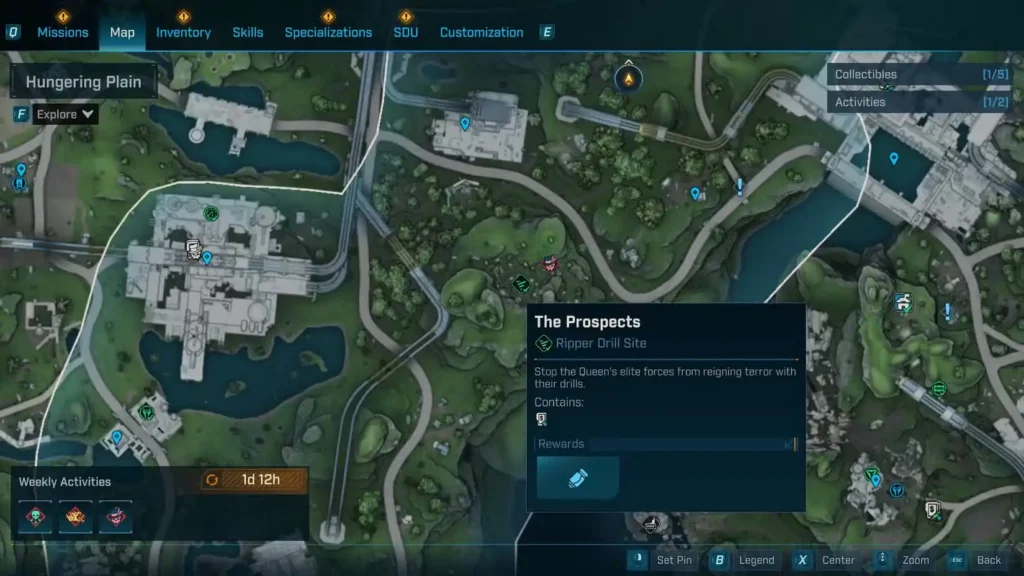
Location: “The Prospects” Ripper Drill Site, Hungering Plain, Fadefields
Availability: Immediately accessible (Ripper Drill Sites don’t require mission unlocks)
Boss Type: Ripper faction leader
Legendary Drops (3):
| Legendary | Type | Notes |
|---|---|---|
| Disc Jockey | Heavy Weapon | Disc/projectile heavy weapon |
| Noisy Cricket | Pistol | Men in Black reference (farming guide) |
| Swarm | Grenade | Multi-projectile grenade |
Why farm Sidney:
- No mission requirements – farmable immediately
- Noisy Cricket pistol is a fun reference weapon
- Part of Ripper Drill Site content
Combat notes: Ripper bosses are typically fast melee fighters. Keep distance and use elemental damage.
The Foundry Freaks – Idolator’s Noose
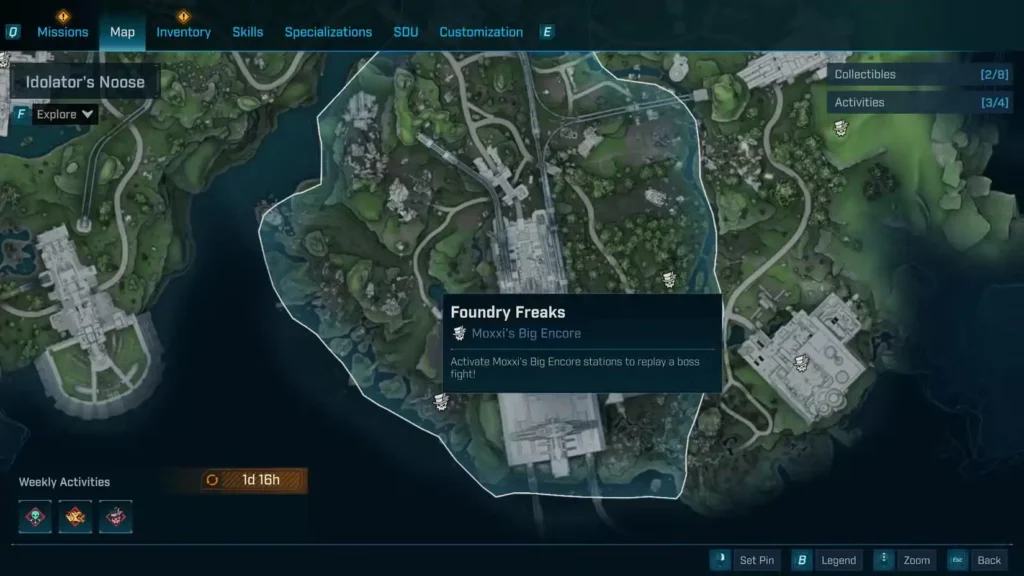
Bosses: Frank the Furnace, Hank the Welder, Sal the Engineer (trio fight)
Location: “The Pitted Stain” Ripper Drill Site, Idolator’s Noose, Fadefields
Availability: Immediately accessible
Boss Type: Three-boss encounter
Legendary Drops (3):
| Legendary | Type | Notes |
|---|---|---|
| Lumberjack | Assault Rifle | Melee/axe-themed AR |
| Chaumurky | Grenade | Unique legendary grenade |
| Chuck | Assault Rifle | Second AR in pool |
Why farm Foundry Freaks:
- Two assault rifles = good for AR-focused builds
- Trio boss = potentially higher legendary drop rates
- No mission requirements
Combat notes: Focus down one boss at a time. Trio fights can overwhelm if you let all three pressure you simultaneously.
Mimicron – Idolator’s Noose
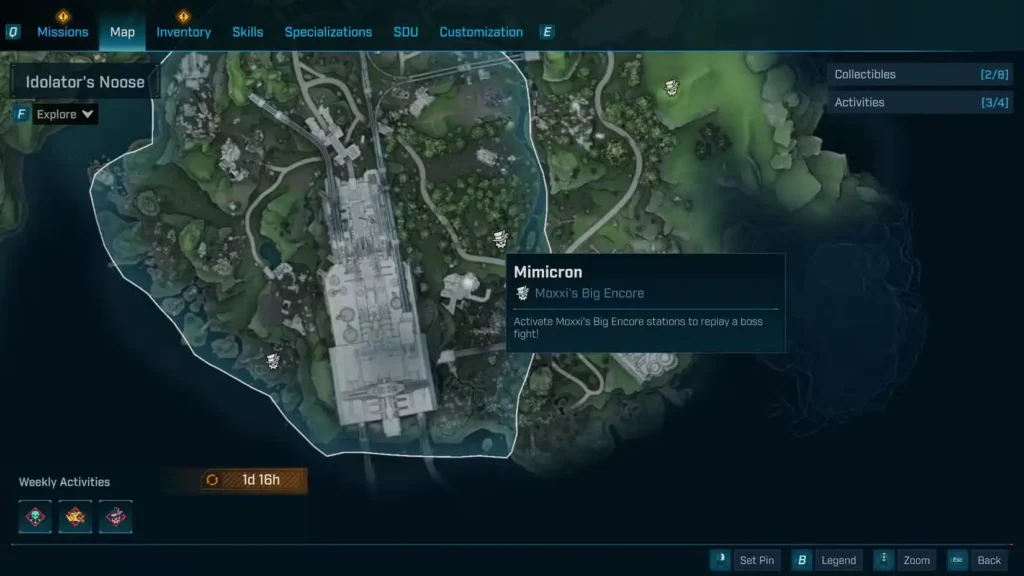
Location: “Tipping Point” Order Bunker, Idolator’s Noose, Fadefields
Availability: After Main Mission “One Fell Swoop”
Boss Type: Order synth/robot
Legendary Drops (3):
| Legendary | Type | Notes |
|---|---|---|
| Complex Root | Sniper Rifle | Returning BL3 legendary |
| Luty Madlad | SMG | High fire-rate SMG |
| UAV | Grenade | Drone-themed grenade |
Why farm Mimicron:
- Complex Root is a fan-favorite returning legendary
- Order Bunker boss = part of bunker completion
- Available after One Fell Swoop
Core Observer – The Howl
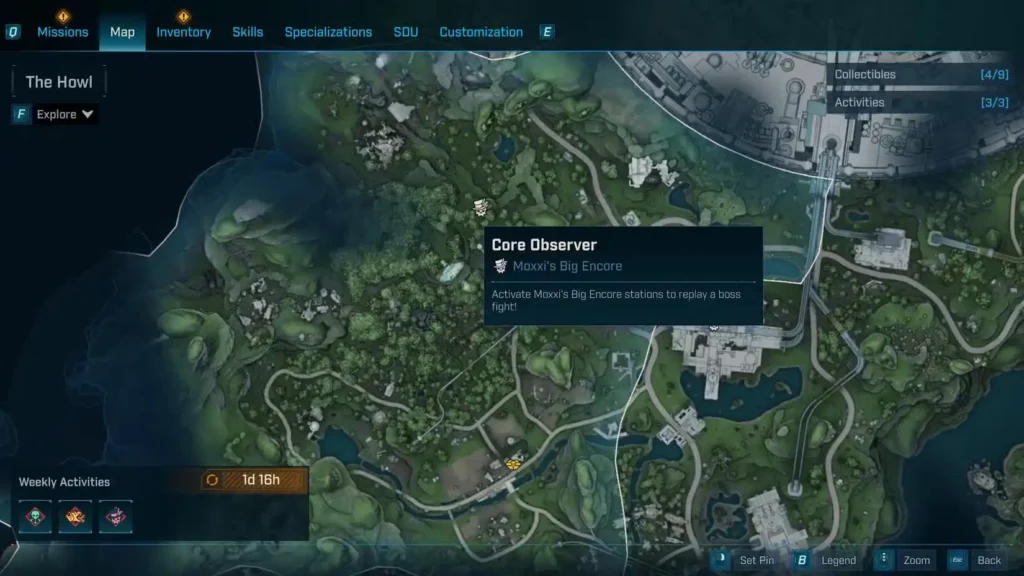
Location: “Blacklime Bunker” Order Bunker, The Howl, Fadefields
Availability: After Main Mission “One Fell Swoop”
Boss Type: Order observation construct
Legendary Drops (3):
| Legendary | Type | Notes |
|---|---|---|
| Bully | Pistol | Aggressive pistol legendary |
| Defibrillator | Repkit | Revival/healing item |
| Divided Focus | Assault Rifle | Multi-target AR |
Why farm Core Observer:
- Divided Focus AR useful for mobbing
- Order Bunker location in The Howl region
- Three-item pool = efficient farming
Idolator Sol – Idolator’s Noose ⭐ PRIORITY FARM
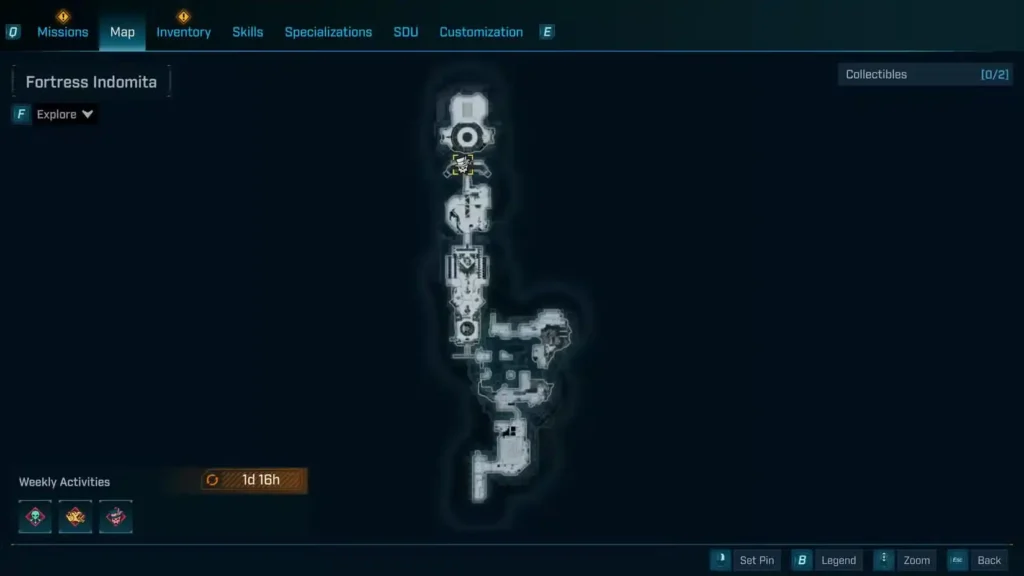
Location: Fortress Indomita, Idolator’s Noose, Fadefields
Availability: After Main Mission “Rush the Gate”
Boss Type: Major story boss (first playthrough final boss)
Legendary Drops (7):
| Legendary | Type | Notes |
|---|---|---|
| Golden God | Shotgun | Powerful legendary shotgun |
| Goremaster | Shotgun | Second legendary shotgun |
| Onslaught | SMG | High-DPS SMG |
| Bio-Robot | Harlowe Class Mod | Harlowe build item |
| Dancer | Rafa Class Mod | Rafa build item |
| Furnace | Amon Class Mod | Amon build item |
| Technomaster | Vex Class Mod | Vex build item |
Why farm Idolator Sol:
- All four Vault Hunter class mods – essential for endgame builds
- Three weapons including two legendary shotguns
- Story boss = guaranteed encounter during campaign
- Best class mod farm in Fadefields
Combat strategy: Idolator Sol is a multi-phase boss fight. Bring varied elemental weapons and prepare for a longer encounter. Check our elemental matchup guide for optimal loadout.
Sludgemaw – Idolator’s Noose
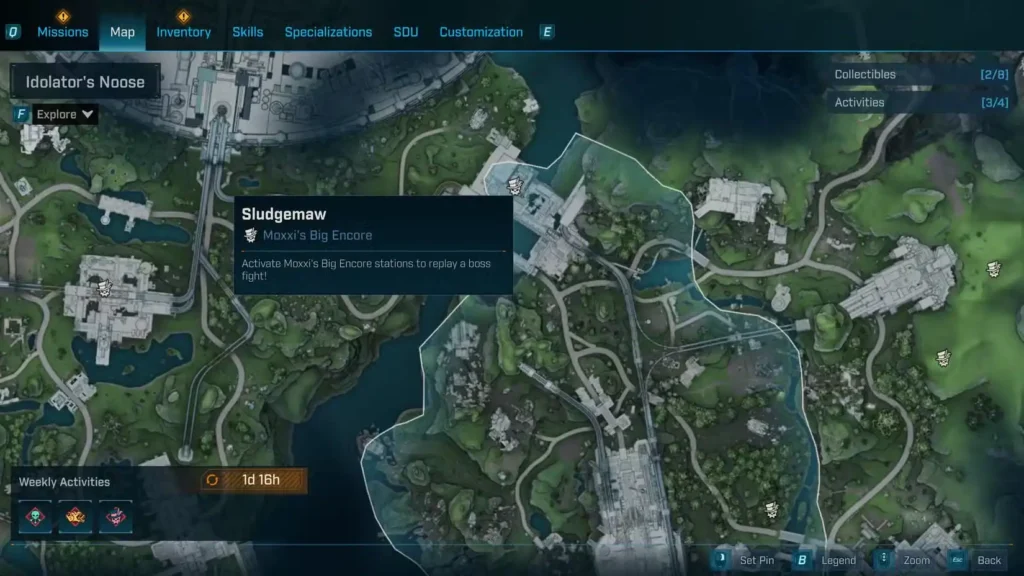
Location: Idolator’s Noose, Fadefields
Availability: After Outbounders Faction Mission “All Charged Up”
Boss Type: Faction boss (farming guide)
Legendary Drops (3):
| Legendary | Type | Notes |
|---|---|---|
| Birts Bees | SMG | Swarming projectile SMG |
| Kickballer | Shotgun | Explosive shotgun |
| Onion | Shield | Layered defense shield |
Why farm Sludgemaw:
- Faction mission boss = special encounter
- Kickballer shotgun adds to shotgun collection
- Three-item pool for focused farming
Primordial Guardian Inceptus – Dissected Plateau ⭐ VAULT BOSS
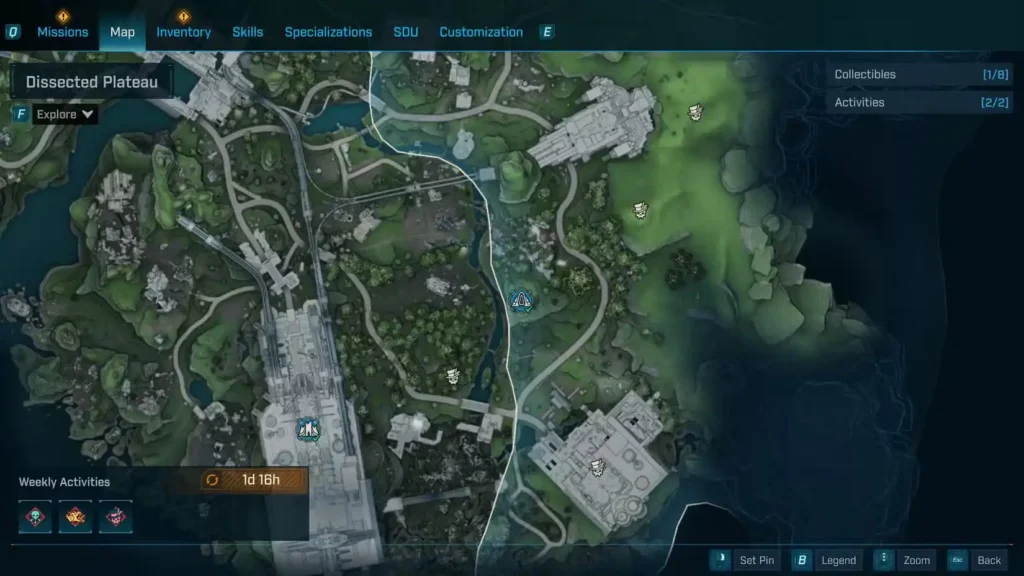
Location: Arch of Inceptus, Dissected Plateau, Fadefields
Availability: After acquiring all Fadefields Vault Key Fragments (fragment guide)
Boss Type: Vault Monster
Legendary Drops (7):
| Legendary | Type | Notes |
|---|---|---|
| Extra Medium | Shield | Vault legendary shield |
| Husky Friend | Shotgun | Pet-themed shotgun |
| Ravenfire | Heavy Weapon | Fire-based heavy weapon |
| Avatar | Vex Class Mod | Vault-exclusive Vex mod |
| Elementalist | Amon Class Mod | Vault-exclusive Amon mod |
| Driver | Harlowe Class Mod | Vault-exclusive Harlowe mod |
| Filantropo | Rafa Class Mod | Vault-exclusive Rafa mod |
Why farm Primordial Guardian Inceptus:
- Vault-exclusive class mods – different from Idolator Sol’s mods
- Three unique weapons including heavy weapon
- Endgame challenge boss
- Required for 100% region completion
Requirements: Complete all Fadefields collectibles and find all Vault Key Fragments before accessing this boss.
Terminus Range: Legendary Boss Locations (11 Bosses)
Terminus Range contains 11 farmable bosses with 40+ legendary drops, including another Vault Monster and multiple Auger Mine encounters.
Skyspanner Kratch – Cuspid Climb

Location: Cuspid Climb, Terminus Range
Availability: After Main Mission “Shadow of the Mountain”
Boss Type: Flying creature
Legendary Drops (3):
| Legendary | Type | Notes |
|---|---|---|
| Hellfire | SMG | Returning BL series favorite |
| Hoarder | Shield | Inventory/loot-focused shield |
| Linebacker | Shotgun | Defensive-themed shotgun |
Why farm Skyspanner:
- Hellfire SMG is an iconic returning legendary
- Early Terminus Range farm
- Three-item pool
Shadowpelt – Cuspid Climb ⭐ SLIPPY FARM
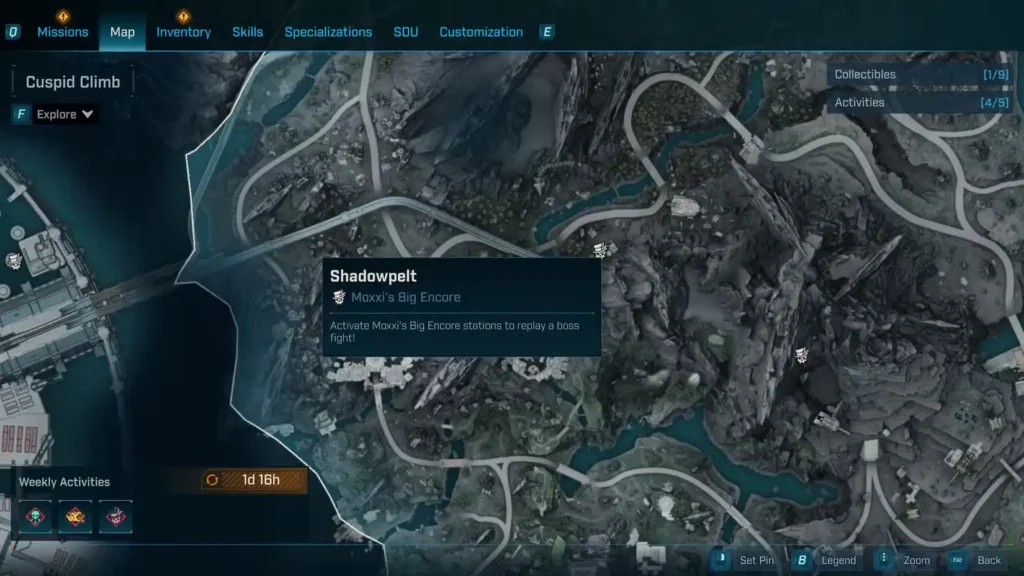
Location: “Whistler’s Maw” Auger Mine, Cuspid Climb, Terminus Range
Availability: After Main Mission “Shadow of the Mountain”
Boss Type: Stealth/invisibility boss
Legendary Drops (3):
| Legendary | Type | Notes |
|---|---|---|
| Slippy | Grenade | The legendary fish grenade (complete guide) |
| Sparky Shield | Shield | Shock-based shield |
| Vamoose | Sniper Rifle | Evasive sniper rifle |
Why farm Shadowpelt:
- Slippy is one of the most unique legendaries in the game
- Only 3-item pool = efficient Slippy farming
- Auger Mine boss with manageable difficulty
- Alternative to fishing for Slippy
Combat strategy: Shadowpelt goes invisible when shield regenerates. Bring Shock weapons to quickly strip shields and keep him visible. See full combat guide in our Slippy farming article.
The Meathead Riders – Cuspid Climb
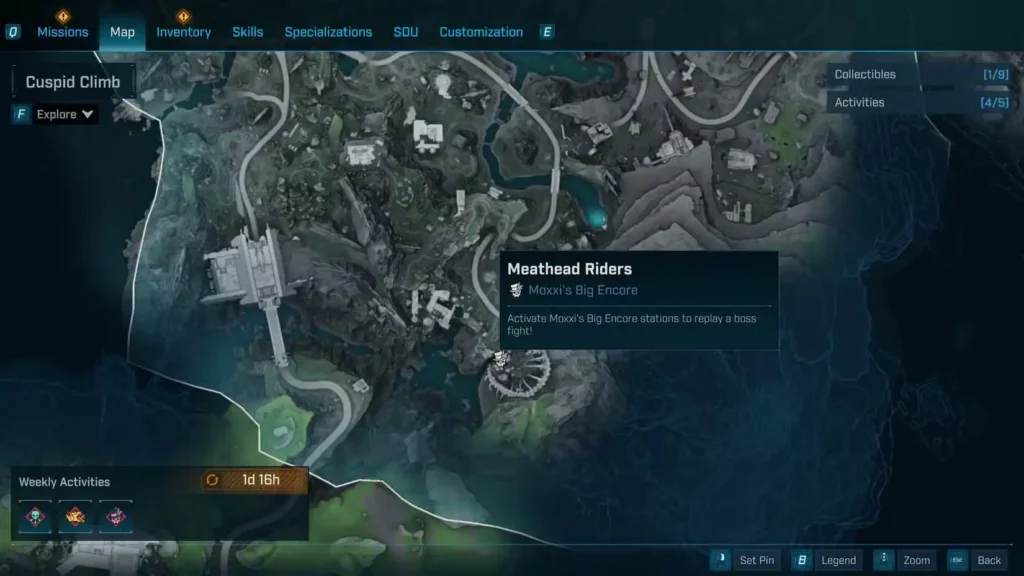
Bosses: Saddleback, The Immortal Boneface (duo fight)
Location: “The Old Scrape” Ripper Drill Site, Cuspid Climb, Terminus Range
Availability: Immediately accessible
Boss Type: Mounted bandit duo
Legendary Drops (3):
| Legendary | Type | Notes |
|---|---|---|
| Hellwalker | Shotgun | DOOM reference, returning favorite |
| Lucian’s Flank | Assault Rifle | Named legendary AR |
| War Paint | Repkit | Combat healing item |
Why farm Meathead Riders:
- Hellwalker is one of the best shotguns in Borderlands history
- No mission requirements
- Duo boss = potentially faster farm than solo bosses
Callous Harbinger of Annihilating Death – Heart of the Mountain
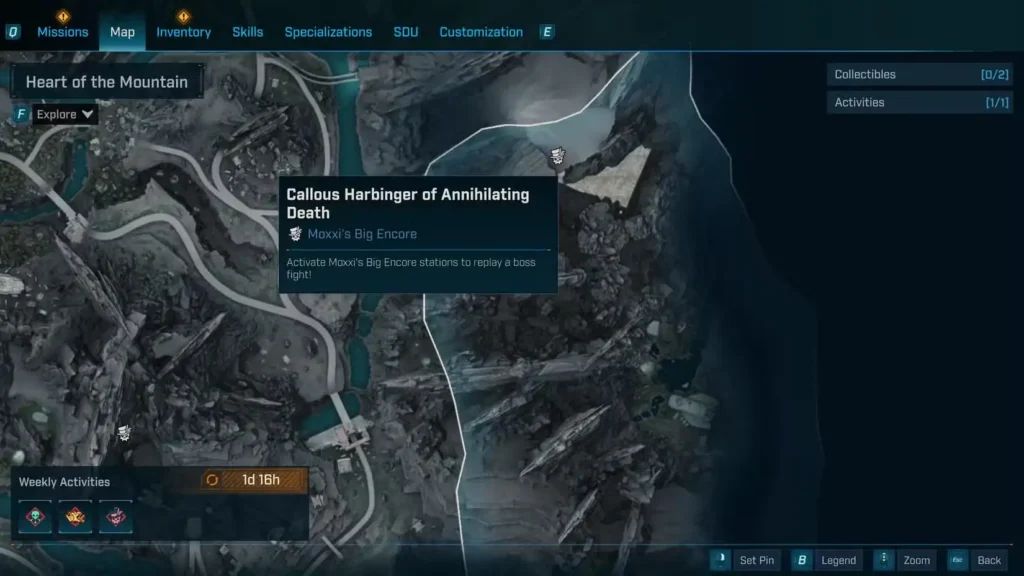
Location: “Craven’s Nook” Order Bunker, Heart of the Mountain, Terminus Range
Availability: After Main Mission “One Fell Swoop”
Boss Type: Order super-weapon
Legendary Drops (3):
| Legendary | Type | Notes |
|---|---|---|
| Atling Gun | Heavy Weapon | Gatling-style heavy weapon |
| Hot Slugger | Shotgun | Fire-based shotgun (guide) |
| Kaleidosplode | Shotgun | Multi-elemental explosive shotgun |
Why farm C.H.A.D.:
- Two legendary shotguns in one loot pool
- Hot Slugger is specifically strong for fire builds
- Order Bunker with ridiculously long name = memorable farm
Bramblesong – Stoneblood Forest
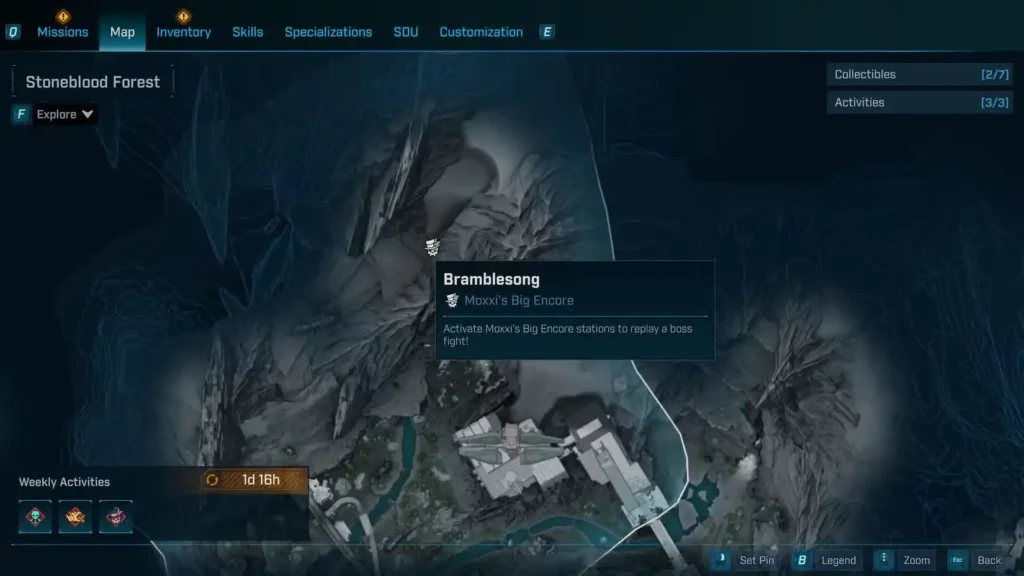
Location: “Bittervein” Auger Mine, Stoneblood Forest, Terminus Range
Availability: After Main Mission “Shadow of the Mountain”
Boss Type: Plant/nature creature
Legendary Drops (3):
| Legendary | Type | Notes |
|---|---|---|
| Convergence | Shotgun | Projectile-converging shotgun |
| Disco | Grenade | Dance/party-themed grenade |
| Ohm I Got | SMG | Ghostbusters reference (guide) |
Why farm Bramblesong:
- Ohm I Got is a fun pop culture reference weapon
- Convergence shotgun unique mechanic
- Auger Mine boss
Battle Wagon – Stoneblood Forest
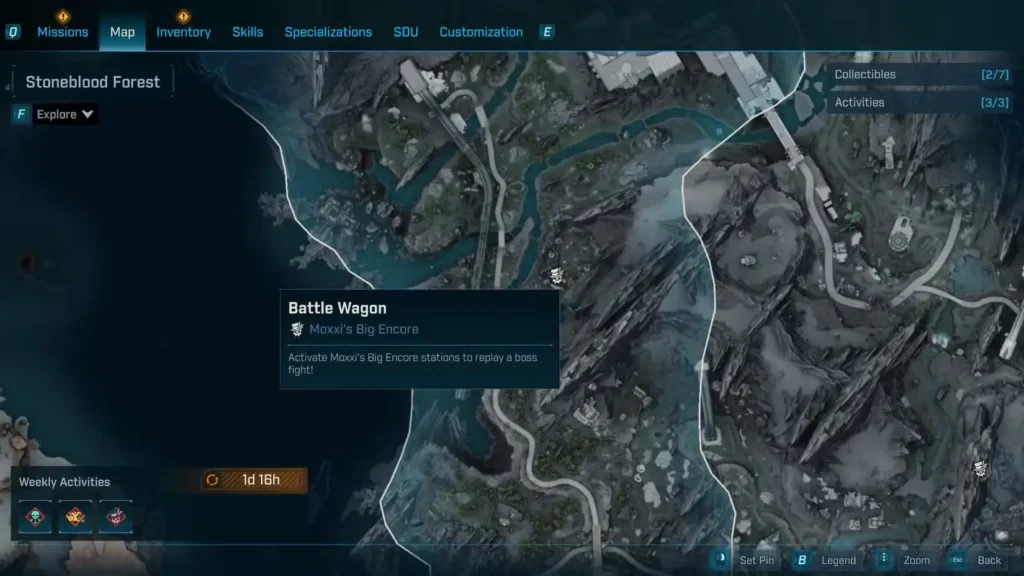
Location: “The Lowering March” Ripper Drill Site, Stoneblood Forest, Terminus Range
Availability: Immediately accessible
Boss Type: Vehicle boss
Legendary Drops (2):
| Legendary | Type | Notes |
|---|---|---|
| Compleation | Shield | Phyrexian/MTG reference shield |
| Finnity XXX-L | Sniper Rifle | Oversized sniper rifle |
Why farm Battle Wagon:
- Only 2-item pool = highest drop chance per legendary
- No mission requirements
- Vehicle boss = unique encounter type
The Divisioner – The Low Leys
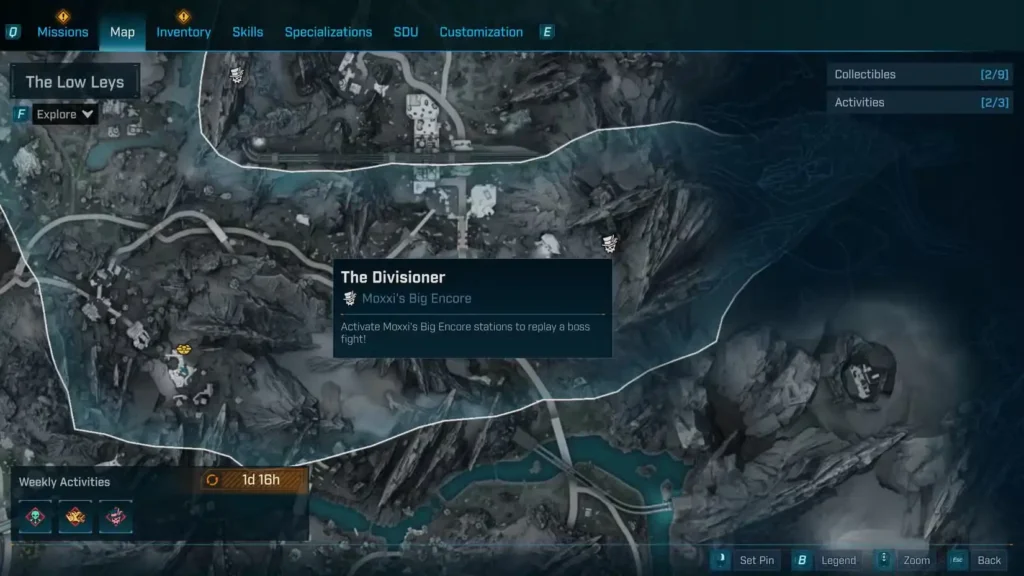
Location: “The Wireworks” Order Bunker, The Low Leys, Terminus Range
Availability: After Main Mission “One Fell Swoop”
Boss Type: Order calculation construct
Legendary Drops (2):
| Legendary | Type | Notes |
|---|---|---|
| Inkling | Heavy Weapon | Ink/splash-themed heavy weapon |
| Sideshow | Pistol | Circus/performance pistol |
Why farm Divisioner:
- Only 2 legendaries = efficient targeted farm
- Order Bunker in The Low Leys (near The Pit)
Vile Prototype – Windspear
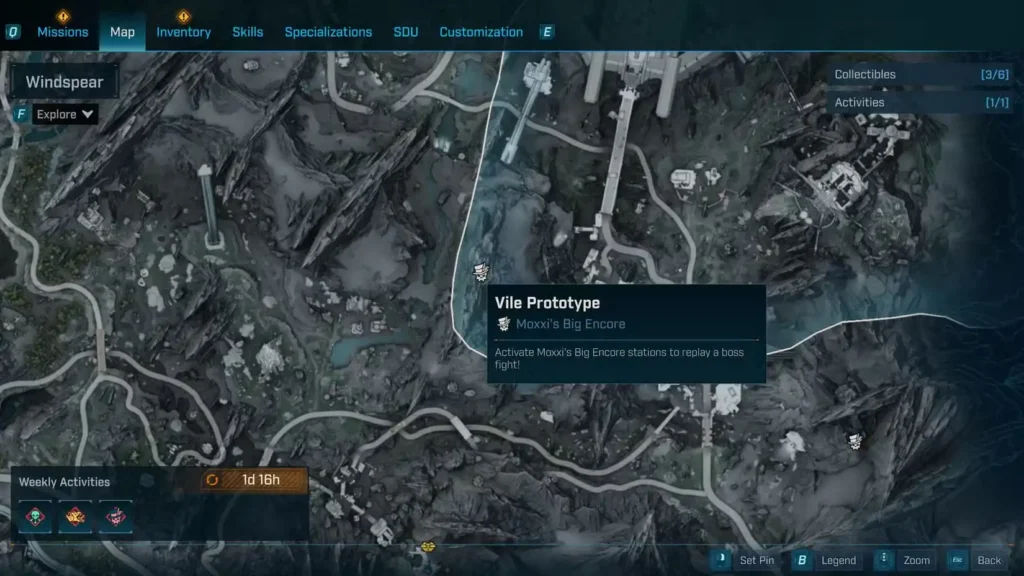
Location: Lictor’s Black Site, Windspear, Terminus Range
Availability: After Main Mission “Dark Subject”
Boss Type: Experimental synth
Legendary Drops (3):
| Legendary | Type | Notes |
|---|---|---|
| Heavyweight | Shield | Heavy defense shield |
| King’s Gambit | Pistol | Chess-themed pistol |
| Rangefinder | Pistol | Targeting pistol |
Why farm Vile Prototype:
- Two legendary pistols = great for pistol builds
- Late-game story boss
- Black Site location = endgame area
Vile Lictor – Windspear ⭐ PRIORITY FARM
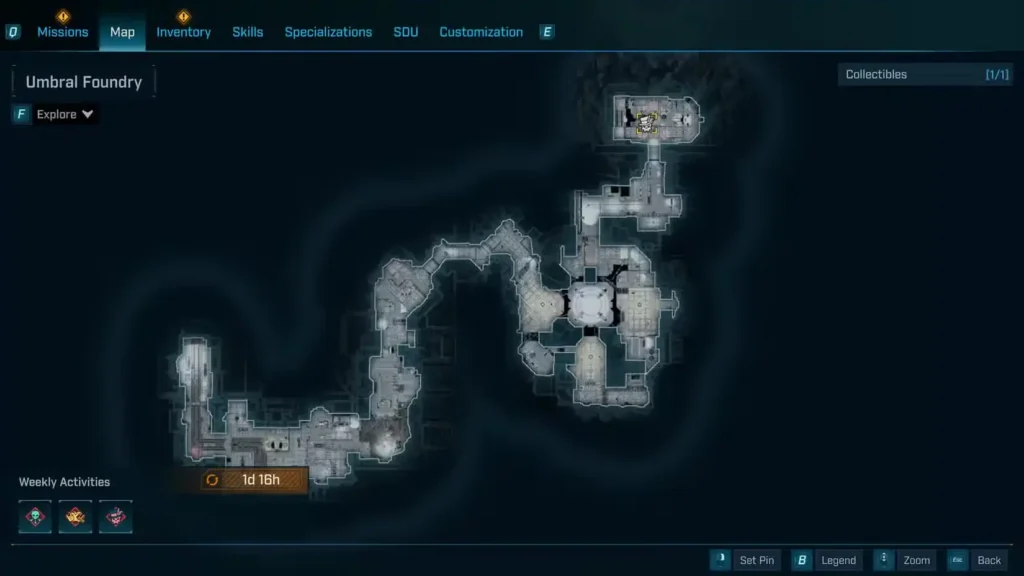
Location: Umbral Foundry, Windspear, Terminus Range
Availability: After “His Vile Sanctum”
Boss Type: Major antagonist
Legendary Drops (7):
| Legendary | Type | Notes |
|---|---|---|
| Blockbuster | Grenade | Explosive grenade |
| Ruby’s Grasp | Pistol | Named legendary pistol |
| Super Soldier | Shield | Enhancement shield |
| Blacksmith | Amon Class Mod | Amon endgame mod |
| Generator | Harlowe Class Mod | Harlowe endgame mod |
| Instigator | Rafa Class Mod | Rafa endgame mod |
| Undead Eye | Vex Class Mod | Vex endgame mod |
Why farm Vile Lictor:
- All four class mods for endgame builds
- Three additional weapons
- Major story antagonist = guaranteed encounter
- Best class mod farm in Terminus Range
Primordial Guardian Origo – The Low Leys ⭐ VAULT BOSS
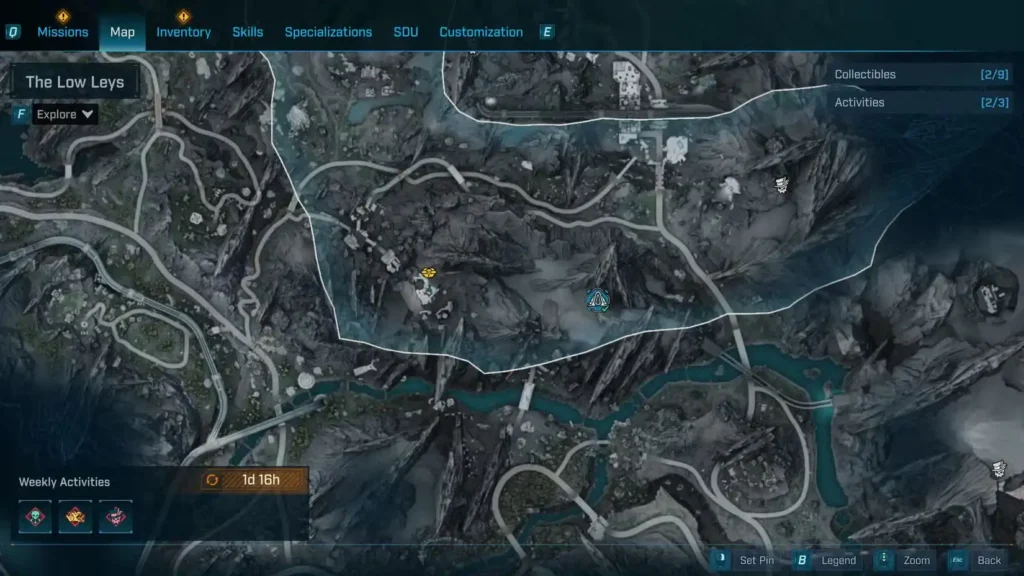
Location: Arch of Origo, The Low Leys, Terminus Range
Availability: After acquiring all Terminus Range Vault Key Fragments
Boss Type: Vault Monster
Legendary Drops (7):
| Legendary | Type | Notes |
|---|---|---|
| Kaoson | SMG | Returning BL3 legendary |
| Watts 4 Dinner | Shield | Electrical shield |
| Bottled Lightning | Heavy Weapon | Lightning heavy weapon |
| Buster | Rafa Class Mod | Vault-exclusive Rafa mod |
| Shatterweight | Amon Class Mod | Vault-exclusive Amon mod |
| Driver | Harlowe Class Mod | Vault-exclusive Harlowe mod |
| Kindred Spirits | Vex Class Mod | Vault-exclusive Vex mod |
Why farm Primordial Guardian Origo:
- Vault-exclusive class mods
- Kaoson SMG returning fan favorite
- Vault Monster challenge
- Terminus Range completion requirement
Carcadia Burn: Legendary Boss Locations (13 Bosses)
Carcadia Burn is the largest region with 13 farmable bosses and 50+ legendary drops across diverse boss types.
Skull Orchid – Grindstone of the Worthy

Location: “Embossed Fault” Auger Mine, Grindstone of the Worthy, Carcadia Burn
Availability: After Main Mission “Shadow of the Mountain”
Boss Type: Plant creature
Legendary Drops (2):
| Legendary | Type | Notes |
|---|---|---|
| Oak-Aged Shield | Shield | Wood/nature-themed shield |
| Roach | Pistol | Insect-themed pistol |
Why farm Skull Orchid:
- Only 2-item pool = efficient farm
- Early Carcadia access
Fractis – Grindstone of the Worthy
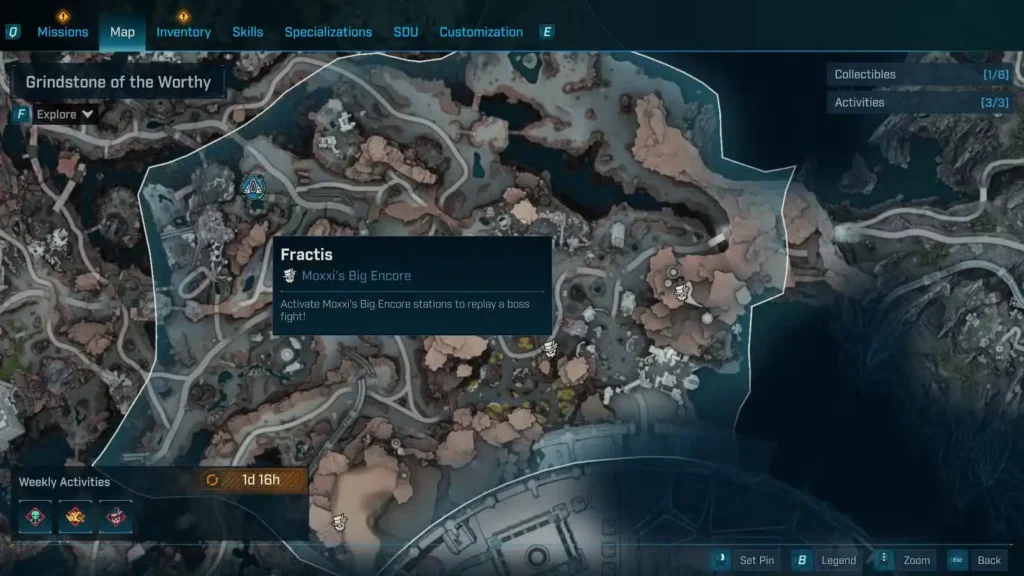
Location: “The Crawlcroft” Order Bunker, Grindstone of the Worthy, Carcadia Burn
Availability: After Main Mission “One Fell Swoop”
Boss Type: Fractured construct
Legendary Drops (3):
| Legendary | Type | Notes |
|---|---|---|
| Chuck | Assault Rifle | Duplicate from Foundry Freaks |
| Protean Cell | Shield | Adaptive shield |
| UAV | Grenade | Duplicate from Mimicron |
Why farm Fractis:
- Alternative farm for Chuck AR and UAV grenade
- Order Bunker boss
Pango & Bango – Lopside
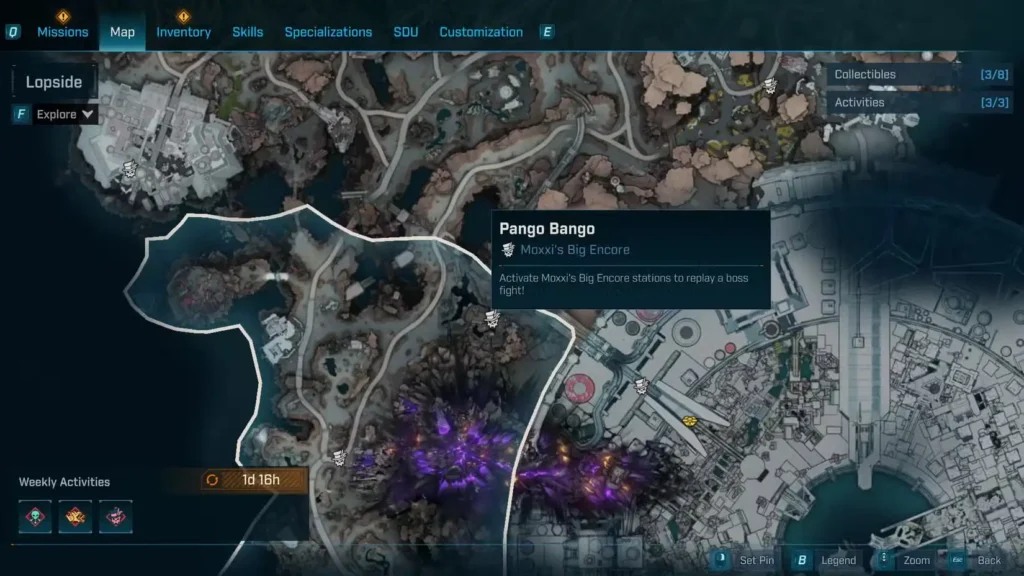
Bosses: Pango, Bango (duo fight)
Location: “Tendercage” Ripper Drill Site, Lopside, Carcadia Burn
Availability: Immediately accessible
Boss Type: Bandit duo
Legendary Drops (3):
| Legendary | Type | Notes |
|---|---|---|
| Phantom Flame | Pistol | Fire-elemental pistol |
| Prince Harming | SMG | Prince Charming parody SMG |
| Stray | Sniper Rifle | Wandering sniper rifle |
Why farm Pango & Bango:
- Three different weapon types
- No mission requirements
- Lopside location near Fault Hunting quest
Genone – Lopside
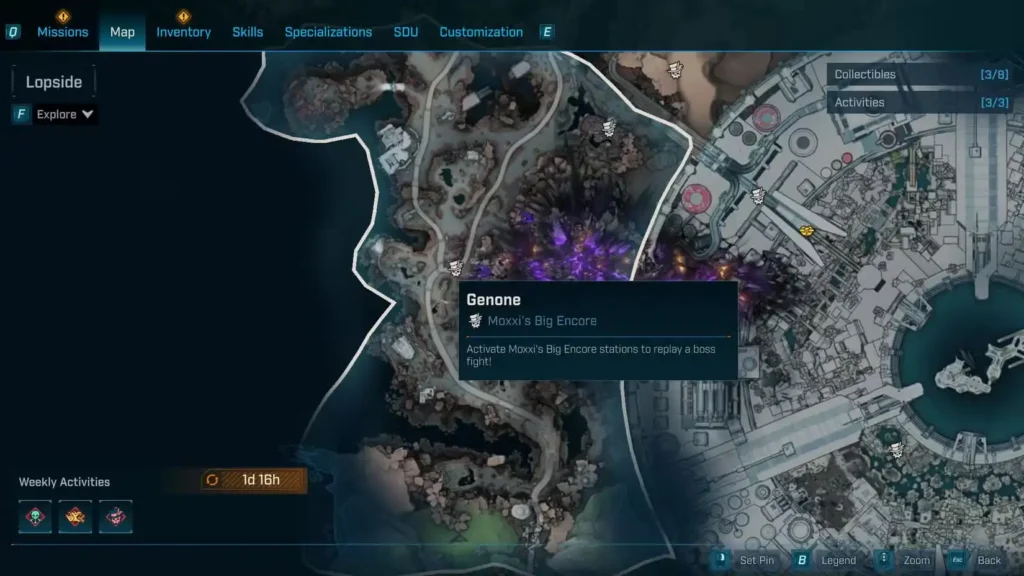
Location: The Yawning Yard, Lopside, Carcadia Burn
Availability: After Side Mission “Fault Finding” (complete guide)
Boss Type: Sentient Order synth
Legendary Drops (2):
| Legendary | Type | Notes |
|---|---|---|
| Oscar Mike | Assault Rifle | Military callout AR |
| Recursive | Grenade | Recursive projectile grenade |
Why farm Genone:
- Only 2-item pool = best drop rates
- Side mission boss with puzzle requirements
- See full farming guide in our Fault Hunting article
The Rippa Roadbirds – Ruined Sumplands
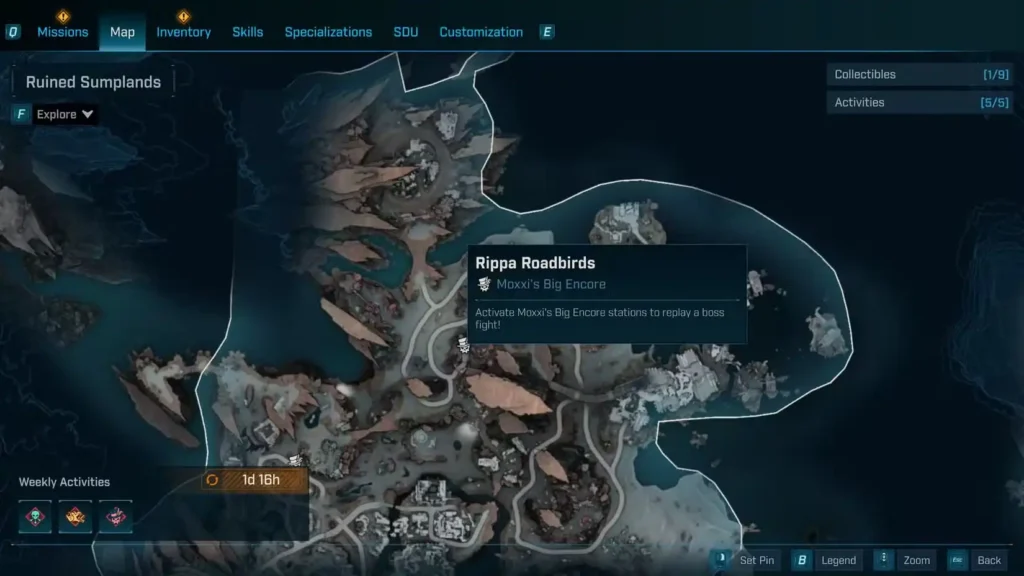
Bosses: Gruntubulous Vork, Baby Grunt, Li’l Grunt (trio fight)
Location: “Saw’s Clench” Ripper Drill Site, Ruined Sumplands, Carcadia Burn
Availability: Immediately accessible
Boss Type: Vehicle-mounted Ripper family
| Legendary | Type | Notes |
|---|---|---|
| Spinning Blade | Grenade | Circular blade grenade |
| Wombo Combo | Assault Rifle | Multi-element combo AR |
Carcadia Burn: Legendary Boss Locations
Rocken Roller – Ruined Sumplands
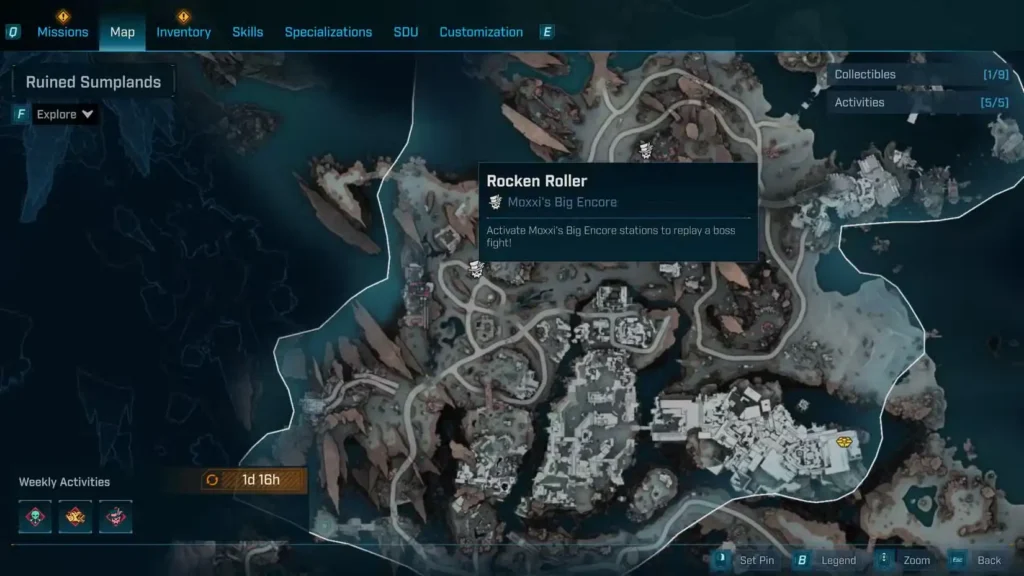
Location: “Trinket Crevass” Auger Mine, Ruined Sumplands, Carcadia Burn
Availability: After Main Mission “Shadow of the Mountain”
Boss Type: Rock creature
Legendary Drops (2):
| Legendary | Type | Notes |
|---|---|---|
| AF1000 | Repkit | High-tech healing item |
| Songbird | Pistol | Musical-themed pistol |
Why farm Rocken Roller:
- Only 2 legendaries = fast targeted farming
- Auger Mine boss in Ruined Sumplands
Driller Hole – Tonnage Peel
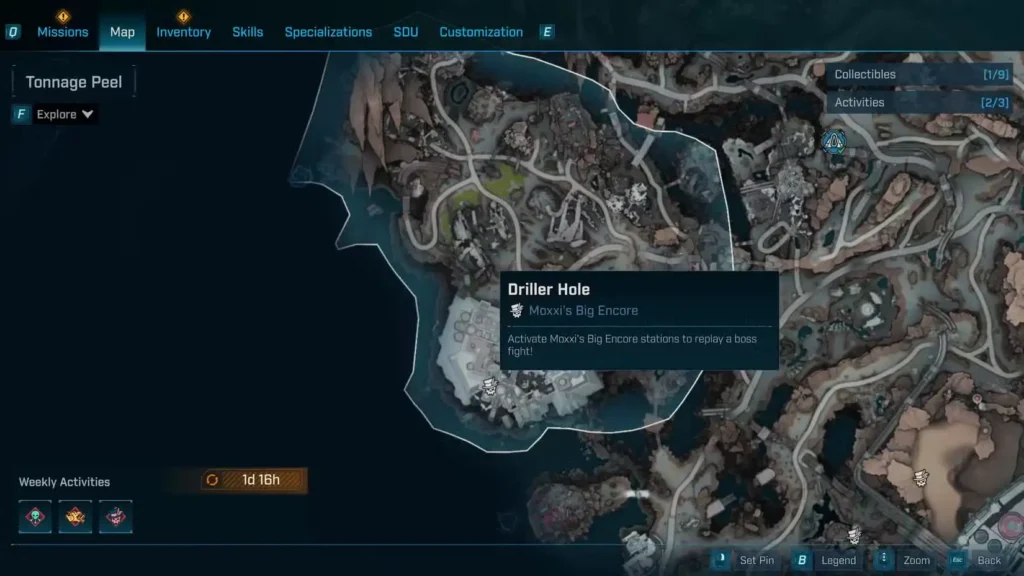
Location: Queen’s Cradle, Tonnage Peel, Carcadia Burn
Availability: After Main Mission “Unpaid Tab” (quest guide)
Boss Type: Drilling construct
Legendary Drops (3):
| Legendary | Type | Notes |
|---|---|---|
| Fuse | Grenade | Timed explosive grenade |
| G.M.R. | Assault Rifle | Acronym-named AR |
| Katagawa’s Revenge | Sniper Rifle | Returning character reference |
Why farm Driller Hole:
- Katagawa’s Revenge references BL3 character
- Available after Unpaid Tab story mission
- Three diverse weapon types
Callis the Ripper Queen – Fallen Crown ⭐ PRIORITY FARM
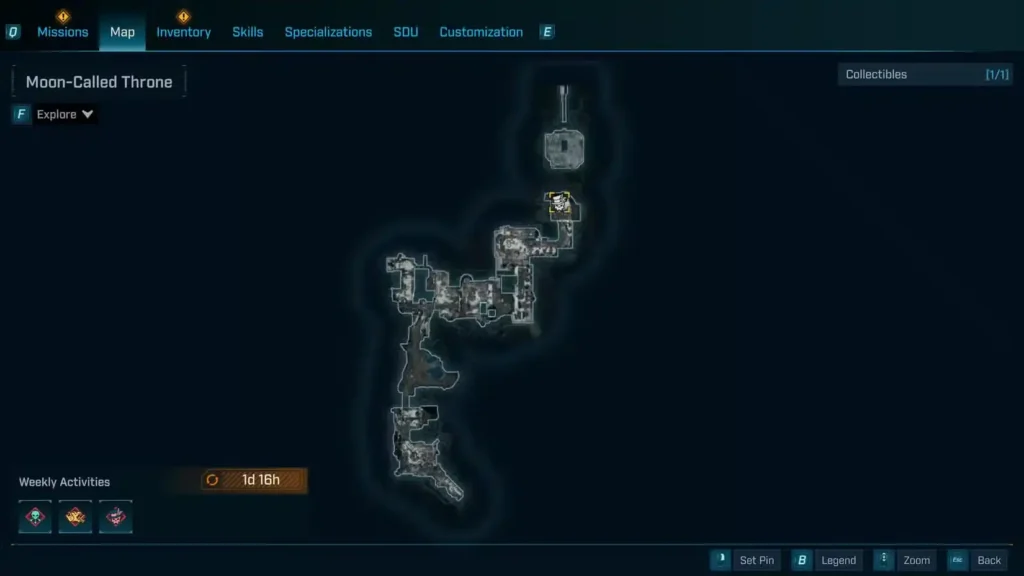
Location: Moon-Called Throne, Fallen Crown, Carcadia Burn
Availability: After Main Mission “Her Flaming Vision”
Boss Type: Ripper faction leader (major boss)
Legendary Drops (6):
| Legendary | Type | Notes |
|---|---|---|
| Pandoran Memento | Shield | Pandora-themed shield |
| Queen’s Rest | Pistol | Royal-themed pistol |
| Esgrimidor | Rafa Class Mod | Ripper Queen Rafa mod |
| Illusionist | Vex Class Mod | Ripper Queen Vex mod |
| Skeptic | Harlowe Class Mod | Ripper Queen Harlowe mod |
| Viking | Amon Class Mod | Ripper Queen Amon mod |
Why farm Callis:
- All four Vault Hunter class mods
- Major faction leader boss
- Unique class mod variants from Ripper Queen
- Priority class mod farm for Carcadia Burn
Combat notes: Major story boss with unique mechanics. Expect multi-phase fight with adds.
Moon-Maddened Callis – Fallen Crown
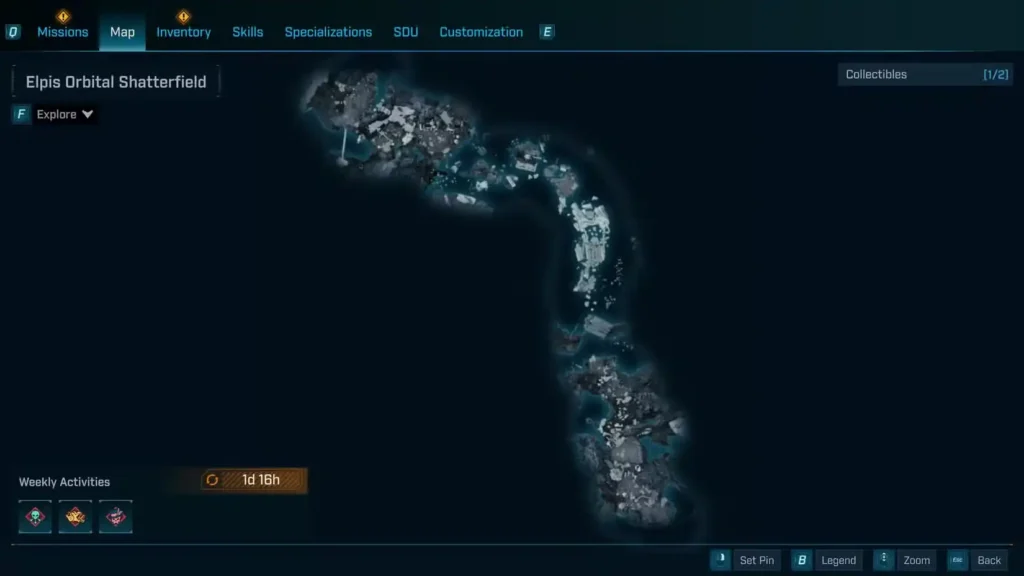
Location: Elpis Orbital Shatterfield, Fallen Crown, Carcadia Burn
Availability: After Main Mission “Another Day, Another Universe”
Boss Type: Transformed Callis (endgame version)
Legendary Drops (1):
| Legendary | Type | Notes |
|---|---|---|
| Gamma Void | Heavy Weapon | Void-elemental heavy weapon |
Why farm Moon-Maddened Callis:
- Endgame story boss
- Only drops 1 legendary = guaranteed Gamma Void if legendary drops
- Late-game exclusive heavy weapon
Note: This is Callis’s powered-up form encountered later in the story. Different boss, different loot pool.
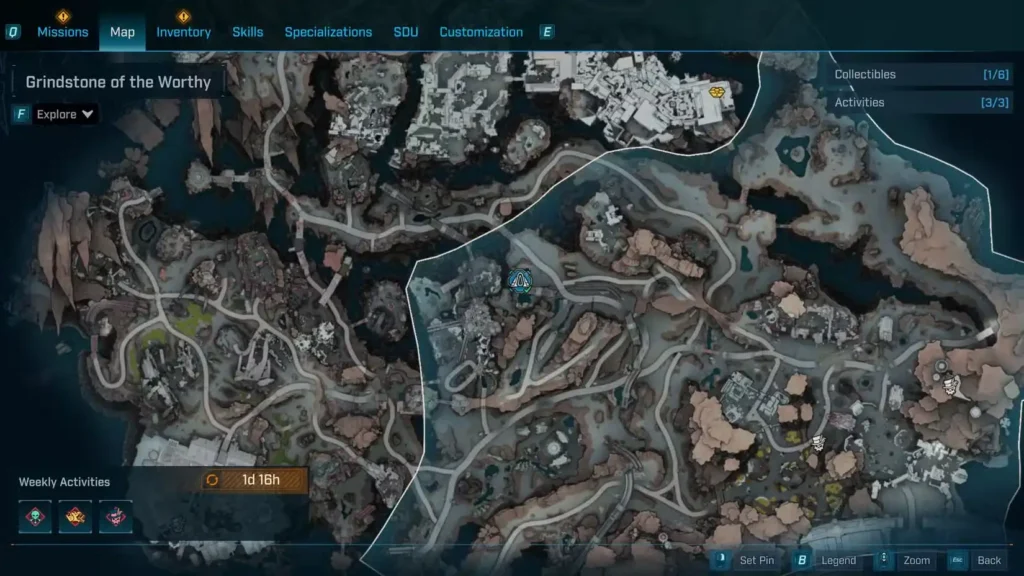
Leader Willem – Grindstone of the Worthy
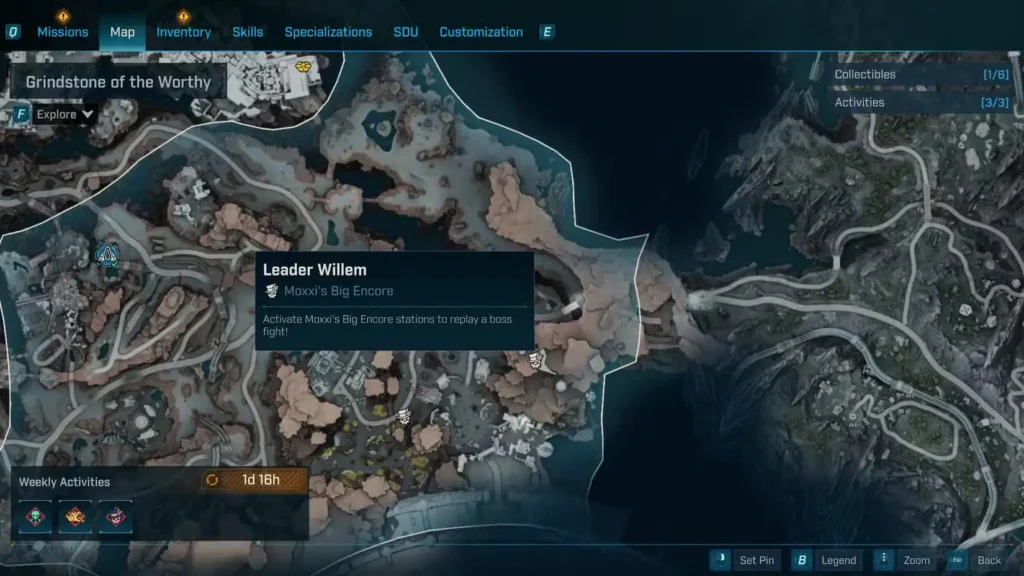
Location: The Excrucible, Grindstone of the Worthy, Carcadia Burn
Availability: After Electi Faction Mission “The Mole’s Gambit”
Boss Type: Electi faction leader
Legendary Drops (3):
| Legendary | Type | Notes |
|---|---|---|
| Firepot | Grenade | Fire-container grenade |
| Rainbow Vomit | Shotgun | Multi-color shotgun |
| Zipper | Pistol | Fast-firing pistol |
Why farm Leader Willem:
- Faction mission boss = special encounter
- Rainbow Vomit shotgun has unique visual effects
- Three-item pool
Primordial Guardian Radix – Grindstone of the Worthy ⭐ VAULT BOSS
Location: Arch of Radix, Grindstone of the Worthy, Carcadia Burn
Availability: After acquiring all Carcadia Burn Vault Key Fragments
Boss Type: Vault Monster
Legendary Drops (6):
| Legendary | Type | Notes |
|---|---|---|
| Adrenaline Pump | Repkit | Adrenaline-based healing |
| Anarchy | Shotgun | Returning BL favorite |
| Forge Master | Amon Class Mod | Vault-exclusive Amon mod |
| Grenazerker | Rafa Class Mod | Vault-exclusive Rafa mod |
| Scientist | Harlowe Class Mod | Vault-exclusive Harlowe mod |
| Witch | Vex Class Mod | Vault-exclusive Vex mod |
Why farm Primordial Guardian Radix:
- Vault-exclusive class mods
- Anarchy shotgun is iconic returning weapon
- Vault Monster challenge for completionists
- Required for Carcadia Burn 100% completion
Dominion: Legendary Boss Locations (6 Bosses)
Dominion is the final region with 6 farmable bosses including the game’s ultimate antagonist, The Timekeeper.
Axemaul – Carcadia District
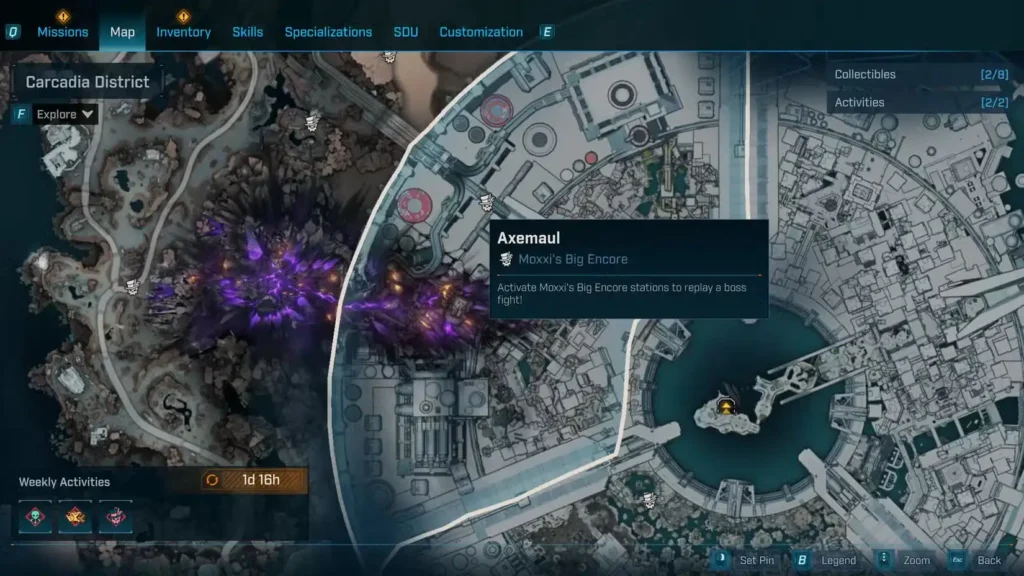
Location: “The Toil of Spoiling Vis” Auger Mine, Carcadia District, Dominion
Availability: After Main Mission “The Falling Wall”
Boss Type: Axe-wielding brute
Legendary Drops (3):
| Legendary | Type | Notes |
|---|---|---|
| Bod | Shotgun | Body-shot focused shotgun |
| Buzz Axe | Throwing Knife | Psycho reference weapon |
| Kill Spring | Repkit | Combat healing item |
Why farm Axemaul:
- Buzz Axe throwing knife = Psycho Krieg reference
- Dominion’s first farmable boss
- Three-item pool
Vile Ted & The Experiments – Terminus District
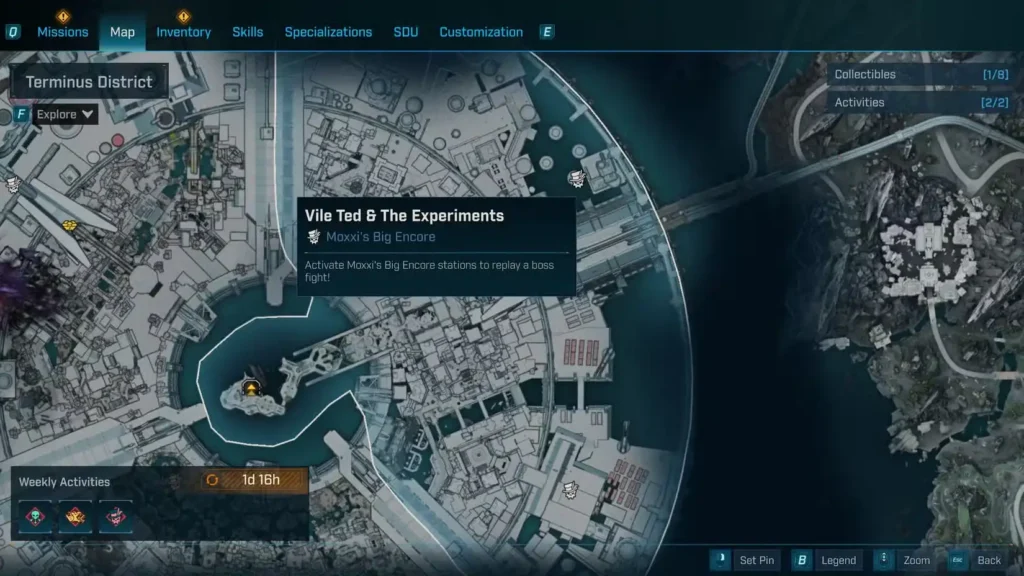
Bosses: Vile Ted + Experiment minions
Location: Terminus District, Dominion
Availability: After Side Mission “Below the Surface”
Boss Type: Mad scientist + creations
Legendary Drops (2):
| Legendary | Type | Notes |
|---|---|---|
| Goalkeeper | Shield | Defensive shield |
| Seventh Sense | Pistol | Perception-themed pistol |
Why farm Vile Ted:
- Only 2-item pool = efficient farm
- Side mission boss
- Terminus District location
Directive-O – Terminus District
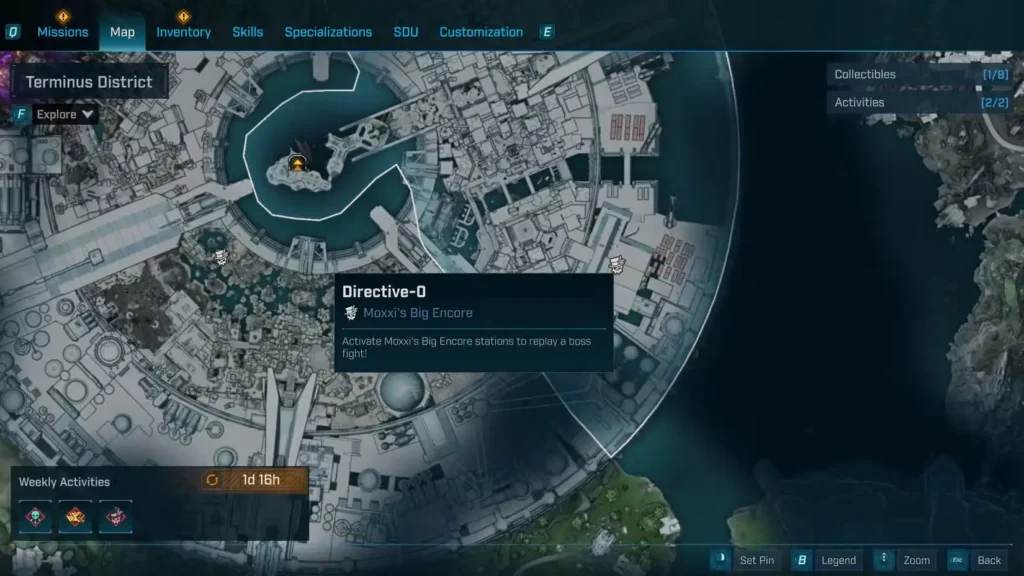
Location: “Ironwall Resolve” Order Bunker, Terminus District, Dominion
Availability: After Side Mission “One Gassy Issue” (quest guide)
Boss Type: Order directive construct
Legendary Drops (3):
| Legendary | Type | Notes |
|---|---|---|
| Bonnie and Clyde | Assault Rifle | Criminal duo reference AR |
| Rowan’s Charge | Assault Rifle | Named legendary AR |
| Whiskey Foxtrot | Assault Rifle | Military callout AR |
Why farm Directive-O:
- Three assault rifles = best AR farm in game
- Order Bunker in Dominion
- One Gassy Issue side quest unlock
Bio-Thresher Omega – Fades District
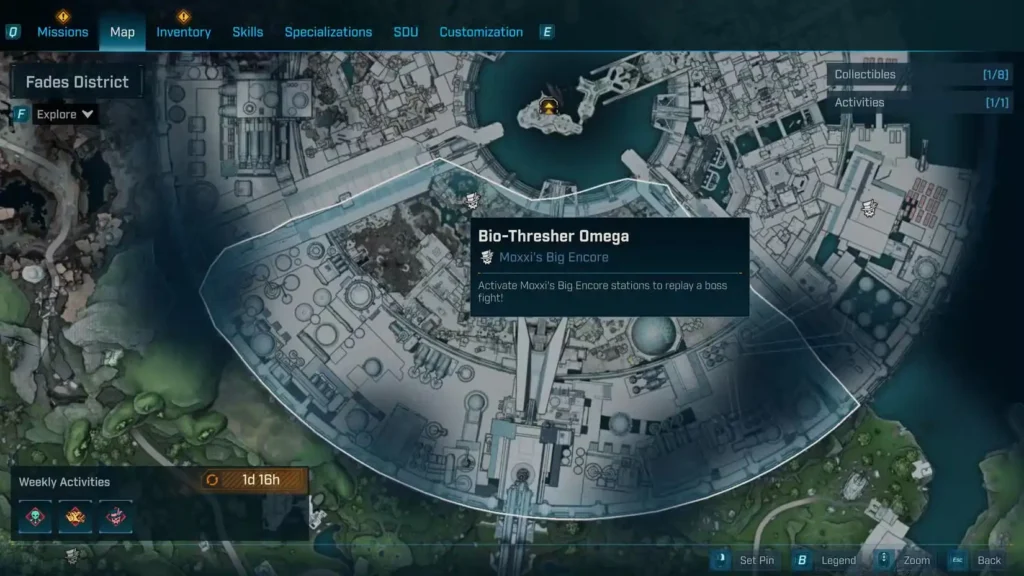
Location: Fades District, Dominion
Availability: After Side Mission “One Slimy Issue”
Boss Type: Enhanced thresher variant
Legendary Drops (2):
| Legendary | Type | Notes |
|---|---|---|
| Bugbear | Assault Rifle | Insect-themed AR |
| Truck | Sniper Rifle | Heavy-hitting sniper |
Why farm Bio-Thresher Omega:
- Only 2 legendaries = focused farming
- Side mission “One Slimy Issue” unlock
- Alternative thresher boss to Voraxis
The Timekeeper (& Primordial Guardian Timekeeper) ⭐ FINAL BOSS
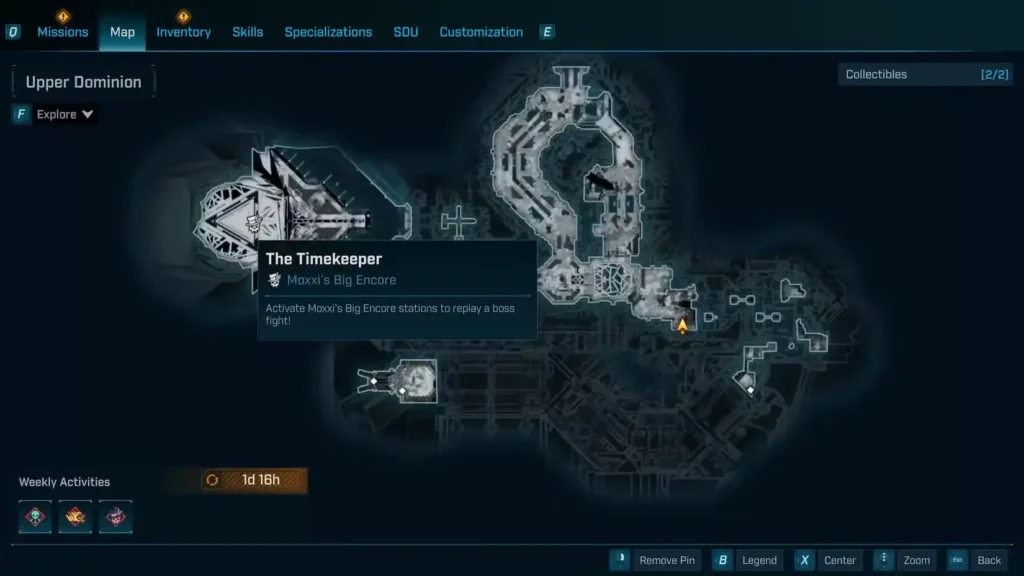
Location: Upper Dominion, Terminus District, Dominion
Availability: After Main Mission “The Timekeeper’s Order”
Boss Type: Final story antagonist + Primordial Guardian form
Legendary Drops (5):
| Legendary | Type | Notes |
|---|---|---|
| Borstel Ballista | Sniper Rifle | Ballista-style sniper |
| Symmetry | Sniper Rifle | Returning BL3 legendary |
| Plasma Coil | SMG | Plasma-based SMG |
| Star Helix | Assault Rifle | Celestial AR |
| Timekeeper’s New Shield | Shield | Boss signature shield |
Why farm The Timekeeper:
- Final boss loot pool
- Five unique legendaries
- Symmetry and Plasma Coil are returning fan favorites
- Mandatory story encounter
- Can be farmed post-game for endgame gear
Combat notes: The Timekeeper has two forms—standard boss fight and Primordial Guardian transformation. Both share the same loot pool.
Farming method: After completing the campaign, The Timekeeper respawns like any other boss. Use quit/reload method for efficient farming.
World Drop Legendaries (No Specific Boss)
These legendaries aren’t tied to dedicated boss drops and can appear from any loot source:
Moxxi’s Tip Jar Exclusives
Location: Moxxi’s Bottoms Up (bar locations across regions)
How to obtain: Tip Moxxi large amounts of cash (tipping guide)
| Legendary | Type | Notes |
|---|---|---|
| Sweet Embrace | Shotgun | Moxxi’s signature healing shotgun |
| Cold Shoulder | Assault Rifle | Rejection-themed AR |
Why tip Moxxi:
- Guaranteed legendaries after tipping milestones
- Sweet Embrace is a traditional Moxxi healing weapon
- Requires cash farming for sufficient tips
True Random Drops
These legendaries have no dedicated source and drop randomly:
| Legendary | Type | Source |
|---|---|---|
| Acey May | Shotgun | Chests, enemies, vending machines |
| Boomslang | Sniper Rifle | Chests, enemies, vending machines |
| Detonator | Grenade | Chests, enemies, vending machines |
| Dog Movement | Enhancement | Chests, enemies, vending machines |
| Fisheye | Sniper Rifle | Chests, enemies, vending machines |
| Forsaken Chaos | Shotgun | Chests, enemies, vending machines |
| Midnight Defiance | Sniper Rifle | Chests, enemies, vending machines |
| T.K’s Wave | Shotgun | Chests, enemies, vending machines |
Farming world drops:
- Check Red Chests in Order Bunkers
- Farm Lost Loot Machines to recover missed legendaries
- Use Golden Keys for guaranteed legendary gear
- Check Maurice’s Black Market weekly rotation
Legendary Farming Best Practices
Efficient Boss Farming Methods
Method 1: Quit to Main Menu (Most Reliable)
- Kill the boss and collect loot
- Save your game (fast travel triggers auto-save)
- Quit to main menu
- Reload save
- Boss respawns immediately
- Repeat
Time per cycle: 1-3 minutes depending on boss difficulty
Method 2: Fast Travel Reset
- Kill the boss
- Fast travel to a distant location
- Wait 10-15 minutes real-time
- Return to boss location
- Boss may respawn (less reliable than Method 1)
When to use: If you’re doing other activities and want passive boss respawns
Optimal Farming Loadouts
For maximum efficiency:
Elemental coverage:
- Shock weapon (shields)
- Corrosive weapon (armor)
- Incendiary weapon (flesh)
- Cryo/Radiation as backup
Why elemental matching matters: Using correct elements can reduce kill times by 50-75%. Check our elemental damage guide for full matchup chart.
Build optimization:
- Respec skills for boss damage
- Equip class mods with boss damage bonuses
- Use firmware sets that boost critical hits
When to Farm: Level Considerations
Early game (Levels 1-20):
- Don’t farm extensively—you’ll out-level gear quickly
- Focus on story progression to unlock more bosses
- Grab easy farms like Sidney Pointylegs (no requirements)
Mid-game (Levels 21-40):
- Farm key weapons for your build
- Target specific bosses for build-enabling legendaries
- Start collecting class mods from story bosses
Endgame (Level 50 / Max Level):
- This is when farming matters most
- All drops scale to max level = permanent gear
- Farm for perfect rolls and complete legendary collection
- Target Vault Monsters for exclusive class mods
Current level cap: Level 50 (level cap guide)
Drop Rate Expectations
Realistic legendary drop rates:
- Dedicated drops: 10-30% per kill
- World drops: <1% from normal enemies
- Red Chests: ~5% legendary chance
- Golden Key Chests: ~50% legendary chance
Expected kills for full loot pool:
- 2-item pool: 7-20 kills
- 3-item pool: 10-30 kills
- 4+ item pool: 15-50 kills
RNG is RNG: Some players get lucky in 5 runs, others need 100+. This is normal.
Priority Farming Guide: Which Bosses to Farm First
Top Priority: Class Mod Farmers
If you need class mods for your Vault Hunter build:
Fadefields:
- Idolator Sol – All 4 base class mods
- Primordial Guardian Inceptus – All 4 Vault mods
Terminus Range:
- Vile Lictor – All 4 endgame class mods
- Primordial Guardian Origo – All 4 Vault mods
Carcadia Burn:
- Callis the Ripper Queen – All 4 Ripper Queen mods
- Primordial Guardian Radix – All 4 Vault mods
Strategy: Farm story bosses (Idolator Sol, Vile Lictor, Callis) first since you encounter them naturally. Save Vault Monsters for endgame.
Best Weapon-Specific Farms
Shotguns:
- Callous Harbinger (Hot Slugger + Kaleidosplode)
- Idolator Sol (Golden God + Goremaster)
- Meathead Riders (Hellwalker)
Assault Rifles:
- Directive-O (3 ARs in one loot pool)
- Horace (Aegon’s Dream)
SMGs:
- The Timekeeper (Plasma Coil)
- Primordial Guardian Origo (Kaoson)
Sniper Rifles:
- The Timekeeper (Borstel Ballista, Symmetry)
Pistols:
- Sidney Pointylegs (Noisy Cricket)
Grenades:
- Shadowpelt (Slippy fish)
Most Efficient Farms (2-Item Loot Pools)
For fastest targeted farming, prioritize bosses with only 2 legendaries:
- Battle Wagon (Compleation shield, Finnity sniper)
- The Divisioner (Inkling heavy, Sideshow pistol)
- Genone (Oscar Mike AR, Recursive grenade)
- Skull Orchid (Oak-Aged shield, Roach pistol)
- Rocken Roller (AF1000 repkit, Songbird pistol)
- Vile Ted (Goalkeeper shield, Seventh Sense pistol)
- Bio-Thresher Omega (Bugbear AR, Truck sniper)
Drop math: 2-item pool = ~50% chance of getting the specific legendary you want per drop (vs. 25% for 4-item pools)
Regional Completion Checklist
Use this checklist to track your legendary farming progress:
Fadefields Bosses (13):
- Splashzone
- Voraxis the Quake Thresher
- Oppressor
- Bio-Bulkhead
- Backhive
- Horace
- Sidney Pointylegs
- The Foundry Freaks
- Mimicron
- Core Observer
- Idolator Sol
- Sludgemaw
- Primordial Guardian Inceptus
Terminus Range Bosses (11):
- Skyspanner Kratch
- Shadowpelt
- The Meathead Riders
- Callous Harbinger
- Bramblesong
- Battle Wagon
- The Divisioner
- Vile Prototype
- Vile Lictor
- Primordial Guardian Origo
Carcadia Burn Bosses (13):
- Skull Orchid
- Fractis
- Pango & Bango
- Genone
- The Rippa Roadbirds
- Rocken Roller
- Driller Hole
- Callis the Ripper Queen
- Moon-Maddened Callis
- Leader Willem
- Primordial Guardian Radix
Dominion Bosses (6):
- Axemaul
- Vile Ted & The Experiments
- Directive-O
- Bio-Thresher Omega
- The Timekeeper
Special Farms:
- Moxxi Tipping (Sweet Embrace, Cold Shoulder)
- World Drops (8 random legendaries)
Additional Farming Resources
Complementary Systems
Lost Loot Machines: Use Lost Loot Machine locations to recover legendaries you accidentally missed during boss kills. The machine automatically collects high-rarity drops you didn’t pick up.
SDU Upgrades: Increase your carrying capacity with SDU tokens so you can carry more legendaries during farming sessions without returning to your Bank.
Golden Keys: Supplement boss farming with Golden Key chests for guaranteed legendary gear. Check active SHiFT codes regularly.
Maurice’s Black Market: Visit Maurice’s weekly rotation for legendaries you can buy with in-game currency instead of farming.
Final Thoughts
This legendary farming guide represents hundreds of hours of collective player research mapping every boss and their loot pools across Borderlands 4 on PC, PlayStation, and all platforms. With 135+ legendary items tied to 40+ bosses, having a complete reference is essential for efficient farming.
Key takeaways:
Early game: Don’t over-farm. Focus on story progression to unlock more bosses and farming opportunities.
Mid-game: Target specific bosses for build-enabling legendaries. Farm class mods from story bosses like Idolator Sol and Vile Lictor.
Endgame: This is when farming truly pays off. Max-level drops are permanent upgrades. Prioritize Vault Monsters for exclusive class mods and complete your legendary collection systematically.
Efficiency matters: Choose bosses with smaller loot pools when targeting specific items. A 2-item pool gives you 50% odds vs. 25% for 4-item pools.
RNG is part of the game: Some farms will be quick, others will test your patience. That’s Borderlands. The dopamine hit when you finally get that perfect legendary makes it all worthwhile.
Whether you’re hunting the Slippy fish grenade from Shadowpelt, building the perfect Rafa class with Vault Monster mods, or just trying to collect every legendary in the game for 100% completion, this guide has you covered.
Now get out there and show those bosses what happens when a motivated Vault Hunter needs better loot. Happy farming!
Need more farming help? Check our beginners guide for essential tips, or browse our complete boss guides for detailed strategies on specific encounters.