Master the ultimate Amon melee build in Borderlands 4 with our complete Onslaught guide. Skill trees, gear recommendations, and strategies for maximum damage and survivability.
TL;DR – Onslaught Build Quick Summary
Build Focus: Melee damage + tank survivability
Primary Tree: Onslaught (Calamity – Red)
Key Strategy: Get close, punch hard, stay alive
Best Weapon: Rainbow Vomit shotgun
Playstyle: Aggressive close-range combat with self-sustaining abilities
Level Range: Optimized for Level 1-50 progression
Why Choose the Onslaught Build?
The Onslaught build transforms Amon into an unstoppable melee juggernaut who gets stronger the closer he gets to danger. Unlike traditional Borderlands builds that keep you at safe distances, this approach rewards aggressive positioning with massive damage bonuses and incredible survivability.
What Makes This Build Special:
- Damage reduction scales with proximity – the closer you are, the tankier you become
- Self-sustaining health and shield mechanics – punch to heal and gain protection
- Hybrid combat style – devastating melee attacks that reload your guns automatically
- Status effect mastery – turns environmental damage into your advantage
Perfect for players who want to feel invincible while dealing catastrophic damage up close.
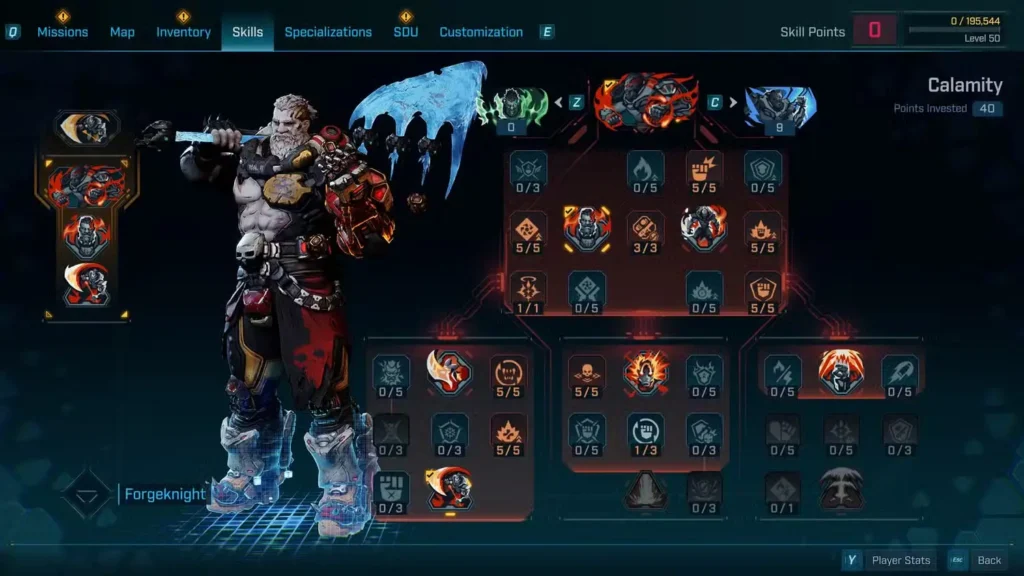
Complete Skill Point Investment Guide
Investment Priority Order (49 Total Points)
Here’s your exact leveling roadmap for maximum effectiveness:
Early Game Foundation (Levels 1-15)
1. Discombobulate (5/5) – Priority #1
- Effect: +25% Melee Critical Hit Chance
- Why essential: Critical hits are your bread and butter for damage scaling
- Investment tip: Max this immediately for consistent damage output
2. Tritanium Knuckles (5/5) – Priority #2
- Effect: +35% Melee Damage, +15% Skill Damage
- Why essential: Raw damage increase that affects everything you do
- Synergy note: Pairs perfectly with critical hit chance from Discombobulate
3. The Best Defense (5/5) – Priority #3
- Effect: Gain 15% Overshield when dealing Melee Damage
- Why essential: Every punch gives you extra protection
- Tactical advantage: Allows aggressive positioning without immediate death
Mid Game Power Spikes (Levels 16-30)
4. Gut Punch (3/3) – Game Changer
- Effect: 60% chance to apply Weakness on melee hits
- Weakness Benefits: Enemies deal 40% less damage, take 20% more damage
- Why crucial: This single skill makes you both tankier AND deadlier
- Duration: 8-second windows of enemy vulnerability
5. Forged In Steel (1/1) – Ultimate Survival Tool
- Effect: 6 seconds of complete damage immunity when activating Forgeskill
- Cooldown consideration: 60-second Forgeskill cooldown makes timing crucial
- Emergency use: Perfect panic button for overwhelming situations
6. Wield the Storm (5/5) – Status Effect Mastery
- Effect: +30% Status Effect Damage and Duration
- Build synergy: Amplifies Pyroclast’s Incendiary damage significantly
- Weapon compatibility: Essential for elemental weapon effectiveness
Late Game Domination (Levels 31-50)
7. Into The Fray (5/5) – The Heart of the Build
- Close-range bonuses: +30% Damage Dealt, 55% Damage Reduction
- Philosophy: Rewards exactly how you want to play
- Positioning strategy: Stay in enemy faces for maximum benefit
8. Bloodlust (5/5) – Combat Sustain
- Triggers: Shield break OR Action Skill activation
- Benefits: +30% Reload Speed, 15% Lifesteal for 8 seconds
- Strategic value: Turns shield breaks from disasters into opportunities
9. Brimming Vigor (5/5) – Health Scaling
- Health bonus: +35% Maximum Health Capacity
- Damage bonus: +35% Melee Damage when at full health
- Build philosophy: Bigger health pool = more damage potential
Specialization and Utility Points
10. Rearm (1/3) – Quality of Life
- Effect: Melee attacks refill 20% of current gun’s ammo
- Why only 1 point: Diminishing returns, other skills are higher priority
- Practical benefit: Punch-reload combo for continuous combat
11. The Thrill (2/3) – Regeneration Engine
- Base effect: +4% Missing Health Regeneration
- Stack system: +20% per Resolute stack (max 20 stacks)
- Damage requirement: Taking non-status effect damage builds stacks
- Why 2 points: Good scaling without over-investment
12. Battleborn (3/5) – Gun Damage Scaling
- Health-based bonus: +9% Gun Damage when at full health
- Double effect: Bonus doubled at maximum health
- Limited investment reasoning: Melee focus means guns are secondary
13. Scar Tissue (4/5) – Tank Enhancement
- Health bonus: +32% Maximum Health Capacity
- Healing bonus: +32% Repkit effectiveness
- Why 4/5: Strong returns, but final point better used elsewhere
Essential Action Skill: Pyroclast Augment
Why Pyroclast is Non-Negotiable:
Immediate Benefits:
- Full health and shield restoration when activating Onslaught
- Forgestorm creation – continuous Incendiary damage aura
- 535 damage per second to nearby enemies automatically
Scaling Mechanics:
- Kill rewards: Each enemy killed in Forgestorm restores 20% Action Skill duration
- Damage stacking: +20% Forgestorm damage per kill (max 200% bonus)
- Sustain potential: Proper positioning can extend Action Skill indefinitely
Hoarcleave vs. Molten Slam:
Choose Hoarcleave because:
- Lower cooldown: 65 seconds vs. longer Molten Slam cooldown
- Better enemy coverage: Effective against Shields and Armor
- Crowd control: Freeze effect stops enemy advances
- AoE potential: Detonation damage spreads to nearby enemies
Weapon and Gear Optimization
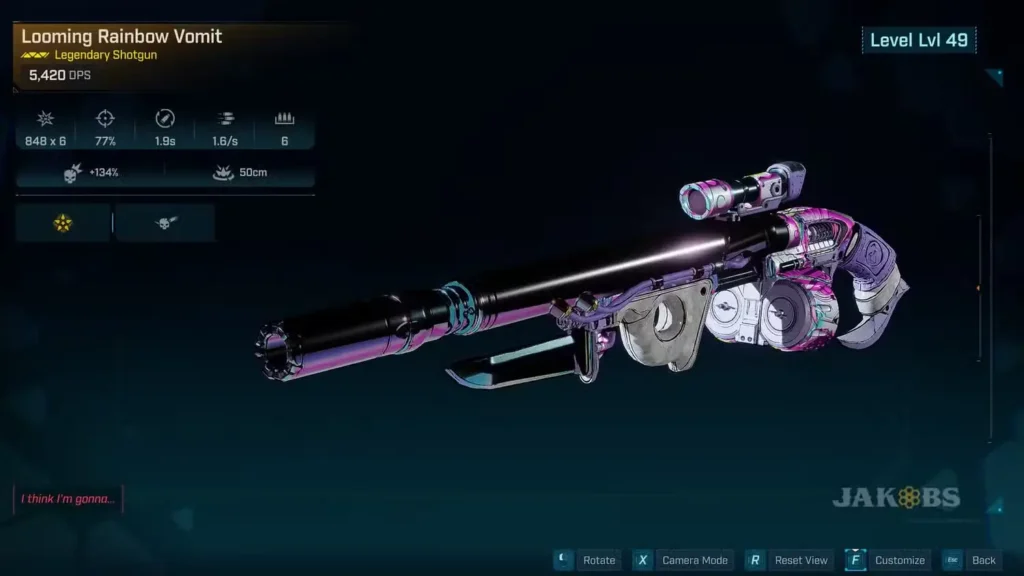
Primary Weapon: Rainbow Vomit Shotgun
Why This Weapon Dominates:
- Source: Weekly Wildcard Mission “A Lot to Process”
- Special Feature: Color Spray – fires 3 elements simultaneously
- Range advantage: Perfect for close-quarters combat
- Reload synergy: Fast reload works with Bloodlust bonuses
- Enemy coverage: Handles Flesh, Shield, and Armor equally well
Alternative Shotgun Options:
- High-damage single-element shotguns for specialized encounters
- Fast-firing variants that trigger Rearm more frequently
- Any shotgun with bonus melee damage properties
Ordnance Selection: Heavy Weapons
Rocket Launchers – Despite the Risk:
- Damage output: Highest DPS against all enemy types
- Risk management: Use Into The Fray’s damage reduction to survive splash
- Tactical timing: Deploy during Forged In Steel immunity windows
- Alternative approach: Switch to grenades for safer close-range use
Shield: Timekeeper’s New Shield
Why This Shield is Perfect:
- Massive capacity: 7,000+ Health buffer
- Regeneration: 350+ Health per second passive healing
- Damage reduction: 33% damage taken reduction
- Source: Defeat the Timekeeper boss
- Build synergy: Supports aggressive positioning perfectly
Repkit Strategy
Optimal Repkit Features:
- 2 charges minimum for emergency situations
- Melee damage bonuses upon use or overcharge
- Fast cooldown to support aggressive playstyle
- Health percentage scaling rather than flat amounts
Enhancement Priorities
Focus on:
- Gun Damage bonuses to complement your hybrid playstyle
- Status Effect enhancements to boost Pyroclast effectiveness
- Health or shield capacity improvements
- Avoid: Pure melee enhancements (skills handle this already)
Class Mod Selection
Essential Properties:
- Skill extensions for your maxed abilities
- Melee Damage bonuses to stack with existing skills
- Damage Reduction increases for better survivability
- Health capacity improvements for scaling benefits
Specialization Investment Strategy

Why Specializations Matter
With respecs costing 5,000 Eridium, your specialization choices become permanent investments. Plan carefully!
Primary Path: Runner Specialization
Early Investment Benefits:
- Increased Melee Damage scaling with your core build
- Bear Arms skill unlock: +50% Gun Damage after melee attacks
- Movement synergies for aggressive positioning
Secondary Path: Survivor Specialization
20-Point Investment Targets:
- Bullets Are Scared of Me: Enhanced Damage Reduction at full health
- The Best Defense: Increased Damage Dealt at full health
- Health scaling that complements Brimming Vigor perfectly
Flexible Third Option
Choose based on playstyle:
- Return to Runner: Bullet Train for +15% Walking Damage
- Invest in Brute: Additional Gun Damage scaling
- Personal preference: Test different combinations
Firmware Configuration
Core 3-Piece: Baker Set
Baker Bonuses (3 pieces):
- +10% Shield Capacity – more buffer for aggressive play
- +15% Repkit Cooldown Reduction – faster healing access
- +25% Maximum Health – scales with all your health-based skills
Why Baker Dominates: The health increase alone makes this essential, plus faster healing supports your playstyle perfectly.
Individual Pieces
Real Big Fist (1 piece):
- +15% Melee Damage – straightforward damage scaling
- Alternative: Action Fist for similar benefits
Rubberband Man (1 piece):
- +5% Damage Reduction – every percentage point matters in close combat
- Stacking benefit: Combines with Into The Fray for massive damage reduction

Combat Strategies and Tactics
The Onslaught Philosophy
Core Principle: “The closer you are, the stronger you become”
Engagement Sequence:
- Activate Onslaught in enemy-dense areas for maximum Forgestorm value
- Rush to close range to trigger Into The Fray bonuses
- Alternate melee and shooting to maintain ammo via Rearm
- Use Gut Punch to weaken priority targets
- Emergency Forgeskill activation for immunity during overwhelming damage
Advanced Positioning Tips
Optimal Combat Distance:
- Melee range for maximum damage and reduction bonuses
- Shotgun effective range for weapon synergy
- Forgestorm radius to maximize kill chaining
Enemy Priority System:
- High-damage dealers – weaken with Gut Punch first
- Crowd controllers – freeze with Hoarcleave
- Grouped enemies – maximize Forgestorm chain kills
Health Management Mastery
The Regeneration Cycle:
- Take damage to build Resolute stacks via The Thrill
- Melee attack to gain Overshield from The Best Defense
- Monitor health for Brimming Vigor and Battleborn bonuses
- Strategic shield breaks to trigger Bloodlust when beneficial
Leveling and Progression Tips
Early Game Survival (Levels 1-15)
Priority focus: Establish your basic melee effectiveness
- Invest in damage first (Discombobulate, Tritanium Knuckles)
- Add survivability second (The Best Defense)
- Practice close-range combat fundamentals
Mid Game Transition (Levels 16-35)
Power spike management: Your build really comes online here
- Gut Punch transforms your combat effectiveness
- Into The Fray makes you nearly invincible up close
- Start experimenting with Action Skill timing
Late Game Optimization (Levels 36-50)
Fine-tuning phase: Perfect your playstyle
- Health scaling becomes incredibly powerful
- Master the Forgestorm chain kill system
- Experiment with different weapon combinations
Troubleshooting Common Issues
“I’m Taking Too Much Damage”
Solutions:
- Verify Into The Fray is maxed and you’re staying close
- Check that Gut Punch is proccing on priority targets
- Consider better shield or Repkit options
- Practice Forged In Steel timing for emergencies
“My Damage Feels Low”
Optimization steps:
- Ensure you’re at full health for Brimming Vigor bonus
- Verify close-range positioning for Into The Fray
- Check weapon elemental matching against enemy types
- Consider respeccing if you’ve misallocated points
“Action Skill Management Problems”
Improvement strategies:
- Save Onslaught for enemy-dense areas
- Focus on chaining kills within Forgestorm radius
- Use Hoarcleave strategically rather than immediately
- Practice immunity timing with Forged In Steel
Build Variations and Adaptations
More Survival-Focused Variant
Adjustments:
- Max The Thrill (3/3) instead of Battleborn
- Invest more heavily in Scar Tissue
- Prioritize health-focused Class Mods and Enhancements
Gun-Hybrid Emphasis
Modifications:
- Max Battleborn (5/5) for full gun damage scaling
- Focus on Bear Arms specialization earlier
- Choose gun damage Enhancements over pure survivability
Status Effect Specialist
Optimizations:
- Prioritize weapons with multiple elemental effects
- Max Wield the Storm early
- Focus on status effect duration Enhancements
Conclusion
The Onslaught build represents Borderlands 4’s most aggressive and rewarding playstyle. By embracing danger and positioning yourself in the thick of combat, you become an unstoppable force that grows stronger under pressure.
Key Success Factors:
- Positioning mastery – staying close maximizes all your bonuses
- Health management – understanding when full health matters most
- Action Skill timing – using Onslaught and Forgeskills strategically
- Weapon synergy – choosing tools that complement melee combat
This build excels in both solo and cooperative play, offering incredible versatility while maintaining its core identity as an unstoppable melee tank. Whether you’re tackling story missions or taking on challenging boss encounters, the Onslaught build ensures you’ll punch your way through anything Kairos throws at you.
Related Guides:
- Complete Character Guide for all Vault Hunter options
- Elemental Damage Guide for weapon optimization
- Difficulty Settings Guide for scaling challenges
Official Game Links: