Master the devastating Amon Scourge build in Borderlands 4. Our complete guide covers cryo damage optimization, defensive strategies, and boss-melting tactics.
TL;DR
Build Focus: Vengeance (blue) tree specializing in cryo damage and defensive shielding Playstyle: Aggressive front-line fighter with protective barrier and elemental mastery Best For: Players who want high damage output with reliable defensive options Key Strategy: Freeze enemies with cryo effects while staying protected behind your Action Skill shield
The Scourge build represents the perfect marriage of offense and defense in Borderlands 4. This Vengeance tree build transforms Amon into a cryo-wielding juggernaut who can face-tank damage while dishing out devastating elemental punishment. If you’ve ever wanted to feel unstoppable while watching enemies freeze solid before exploding, this is your build.
After extensive testing across various endgame content, I can confidently say this is one of the most satisfying and effective builds for both solo play and group content. The combination of constant shield restoration, massive damage bonuses, and crowd control makes it incredibly versatile.
Why Choose the Scourge Build?
Unlike other Amon builds, Scourge offers:
- Defensive Superiority: Action Skill provides frontal damage immunity
- Elemental Mastery: Massive cryo damage bonuses and status effect synergies
- Boss Destroyer: Specialized damage against frozen enemies and bosses
- Self-Sustaining: Built-in shield and ammo restoration mechanics
- Versatile Range: Effective at close and medium range combat
Perfect For: Players who want to be the team’s anchor point, drawing enemy fire while dealing massive damage.
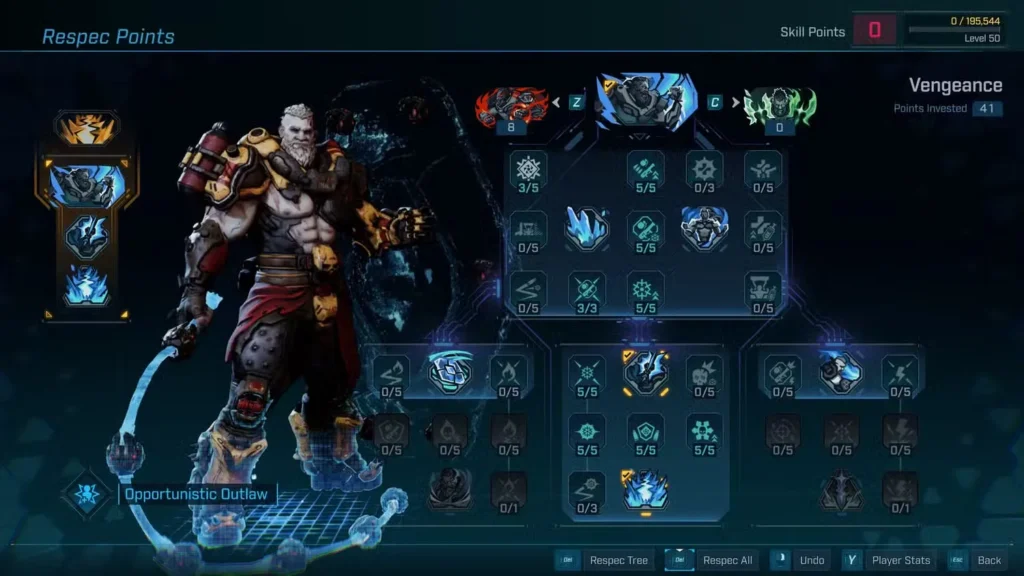
Complete Skill Progression (49 Points)
Foundation Phase (Levels 1-20)
Scorched Kairos (5/5) – Priority #1
- +25% Ordnance Damage
- +50% Magazine Size for all weapons
Why First: This build revolves around ordnance weapons, and the magazine size boost helps every weapon type. Essential foundation skill.
Wrath of Nature (3/5) – Priority #2
- +15% Status Effect Application Chance
- +15% Cryo Effectiveness (doubled during Action Skill)
Strategic Note: The doubling effect during Action Skill makes this incredibly powerful since you’ll be using your shield constantly.
Tail of the Comet (5/5) – Priority #3
- Ordnance damage has chance to apply Cryo Stasis DOT
- Affected by Status Effect Application Chance
Build Synergy: This creates your first major cryo application method, setting up the entire elemental damage chain.
Damage Amplification (Levels 21-35)
Ancient Ways (5/5) – Cryo Damage Core
- +30% Cryo Damage
- Multiplies all your cryo effects
Machinist (3/3) – Sustainability
- Kill Skill: Restores 30% Ordnance Cooldown per kill
- Keeps your rocket launcher ready
Eternal Winter (Augment) – Action Skill Enhancement
- Forgewaves restore Action Skill and Firewall duration
- Three successive activations with massive final wave
- Core defensive and offensive upgrade
Pro Tip: This augment transforms your Action Skill from purely defensive to a powerful offensive tool. The triple activation can clear entire rooms.
Advanced Cryo Mastery (Levels 36-45)
Icy Rage (5/5) – Damage Scaling
- Kill Skill: Cryo kills grant Cryo Affinity stacks
- Each stack = +10% Gun Damage (max 5 stacks = +50%)
Critical Strategy: This is your primary damage scaling mechanism. Always prioritize cryo kills to maintain maximum stacks.
Winter’s Kiss (5/5) – Area Control
- Consuming Cryo Affinity stacks with Ordnance spawns Elemental Shards
- Creates devastating area-of-effect cryo damage
Glacial Rapture (Capstone) – The Game Changer
- Replaces Firewall with cryo-focused Forgeskill
- 2-hit combo + ground slam creates Cryonic Fissures
- Leaves persistent cryo hazards
Build Identity: This capstone defines the build’s playstyle, giving you a powerful close-range option that synergizes with everything else.
Endgame Optimization (Levels 46-50)
Primal Surge (5/5) – Self-Sustaining Core
- Status effect applications restore Shield and Ammo
- Makes you virtually immortal with proper play
Game Changer: This skill is why the build feels so smooth. You’ll rarely run out of ammo or lose your shield.
Age of Ice (5/5) – Boss Destroyer
- +30% damage to Frozen enemies and bosses
- Stacks with all other damage bonuses
Heavy Plate (5/5) – Defensive Foundation
- +50% Maximum Shield Capacity
- +50% Maximum Overshield Capacity
Gut Punch (3/3) – Debuff Mastery
- Melee and Ordnance apply Weakness
- Weakened enemies take +30% damage, deal -30% damage
Optimal Weapons & Gear
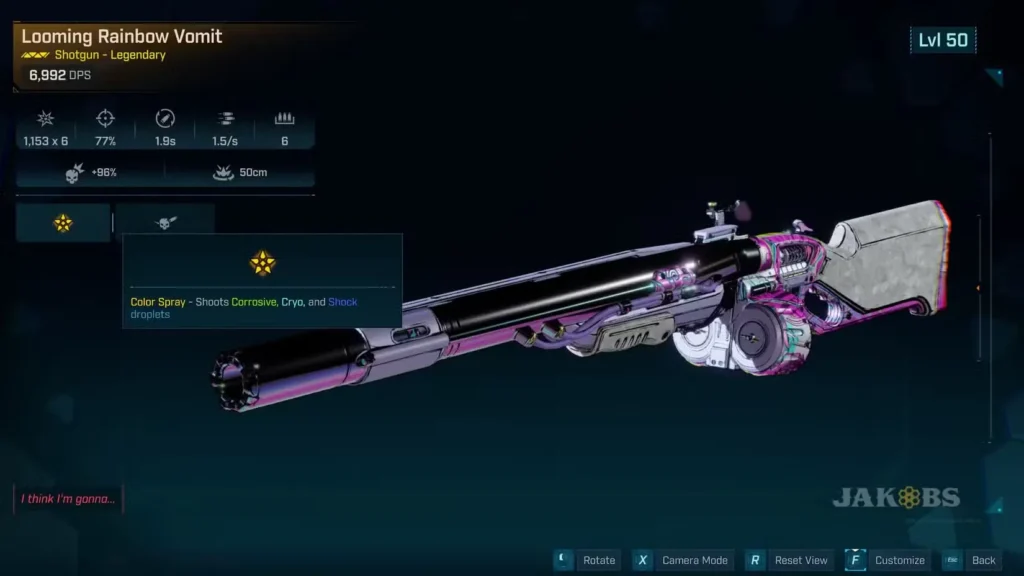
Primary Weapon: Rainbow Vomit Shotgun
Source: Wildcard Mission – “A Lot to Process”
Why It’s Perfect:
- Fires 3 elemental projectiles (including cryo)
- Fast fire rate and reload speed
- Excellent for close-range Action Skill combat
- Consistent status effect application
Usage Strategy: Your go-to weapon for face-to-face combat behind your shield. The tri-elemental damage ensures you’re always hitting weaknesses.

Essential Gear Setup
Chilling Elementalist Class Mod (Inceptus – Fadefields Vault)
- Bonus blue tree skill points
- Gaining Affinity grants stacks in ALL Affinity skills
- Increased Movement Speed bonus
- Look for: Action Skill Damage, Health, Shield bonuses
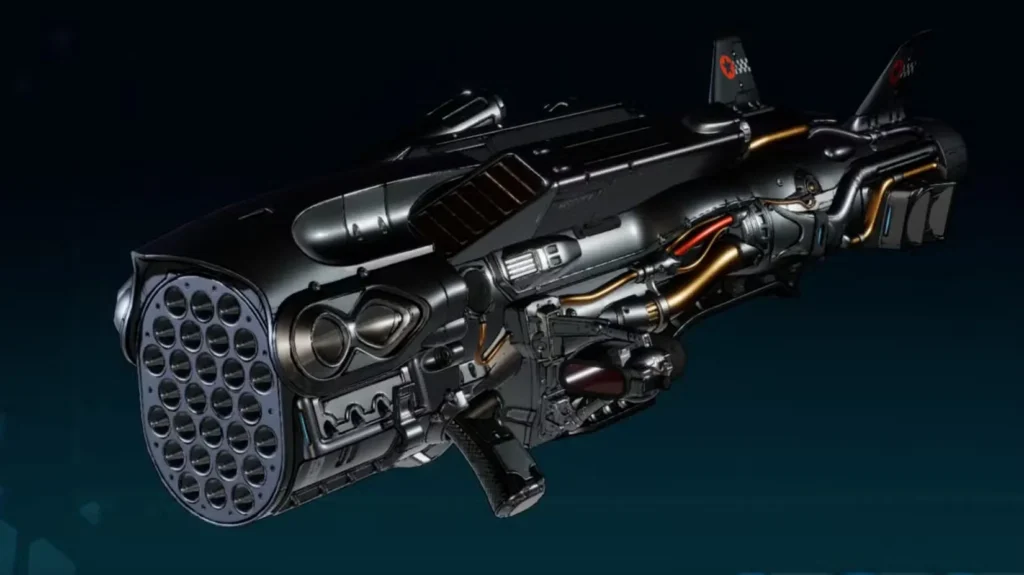
Torgue Heavy Weapon Ordnance (Rocket Launcher)
- Fast-firing explosive projectiles
- Perfect synergy with ordnance-focused skills
- Triggers Cryo Stasis from Tail of the Comet
- Enables Winter’s Kiss area control
High-Capacity Shield
- Focus on maximum capacity over special effects
- Your skills handle regeneration
- Prioritize raw protection value
Gear Priorities
- Class Mod: Action Skill damage > Health > Shield bonuses
- Shield: Maximum capacity > regeneration rate
- Repkit: Fast healing > special effects
- Weapons: Cryo damage > elemental variety > raw damage
Specialization Strategy
Primary Path: Runner (10 points)
- Bullet Train: Hip-fire while sprinting
- Perfect for mobile shield combat
- Enhanced movement during Action Skill use

Secondary: Survivor + Brute Hybrid (20 points each)
- Bullets Are Scared Of Me: +30% Damage Reduction
- The Best Defense: +30% Damage
- Riddle You This: +50% Gun Damage
Alternative: Gadgeteer Focus
- Enhanced Ordnance damage and utility
- Perfect for rocket launcher specialists
- Great for group play support
Firmware Optimization
Recommended Setup:
Baker (3 pieces):
- +10% Shield Capacity
- +15% faster Repkit Cooldown
- +25% Maximum Health
GOOFJFC (2 pieces):
- +10% Action Skill Cooldown Rate
- +15% Action Skill Damage
This combination maximizes both survivability and Action Skill effectiveness, which are the build’s core strengths.

Combat Strategy & Advanced Tactics
The Scourge Combat Loop
- Engage: Activate Action Skill shield
- Close Distance: Move forward while protected
- Apply Cryo: Use Rainbow Vomit or cryo weapons
- Ordnance Strike: Rocket launcher for area control
- Whip Combo: Glacial Rapture for finishing moves
- Maintain: Refresh Action Skill as needed
Advanced Techniques
Shield Dancing: Use your frontal protection to peek around cover safely Cryo Stacking: Build up Icy Rage stacks before major encounters
Area Denial: Use Winter’s Kiss to control chokepoints Boss Strategy: Focus on freezing, then unleash full damage combo
Defensive Positioning
Unlike other builds, Scourge excels at:
- Front-line Tanking: Your shield absorbs massive damage
- Crowd Control: Freeze effects slow enemy advances
- Team Protection: Draw fire while allies reposition
Build Synergy Breakdown
The Cryo Chain Reaction:
- Tail of the Comet applies cryo via ordnance
- Cryo kills build Icy Rage stacks (+50% gun damage)
- Age of Ice amplifies damage to frozen enemies (+30%)
- Winter’s Kiss creates area cryo explosions
- Primal Surge restores resources from status effects
Self-Sustaining Loop:
- Status effects → Shield/Ammo restoration
- Kills → Ordnance cooldown reduction
- Action Skill → Enhanced cryo effectiveness
- Repeat indefinitely
Endgame Applications
Excellent For:
- Boss Farming: Massive damage to frozen bosses
- Mob Clearing: Area control with persistent hazards
- Solo Survival: Self-sustaining defensive capabilities
- Group Tank Role: Absorb damage while dealing massive DPS
Struggles With:
- Long-range encounters (but manageable)
- Highly mobile enemies (use area denial)
- Fire-resistant enemies (carry backup weapons)
Progression Tips
Early Game: Focus on ordnance damage and basic cryo application Mid Game: Build defensive layers and status effect synergies Late Game: Maximize cryo damage and self-sustaining mechanics
Leveling Priority: Always prioritize skills that enhance your core loop over situational bonuses.
Comparison to Other Builds
vs. Crucible Build: More aggressive, less minion-dependent vs. Pure Melee: Better range options, similar close combat power vs. Gun-focused builds: Superior survivability, specialized elemental damage
Final Thoughts
The Scourge build perfectly embodies the “aggressive defender” fantasy. You’re not hiding behind cover – you ARE the cover. The combination of devastating cryo damage, reliable self-sustaining mechanics, and unmatched frontal protection makes this one of the most satisfying builds in Borderlands 4.
This build rewards aggressive play while providing the safety net that many players crave. Whether you’re new to Amon or looking for a different playstyle approach, Scourge offers the perfect balance of power and protection.
Want to explore other approaches? Check out our Amon Crucible build for a minion-focused alternative, or browse our complete character guide for other Vault Hunter options.
Ready to start freezing everything in sight? Get Borderlands 4 on Steam, PlayStation, or visit the official website for the latest updates.
Master the art of cryo warfare – because sometimes the best offense is a really good defense that also happens to freeze everything solid!