To dominate the Borderlands 4 endgame, you need more than just Legendary loot—you need optimized Legendary loot. We’ve spent 80+ hours testing every top-tier SMG to determine their real-world DPS, optimal anointments, and the exact Vault Hunter builds that push them into the S-Tier. This is the definitive guide to max performance and the fastest farming routes.
I’ve spent countless hours farming these beauties, and let me tell you—the grind is worth it. Whether you’re building around elemental damage, looking for infinite ammo exploits, or just want something that makes enemies explode, this guide covers the eight Legendary SMGs you absolutely need to know about.
Why SMGs Dominate in Borderlands 4
Before we dive into specific weapons, let’s talk about why SMGs deserve a spot in your loadout. Unlike their heavier counterparts, SMGs strike that perfect balance between mobility and firepower. You’re not standing still like a turret—you’re dancing around enemies, chaining crits, and reloading faster than most vault hunters can blink.
The real magic happens when you match the right SMG with your character’s build. Stack elemental bonuses? Pair it with Hellfire. Running a shield-focused build? Ohm I Got just became your new religion. The versatility is unmatched, and that’s what makes hunting these Legendaries so addicting.
Quick SMG advantages:
- High fire rate means more chances to proc special effects
- Lightweight design keeps your movement speed maxed
- Generous magazine sizes minimize downtime between reloads
- Elemental synergy that pairs beautifully with skill tree bonuses
1. Ohm I Got – The Ghostbusters Special
Farm Location: Bramblesong (Boss) at Bittervein, Abandoned Auger Mine, Stoneblood Forest, Terminus Range

Legendary Perk – Energy Transfer:
When your Energy Shield is active, you get a massive +50% damage boost by consuming shield energy instead of ammo. If you’ve got an Overshield active too? Your Energy Shield won’t even deplete. Yeah, it’s as broken as it sounds.
Look, I’m not saying this gun is a literal Proton Pack… but it’s a literal Proton Pack. The continuous Shock beam absolutely melts shielded enemies, and if you’re running any kind of shield-focused build, this weapon essentially gives you infinite ammo with a 50% damage buff.
Pro tip: Pair this with Legendary Shields that boost shield capacity and recharge rate. The longer you keep that shield up, the longer you’re essentially firing for free. Also works incredibly well with Shock damage bonuses from your skill tree.
For a complete breakdown of this weapon’s hidden mechanics, check out our dedicated Ohm I Got farming guide.
2. Luty Madlad – The Overheating Oddball
Farm Location: Mimicron (Boss) at Tipping Point Order Bunker, Idolator’s Noose, Fadefields
Legendary Perk – Homemade Ingenuity:
Overheats quickly but cools down just as fast
This one’s for the players who enjoy that risk-reward gameplay loop. The CoV-Licensed Magazine means unlimited capacity technically, but you’re playing a constant game of heat management. Fire in controlled bursts, let it cool, repeat.
Here’s the thing—while other players are reloading, you’re still dealing damage during those brief cooling windows. It’s weird, it’s quirky, but once you find your rhythm with the Luty Madlad, it becomes surprisingly effective. Not the strongest option on this list, but definitely one of the most unique.
My take: This SMG works best for players who have strong positioning skills. You need to know when to push and when to hold back while it cools. Not beginner-friendly, but satisfying to master.
Understanding weapon manufacturers helps you predict these quirks before you even pull the trigger.
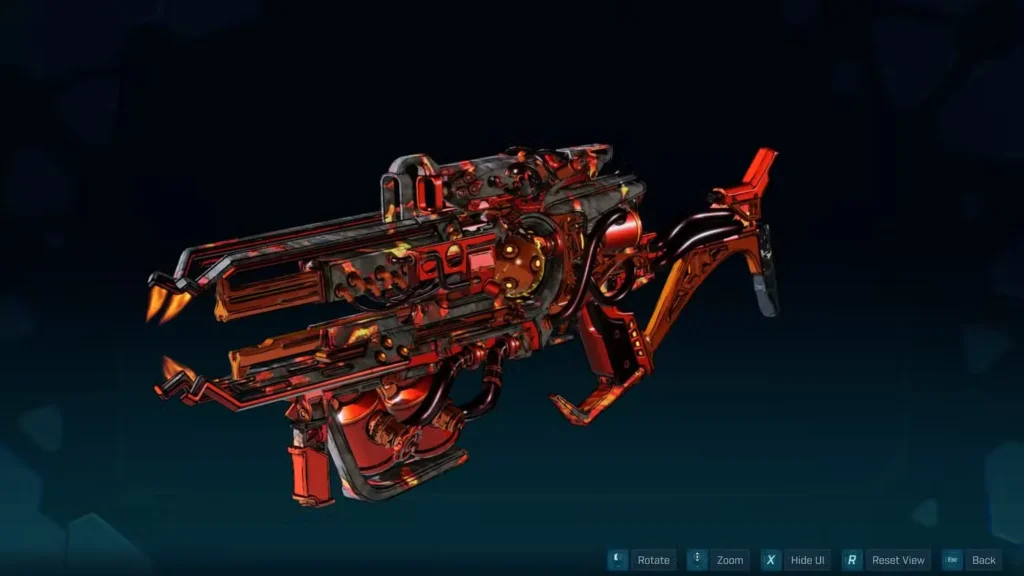
3. Darkbeast – The Explosive Piercer
Farm Location: Voraxis (Quake Thresher) at Timid Kyle’s Neglected Opening, Abandoned Auger Mine, Coastal Bonescape, Fadefields

Legendary Perk – Parley:
Bullets pierce enemies with a 5% chance per hit to trigger an explosion
Don’t let that 5% fool you—with SMG fire rates, you’re proc’ing explosions constantly. The Darkbeast combines armor penetration with random explosive damage, making it incredible for crowd control and shredding through armored enemies.
The catch? It uses a Ripper-Licensed Magazine, so you need to charge it before firing in full auto. Honestly, once you get used to the charge time, it’s barely noticeable, and the payoff is absolutely worth it.
Build synergy: Stack explosive damage bonuses and critical hit chance. Every piercing shot can crit multiple enemies, and when those explosions go off? Chef’s kiss.
Fadefields is full of challenging content—check our complete Fadefields guide to navigate the area efficiently.
4. Hellfire – Burn Baby Burn
Farm Location: Skyspanner Kratch (Boss) in Cuspid Climb, Terminus Range (available after “Shadow of the Mountain” main mission)
Legendary Perk – Burning Desire:
Deals significantly higher Incendiary damage than standard weapons
If you want enemies to feel the heat, Hellfire is your answer. This Ripper manufacturer SMG brings high DPS and excellent ammo capacity, but the real star is that Burning Desire perk. The damage-over-time tick from this weapon is genuinely disgusting in the best way.
I’ve watched flesh enemies melt—and I mean literally melt—under sustained fire from this thing. Combine it with Status Effect Chance and Status Effect Damage bonuses, and you’re looking at one of the most efficient enemy-clearing tools in the game.
Farming note: You’ll need to progress through the main story missions to unlock Skyspanner Kratch, so this isn’t an early-game farm. But trust me, it’s worth the wait.
For deeper insights into fire damage mechanics, read our elemental damage guide.
5. Birt’s Bees – The Homing Swarm
Farm Location: Sludgemaw (Boss) in Idolator’s Noose, Fadefields (requires completing “All Charged Up” Outbounders Faction Mission post-campaign)
Legendary Perk – Hivemind:
Bullets home in on enemies with auto-tracking
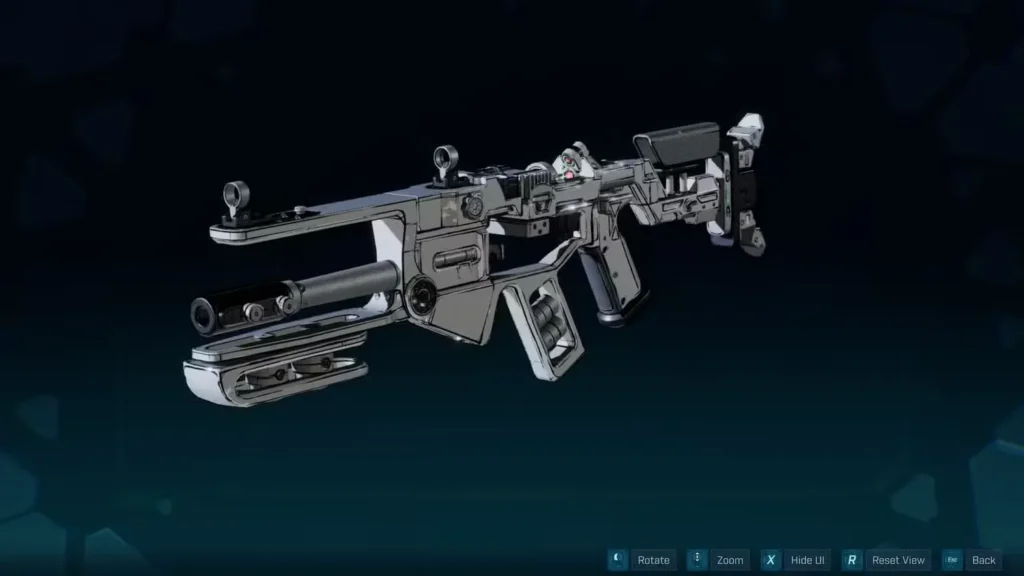
Okay, so Birt’s Bees isn’t going to win any “most powerful weapon” awards, but hear me out—it’s fun. The Vladof kinetic weapon fires slower than most SMGs, but every bullet tracks enemies automatically. You’re basically firing a swarm of angry bees that hunt down targets for you.
With almost 50 rounds per mag, you can just hold down the trigger and watch the chaos unfold. It’s reliable, forgiving for players with less-than-perfect aim, and satisfying in a way that pure DPS stats can’t capture.
Best use case: Great for hitting fast-moving enemies or when you’re under heavy fire and can’t aim precisely. Let the bees do the work while you focus on not dying.
6. Onslaught – The Never-Ending Magazine
Farm Location: Idolator Sol at Fortress Indomita, Idolator’s Noose, Fadefields (available after “Rush the Gate” main mission)
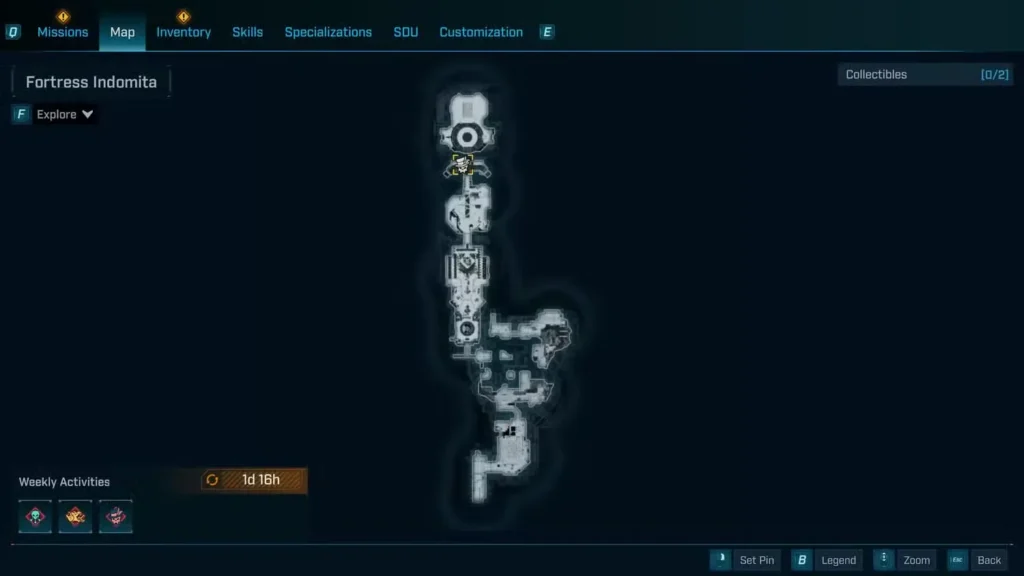
Legendary Perk – Keep It Coming:
30% chance per bullet to deal extra damage and return ammo to the magazine
This is it. This is the SMG that made me fall in love with the weapon class all over again. Onslaught is beautifully simple—no gimmicks, no weird mechanics, just pure sustained damage with a CoV magazine that barely ever needs cooling thanks to that 30% ammo return chance.
In practice, you’re firing indefinitely while randomly dealing bonus damage. The math works out so favorably that you’ll rarely hit overheat, and when you do, it’s brief. This weapon is the definition of “reliable workhorse.”
Why it’s top-tier: Every build benefits from consistent damage output. Whether you’re going shields, explosives, or elemental, Onslaught fits seamlessly and just works.
Since this drops from a main boss, check our all legendary drop locations guide for optimal farming routes.
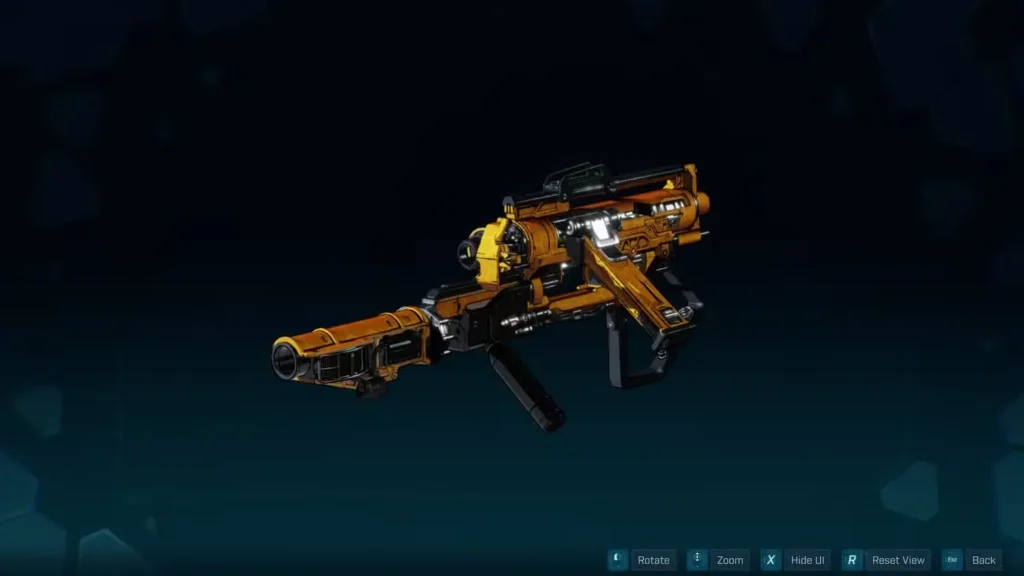
7. Kaoson – The Sticky Bomb Launcher
Farm Location: Primordial Guardian Origo at Arch of Origo, The Low Leys, Terminus Range (requires collecting all 3 Terminus Range Vault Key Fragments)

Legendary Perk – Granted:
Fires sticky explosive rounds that detonate after impact
From Dahl to Vladof, the Kaoson has evolved, and boy did it get better. This Torgue-synergy weapon fires sticky grenades that stick to enemies before detonating. With magazine sizes around 25, you’re planting 25 mini-explosions on targets, and landing critical hits becomes absurdly easy.
The beauty is that you don’t need elemental bonuses—pure explosive and kinetic damage buffs turn this SMG into a portable nuke launcher. Just stick, detonate, repeat. It’s devastatingly effective against single targets and crowds alike.
Farming heads-up: You need all three Vault Key Fragments before accessing this boss, so it’s definitely a mid-to-late game farm. Plan accordingly.
8. Plasma Coil – The Elemental Hybrid
Farm Location: The Timekeeper in Upper Dominion, Terminus District, Dominion (available after “The Timekeeper’s Order” main mission)

Legendary Perk – Superheated:
Switches between Shock and Radiation elements with burst-fire mode
Saving arguably the best for last, the Plasma Coil is a returning Legendary that combines two incredible elements into one weapon. The burst-fire mode helps with accuracy, and the rapid reload keeps you in the fight constantly.
The dual-element nature makes this SMG versatile against any enemy type—shields get shredded by Shock while Radiation handles armor. The only downside is the slightly slower bullet travel speed, but honestly? With proper positioning, it’s negligible.
End-game notes: Since you need to beat the main story to farm The Timekeeper, this is your reward for completion. And what a reward it is. If you’re only going to farm one weapon from this list, make it this one.
For more post-campaign content, explore our endgame activities guide.
Building Around Your Legendary SMGs
Now that you know what to farm, let’s talk about how to use these weapons effectively. SMGs shine brightest when your skill specializations complement their strengths:
For elemental SMGs (Hellfire, Plasma Coil, Ohm I Got):
- Prioritize Status Effect Chance and Duration
- Stack elemental damage bonuses for your weapon’s type
- Look for skills that trigger effects on elemental damage
- Consider shield or grenade mods that amplify elemental output
For explosive SMGs (Kaoson, Darkbeast):
- Max out explosive damage bonuses
- Critical hit chance becomes even more valuable
- Area damage skills create devastating chain reactions
- Reload speed matters less—focus on sustained fire bonuses
For infinite-ammo builds (Onslaught, Ohm I Got):
- Shield capacity and recharge for Ohm I Got
- Heat reduction for CoV magazines on Onslaught
- Damage-over-time to maximize sustained fire advantage
- Movement speed to leverage the run-and-gun playstyle
Need help building your Vault Hunter? Check out our character-specific guides for Rafa, Amon, and Vex.
Farming Tips: How to Get These Legendaries Faster
Let’s be real—farming can be tedious. Here’s how to optimize your time:
Difficulty matters: Higher difficulty levels increase Legendary drop rates significantly. If you can handle the challenge, farm on harder settings for noticeably better results. Our difficulty settings guide explains the risk-reward balance.
Save/quit farming: After killing a boss, save and quit to the main menu, then reload. The boss respawns, but you keep your progress. It’s the fastest method for dedicated boss farms. Check our main boss farming guide for efficient routes.
Level up efficiently: If you’re struggling with boss difficulty, consider our fast XP farming methods to reach the level cap faster.
Use Golden Keys: Don’t forget about Golden Keys and SHIFT codes for guaranteed Legendary loot when RNG isn’t cooperating.
Maurice’s Black Market: Check Maurice’s weekly rotation for potential SMG deals—sometimes you can skip the farm entirely.
Final Thoughts: Which SMG Should You Farm First?
If you’re just starting your Legendary hunt, I’d recommend this priority order:
- Onslaught – Universally useful, fits any build
- Hellfire – Accessible farm with massive payoff for elemental builds
- Plasma Coil – End-game powerhouse worth the main story completion
- Ohm I Got – Game-changing for shield builds
- Kaoson – Requires Vault Key fragments but dominates explosive builds
The others are absolutely worth collecting, but these five will carry you through the toughest content Borderlands 4 throws at you.
SMGs might not have the raw damage of sniper rifles or the crowd control of legendary shotguns, but what they bring to the table is consistency, mobility, and sheer fun factor. There’s something deeply satisfying about maintaining pressure on enemies while dancing through combat, and these Legendary SMGs take that experience to the next level.
Now get out there and start farming, Vault Hunter. Kairos isn’t going to loot itself. And if you’re looking for even more ways to optimize your loadout, don’t miss our best legendary shields guide to complete your perfect build.
Official Borderlands 4 Resources
- Official Game Page: borderlands.2k.com/borderlands-4
- Steam Store: Borderlands 4 on Steam
- PlayStation Store: Borderlands 4 on PlayStation
What’s your favorite Legendary SMG so far? Drop a comment and let me know which one you’re grinding for next!