Master all 18 Firmware sets in Borderlands 4! Complete guide to bonuses, transfer mechanics, and optimal build combinations for maximum power.
Understanding Firmware: Borderlands 4’s Game-Changing Endgame System
If you thought legendary weapons were the endgame in Borderlands 4, think again. Firmware represents the deepest layer of build customization in the series, transforming good builds into absolutely broken powerhouses. With over 18 different Firmware sets and escalating bonuses for multiple pieces, this system rewards dedicated players with build synergies that go far beyond anything we’ve seen in previous Borderlands games.
Think of Firmware as Borderlands 4’s answer to Diablo’s set items – passive bonuses that scale dramatically when you commit to collecting multiple pieces of the same type. The difference? These bonuses can fundamentally change how your character plays, not just make them stronger.
What Makes Firmware Special
Unlike weapon modifications or traditional gear stats, Firmware creates build-defining synergies:
Equipment Exclusivity
- Weapons: Cannot equip Firmware
- Compatible Gear: Ordnance, Rep-Kits, Shields, Class Mods, and Enhancements only
- Set Bonuses: 1, 2, and 3-piece escalating benefits
- Transfer System: Move Firmware between compatible equipment types
Why This Matters for Build Diversity
The equipment limitation means every Firmware build requires strategic choices. You can’t just slap Firmware on weapons and call it a day – you need to optimize your entire gear loadout around the bonuses you want to achieve.
Complete Firmware Sets Breakdown
Combat-Focused Sets
Action Fist (Melee + Action Skill Synergy)
- 1 Piece: +15% Melee Damage
- 2 Pieces: +10% Action Skill Damage
- 3 Pieces: Melee kills boost Action Skill Damage by 25% for 8 seconds
- Best For: Amon Onslaught builds and hybrid melee/action skill characters
- Build Strategy: Perfect for characters who can weave melee attacks into their rotation
Airstrike (Explosive Specialist)
- 1 Piece: +20% Splash Radius
- 2 Pieces: +20% Splash Damage
- 3 Pieces: Kills trigger missile strikes on nearby enemies
- Best For: Ordnance weapon builds and crowd control specialists
- Build Strategy: Transforms any build into an area denial powerhouse
God Killer (Badass Hunter)
- 1 Piece: +10% Damage to Badass Enemies
- 2 Pieces: -10% Damage from Badass Enemies
- 3 Pieces: Killing Badass enemies grants +20% Damage for 60 seconds
- Best For: Boss farming and Ultimate Vault Hunter progression
- Build Strategy: Essential for endgame content where Badass enemies are common
Weapon Enhancement Sets
Atlas Infinum (Atlas Weapon Mastery)
- 1 Piece: +5% Fire Rate with Atlas Target Lock active
- 2 Pieces: +10% Damage for Atlas-licensed weapons
- 3 Pieces: Infinite Atlas Target Locks (until weapon swap)
- Best For: Atlas weapon specialists and precision builds
- Build Strategy: Requires committing to Atlas weapons but offers incredible target tracking
Bullets to Spare (Magazine Synergy)
- 1 Piece: +5% Gun Fire Rate
- 2 Pieces: +20% Magazine Size
- 3 Pieces: Fire Rate increases by 50% of Magazine Size percentage
- Best For: High-capacity weapons and sustained DPS builds
- Build Strategy: Works best with naturally large magazines – the math gets crazy
Daed-dy O’ (Mode Switching Mastery)
- 1 Piece: +25% Gun Mode Switch Speed
- 2 Pieces: +15% Magazine Size
- 3 Pieces: Mode switches grant 20% Damage and Fire Rate for 5 seconds
- Best For: Adaptive weapons with multiple firing modes
- Build Strategy: Rewards active weapon mode management
High Caliber (Projectile Enhancement)
- 1 Piece: +25% Projectile Speed
- 2 Pieces: +10% Gun Damage
- 3 Pieces: Bullets pierce enemies
- Best For: Sniper builds and crowd control situations
- Build Strategy: Piercing bullets can hit multiple enemies in tight formations
Precision and Critical Sets
Deadeye (Critical Hit Specialist)
- 1 Piece: +30% Gun Accuracy
- 2 Pieces: +25% Critical Damage
- 3 Pieces: Critical hits grant stacking 15% Critical Damage (max 5 stacks, 10 seconds)
- Best For: Precision builds and headshot specialists
- Build Strategy: Can achieve insane critical damage with proper aim and positioning
Trickshot (Critical Utility)
- 1 Piece: +5% Reload Speed
- 2 Pieces: +10% Critical Damage
- 3 Pieces: 50% chance for critical hits to refill 1 ammo
- Best For: Ammo-efficient builds and sustained combat
- Build Strategy: Essentially infinite ammo with good critical hit consistency
Manufacturer-Specific Sets
Jacked (Hyperion Mastery)
- 1 Piece: +20% Zoom Speed
- 2 Pieces: +25% Hyperion Gun Shield Capacity
- 3 Pieces: 30% chance for Hyperion shields to ricochet projectiles
- Best For: Hyperion weapon builds and defensive playstyles
- Build Strategy: Turns Hyperion weapons into defensive powerhouses
Utility and Support Sets
Baker (Defensive Specialist)
- 1 Piece: +10% Shield Capacity
- 2 Pieces: -15% RepKit Cooldown
- 3 Pieces: +25% Maximum Health
- Best For: Tank builds and survival-focused characters
- Build Strategy: Perfect foundation for any defensive build
GOOJFC (Action Skill Focus)
- 1 Piece: +10% Action Skill Cooldown Rate
- 2 Pieces: +15% Action Skill Damage
- 3 Pieces: Additional +20% Action Skill Cooldown Rate
- Best For: Action skill-dependent builds like Amon Crucible
- Build Strategy: Enables near-constant action skill usage
Gadget Ahoy (Ordnance Specialist)
- 1 Piece: -15% Ordnance Cooldown
- 2 Pieces: +20% Ordnance Damage
- 3 Pieces: Ordnance kills grant +20% Damage for 15 seconds
- Best For: Heavy weapon builds and explosive specialists
- Build Strategy: Makes Ordnance weapons a core part of your damage rotation
Lifeblood (Healing Specialist)
- 1 Piece: +10% RepKit Healing
- 2 Pieces: +5% Lifesteal
- 3 Pieces: Kills regenerate 10% Maximum Health
- Best For: Sustain builds and close-range combat
- Build Strategy: Enables aggressive playstyles through constant healing
Advanced Mechanics Sets
Oscar Mike (Reload Mastery)
- 1 Piece: +10% Reload Speed
- 2 Pieces: Damage increases up to +20% based on magazine emptiness
- 3 Pieces: +30% Fire Rate for 4 seconds after reloading
- Best For: Active reload management builds
- Build Strategy: Rewards tactical reloading and magazine management
Real Big Fist (Melee Powerhouse)
- 1 Piece: +15% Melee Damage
- 2 Pieces: Additional +25% Melee Damage (40% total)
- 3 Pieces: Melee kills trigger Nova explosions for 200% Melee Damage
- Best For: Pure melee builds and crowd control
- Build Strategy: Turns melee kills into AoE devastation
Risky Boots (Low Health Specialist)
- 1 Piece: -30% Damage Taken when below 35% health
- 2 Pieces: +35% Movement Speed when below 35% health
- 3 Pieces: +100% Damage and +5% Lifesteal when below 35% health
- Best For: Risk/reward builds and experienced players
- Build Strategy: Requires careful health management but offers incredible power
Rubberband Man (Scaling Specialist)
- 1 Piece: -5% Damage Reduction
- 2 Pieces: +5% Lifesteal
- 3 Pieces: All bonuses from this Firmware are doubled
- Best For: Defensive builds focused on sustain
- Build Strategy: The doubling effect makes this incredibly powerful for tank builds
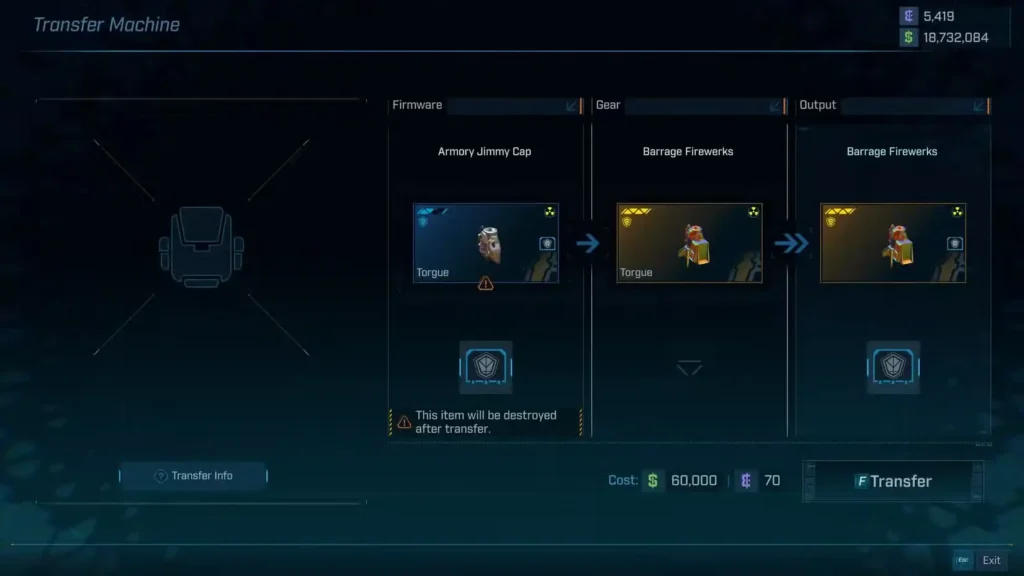
Zane’s Transfer Machine: Firmware Management
Understanding how to move Firmware between gear pieces is crucial for build optimization:
Transfer Mechanics
- Location: Any Faction Town in Kairos (post-campaign)
- Process: Place Firmware donor in one slot, target gear in another
- Cost: The donor item is completely destroyed
- Limitation: Can only transfer between compatible equipment types
Compatible Equipment Types
- Ordnance: Heavy weapons and grenades
- Rep-Kits: Healing devices
- Shields: All shield types
- Class Mods: Character-specific modifications
- Enhancements: General stat boosters
Critical Rule: You cannot transfer Firmware between different equipment categories. Ordnance Firmware stays on Ordnance, Shield Firmware stays on Shields, etc.
Strategic Build Planning with Firmware
Single-Piece Builds (Flexibility Focus)
Strategy: Use different Firmware sets for varied bonuses Benefits: Maximum flexibility and situational adaptation Drawbacks: Missing powerful 3-piece synergies Best For: Experimental builds and general play
Two-Piece Builds (Balanced Approach)
Strategy: Focus on strong 2-piece bonuses with flexibility Benefits: Solid bonuses while maintaining some variety Drawbacks: Still missing ultimate 3-piece effects Best For: Most players and balanced builds
Three-Piece Builds (Maximum Power)
Strategy: Commit fully to one Firmware set for maximum bonuses Benefits: Game-changing 3-piece effects Drawbacks: Limited flexibility and high gear requirements Best For: Specialized builds and endgame optimization
Firmware Farming and Acquisition
Where Firmware Drops
- Level Requirement: 25+ for Firmware-enabled gear
- Drop Sources: Any high-level equipment can roll with Firmware
- Best Farming: Legendary Class Mod farming and endgame activities
- Quality Scaling: Higher-level content offers better Firmware gear
Storage Strategy
Use your bank system to store Firmware pieces you’re not currently using. Building a Firmware collection takes time, and you’ll want options for different builds.
Optimal Firmware Combinations by Playstyle
Aggressive DPS Builds
Primary: Deadeye (3-piece for stacking critical damage) Alternative: Bullets to Spare (3-piece for sustained fire) Support Pieces: High Caliber for piercing or Atlas Infinum for target locks
Tank/Survival Builds
Primary: Baker (3-piece for maximum survivability) Alternative: Risky Boots (for experienced players) Support Pieces: Lifeblood for additional sustain
Elemental Specialists
Primary: Varies by character Focus: Rafa builds benefit from critical-focused Firmware Strategy: Match Firmware to elemental build focus
Hybrid Action Skill Builds
Primary: GOOJFC (3-piece for constant action skills) Alternative: Action Fist (for melee/action skill synergy) Strategy: Build around action skill cooldown and damage
Advanced Firmware Strategies
The Meta Progression Approach
- Early Endgame: Focus on single strong pieces
- Mid Endgame: Build toward 2-piece bonuses
- Late Endgame: Commit to 3-piece specialist builds
- Master Level: Multiple complete sets for different situations
Cross-Character Planning
Since Firmware transfers through shared storage, you can build Firmware collections that benefit multiple characters. Plan acquisitions across your entire account.
Economic Considerations
High-quality Firmware gear is expensive to acquire and transfer. Budget your cash farming around Firmware goals, especially when using Zane’s Transfer Machine frequently.
Integration with Other Systems
Ultimate Vault Hunter Synergy
Many Firmware sets become essential for higher UVH ranks. God Killer, for example, trivializes Badass enemy encounters that become common in endgame content.
Weekly Content Optimization
Maurice’s Black Market can offer Firmware-enabled gear. Plan your weekly purchases around building complete Firmware sets.
Specialization Integration
Firmware bonuses stack with Specialization investments, creating multiplicative rather than additive benefits in many cases.
Looking Forward: Firmware in the Meta
Firmware represents Borderlands 4’s most sophisticated build system, rewarding long-term planning and strategic thinking over simple gear acquisition. As the community discovers optimal combinations and synergies, expect certain Firmware sets to become highly sought after.
The system’s complexity means there’s likely undiscovered synergies waiting to be found, especially when combined with specific weapon manufacturers or character abilities.
Mastering Firmware isn’t just about getting stronger – it’s about understanding the deepest mechanical systems in Borderlands 4 and using them to create builds that feel genuinely unique and powerful.
Ready to start building your Firmware collection? Grab Borderlands 4 on Steam, PlayStation, or check the official website to begin experimenting with these game-changing build modifiers!/isolated-segment.html