The Gentleman’s Shotgun: Why Hot Slugger Stands Out
In a game full of explosive mayhem and over-the-top weapons, the Hot Slugger takes a refreshingly different approach. This Borderlands 4 legendary shotgun embodies everything great about Jakobs design philosophy – precision, power, and that satisfying “one shot, one kill” mentality that makes every trigger pull feel meaningful.
As someone who’s spent countless hours perfecting builds around this weapon, I can tell you the Hot Slugger isn’t just another legendary to collect. It’s a build-defining weapon that rewards skilled players with incredible damage potential, especially when paired with characters who can capitalize on its unique mechanics.
Minor spoiler note: This guide mentions Craven’s Nook, a returning location from Borderlands 3, so consider yourself warned if you’re avoiding any story reveals.
Why Hot Slugger Deserves Your Farming Attention
Before we dive into the farming strategy, let’s talk about what makes this weapon special:
- Single-shot magazine synergizes perfectly with “first shot” damage bonuses
- Stacking damage buff that rewards aggressive playstyles and kill chains
- Jakobs critical mechanics for ricocheting devastation across multiple enemies
- Slug projectile design offers precision at range unlike traditional shotguns
- Satisfying reload animation that actually adds to the weapon’s tactical rhythm
The Hot Slugger becomes available once you’ve completed the “One Fell Swoop” main quest, making it accessible to players who’ve progressed through the mid-game story content.

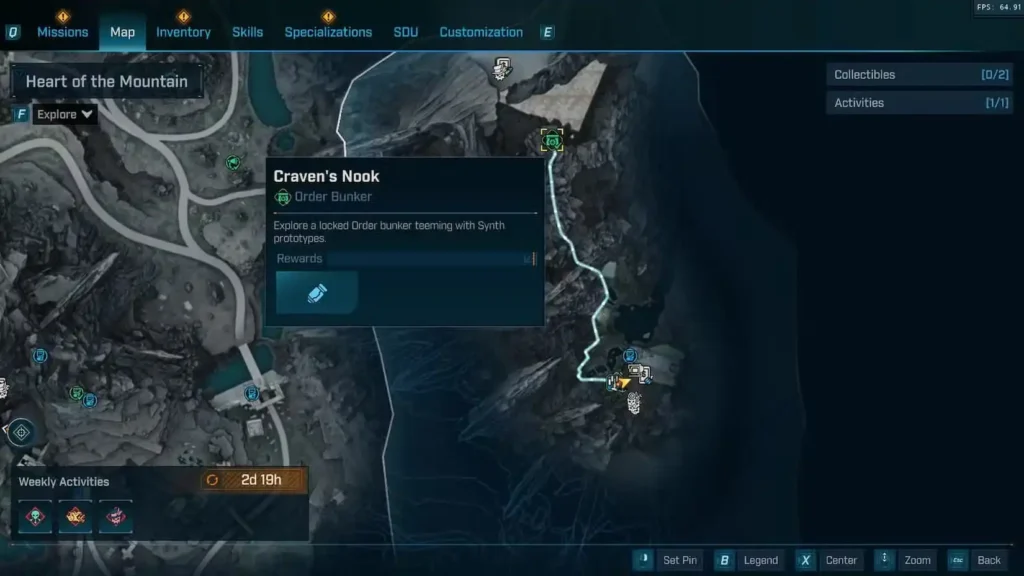
Complete Farming Guide: Reaching Craven’s Nook
Prerequisites and Preparation
Story Requirements:
- Complete “One Fell Swoop” main quest first – this unlocks Locust Canister dispensers across Kairos
- Reach Bones of Sanctuary fast travel point
- Stock up on ammo and gear for the boss fight ahead
Why the One Fell Swoop Requirement Matters: This main quest doesn’t just unlock the farming location – it fundamentally changes how Order Bunkers work throughout the game. Without completing it, you’ll find bio-armored doors completely impenetrable across multiple zones.
Navigation Strategy
Getting to Craven’s Nook:
- Fast travel to Bones of Sanctuary (the most efficient starting point)
- Head north from the fast travel station – it’s a fairly straightforward path
- Look for the distinctive bunker architecture that marks Order facilities
The Bio-Armor Door Puzzle: Here’s where many players get confused. The bunker door is protected by bio-armor that’s immune to all weapons, but the solution is environmental:
- Locate the Locust dispenser positioned on a rock formation
- The dispenser sits below the ledge just west of the bunker entrance
- Grab a Locust Canister and chuck it at the bio-armored door
- Watch the satisfying door dissolution that grants you access
Pro tip: This bio-armor mechanic appears throughout Kairos, so mastering it here saves you confusion later. The dispensers are always positioned logically near their intended targets.
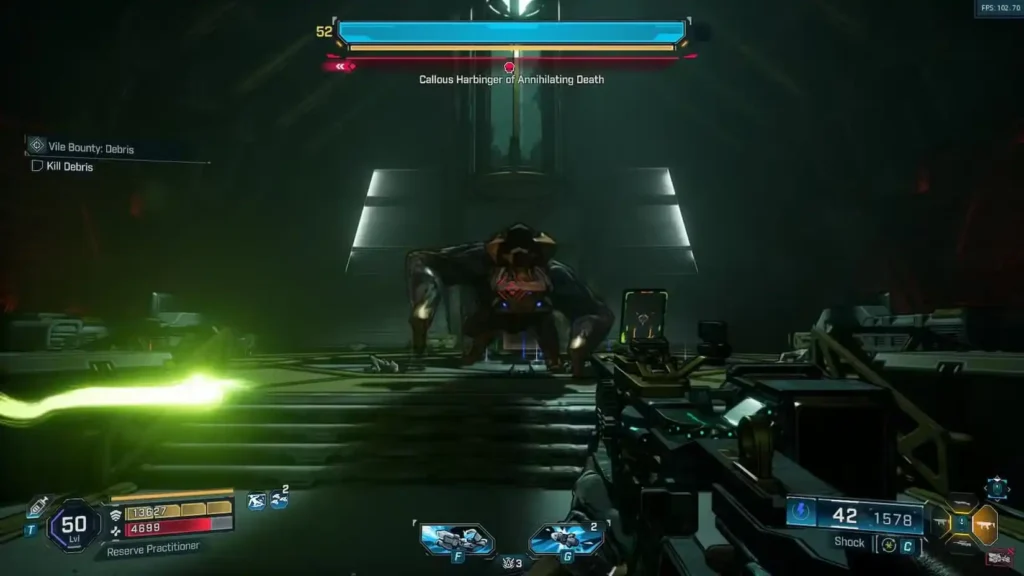
Mastering the Callous Harbinger Boss Fight
Understanding Your Opponent
Callous Harbinger of Annihilating Death (yes, that’s really the full name) represents an enhanced Bulkhead with several unique attack patterns. While it’s not the most mechanically complex boss in Borderlands 4, it demands respect and preparation.
Core Combat Strategy:
- Constant movement is essential – standing still equals death
- Circle-strafe around the arena to avoid the majority of attacks
- Use cover selectively – don’t get trapped, but use brief respites to reload/heal
- Watch for telegraphed attacks that give you windows for concentrated fire
Advanced Boss Tactics
Phase Management: Unlike basic Bulkheads, the Callous Harbinger has escalating aggression phases:
Phase 1 – Standard Assault:
- Basic Bulkhead attack patterns with increased frequency
- Perfect time to learn the arena layout and establish movement patterns
- Focus on consistent damage rather than burst windows
Phase 2 – Enhanced Aggression:
- New attack patterns that catch inexperienced players off-guard
- Increased projectile speed and attack frequency
- Requires more dynamic positioning and better cover usage
Phase 3 – Desperate Measures:
- All attacks become more dangerous and harder to avoid
- Shortest phase but highest risk – don’t get greedy with damage
- Perfect opportunity for high-DPS weapons if you can stay alive
Personal insight: This boss teaches excellent fundamentals for the more challenging encounters later in the game. Don’t rush through it – really learn the movement patterns.
Farming Optimization
Efficient Reset Strategy:
- Use the Encore machine immediately after the fight for instant resets
- Skip all optional enemies during repeat runs – they’re not worth the time investment
- Master the approach route to minimize travel time between attempts
- Consider difficulty settings that optimize drop rates vs clear time

Hot Slugger Mechanics Deep Dive
The Slug Shotgun Concept
The Hot Slugger breaks traditional shotgun conventions by firing single, high-damage projectiles instead of pellet spreads:
Advantages:
- Pinpoint accuracy at ranges where normal shotguns become useless
- No damage falloff from pellet spread – all your damage goes exactly where you aim
- Synergizes with precision-based skills rather than spray-and-pray tactics
Trade-offs:
- Slower projectile speed requires leading targets at medium range
- Requires precise aim – missing means wasting significant DPS
- Single-target focused unless you’re capitalizing on Jakobs ricochet mechanics
The Stacking Damage System
Kill-Based Damage Scaling:
- 30% damage increase per kill lasting 10 seconds
- Stacks up to 3 times for a maximum 90% damage bonus
- Timer refreshes with each kill but doesn’t extend existing stacks
Strategic Implications: This mechanic rewards aggressive, kill-focused playstyles:
- Target weaker enemies first to build stacks before engaging priority targets
- Maintain kill momentum to keep stacks active during extended fights
- Plan engagement sequences to maximize stack uptime
Jakobs Critical Hit Mechanics
Ricochet System:
- Critical hits cause ricochets that seek nearby enemies automatically
- Ricochet damage scales with your critical hit damage bonuses
- Can chain multiple ricochets in dense enemy groups
Optimization Tips:
- Aim for headshots whenever possible to trigger ricochets
- Position yourself strategically to maximize ricochet effectiveness
- Combine with critical damage skills for exponential damage scaling
Build Synergy and Character Integration
Perfect Character Matches
Rafa (Apophis Lance): The Hot Slugger was practically made for Rafa builds:
- Vitriol skill amplifies first-shot damage significantly
- First Impression provides additional first-shot bonuses
- Lance abilities synergize with precision weapons
- Reload speed boosts minimize the single-shot magazine downside
Universal Synergies:
- Any “first shot” damage bonuses multiply the Hot Slugger’s effectiveness
- Critical damage amplification maximizes both direct damage and ricochet potential
- Reload speed improvements reduce the weapon’s main tactical limitation
- Kill skill triggers pair beautifully with the damage stacking mechanic
Advanced Build Integration
Damage Stacking Builds:
- Focus on kill skills that extend or enhance the damage bonus duration
- Prioritize enemy density areas where you can maintain stacks consistently
- Consider elemental damage bonuses that apply to the slug projectile
Precision Sniper Builds:
- Treat it as a close-to-medium range sniper rifle rather than traditional shotgun
- Combine with scope attachments if available for enhanced accuracy
- Pair with movement skills that improve aim stability
Farming Efficiency and Drop Rate Optimization
Maximizing Your Time Investment
Optimal Farming Sessions:
- Plan for 30-45 minute sessions to account for RNG variance
- Track your attempts to understand your personal drop rate patterns
- Take breaks between long sessions to maintain focus and enjoyment
Drop Rate Considerations:
- The Hot Slugger has dedicated drop status from Callous Harbinger
- Higher difficulty modes may improve legendary drop rates
- Consider Mayhem modifiers that boost specific weapon types
Alternative Acquisition Methods
While Craven’s Nook offers the most reliable farming route, keep in mind:
- World drop potential means any legendary source could theoretically drop it
- Golden Keys occasionally grant access to Hot Slugger
- Vendor rotations sometimes feature it, though this requires patience and cash reserves

Why Hot Slugger Defines “Quality Over Quantity”
The Hot Slugger represents everything great about thoughtful weapon design in Borderlands 4. Instead of relying on flashy gimmicks or overwhelming firepower, it rewards skill, precision, and tactical thinking. Every shot matters, every reload is a tactical decision, and every kill builds toward greater power.
For players transitioning from spray-and-pray weapons to more tactical approaches, the Hot Slugger serves as an excellent bridge. It teaches aim discipline, target prioritization, and resource management – skills that transfer beautifully to other precision weapons throughout your journey on Kairos.
Ready to Master Precision Combat?
Once you’ve secured your Hot Slugger and begun integrating it into your build, you’ll discover a whole new dimension of Borderlands 4 combat. The satisfaction of perfectly timed shots, strategic positioning, and kill-chain management creates gameplay moments that feel genuinely earned rather than handed to you.
For players looking to explore more legendary farming opportunities or optimize their approach to boss encounters, our comprehensive guides provide the strategic depth you need to dominate every challenge Kairos can throw at you.
Ready to dive deeper into Borderlands 4’s strategic possibilities? Check out our essential Borderlands 4 beginners guide for advanced tactics that’ll elevate your entire approach to vault hunting.
External Links:
Remember: The Hot Slugger isn’t just a weapon – it’s a philosophy. Master the precision, and you’ll master the wasteland.