Only in Borderlands 4 would you encounter an eccentric “artist” named Wrenching Allen who tasks you with assembling a chair from scrap parts scattered across an Auger mining settlement. The Importance of Being Furnished is one of those delightfully absurd side quests that perfectly captures Borderlands’ bizarre sense of humor—complete with pretentious art critics, questionable design choices, and a decision that lets you either enable or destroy Allen’s “masterpiece.”
This quest becomes available in Belton’s Bore (Terminus Range) after you’ve made contact with the Augers during your campaign progression. Allen doesn’t care about the Order, the Timekeeper, or saving Kairos—he only cares about his art. And apparently, high art in the Borderlands universe involves jury-rigging furniture from junk parts while fending off hostile art critics (who are literally bandits).
This guide covers everything you need to complete The Importance of Being Furnished: finding the assembly instructions hidden in trash cans and laundry machines, locating all five chair pieces scattered across Belton’s Bore, dealing with the Ripper art critics who want to stop you, and making the final choice between selling, destroying, or… well, there’s a secret third option that’s wonderfully dark.
Let’s build some questionable furniture!
Starting The Importance of Being Furnished
Quest Giver: Wrenching Allen
Location: Belton’s Bore, Terminus Range
Prerequisite: Progress far enough in the main story to unlock the Auger population and Belton’s Bore settlement
Recommended Level: Mid-game (scales to your level)
Finding Wrenching Allen
Belton’s Bore is the main Auger settlement in Terminus Range—you’ll visit here during the campaign as part of the main story progression. The settlement is built into mining infrastructure with multiple levels, walkways, and industrial equipment.
Where Allen hangs out:
Look for Wrenching Allen in the central areas of Belton’s Bore. He’s typically near the main gathering spaces where NPCs congregate. You can’t miss him—he’s the one pontificating about art and creative vision while everyone else is just trying to survive.
Character notes: Allen is clearly a parody of pretentious artists who take themselves way too seriously. His dialogue is filled with artistic jargon and philosophical musings about the nature of craftsmanship. It’s hilarious, especially contrasted against the backdrop of a gritty mining settlement filled with bandits and monsters.
Accept his quest and prepare for one of the stranger fetch quests in the game.

Part 1: Finding the Assembly Instructions (3 Locations)
Allen wants to build a chair, but he needs the assembly instructions first. Because apparently even makeshift furniture in the apocalypse comes with an IKEA-style instruction manual.
Your job is to search three specific locations in Belton’s Bore to find the instructions. Allen directs you to each spot, but let’s break down exactly where to go and what to look for.
Location 1: Search Trash (Vending Machine Area)
Where to go: Upper floor near the vending machines
What to search: Trash can on the railing
Step-by-step:
- Head to the area in Belton’s Bore where the vending machines are located (typically near the fast travel station or central hub)
- Look for stairs or ramps leading to the floor above the vending machines
- Once on the upper level, face the weapon vending machine below
- Turn around to face the opposite railing
- Search the trash can sitting on or near this railing
What you’ll find: The first part of the assembly instructions—apparently someone threw away important furniture documentation. In a trash can. On a railing. Makes total sense.
Lore humor: The fact that critical assembly instructions are in a trash can is Peak Borderlands. It’s simultaneously ridiculous and completely fitting for this universe.
Location 2: Search Laundry (Auger HQ Upper Rooms)
Where to go: Upper left section of Auger HQ
What to search: Third laundry machine from the left
Step-by-step:
- Navigate to the Auger HQ building in Belton’s Bore (the main administrative/residential structure)
- Head to the upper level—look for stairs or ladders
- Enter the rooms on the left side of the upper floor
- Look for a row of laundry machines (washer/dryer units)
- Count from the left and open the third laundry machine
- Search inside to find the next instruction piece
Why laundry machines? Someone apparently mixed the assembly instructions in with their dirty clothes. Or maybe they were trying to wash away the stains of poor design choices. Either way, it’s in there now.
Navigation tip: If you’re having trouble finding the upper rooms, look for residential areas or living quarters within the Auger HQ. The laundry facilities are typically in communal living spaces.
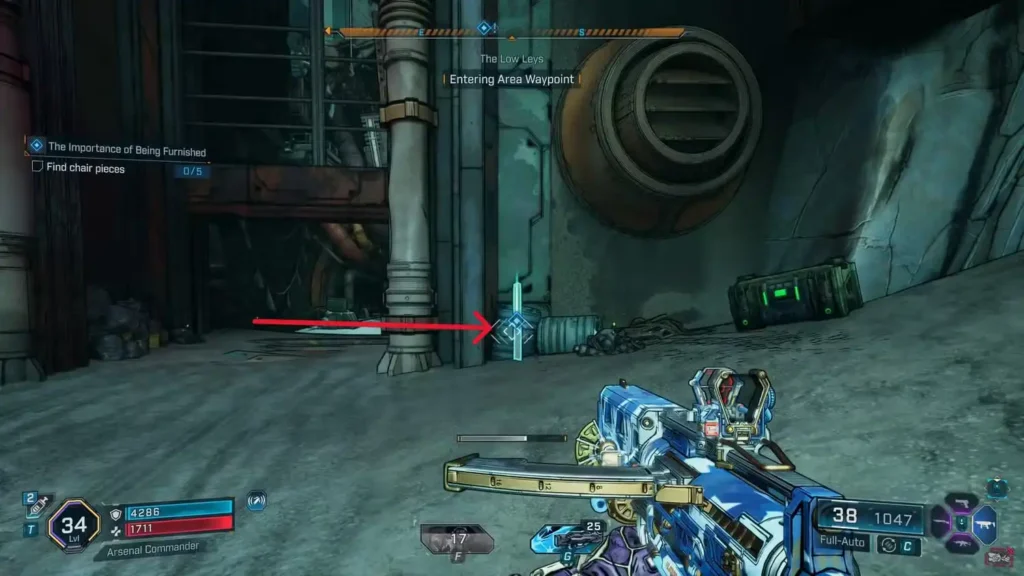
Location 3: Search Grill (Outside Belton’s Bore)
Where to go: Outside the settlement, near the rock wall
What to search: BBQ grill
Step-by-step:
- Exit Belton’s Bore through one of the main gates
- Once outside, look for the rock wall (natural stone cliff face near the settlement exterior)
- Identify the grill on the left side, closest to the rock wall
- Open the grill (it’s interactive like a loot container)
- Search inside for the final instruction piece
Why a grill? Because nothing says “furniture assembly instructions” like storing paper documents next to charcoal and grease. The logic is flawless.
Important event trigger: As soon as you search the grill, you’re about to get interrupted…
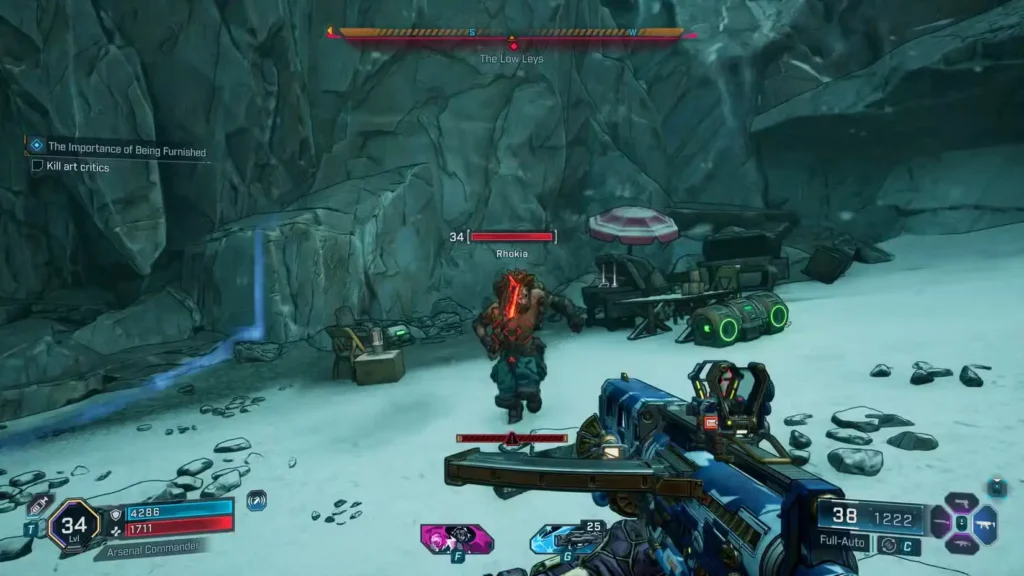
Part 2: Dealing with the Art Critics (Ripper Encounter)
Rhokia and the Critics Spawn
The moment you search the grill, Rhokia makes a dramatic entrance. This Ripper bandit fancies himself an art critic and has some… strong opinions about Allen’s work.
Initial spawn:
- Rhokia (Named Ripper) drops down from a cave above the grill
- Additional Ripper enemies should spawn alongside him
- These are your “art critics”—they critique with bullets
Enemy type: Rippers (typically Flesh + Shield health bars)
Recommended element: Incendiary for flesh, Shock for shields
Bug Fix: If Enemies Don’t Spawn Properly
Here’s where things get weird. There’s a known bug where Rhokia spawns alone without his backup, making it impossible to complete the objective “Kill Art Critics” since you need to defeat multiple enemies.
If Rhokia spawns solo:
- Quit to main menu (don’t just fast travel)
- Reload your save
- Return to the grill location
- Search the grill again to trigger the spawn
- Repeat until 4-5 Ripper enemies spawn (including Rhokia)
Why this happens: It’s likely a spawn trigger bug that doesn’t properly queue up all enemies on the first attempt. The quit/reload method forces the game to re-initialize the encounter properly.
How many enemies total? You need to kill approximately 4-5 Rippers including Rhokia to satisfy the “Kill Art Critics” objective. If you only see Rhokia, keep resetting.
Combat Strategy: Fighting the Art Critics
Once the encounter properly spawns:
Tactics:
- Focus fire on standard Rippers first – They’re easier to kill and reduce incoming damage
- Save Rhokia for last – He has more health and possibly unique attacks
- Use Incendiary weapons – Rippers typically have Flesh health bars
- Stay mobile – Rippers are aggressive melee/close-range fighters
- Use the terrain – The area outside the grill has rocks and cover you can use
Difficulty: Easy to Moderate (standard enemy encounter, nothing special)
Rewards: Standard enemy drops (ammo, cash, maybe some gear). The real reward is continuing the quest.
After clearing all the critics, you can proceed to the main event: collecting chair parts.
Part 3: Finding All Chair Pieces (5 Locations)
Now comes the scavenger hunt. Allen needs five chair pieces scattered across Belton’s Bore. These are marked on your HUD once the objective activates, but the exact locations can be tricky to spot.
Here’s each piece location in detail:
Chair Piece #1: Main Gate Right Wall
Location: Right wall of the main entrance gate
How to find it:
- Stand at the main gate entrance to Belton’s Bore (the primary way in/out of the settlement)
- Face inward (looking into the settlement)
- Look at the right-side wall of the gate structure
- The chair piece is mounted or leaning against this wall
Visual cue: It should be clearly visible once you’re at the correct gate. Look for the glowing/interactive highlight.
Chair Piece #2: Right Side Through Walkway Entrance
Location: To the right after entering through the walkway
How to find it:
- Enter Belton’s Bore through the walkway entrance (may be different from the main gate depending on your approach)
- Immediately turn right after passing through
- The chair piece is in this area, typically against a wall or structure
Landmark: Look for industrial equipment, crates, or mining infrastructure in this entrance area.
Chair Piece #3: Left of Fast Travel Station (West Area)
Location: West side of Belton’s Bore, left of fast travel
How to find it:
- Locate the Fast Travel Station in Belton’s Bore (central hub area)
- From the fast travel point, look to the left (west)
- The chair piece is in the western section of the settlement
- Check around buildings, walkways, or mining equipment in this direction
Navigation tip: The fast travel station is your main landmark here. If you’re oriented at the station, scanning left should reveal the piece’s location marker.
Chair Piece #4: Bottom Floor Shack (Northeast Area)
Location: Northeast ground level, inside a shack
How to find it:
- Navigate to the northeast section of Belton’s Bore
- Look for the bottom/ground floor level (not upper walkways)
- Find a small shack structure in this area
- Enter the shack and look inside for the chair piece
Building description: These shacks are typically small wooden or metal structures—residential or storage buildings. The northeast corner of Belton’s Bore has several, so check the one that highlights with your objective marker.
Chair Piece #5: Top Floor Northeast (Past Trash Location)
Location: Upper floor northeast area, near where you searched trash earlier
How to find it:
- Return to the northeast section of Belton’s Bore
- This time, go to the top floor/upper level
- Look for the stairs you used earlier when searching the trash can for assembly instructions
- The chair piece is past the trash location, continuing along the upper walkway
Reference point: Remember Location 1 (Search Trash)? You’re returning to roughly the same area, but continuing further along the upper level to find this final piece.
Completion: Once you’ve collected all five pieces, return to Wrenching Allen to assemble the “chair.”
Efficient Collection Route
If you want to minimize backtracking, collect the pieces in this order:
- Piece #3 (Fast Travel Station area – you’re probably near here anyway)
- Piece #1 (Main gate – nearby)
- Piece #2 (Walkway entrance – nearby)
- Piece #4 (Northeast bottom floor)
- Piece #5 (Northeast top floor – same area as #4, just climb up)
This route groups geographically close pieces together and saves time.
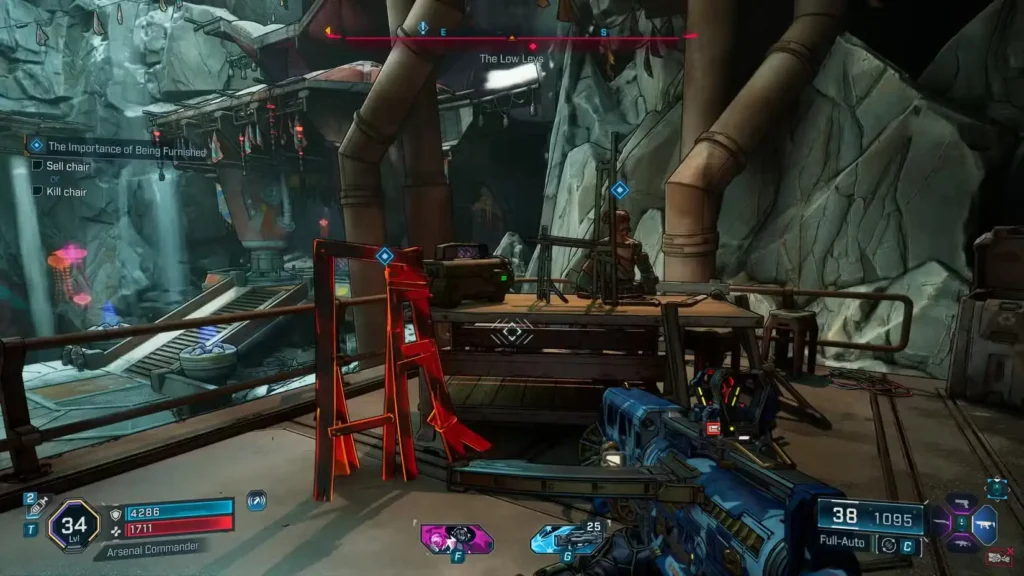
Part 4: The Chair Assembly & Final Decision
Assembling the Masterpiece
Return to Wrenching Allen with all five chair pieces. He’ll assemble the chair, and… well, let’s just say it’s a unique piece of furniture. The chair is described as a “monstrosity,” which in the Borderlands universe could mean anything from mildly ugly to actively dangerous to sit on.
Allen, of course, loves it. He thinks it’s a brilliant work of art. And now, he presents you with a choice that will determine the fate of his creation.
The Decision: Three Endings Explained
This is where The Importance of Being Furnished gets interesting. You have three options, though only two are presented in the dialogue wheel:
Option 1: Sell the Chair to Allen
Dialogue choice: Agree to sell the chair
Allen’s reaction: He initially judges you for making a “capitalist” decision, criticizing you for prioritizing profit over art
Plot twist: He then reveals that selling the chair was actually an artistic choice all along, and praises you for understanding the deeper meaning
Rewards:
- Extra cash (more money than the other options)
- Quest completion XP
- Standard quest rewards
Why choose this?
If you want maximum cash rewards and enjoy Allen’s philosophical rambling about capitalism as art, pick this option. It’s the “good ending” from a practical standpoint.
Option 2: Destroy the Chair
Dialogue choice: Destroy the masterpiece
Allen’s reaction: He’s absolutely thrilled by the destruction, exclaiming “Oh, brilliant!” in genuine awe
Philosophy: Allen sees the destruction as the ultimate artistic statement—the ephemeral nature of art, creation and destruction as one, etc.
Rewards:
- Standard quest XP
- Standard quest rewards
- No extra cash (less money than selling)
Why choose this?
If you want to lean into the absurdist humor and see Allen appreciate the destruction of his own work, this is peak Borderlands comedy. It’s the “artistic integrity” ending.
Secret Option 3: Kill Wrenching Allen
How to trigger: Simply shoot Allen after the chair is assembled
Availability: This option isn’t shown in dialogue—you have to take matters into your own hands (literally)
What happens:
- Allen dies (obviously)
- He delivers the same voiceline as if you destroyed the chair: “Oh, brilliant!”
- Apparently, even his own death is an artistic statement
Rewards:
- Identical to Option 2 (standard rewards, no extra cash)
- You’re now a patron of violent art
Why choose this?
Because it’s hilarious. And because only in Borderlands can you kill a quest giver after completing the quest and have them compliment you on your artistic vision as they die. This is the “chaos” ending.
Important note: Don’t worry about consequences—killing Allen doesn’t lock you out of future content or give you any penalties. The Borderlands series has always been flexible about murdering NPCs once their quest utility ends.
Which Option Should You Choose?
From a rewards perspective:
Choose Option 1 (Sell the Chair) for extra cash. If you’re working on cash farming or saving up for expensive gear, this nets you more money.
From a comedy perspective:
Choose Option 3 (Kill Allen) for the most absurd outcome. The fact that he appreciates his own murder as an artistic statement is quintessential Borderlands dark humor.
From a thematic perspective:
Choose Option 2 (Destroy the Chair) if you want to roleplay as someone who respects artistic vision and the impermanence of creative works.
My recommendation?
On your first playthrough, sell the chair for the extra cash and full dialogue. On subsequent characters, kill Allen for the laugh. Save a clip of it—your friends won’t believe you without proof.
Quest Rewards Breakdown
Regardless of which option you choose, you’ll receive:
Guaranteed rewards:
- Quest completion XP (scales to your level, contributes to leveling progress)
- Base cash reward
- Potential gear drops (random loot from quest completion)
Variable reward:
- Extra cash if you sell the chair (Option 1 only)
No unique legendary items: Unlike some side quests with dedicated legendary rewards (like specific boss farms), The Importance of Being Furnished doesn’t grant special weapons or gear. It’s purely about the experience and the cash.
Tips for Efficient Completion
For First-Time Players
Preparation:
- Make sure you have decent weapons for the Ripper encounter (Incendiary recommended)
- Stock up on ammo before starting—the quest involves some running around
- Accept the quest when you’re already in Belton’s Bore for another reason to maximize efficiency
During the quest:
- Mark the chair piece locations on your map as you discover them
- If the Ripper spawn bugs out, don’t waste time fighting Rhokia alone—just reload
- Take screenshots of each chair piece location for future reference if you’re replaying
For Completionists
- Complete this quest as part of your Terminus Range 100% completion
- Combine with other Belton’s Bore activities like unlocking the safehouse and collecting Lost Capsules
- Document your choice for achievement tracking if you’re going for all dialogue options
For Speed Runners
- Skip all dialogue (if you’ve already done the quest once)
- Use the efficient collection route listed above
- Fast travel liberally to minimize walking time
- Choose Option 1 (sell) for fastest completion with best rewards
Related Terminus Range Content
While you’re in Belton’s Bore for The Importance of Being Furnished, consider tackling other nearby content:
Other Terminus Range activities:
- Mob Mentality mission – Starts in Belton’s Bore area
- Auger Mines exploration – Multiple legendary boss opportunities
- Ripper Drill Sites – Additional legendary loot farming
- Collect region collectibles – ECHO Logs, Vault Symbols, SDU tokens
Quest chain connections: The Importance of Being Furnished is a standalone quest, but it’s part of the larger Auger faction storyline. Completing all Auger-related quests provides fuller context for the region’s conflicts and characters.
The Importance of Being Furnished: Thematic Analysis
Okay, let’s briefly put on our art critic hats (the non-violent Ripper kind).
This quest is obviously a satire of pretentious art culture, with Wrenching Allen as the avatar of artists who take themselves far too seriously while creating objectively questionable work. The fact that he calls a jerry-rigged chair made from scrap parts a “masterpiece” is the joke—but the deeper humor comes from the fact that he’s not entirely wrong.
In the context of the Borderlands universe, where resources are scarce and survival is paramount, creating anything for aesthetic rather than practical purposes is genuinely subversive. Allen’s chair might be ugly, but the fact that it exists purely as art in a world that usually prioritizes utility over beauty makes it legitimately meaningful (in a twisted way).
The three endings reinforce this theme:
- Selling = Commodification of art (but also pragmatic survival)
- Destroying = Rejecting permanence, embracing the moment
- Killing Allen = The ultimate nihilistic statement (or maybe just funny violence)
None of the choices are “wrong”—they’re all valid artistic expressions in their own right, which is why Allen appreciates all of them (even his own murder). It’s clever writing disguised as absurdist comedy.
…Or maybe it’s just a silly quest about building a chair. Either interpretation works.
Common Questions
A: It’s a side quest, so yes—but it remains available as long as Belton’s Bore is accessible. Complete it whenever you want during or after the campaign.
A: No. There are no achievement requirements tied to your choice in this quest.
A: Yes, if you save before making the final choice, you can reload and select different options to see all three outcomes.
A: Likely a parody of pretentious modern artists and the high-art world in general, though not a specific reference to one person.
A: No. He’s not involved in any other content, so his death has zero consequences.
Ending Notes
The Importance of Being Furnished is one of those side quests that exemplifies why people love Borderlands 4 on Steam and other platforms. It’s bizarre, funny, surprisingly thought-provoking if you think about it too hard, and culminates in a choice where you can literally murder the quest giver and have them thank you for it.
The actual mechanics—finding instruction pieces and collecting chair parts—are straightforward fetch quest tasks. But the writing, the character of Wrenching Allen, and the absurdist endings elevate it beyond typical side quest material. It’s the kind of quest that makes you laugh out loud and then screenshot the dialogue to share with friends.
Whether you choose to sell the chair, destroy it, or take the secret third option of violent artistic expression, you’re participating in Allen’s grand creative vision. Just maybe don’t sit on the chair. It looks structurally unsound.
Now get out there, build some questionable furniture, and remember: in the wasteland, even trash can become art (literally—you found instructions in a trash can).
Need more Borderlands 4 quest guides? Check out our complete mission list, or browse our beginner’s guide for essential gameplay tips. For more comedy gold, explore other side quest walkthroughs!