Complete walkthrough for Borderlands 4’s Meat is Murder quest. Find all clues, track down the killer, and uncover the dark truth behind this chilling murder mystery side mission.
When Borderlands Goes Dark: A Serial Killer on Kairos
Most Borderlands side quests involve exploding things, collecting random junk, or dealing with eccentric NPCs who’ve lost their minds in amusing ways. “Meat is Murder” breaks that mold entirely, delivering one of the series’ most genuinely unsettling storylines wrapped in a classic murder mystery format.
This isn’t your typical “go here, shoot that” mission. Instead, you’ll be playing detective, examining crime scenes, following leads, and ultimately confronting a serial killer who’s been terrorizing the Harper’s Hideaway area. It’s a refreshing change of pace that shows Borderlands 4 isn’t afraid to explore darker themes while maintaining its signature style.
Getting Started: Finding Byron in Harper’s Hideaway
Location: Harper’s Hideaway (near the first Safe House) Prerequisites: None – accessible very early in the game Recommended: Grab a vehicle from the Outbounders first for easier travel
The Rescue Mission
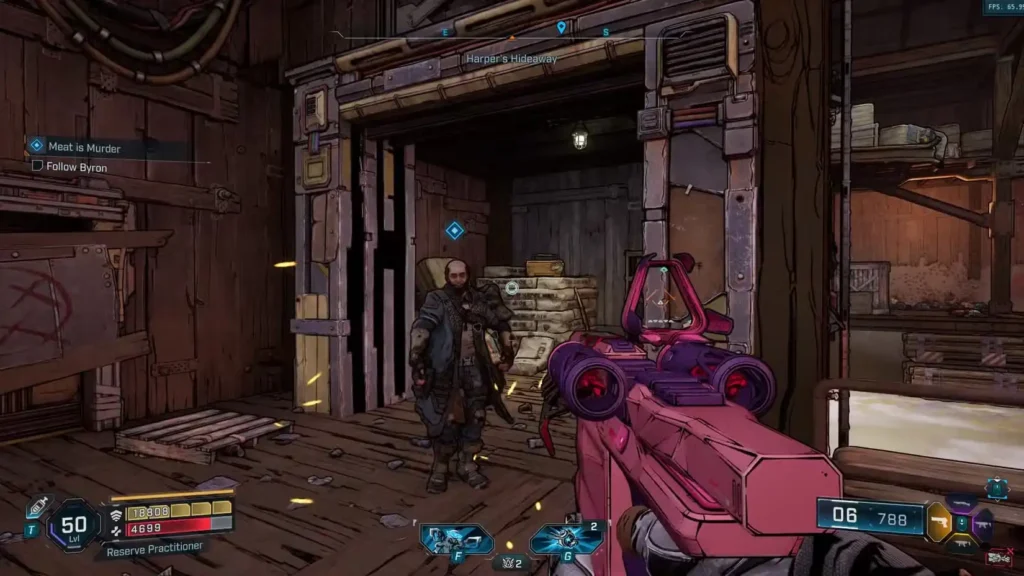
Your adventure begins in a massive barn where you’ll find Byron trapped behind makeshift barricades in one of the corner rooms. This isn’t just environmental decoration – someone deliberately trapped him here, which should be your first red flag that something seriously wrong happened at this farmstead.
Getting Byron Out:
- Locate the barricaded corner room
- Destroy the barriers blocking the entrance (any weapon works)
- Interact with Byron to trigger the quest dialogue
- Listen to his account of the “Ripper attack”
Pro tip: Before diving into the investigation, take a moment to scan the barn’s layout. Familiarizing yourself with the space now will help when you’re hunting for clues later.
Playing Detective: The Crime Scene Investigation
Byron’s story seems straightforward at first – Rippers attacked, his brother Harper went missing, chaos ensued. But as any good detective knows, the devil’s in the details, and this crime scene has plenty of disturbing details to uncover.
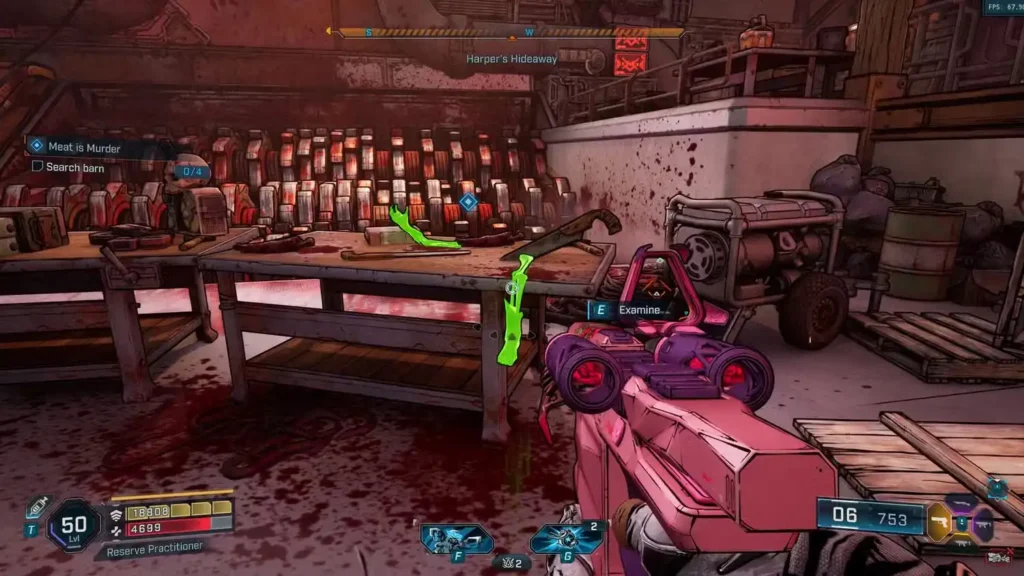
The Four Critical Clues
1. The Butcher’s Table
- Location: Near the giant crusher mechanism
- What you’ll find: Severed limbs arranged on a table
- Significance: This isn’t random violence – it’s methodical dismemberment
2. Ripper Corpses
- Location: Next to the drill near the crusher
- What you’ll find: Dead Ripper bodies
- Significance: Were they really the attackers, or victims themselves?
3. Dead Wildhorn
- Location: Near the barn entrance
- What you’ll find: Animal corpse
- Significance: Even the wildlife wasn’t spared
4. Sheet Metal Evidence
- Location: Wall opposite the dead Wildhorn
- What you’ll find: Piece of metal leaning against the wall
- Significance: Possible weapon or tool used in the crime
Investigation Tip: Use ECHO-4 liberally during this section. His highlighting feature will ensure you don’t miss any interactable objects, including clues that might not be immediately obvious.
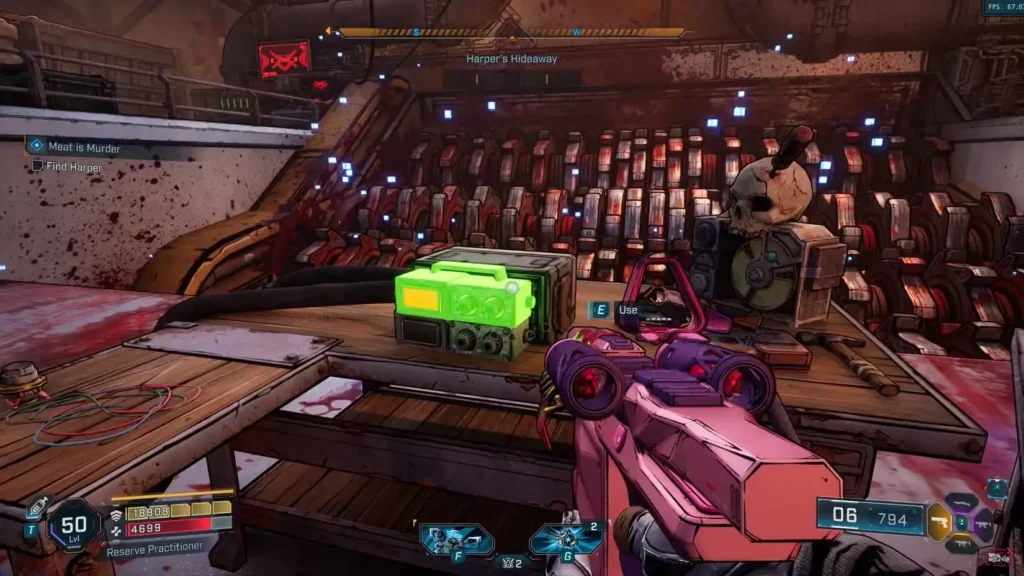
The Horrifying Discovery: Harper’s Fate
After examining all the evidence, return to the table near the crusher and interact with the radio. What happens next is genuinely shocking by Borderlands standards – Harper’s mutilated body drops from the ceiling, strung up like a macabre puppet show.
This moment transforms the quest from a simple missing person case to something far more sinister. The killer didn’t just murder Harper; they staged his corpse as a twisted display.
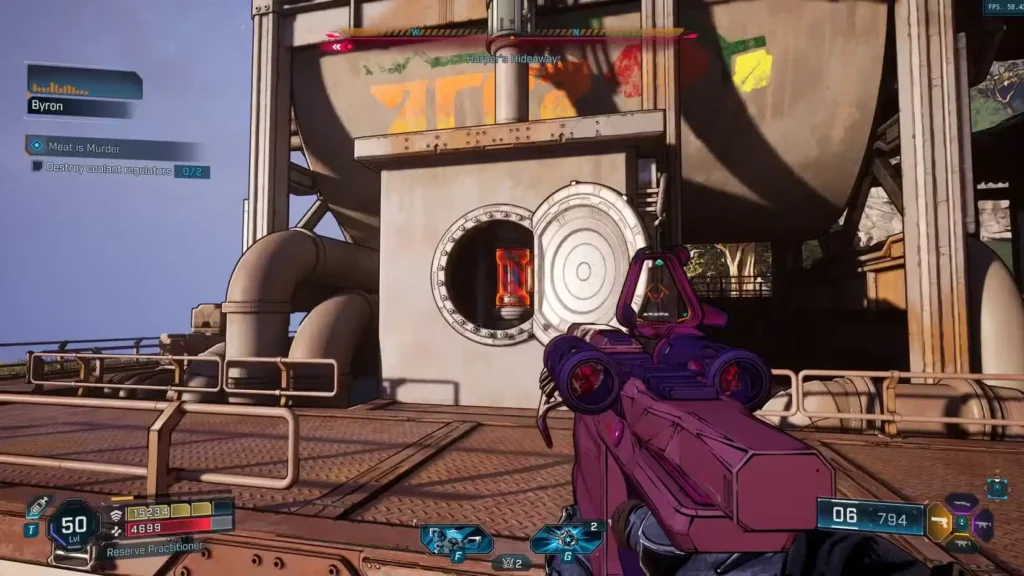
Bringing Down Harper’s Body
The crusher’s killswitch is conveniently broken (surprise, surprise), forcing you to take a more hands-on approach:
Step-by-Step Process:
- Exit the barn and locate the coolant regulators
- Find the circular hatches with grapple points on opposite sides
- Use your grappling hook to open each hatch
- Shoot the regulators inside to disable the crusher
- Fight off the Ripper ambush (they show up right on cue)
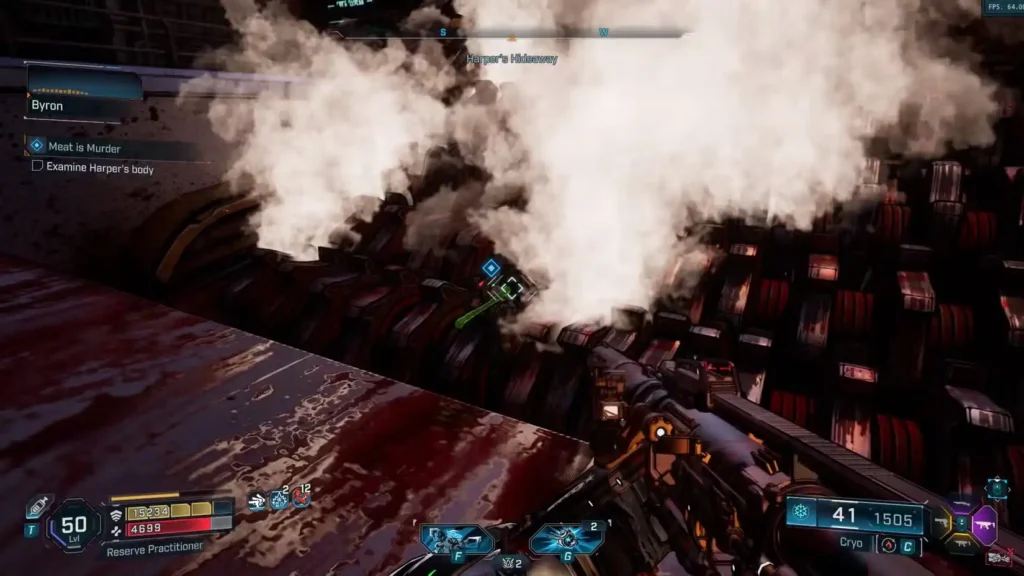
- Return to the barn and free Harper’s body
Combat Warning: The Ripper attack during the regulator sabotage isn’t coincidental. Someone’s been watching you, and they’re not happy about your investigation.
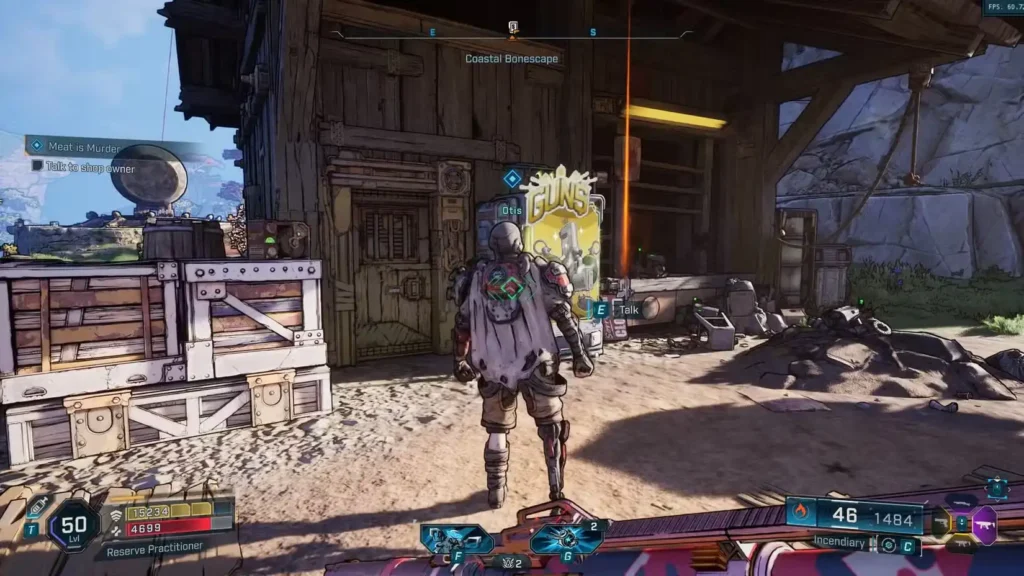
Following the Trail: From Tool Shop to Killer’s Lair
Meeting Otis: The Helpful Informant
Byron directs you to a tool shop east of the barn, where you’ll meet Otis – a surprisingly helpful NPC who actually provides useful information without demanding you collect 20 random items first.
Otis’s Intel:
- The killer operates from a cave near a waterfall
- Location: Plungeford (north of the tool shop, past the lake)
- Warning: The area is crawling with Rippers
Travel Tip: This is where having a Digirunner really pays off. The distance between locations makes walking tedious, and you’ll want to conserve your energy for the fights ahead.
Plungeford: More Than Just a Scenic Waterfall Town
Plungeford isn’t just a waypoint – it’s a full combat encounter disguised as a travel destination. The town is overrun with Rippers, which raises some interesting questions about the larger conspiracy at play.
Combat Strategy for Plungeford:
- Approach carefully – enemies can overwhelm you if you rush in
- Use elevation – many buildings offer tactical advantages
- Loot everything – good gear and XP opportunities abound
- Look for the waterfall – your destination is marked by the distinctive sound
The Killer’s Cave: Final Confrontation
The cave entrance near Plungeford’s waterfall is boarded up – a clear sign that someone doesn’t want visitors. Breaking through reveals the killer’s hideout and your final target.
Meet Zeke: The Grin Reaper’s Puppet
Inside the cave, you’ll find Zeke, a clearly unhinged individual standing near a table with a radio. The confrontation is brief but revealing:
- Zeke’s mental state: Completely broken by his experiences
- Combat difficulty: Minimal threat – more tragic than dangerous
- Real revelation: The radio connects to the true mastermind
The Grin Reaper’s Message: After defeating Zeke, interact with the radio to hear the same voice from the barn. The mysterious “Grin Reaper” delivers cryptic exposition that suggests this murder spree is far from over.
Quest Rewards and Strategic Benefits
Immediate Rewards:
- Experience Points: Solid XP boost for early-game progression
- Cash: Always useful for equipment upgrades and ammunition
- Eridium: Premium currency (save for endgame activities)
- Random Pistol: Up to purple rarity quality
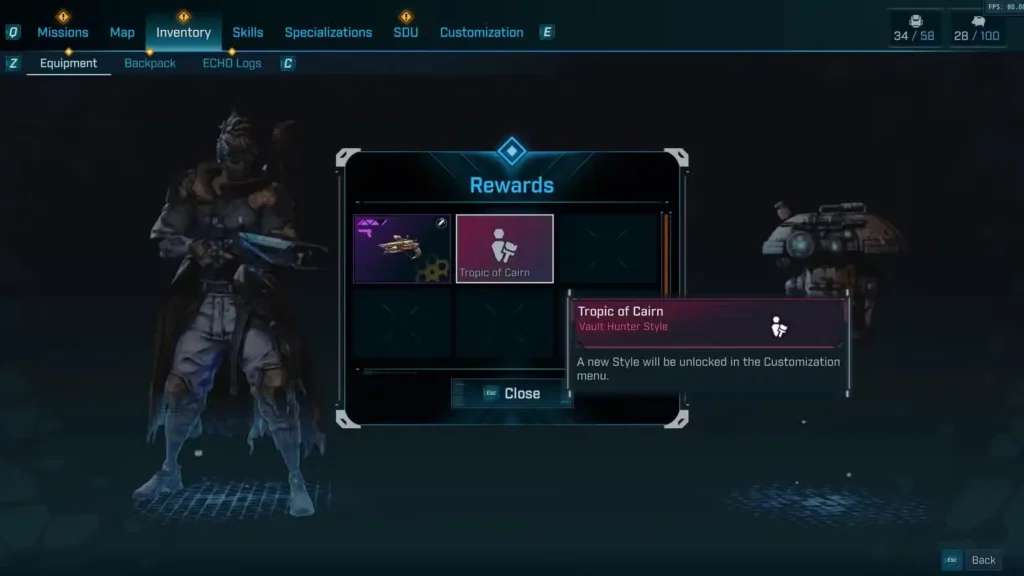
Cosmetic Rewards:
Tropic of Cairn Vault Hunter Style: Account-wide cosmetic unlock
- Note: May require quest replay if it doesn’t drop immediately
- Benefit: Usable across all characters on your account
How to Claim Rewards:
- Automatic items: XP, Cash, and Eridium are added directly
- Manual items: Check the Rewards tab in your Inventory screen
- Space requirement: Ensure adequate inventory space before claiming
- Cosmetics: Access through character customization menu
Inventory Management Tip: Upgrade your Backpack SDU early using SDU Tokens to avoid missing out on quest rewards due to space limitations.
The Bigger Picture: What Meat is Murder Reveals
This quest serves multiple purposes beyond just being an entertaining diversion:
Narrative Significance:
- World building: Shows the darker side of life on Kairos
- Character development: Tests your problem-solving skills beyond combat
- Foreshadowing: The Grin Reaper’s message hints at larger threats
Gameplay Variety:
- Investigation mechanics: Different from standard Borderlands mission structure
- Environmental storytelling: Crime scene details tell a story without exposition
- Atmospheric shift: Proves the series can handle serious themes effectively
Advanced Tips for Maximum Efficiency
Speed Running Approach:
- Skip unnecessary combat in Plungeford if you’re focused on completion
- Use fast travel between major waypoints to save time
- Memorize clue locations for subsequent playthroughs
Completionist Strategy:
- Explore every corner of Harper’s Hideaway for additional loot
- Clear all Rippers in Plungeford for maximum XP gain
- Document the story – this quest has some of the best environmental storytelling in the game
Co-op Considerations:
- Split investigation duties – different players can examine different clues simultaneously
- Coordinate combat in Plungeford for efficient enemy clearing
- Share discoveries – call out interesting environmental details to teammates
Why This Quest Matters
“Meat is Murder” stands out as proof that Borderlands 4 can successfully blend its trademark humor with genuinely unsettling themes. It’s a reminder that beneath all the explosions and mayhem, the series has always been about survival in a hostile universe where not all threats carry guns.
The quest also demonstrates excellent game design principles: environmental storytelling, player agency in investigation, and meaningful consequences for your actions. It’s the kind of content that elevates Borderlands 4 from a simple looter-shooter to a more sophisticated gaming experience.
Bottom Line: Don’t skip this quest just because it’s a side mission. “Meat is Murder” offers some of the game’s best storytelling, introduces unique gameplay mechanics, and provides solid rewards for both new and experienced players.
Ready to explore more of Borderlands 4’s mysteries? Check out the official Borderlands 4 page for updates, grab it on Steam for PC gaming, or get it on PlayStation for console.
Related Quest Guides:
Complete Trophy Achievement Guide
All Claptrap Mission Locations
SDU Tokens Complete Collection Guide