Gotta Catch ‘Em All… Wait, Wrong Game?
Borderlands 4 loves its pop culture references, but The Wayward Gun side quest might be the most blatant—and hilarious—homage yet. If you grew up throwing Pokéballs and shouting “I choose you!” at your TV, this mission is basically a love letter wrapped in bullets and explosions.
You’re not catching Pikachu here, though. Instead, you’re hunting down sentient walking turrets using “Catch-tainers” (basically Pokéballs with attitude), fighting off a Team Rocket parody called the Bomb Squad, and battling a boss literally named PEWPEW. It’s ridiculous, nostalgic, and absolutely worth experiencing.
Let’s break down every Pokemon reference in this quest and how to complete it from start to finish.
How to Unlock The Wayward Gun Quest
Prerequisites
Main Mission Requirement: Complete A Lot to Process, the fourth main story mission in Borderlands 4. Once that’s wrapped up, The Wayward Gun becomes available.
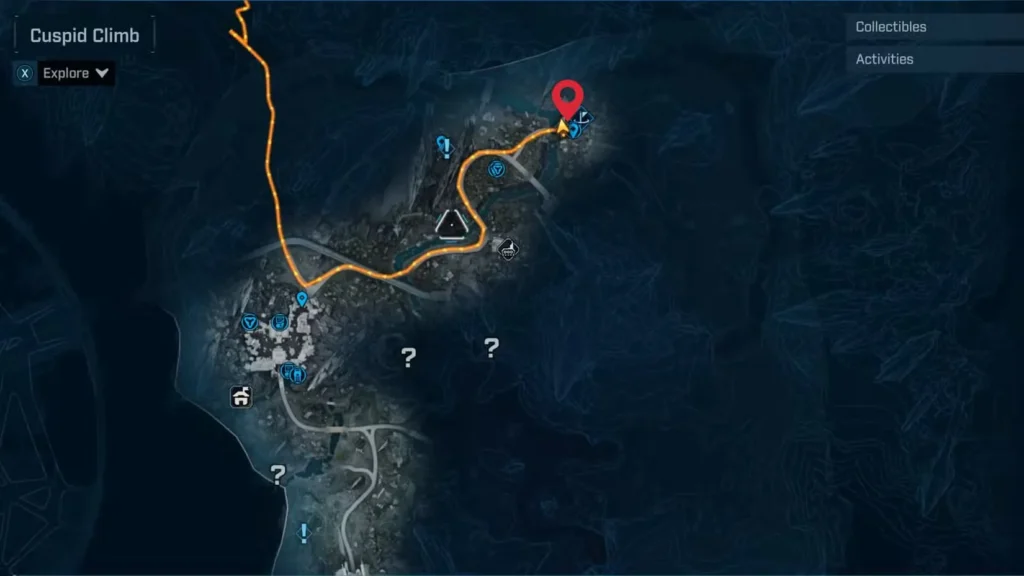
Location: Terminus Range
1. Fast Travel to Terminus Range After finishing A Lot to Process, you’ll have access to this region.
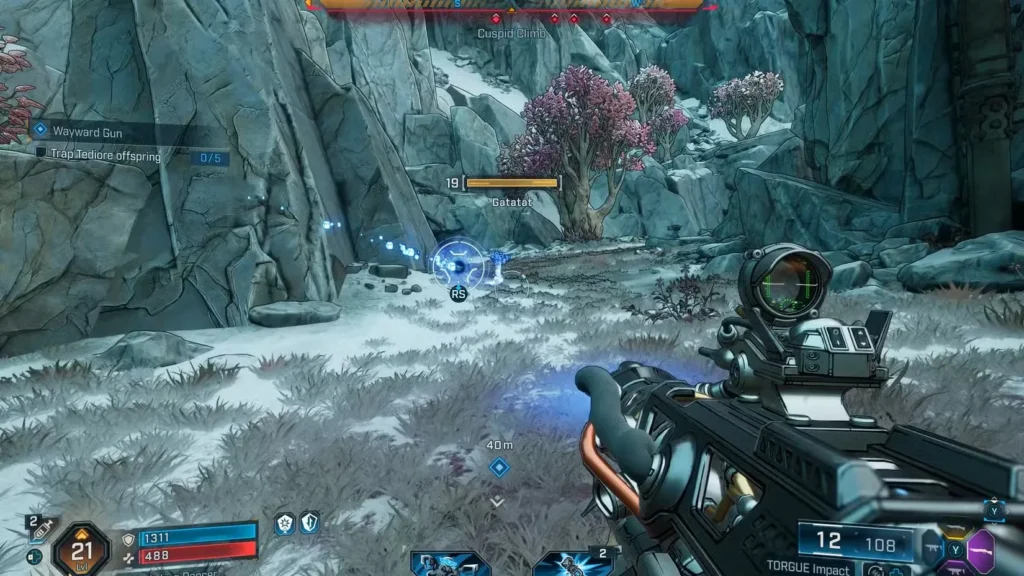
2. Head to Cuspid Climb Area Navigate through Terminus Range until you reach the Cuspid Climb zone.
3. Find Dusk’s Advent Settlement Look for a small settlement—this is where the quest begins.
Meeting Emile (First Pokemon Reference!)
As you approach Dusk’s Advent, you’ll hear an NPC named Emile shouting:
“I choose you, to save our A–!”
If you didn’t catch that reference, that’s the iconic “I choose you!” line from Pokemon. Borderlands just couldn’t help themselves with the censored ending. Talk to Emile to officially start the quest, and get ready for more nostalgia bombs.
Phase 1: The Turret Ambush
What Happens: Immediately after accepting the quest, sentient walking gun-turrets storm the area. These aren’t your typical stationary turrets—they’ve got legs, attitude, and apparently free will.
Objective: Eliminate the attacking turrets
Combat Tips:
- These turrets are mobile but not particularly tanky
- Use medium-range weapons to keep them at bay
- Watch for their firing patterns—they telegraph before shooting
- Clear the immediate area before talking to Emile again
After the fight, Emile directs you to the quartermaster. And what’s his name? Bash. You know, like Ash from Pokemon. Subtle? No. Entertaining? Absolutely.
Phase 2: Meeting Bash & Getting the Catch-tainers
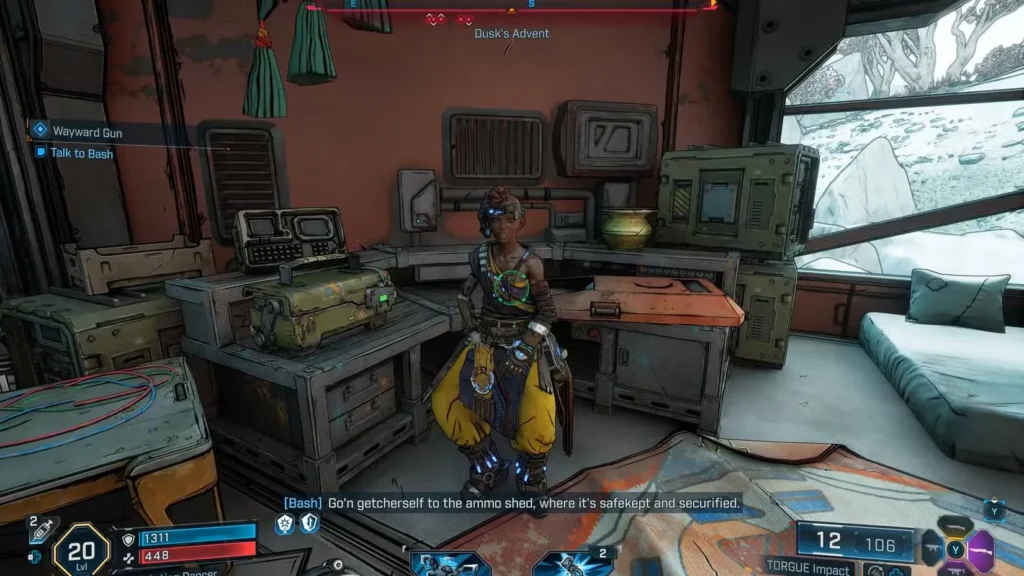
Talk to Bash at the Quartermaster’s Office
Bash explains that you need special equipment to capture these rogue turrets. That equipment? Catch-tainers. Literally just Pokéballs with a different name. The game isn’t even trying to hide it anymore.
Problem: The Catch-tainers are locked in the Ammo Shed behind powered barriers.
Solution: Destroy two generators to disable the barriers.
Destroying Generator #1
Location: On top of the Ammo Shed itself
How to destroy it:
- Look up at the roof of the building with the barrier
- You’ll see the first generator sitting on top
- Shoot it from ground level—any weapon works
- Generator explodes, one barrier down
Enemy Alert: Clear out any turrets in the area first so you can focus on shooting accurately.
Destroying Generator #2
Location: Inside the building opposite the Ammo Shed
How to reach it:
- Find the building directly across from the Ammo Shed
- Use your grapple ability to climb up the structure
- Enter the building through the upper entrance
- Locate the second generator inside
- Shoot it to destroy it
Pro tip: Once you’re up there, take a moment to scout the area. The elevated position gives you a good view of what’s coming next.
Grabbing the Catch-tainers
With both generators destroyed, the barriers drop. Use the zipline to reach the Ammo Shed entrance, head inside, and pick up your supply of Catch-tainers.
You’re now officially a Pokemon trainer. Sort of.
Phase 3: Catching Tediore Offsprings (The Pokemon Part!)
How the Catch-tainer System Works
This is where the Pokemon mechanics really shine through:
1. Place Catch-tainers Head to the quest marker location and place the Catch-tainers in the designated supply zone.
2. Pick One Up Grab a Catch-tainer from the supply area—it functions like a throwable grenade.
3. Throw at Turrets When you see a Tediore Offspring (that’s what the game calls the walking turrets), throw the Catch-tainer at it.
4. Capture Success! If your aim is true, the turret gets sucked into the Catch-tainer, just like catching a Pokemon.
Objective: Capture 5 Tediore Offsprings initially
Throwing Tips:
- Lead your target if the turret is moving
- Don’t throw from too far away—accuracy drops with distance
- You have unlimited Catch-tainers, so don’t stress about missing
- Weakening turrets first isn’t necessary—they capture at full health
Phase 4: Team Rocket—I Mean, The Bomb Squad
Just when you think you’re done capturing turrets, the game hits you with its best reference yet.
The Bomb Squad Introduction
After capturing five Tediore Offsprings, you’re ambushed by Jake and Josey, members of the Bomb Squad. They literally drill up from underground (just like Team Rocket’s dramatic entrances) and deliver a nostalgic monologue clearly parodying Team Rocket’s infamous intro.
The Bomb Squad basically ARE Team Rocket:
- Dramatic entrance? Check
- Over-the-top monologue? Check
- Ultimately incompetent villains? Check
- Ridiculous team name? Check
Defeating Jake and Josey
Combat Strategy:
- They’re not particularly tough, just slightly beefier enemies
- Standard weapons and tactics work fine
- Focus on one at a time to avoid getting flanked
- Watch for their thrown explosives (hence “Bomb Squad”)
After defeating them, you get a choice:
Option A: Capture 6 more Tediore Offsprings (optional completionist route) Option B: Head straight to Rock Bottom to continue the main quest
Recommendation: If you’re enjoying the Pokemon vibe, capture the extra turrets. If you want to move the story forward, skip to Rock Bottom.
Phase 5: Battle at Rock Bottom
Clearing the Area
Fast travel or run to Rock Bottom (marked by your quest indicator). Upon arrival, you’ll need to eliminate multiple walking turrets in the area.
What to expect:
- Waves of Tediore Offsprings
- More aggressive than earlier encounters
- They come from multiple directions
Strategy tip: Find a defensible position with cover. The turrets will funnel toward you, making them easier to pick off.
Fighting Pew and His Army
After clearing enough turrets, the objective changes to “Battle PEWPEW and his army.” But first, you fight his lieutenant: Pew.

How to reach Pew:
- Grapple up to the Grey Havenage Safehouse
- Pew spawns from a shipping container near the safehouse
- He comes with backup turrets
Combat Strategy:
- Pew is a mini-boss with more health than regular turrets
- Take out his minions first to reduce incoming fire
- Use cover effectively—the safehouse area has plenty
- Elemental weapons work well here (shock for shields, fire for flesh)
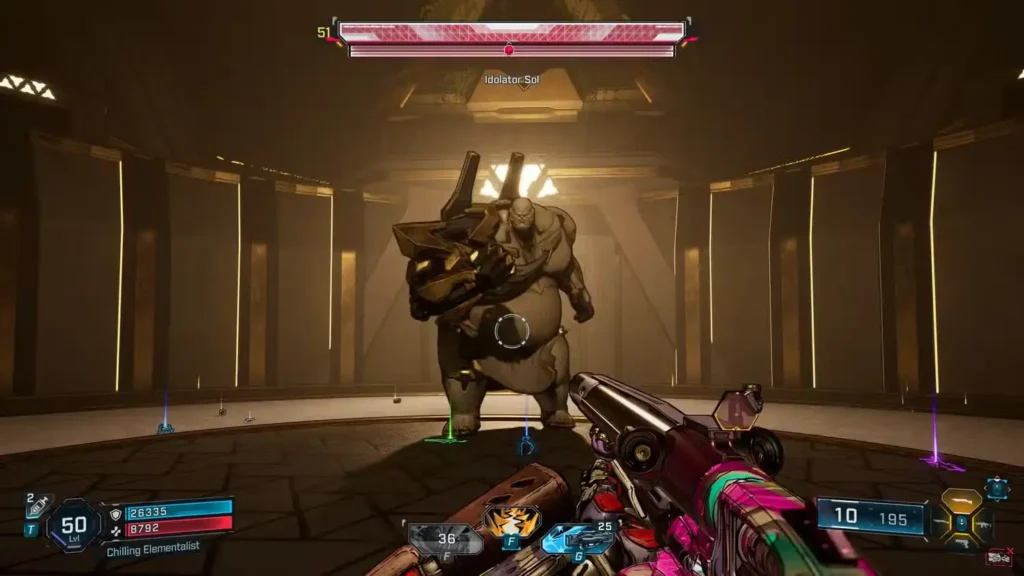
Phase 6: The Final Boss – PEWPEW
Reaching the GIM
After defeating Pew, you’ll receive a radio transmission from the main boss: PEWPEW himself. He’s located high up in an area called the GIM.
Navigation steps:
- Return to the Grey Havenage Safehouse area
- Use the shipping container to climb to the upper platform
- Perform a double-jump from the platform
- Use your hover/glide ability to close the gap
- Land on the GIM platform
Parkour tip: Don’t rush the jump. Wait until you have a clear view of the landing zone before leaping.
Boss Fight: PEWPEW and His Army
This is the climax of the quest, and it can get chaotic fast.
What you’re facing:
- PEWPEW (main boss)
- Multiple waves of walking turret minions
- 360-degree threat environment (enemies from all sides)
Winning Strategy:
1. Find Cover Immediately The GIM area has limited cover, but find whatever you can. The edges of the platform offer some protection.
2. Clear the Adds First Don’t tunnel-vision on PEWPEW. His army will overwhelm you if you ignore them. Prioritize the smaller turrets.
3. Focus Fire on PEWPEW Once the adds are manageable, concentrate damage on PEWPEW. He has more health but follows predictable attack patterns.
4. Keep Moving Standing still = death. Circle-strafe around the area while shooting to avoid concentrated fire.
5. Use Your Action Skill Don’t forget your character’s abilities! This is exactly when you should use them.
Recommended Loadout:
- High fire-rate weapons (SMGs, ARs)
- Shock element for breaking shields quickly
- Grenades for crowd control
- Shield with good capacity
The Emotional Ending
After defeating PEWPEW, something unexpected happens. Instead of exploding or running away, PEWPEW asks you to wipe his memory so he can “live in blissful ignorance.”
It’s… actually kind of sad? In a quest full of Pokemon jokes and turret violence, this ending has genuine pathos. PEWPEW just wanted to be free, and now he’s asking to forget it all happened.
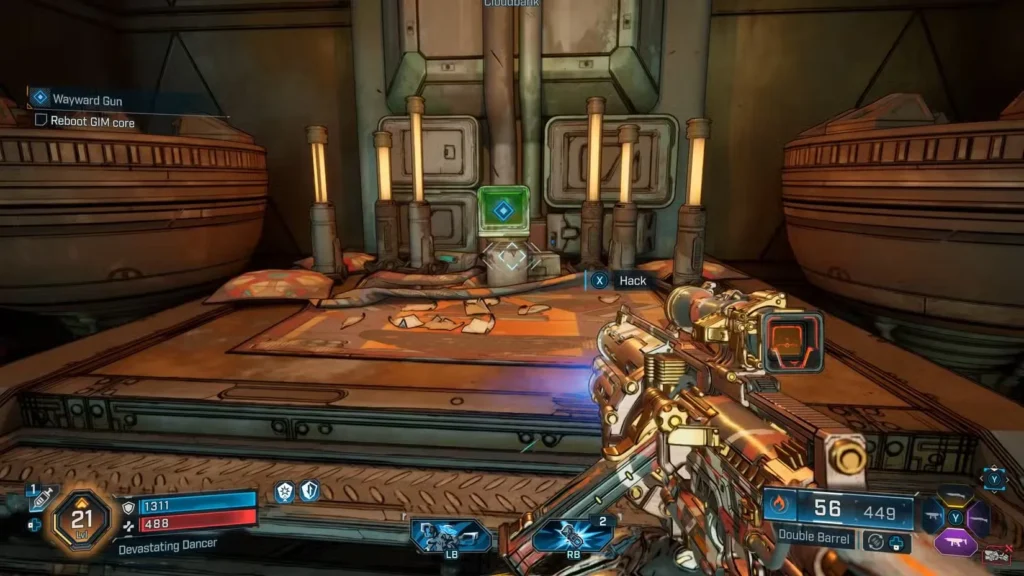
Final Objective:
- Approach the terminal near PEWPEW
- Hack into the system
- Reset the GIM core
- Complete the memory wipe
And just like that, The Wayward Gun quest concludes with an oddly melancholic note wrapped in a ridiculous Pokemon parody.
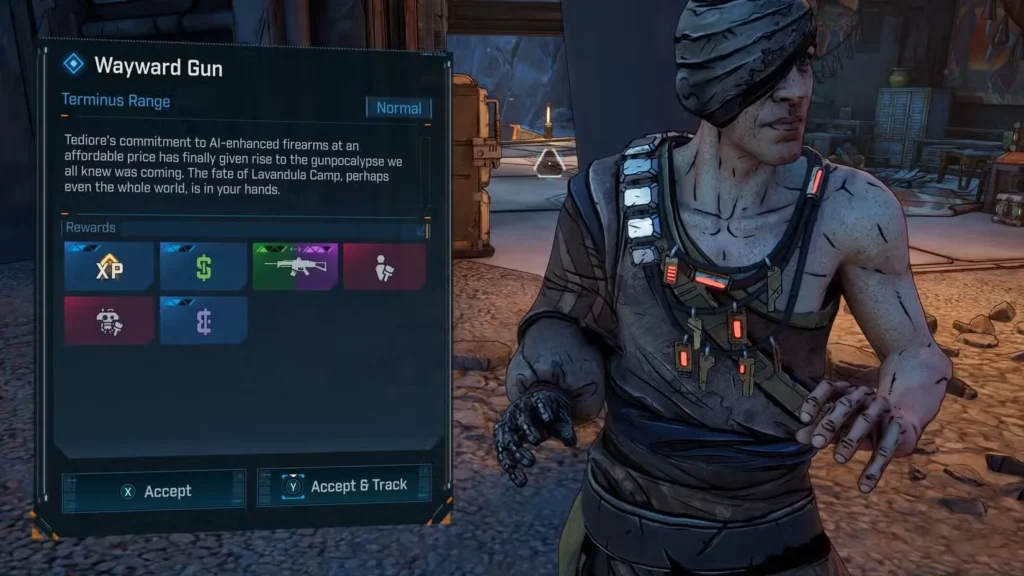
All Wayward Gun Quest Rewards
After completing the quest, you’ll receive:
Guaranteed Rewards:
- Assault Rifle (Green to Purple rarity)
- Stats vary based on your level
- Solid mid-game weapon
- “Loyal Customer” Paint Job for Echo-4
- Vehicle customization cosmetic
- Exclusive to this quest
Experience and Currency:
- Standard mission XP appropriate to your level
- Currency reward (scales with progression)
Is it worth it? Absolutely, even if just for the entertainment value. The rewards are decent, but the real prize is experiencing one of Borderlands 4’s most creative side quests.
Every Pokemon Reference in The Wayward Gun
Let’s catalog all the nods to Pokemon sprinkled throughout this quest:
1. “I choose you!” – Emile’s opening line 2. Bash – Quartermaster’s name (Ash parody) 3. Catch-tainers – Literally Pokéballs 4. Tediore Offsprings – The “Pokemon” you’re catching 5. The Bomb Squad – Team Rocket parody (Jake and Josey) 6. “Gotta catch ’em all” objective structure – Collecting creatures 7. PEWPEW – Boss name sounds like a Pokemon cry 8. The entire capture mechanic – Throwing containers to catch enemies
The developers clearly had fun with this one. It’s a perfect example of Borderlands’ self-aware humor and willingness to lean into absurdity.
Tips for Speedrunning This Quest
If you’re trying to complete The Wayward Gun quickly:
Time-savers:
- Skip the optional 6 extra captures after the Bomb Squad fight
- Use fast-moving characters or speed-boosting skills
- Equip high DPS weapons to clear turret waves faster
- Memorize the parkour route to the GIM
- Don’t loot during combat—save it for after PEWPEW
Estimated completion time: 20-30 minutes with this approach
Why This Quest Works So Well
The Wayward Gun succeeds because it doesn’t just reference Pokemon—it commits to the bit completely. From the moment Emile says “I choose you” to the memory-wiping ending, the quest embraces the absurdity while still delivering solid Borderlands gameplay.
It also shows that Borderlands 4 understands its audience. Players who grew up with Pokemon are now adults playing looter-shooters, and this quest is a perfect nostalgia trip that doesn’t feel forced or cringe-worthy.
Plus, it’s just fun. Sometimes you want to catch walking turrets instead of shooting them. Sometimes you want to fight discount Team Rocket. And sometimes, you want your video game to acknowledge that yes, we all remember Pokemon, and yes, that’s awesome.
If you enjoyed this quest’s puzzle-like elements, you might also appreciate the Willem’s Nodes puzzle solution in A Traitor Within mission.
Final Thoughts
The Wayward Gun is peak Borderlands: ridiculous premise, solid execution, memorable characters, and rewards that make the journey worthwhile. Whether you’re a Pokemon fan reliving childhood memories or just a Borderlands player who appreciates creative quest design, this side mission delivers.
So grab your Catch-tainers, channel your inner Pokemon trainer, and go catch some sentient turrets. PEWPEW and his army are waiting.
And remember: you’re not just a Vault Hunter anymore. You’re a Pokemon Master. Kind of. Sort of. In the weirdest way possible.
Get Borderlands 4:
Related Easter Eggs & Quest Guides: