The Invisible Beast of Whistler’s Maw
Shadowpelt is one of Borderlands 4’s most mechanically interesting bosses—an invisible predator that stalks you through the arena, only becoming visible when you strip away its protective shield. Featured as a Weekly Big Encore boss (September 21, 2025), this encounter tests your ability to fight what you can’t see while dodging shock orbs and seeking tail spikes.
Moxxi’s Big Encore system lets you respawn bosses for greater rewards by spending Eridium, and Shadowpelt is a prime farming target when it’s featured. But is the investment worth it? Let’s break down where to find this beast, how to beat it efficiently, and whether its legendary drops justify the grind.
Where to Find Shadowpelt
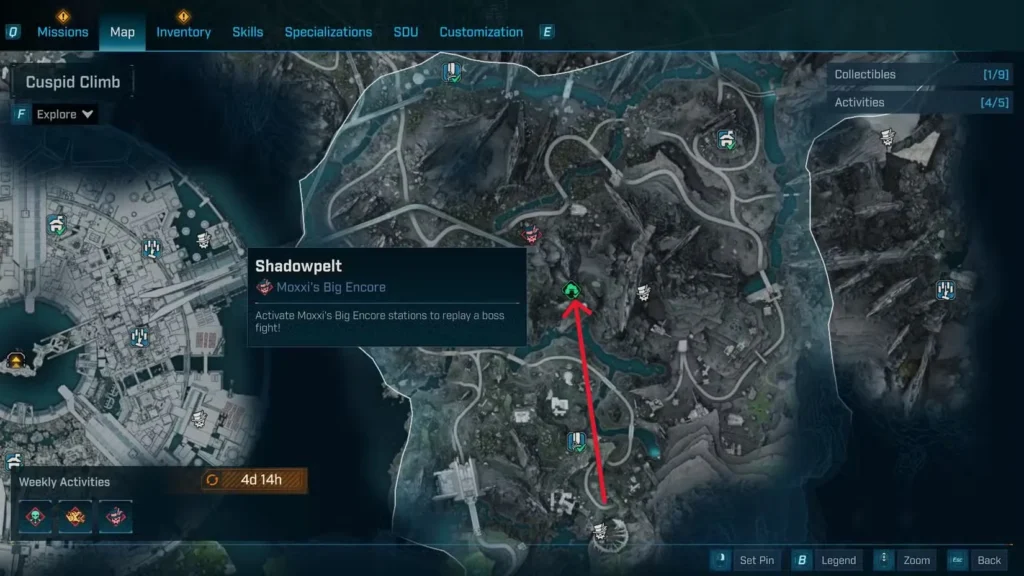
Location Details
Region: Terminus Range
Area: Cuspid Climb
Specific Location: Whistler’s Maw (Abandoned Auger Mine)
Unlock Requirements
You can’t access Whistler’s Maw immediately. Here’s what you need first:
Main Mission Required: Complete Shadow of the Mountain
- This is the first main mission in Terminus Range
- Completing it grants you access to your Clave
- The Clave is required to enter abandoned auger mines
Why the Clave matters: These mines are locked behind special doors that only respond to your Clave device. It’s essentially a key card system for accessing previously sealed locations.
For more background on Terminus Range exploration, check out our Auger Mines complete guide.
Navigating Whistler’s Maw
Once you’ve got your Clave and can access the mine, here’s how to reach Shadowpelt:
Path to the Boss Arena
1. Enter Whistler’s Maw Use your Clave on the entrance to gain access to the abandoned mine.
2. Follow the Linear Path The mine layout is straightforward—there’s essentially one main route through. Just keep moving forward.
3. Remove the Vent You’ll eventually encounter a vent blocking your path. Interact with it to yank it out of the way.
4. Crawl Through After removing the vent, crawl through the opening.
5. Prep Area You’ll emerge in a chamber with:
- Ammo Vending Machine – Stock up on ammunition
- Medical Vending Machine – Grab health items
- Moxxi’s Big Encore Machine – Activate the boss fight
Pro tip: Always max out your ammo and health supplies before using Moxxi’s Encore. You can’t return to the vending machines once the fight starts.
Understanding Moxxi’s Big Encore
Weekly Boss Rotation
Moxxi’s Big Encore features a rotating weekly boss. When Shadowpelt is the featured boss (like the week of September 21, 2025), you get special benefits for farming it.
The Eridium Investment
Cost: 100 Eridium per respawn
What you get:
- Boss respawns with increased health
- Boss deals significantly more damage
- Enhanced loot drop rates
- Higher chance for legendary items
Is it worth it? If Shadowpelt’s dedicated drops fit your build, absolutely. The increased legendary drop rate during Weekly Big Encore weeks makes the Eridium cost worthwhile. If you’re not interested in Slippy, Sparky Shield, or Vamoose, save your Eridium for different weekly rotations.
How to Beat Shadowpelt – Complete Strategy
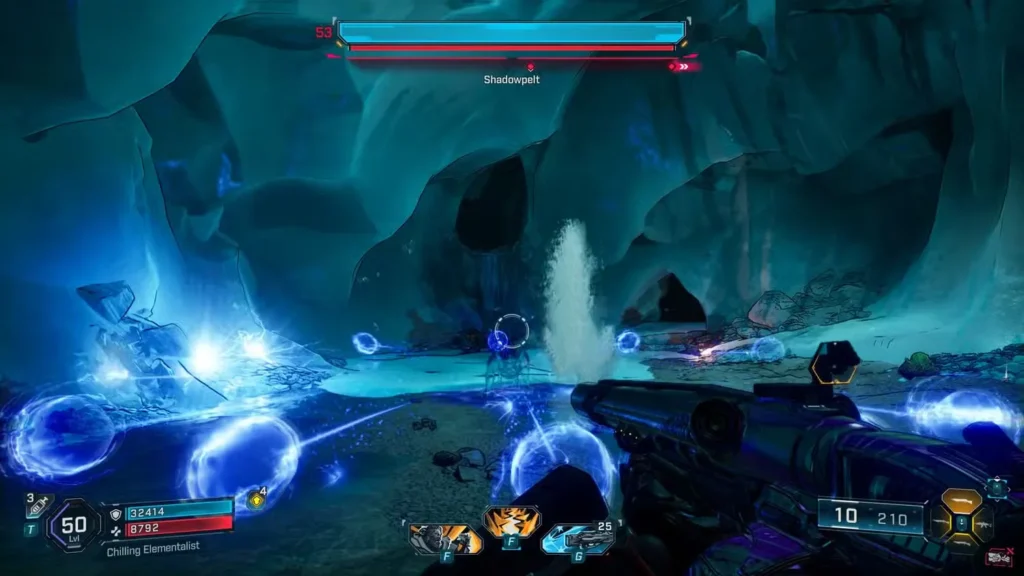
The Core Mechanic: Invisibility
Shadowpelt’s defining feature is its ability to turn invisible, and understanding this mechanic is crucial to winning:
Phase Cycle:
- Shadowpelt spawns invisible with shield active
- Strip the shield → becomes visible for 15 seconds
- After 15 seconds → shield reactivates, becomes invisible again
- Repeat until defeated
The visibility window is everything. You only have 15 seconds of vulnerability before dealing with invisibility again, so maximize your DPS during those brief windows.
Elemental Weakness Strategy
Shadowpelt has two distinct health bars that require different elemental approaches:
Shield (Blue Bar) – Use SHOCK Damage
- Shock is super effective against shields
- This is your priority when Shadowpelt is invisible
- Faster shield strip = more uptime for damage
Flesh (Red Bar) – Use INCENDIARY (Fire) Damage
- Fire is super effective against flesh
- Switch to fire weapons when Shadowpelt becomes visible
- This is where you deal your real damage
Weapon loadout recommendation:
- Primary: Shock SMG or Assault Rifle (shield stripping)
- Secondary: Incendiary SMG or Assault Rifle (main DPS)
- Backup: Whatever you’re comfortable with for emergencies
If you need weapon recommendations, check our best legendary assault rifles guide for top-tier options.
Recommended Weapon Types
Best Choices:
Close-Range:
- SMGs – High DPS, accurate enough for the fast-moving target
- Shotguns – Devastating during the 15-second visibility window
- Melee builds – If you’re running a melee-focused character
Medium-Range:
- Assault Rifles – Versatile for both shield stripping and damage
- Pistols – Good for precise shots when Shadowpelt moves erratically
Avoid:
- Sniper Rifles – Too slow for a highly mobile target
- Rocket Launchers – Self-damage risk in close quarters
- Explosive weapons – High chance of knocking yourself into Fight For Your Life
Why close/medium range? Shadowpelt is fast and constantly lunges at you. Long-range weapons give you less reaction time and lower DPS against this aggressive enemy.
Shadowpelt’s Attack Patterns
Understanding what Shadowpelt throws at you helps with survival:
Attack 1: Lunge Strike
What happens: Shadowpelt charges directly at you with a melee attack
Frequency: Very common—this is its go-to move
How to dodge: Side-step or dodge perpendicular to the lunge direction
Attack 2: Shock Orbs (AOE)
What happens: While invisible, Shadowpelt jumps into the air and releases shock orbs in all directions
Damage: Lethal if multiple orbs connect
Visual cue: Look up—you’ll see Shadowpelt briefly during the jump
How to dodge:
- Use vertical movement (jetpack/jump)
- Get to higher ground immediately
- Spread out if playing co-op
Danger level: HIGH. This attack can one-shot you if you’re caught off-guard.
Attack 3: Tail Spikes (Homing)
What happens: Shadowpelt flicks spikes from its tail that seek your position
Tracking: These projectiles home in on you
How to dodge:
- Constant lateral movement (strafe continuously)
- Use dash abilities to create distance
- Jetpack to higher platforms
Attack 4: Slam Attack
What happens: Shadowpelt leaps high and slams down at your location
AOE: Creates shockwave on impact
How to dodge:
- Watch for the jump animation
- Use jetpack to get airborne before impact
- Higher ground = complete avoidance
Defensive Strategy
Essential Skills/Gear:
Damage Reduction:
- Skills that reduce incoming damage percentage
- Shields with damage resistance bonuses
- Class mods that boost survivability
Shock Resistance:
- The shock orb attack is Shadowpelt’s deadliest move
- Shock-resistant shields significantly improve survival
- Elemental resistance bonuses from skill trees
Movement Skills:
- Dash abilities for quick repositioning
- Speed bonuses to maintain distance
- Jump height increases for vertical evasion
Best defensive approach: Don’t face-tank Shadowpelt. This isn’t a DPS race—it’s a dance. Stay mobile, use vertical space, and only commit to extended fire during the 15-second visibility windows.
Winning Strategy Summary
Here’s the proven approach for efficient Shadowpelt kills:
Phase 1: Invisible Shadowpelt (Shield Active)
- Equip shock weapon
- Listen for audio cues (growling, movement sounds)
- Fire at where you hear sounds coming from
- Watch for particle effects that reveal position
- Strip shield as quickly as possible
Phase 2: Visible Shadowpelt (15-Second Window)
- Immediately switch to incendiary weapon
- Unload maximum DPS into the flesh health bar
- Use action skills and abilities
- Throw grenades for bonus damage
- Position yourself for when invisibility returns
Phase 3: Repeat Until Victory
- When shield reactivates (invisibility returns), switch back to shock
- Rinse and repeat the cycle
- Stay mobile between phases
- Manage your health and ammo carefully
Co-op tip: One player on shock duty (shield stripping), others ready with fire weapons for the visibility window. Coordinate your burst damage during the 15-second openings.
All Shadowpelt Legendary Drops
Shadowpelt has a dedicated loot pool of three legendary items. Here’s the complete breakdown:
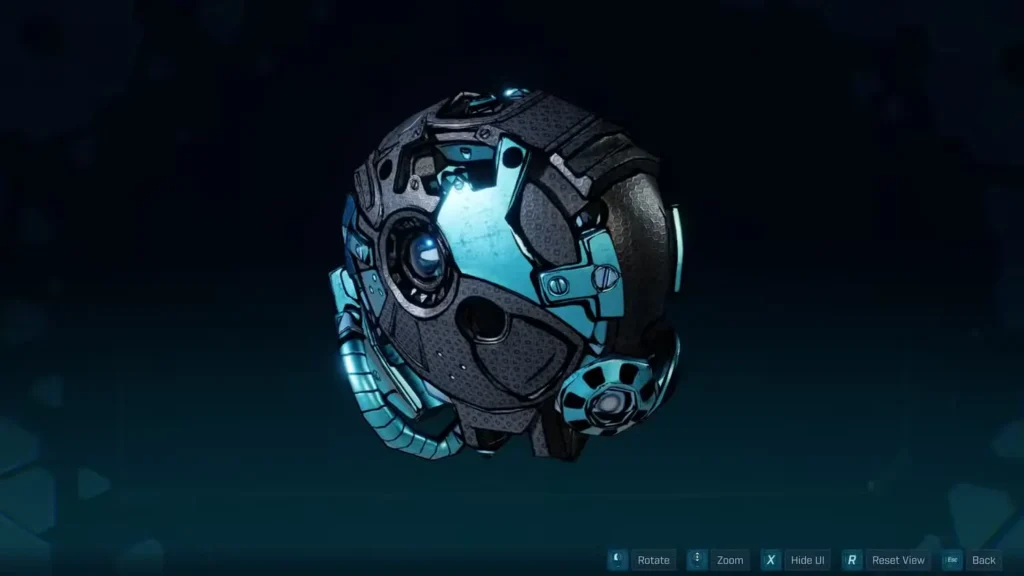
1. Slippy (Grenade)
Type: Legendary Grenade Mod
Special Perk: Swordfish – Deals melee damage on detonation
What it does: When Slippy detonates, it deals melee damage instead of typical explosive damage. This means it benefits from melee damage bonuses and scales with melee-focused builds.
Best for:
- Melee-centric builds (obviously)
- Characters with melee damage amplification skills
- Close-quarters combat specialists
Honest assessment: Niche. If you’re running a melee build, this has potential. Otherwise, there are better grenades. It’s creative but not universally useful.
Farm priority: Low (unless you’re specifically building melee)
2. Sparky Shield
Type: Legendary Shield
Special Perk: Short Circuit – While energy shield is not full, periodically shocks nearby enemies
What it does: Whenever your shield isn’t at full capacity, it automatically releases shock damage to nearby enemies in periodic pulses. Essentially, taking damage activates an offensive retaliation effect.
Best for:
- Tank builds that expect to take hits
- Characters with shield regeneration skills
- Close-range fighters who are frequently in melee distance
- Shock damage-focused builds
Synergy potential:
- Pairs beautifully with skills that trigger on shield damage
- Works well with “shield down” bonuses
- Complements aggressive playstyles
Honest assessment: Actually pretty good with the right build. The passive shock damage helps with crowd control and adds DPS without any input from you. Not top-tier meta, but solid for specific builds.
Farm priority: Medium to High (depends on your build)
3. Vamoose (Sniper Rifle)
Type: Legendary Sniper Rifle
Special Perk: Scarce
What it does: The “Scarce” designation typically means this weapon has unique behavior tied to rarity or unusual mechanics. Without more specific details, this is likely a precision-focused sniper with limited ammo or special shot properties.
Best for:
- Sniper-focused builds
- Long-range specialists
- Precision players who prioritize single-target damage
Honest assessment: Snipers in Borderlands 4 are hit-or-miss depending on your playstyle. If you love sniping, this might be worth checking out. If you prefer close-to-mid range combat, skip it.
Farm priority: Low (unless you’re a dedicated sniper main)
Is Shadowpelt Worth Farming?
Let’s be honest about the value proposition:
Farm Shadowpelt if: ✅ You’re building a melee character (Slippy grenade)
✅ You want Sparky Shield for a tank/shock build
✅ You’re a completionist collecting all legendaries
✅ It’s Weekly Big Encore week (better drop rates)
✅ You have excess Eridium to spend
Skip Shadowpelt if: ❌ None of its drops fit your build
❌ You’re low on Eridium
❌ You prefer boss fights without invisibility mechanics
❌ You’re farming for top-tier meta weapons
Verdict: Shadowpelt is a “farm if it fits your build” boss. The drops are decent but not universally game-changing. Sparky Shield is the standout item for the right builds, while Slippy and Vamoose are more specialized.
If you’re looking for universally powerful legendary drops, consider farming bosses like Idolator Sol or checking our legendary drop locations guide for better targets.
Farming Efficiency Tips
Maximizing Your Time
Speed farming setup:
- Shock SMG as primary – Fastest shield strip
- Fire SMG as secondary – Maximum DPS during visibility
- Movement-focused skill tree – Dodge attacks faster
- Damage reduction gear – Minimize healing downtime
Fast kill strategy:
- Don’t chase Shadowpelt when invisible—wait for audio cues
- Save your action skill for the visibility windows
- Use grenades during the 15-second DPS phase
- Don’t loot until after multiple kills (saves time)
Eridium management:
- Only farm during Weekly Big Encore weeks for Shadowpelt
- Regular spawns (non-Encore) have lower legendary rates
- 100 Eridium per run adds up—make each attempt count
Drop Rate Reality
RNG is brutal: Shadowpelt’s loot pool is completely random. You could get Sparky Shield on your first run or go 20+ kills without seeing it.
Average farm expectations:
- 10-15 runs for a specific legendary (rough estimate)
- Better odds during Weekly Big Encore weeks
- Co-op can split costs and speed up kills
Patience required: If you want a specific drop, prepare for repetition. This is Borderlands—RNG is king.
Common Mistakes to Avoid
❌ Using the wrong elements – Shock for shield, fire for flesh. Don’t mix these up.
❌ Standing still – Shadowpelt punishes immobile players with shock orbs and lunges
❌ Wasting DPS during invisibility – Save your big damage for the 15-second windows
❌ Ignoring vertical space – Use your jetpack to dodge slam attacks and orbs
❌ Explosive weapons – High risk of self-damage in close quarters
❌ Fighting without prep – Always stock ammo and health before starting
Character-Specific Tips
Rafa (Exo-Class Soldier):
- Gun damage bonuses amplify DPS during visibility windows
- Mobility skills help dodge attacks
- Reload speed buffs minimize downtime
Amon (Forgeknight):
- Elemental amplification maximizes shock/fire damage
- Summon abilities provide distraction targets
- Tank-focused builds pair well with Sparky Shield
Vex (Siren):
- Elemental synergies shine here
- Status effect duration extends fire DOT
- Crowd control helps if you’re overwhelmed
Harlowe (Gravitar):
- Defensive abilities improve survival against shock orbs
- Tank builds benefit most from Sparky Shield drop
- Sustained damage output works well with visibility cycles
Alternative Bosses to Farm
If Shadowpelt’s drops don’t interest you, consider these alternatives:
For Better Weapons:
- Idolator Sol – Onslaught SMG, class mods
- Legendary AR Boss Locations
For Shields:
For Class Mods:
Final Thoughts
Shadowpelt is a mechanically interesting boss that requires elemental awareness, good movement, and patience with RNG. The invisibility mechanic makes fights feel different from typical “stand and shoot” encounters, forcing you to rely on audio cues and strategic weapon swapping.
The legendary drops are serviceable but not meta-defining. Sparky Shield has real build potential, while Slippy and Vamoose are more specialized. If you’re a completionist or the drops align with your build, Shadowpelt is worth your Eridium investment—especially during Weekly Big Encore rotations.
Otherwise? Save your resources for bosses with drops that better fit your playstyle. There are plenty of farming targets in Borderlands 4, and efficiency matters when you’re chasing perfect gear rolls.
Ready to hunt the invisible beast? Stock up on shock and fire weapons, grab some Eridium, and head to Whistler’s Maw. Shadowpelt is waiting in the darkness.
Get Borderlands 4:
Related Boss & Farming Guides: