Don’t let Splashzone’s position as an early-game boss fool you—this bandit leader guards some of the most powerful legendary items you’ll use throughout your entire Borderlands 4 playthrough. In fact, the Firewerks shield alone is worth farming repeatedly, even at max level.
What makes Splashzone special isn’t just the quality of drops, but the accessibility. This is one of the most beginner-friendly farming locations in the game, and experienced players keep coming back because of how quickly you can complete farming runs. If you’re looking for an efficient legendary farm that doesn’t require endgame progression or a perfectly optimized build, Splashzone is your answer.
Let me show you exactly how to find, defeat, and efficiently farm this boss for maximum legendary gains.
Finding Splashzone: Step-by-Step Location Guide
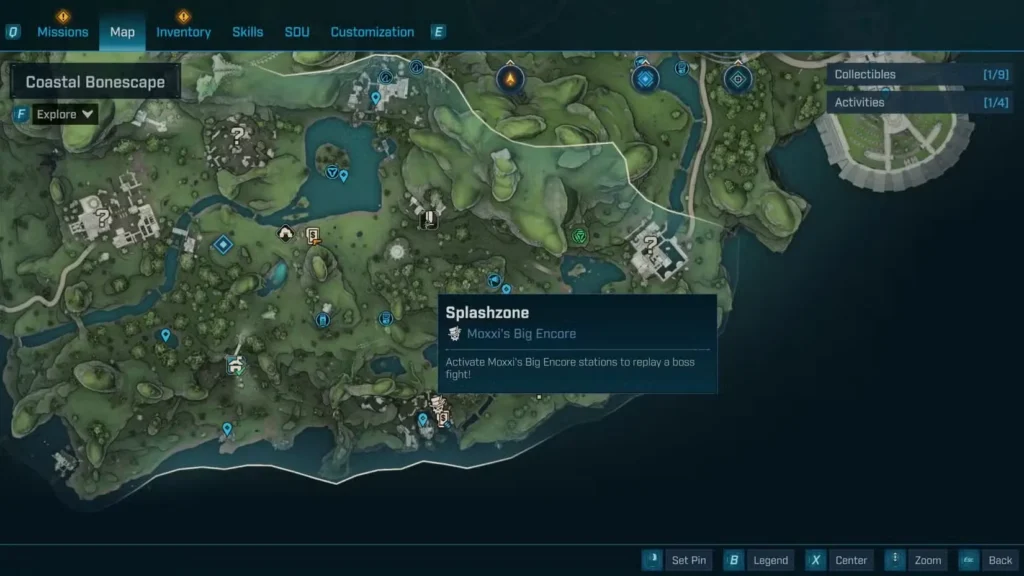
Splashzone makes his home in Riptide Grotto, a bandit stronghold tucked away on the southern coastline of Coastal Bonescape in the Fadefields region.
Complete Navigation Guide:
Starting Point:
- Fast travel to the Abandoned Post safehouse in Fadefields
- This is your closest spawn point to Riptide Grotto
Route to Riptide Grotto:
- Exit the safehouse and head east from your spawn location
- Travel through the area until you encounter some ponds or water features
- Once you reach the ponds, turn south
- Look for a drop-off point that descends into the bandit encampment
- Drop down into Riptide Grotto below
Landmark Tips: The Fadefields coastline is fairly distinctive, so if you’re having trouble finding Riptide Grotto, keep the ocean to your south and follow the cliff edges. The entrance is basically a large depression or crater filled with bandit structures.
One thing I love about this location: it’s available extremely early in the campaign. You don’t need to unlock special areas or complete lengthy quest chains. If you’ve reached the Fadefields, you can farm Splashzone. This makes it perfect for gearing up during your first playthrough.
For more context on navigating the Fadefields region, check out our Fadefields Echo Logs locations guide which covers the entire area.
Navigating Riptide Grotto: The Fast Route
Here’s where Splashzone farming becomes incredibly efficient: you don’t actually need to fight anything before reaching the boss.
Speed Run Strategy:
Option 1 – Direct Glide:
- The bandit camp has a central arena where Splashzone waits
- You can completely bypass all regular enemies
- Simply glide from the entrance straight toward the center of Riptide Grotto
- Land directly in Splashzone’s arena
Option 2 – Ground Route: If you prefer staying grounded (or don’t have glide available):
- Stick to the perimeter of the camp
- Use cover to avoid aggro from bandits
- Most enemies won’t chase you far if you keep moving
Pro tip: The glide method is significantly faster and completely safe. Regular bandits can’t really threaten you while you’re airborne, and you’ll land right where you need to be. I typically complete the entire run from fast travel to boss engagement in under 30 seconds this way.
Essential Services Near the Boss Arena
Borderlands 4 makes farming incredibly convenient at Splashzone’s location, with all the facilities you need right next to the fight.
Moxxi’s Big Encore Machine Location:
- Cross the broken bridge east of Splashzone’s arena
- The respawn machine sits just across this bridge
- Allows instant boss respawning without re-running the entire camp
Ammo Vending Machine:
- Located near the Big Encore machine
- Perfect for selling unwanted loot between runs
- Restock ammo and grenades as needed
Farming Loop Optimization: This setup is perfect for rapid farming sessions. Here’s the flow:
- Kill Splashzone
- Collect loot
- Sell unwanted items at the vending machine
- Use your earned cash to activate Big Encore
- Fight Splashzone again immediately
The proximity of these machines to the boss arena eliminates all downtime. You’re basically fighting Splashzone, getting paid from your loot, then using that money to fight him again. It’s a beautiful, self-sustaining loop.
For players new to the boss farming system, our Moxxi’s Big Encore complete guide explains all the mechanics and cost considerations.
Splashzone Combat Strategy
Splashzone isn’t mechanically complex, which is part of what makes him such an excellent farm target. However, understanding his patterns helps you kill him faster.
Boss Characteristics:
- Low health pool compared to most bosses
- Standard bandit-style attacks (bullets, grenades)
- Relatively predictable movement patterns
- No immunity phases or complex mechanics
Combat Tips:
Offensive Strategy:
- Splashzone has a noticeably short health bar for a boss
- Focus on consistent DPS rather than burst damage
- Any reasonably leveled build can take him down quickly
- Elemental damage isn’t critically important but helps
Defensive Approach:
- Use the arena’s cover points to break line of sight
- Watch for grenade throws and reposition accordingly
- Don’t stand still—keep moving to avoid concentrated fire
- Shield management is more important than raw damage mitigation
Speed Kill Techniques: For experienced farmers wanting to maximize runs per hour:
- Use your action skill immediately at fight start
- Throw grenades while closing distance
- Aim for critical hits to shorten the fight
- Save your best weapon for this encounter
Level Considerations: If you’re farming Splashzone at a higher level than the area’s natural difficulty, you’ll absolutely demolish him. This is common for players returning to farm specific legendaries after progressing further in the campaign. Even at-level players shouldn’t struggle with this fight, though.
Complete Splashzone Legendary Loot Pool
Splashzone drops three legendary items, and each one brings something unique to your arsenal. Here’s the complete breakdown:
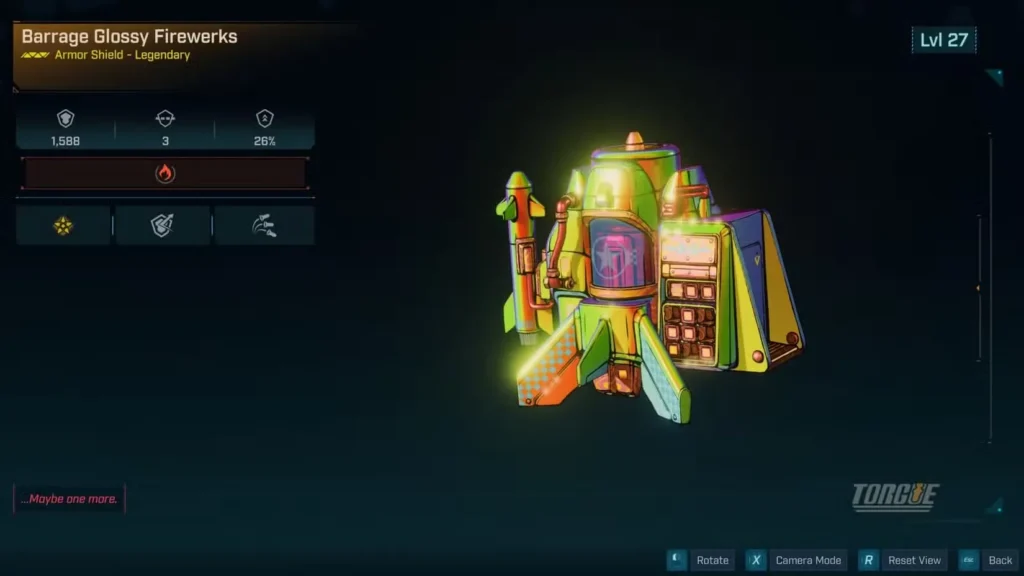
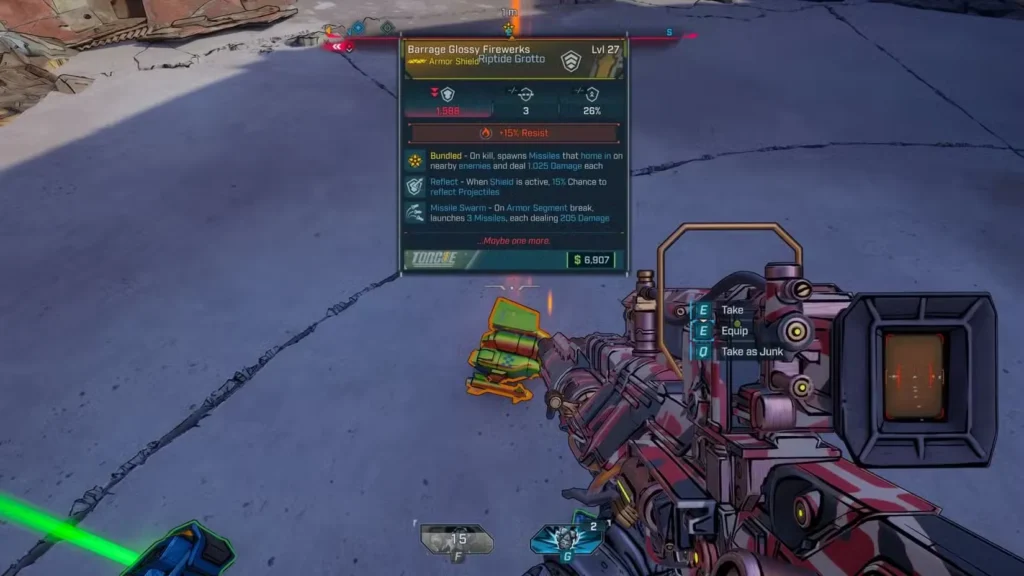
Firewerks (Legendary Shield)
Special Effect – Bundled:
- On kill, spawns homing missiles that seek nearby enemies
- Missiles automatically target the closest threats
Why Firewerks is Elite-Tier:
This isn’t just the best drop from Splashzone—it’s one of the best shields in the entire game, period. Here’s what makes it exceptional:
Primary Strengths:
- Passive damage amplification that requires zero input from you
- Works with ALL kill sources (guns, grenades, action skills, melee)
- Scales beautifully into late game and Ultimate Vault Hunter Mode
- Perfect for crowd control situations
- Synergizes with virtually every build archetype
Missile Swarm Synergy: Firewerks has a high probability of rolling with the Missile Swarm perk as a bonus stat. When this happens:
- Breaking any armor segment spawns additional missiles
- Creates even more projectiles flying across the battlefield
- Dramatically increases your effective DPS
- Makes armored enemies much easier to handle
Build Applications:
- Mobbing builds: Incredible for clearing rooms full of enemies
- Boss farming: The missiles provide free additional damage
- Solo play: Acts as force multiplication when outnumbered
- Co-op: Missiles help teammates without requiring coordination
I’ve used Firewerks across multiple characters and playsthroughs, and it never feels like it falls off. Even when you find higher-capacity shields with better stats, that missile spawning effect remains incredibly valuable. This is a chase item worth farming until you get a good roll.
For more legendary shield options, explore our best legendary shields farming guide.
Jelly (Legendary Grenade)
Special Effect – Self-Replicating:
- Creates duplicate grenades after the initial explosion
- Child grenades inherit the base grenade’s properties
Practical Applications:
Jelly is the crowd control specialist in Splashzone’s loot pool. While not as universally powerful as Firewerks, it excels in specific scenarios.
Where Jelly Shines:
- Mob-heavy encounters with lots of grouped enemies
- Clearing rooms filled with low-to-medium health targets
- Area denial (keeps spawning explosions in a zone)
- Damage over time when combined with elemental effects
Strategic Considerations:
- The duplication effect means one grenade becomes many
- Great ammo efficiency for grenade-focused builds
- Works exceptionally well with grenade damage bonuses
- Can overwhelm tight spaces with continuous explosions
Limitations:
- Less effective against single-target bosses
- Can be overkill for regular encounters
- Relies on enemy positioning for maximum effect
Jelly is the kind of grenade that feels amazing in the right situations but sits in your inventory during boss fights. It’s a situational tool rather than an always-equipped staple.
Lead Balloon (Legendary Shotgun)
Special Effect – Lightweight:
- Projectiles float upward instead of following standard ballistics
- Projectiles explode and spawn child projectiles mid-air
- Creates a carpet bombing effect
Combat Profile:
Lead Balloon is easily the weirdest weapon in Splashzone’s drop pool. The floating projectile mechanic fundamentally changes how you use it.
Unique Mechanics:
- Pellets rise after firing, defying normal shotgun physics
- Each projectile explodes while airborne
- Explosions spawn additional child projectiles
- Creates a cascading area-of-effect damage zone
Best Use Cases:
- Enclosed arenas where enemies can’t easily escape the effect radius
- Multi-level environments (shoot from below, hit enemies above)
- Grouped enemy encounters
- Stationary or slow-moving targets
Tactical Advantages:
- Bypasses some cover since projectiles arc over obstacles
- Excellent for hitting enemies on elevated positions
- The child projectile spawning multiplies your effective pellet count
- Strong area denial weapon
Drawbacks:
- Unusual projectile behavior requires adjustment
- Less effective in open environments
- Not ideal for precision shooting
- Hit registration can feel inconsistent
Lead Balloon is a love-it-or-hate-it weapon. Some players build entire strategies around its unique mechanics, while others find it too unpredictable. I recommend giving it a fair shake before dismissing it—the carpet bombing effect can be surprisingly devastating when you learn to aim it properly.
If shotguns are your preferred weapon type, check out our best legendary shotguns farming guide for more options.
Why Splashzone is the Perfect Farm Target
Among all the legendary farming locations in Borderlands 4, Splashzone stands out for several compelling reasons.
Accessibility Factors:
1. Early Game Availability
- Reachable within the first few hours of gameplay
- No endgame prerequisites or special unlocks required
- Perfect for gearing up during your initial playthrough
2. Minimal Combat Required
- Skip all trash mobs by gliding to the arena
- Only fight the actual boss
- Zero-risk approach to the encounter
3. Short Kill Times
- Splashzone has one of the lowest health pools among legendary-dropping bosses
- Most builds kill him in under a minute
- Some optimized setups can achieve 15-20 second kills
4. Convenient Infrastructure
- Moxxi’s Big Encore right next to the arena
- Vending machine for inventory management
- Close fast travel point
5. Quality Loot Pool
- Only three legendaries means higher individual drop rates
- All three items are actually useful (no complete duds)
- Firewerks alone justifies farming this boss
Efficiency Comparison:
Compared to other legendary farm targets:
- Faster than most Auger Mine bosses (shorter approach, easier fight)
- More accessible than late-game world bosses
- Better loot concentration than world drop farming
- More forgiving than challenging bosses like Rocken Roller
For players looking to expand their farming routes, our Rocken Roller boss farming guide covers another excellent legendary source.
Optimal Splashzone Farming Strategy
Want to maximize your legendary drops per hour? Follow this optimized farming approach:
Standard Farming Method:
Initial Clear:
- Fast travel to Abandoned Post safehouse
- Navigate to Riptide Grotto (east then south)
- Glide directly to Splashzone’s arena
- Defeat the boss and collect loot
- Fast travel back to Abandoned Post
- Repeat the process
This method costs zero money but requires repeated navigation.
Advanced Farming Method (Moxxi’s Big Encore):
Rapid Respawn Technique:
- Complete your initial Splashzone kill
- Collect all loot drops
- Sell unwanted items at the nearby vending machine
- Use Moxxi’s Big Encore to instantly respawn Splashzone
- Fight and collect loot again
- Repeat steps 3-5 as long as you have money
Cost-Benefit Analysis:
Moxxi’s Big Encore costs in-game currency per use, but saves significant time:
- Eliminates travel time between runs
- No need to re-navigate Riptide Grotto
- Stay in your optimal DPS stance/position
- Can chain multiple kills in minutes
Budget Management: The loot you get (even non-legendaries) sells for enough to fund multiple Big Encore activations. As long as you’re selling drops between runs, you can sustain indefinite farming sessions.
Farming Session Recommendations:
New Players (Limited Resources):
- Use standard farming method initially
- Switch to Big Encore once you have excess cash
- Budget for 5-10 respawns per dedicated session
Experienced Players (Optimized Builds):
- Pure Big Encore farming for maximum efficiency
- Expect 10-15 kills per 30-minute session
- Fast kill times mean excellent legendary-per-hour rates
Loot Management Tips:
- Keep Firewerks with good rolls (high capacity, useful perks)
- Save Jelly grenades with beneficial elements
- Evaluate Lead Balloon damage rolls before discarding
- Sell everything else to fund more farming
For more ways to generate farming currency, visit our cash farming unlimited money guide.
Build Recommendations for Splashzone Farming
While Splashzone isn’t a demanding fight, certain builds farm him more efficiently than others.
Optimal Build Characteristics:
High Priority:
- Burst damage capabilities to shorten kill times
- Mobility skills for faster arena positioning
- Any build above the area’s level threshold
Nice to Have:
- Weapon swap speed for Lead Balloon testing
- Grenade damage bonuses if farming for Jelly
- Shield-focused builds benefit most from Firewerks
Class Considerations:
Any vault hunter can farm Splashzone effectively, but consider:
- Damage-focused skill trees reduce time per kill
- Action skills with crowd control help if you fight trash mobs
- Passive survivability means less downtime between attempts
For players still developing their character, our best solo class guide helps you choose the right vault hunter for your playstyle.
When to Farm Splashzone vs. Other Bosses
Splashzone shouldn’t be your only farming location, but he fills a specific niche in your legendary farming rotation.
Farm Splashzone When:
- You need a reliable Firewerks shield
- Building a grenade-focused character (Jelly)
- Looking for low-investment farming
- Leveling a new character
- Short on time but want legendary chances
Move to Other Bosses When:
- You’ve obtained your desired Firewerks roll
- Seeking specific legendary weapons (shotguns excluded)
- Ready for more challenging encounters
- Looking for endgame-specific gear
Farming Rotation Suggestion:
Early Game → Splashzone (Firewerks priority) Mid Game → All legendary drop locations (diversify loot) Late Game → Specialized boss farms based on build needs
Official Resources & Additional Guides
Official Borderlands 4 Links:
Related Farming Guides:
- Rocken Roller Boss Farming Guide
- Best Legendary Shields Farming Locations
- Boss Farming: Moxxi’s Big Encore Guide
- All Main Bosses Legendary Loot Guide
Progression Resources:
Final Thoughts: Why Splashzone Matters
In a game filled with complex endgame bosses and challenging raid encounters, Splashzone represents something refreshingly straightforward: an accessible, efficient legendary farm that respects your time.
The Firewerks shield alone makes this boss worth farming throughout your entire Borderlands 4 journey. Whether you’re building your first character or optimizing your tenth, that legendary shield provides value that scales all the way to max level content.
What really sets Splashzone apart isn’t just the loot quality—it’s the complete package. Easy navigation, short kill times, convenient infrastructure, and genuinely useful legendary drops create a farming experience that feels rewarding rather than tedious. This is how legendary farming should work in every looter shooter.
Start your farming session today:
- Fast travel to Abandoned Post
- Glide into Riptide Grotto
- Defeat Splashzone
- Collect your Firewerks
- Dominate the rest of the game
Don’t sleep on this early-game boss. Some of the best gear in Borderlands 4 drops right here in this unassuming bandit camp. Happy hunting, Vault Hunter!
Quick Reference Guide:
- Location: Riptide Grotto, Coastal Bonescape, Fadefields
- Access: Abandoned Post safehouse → East → South → Drop down
- Difficulty: Easy (low health boss, simple mechanics)
- Legendary Drops: Firewerks (shield), Jelly (grenade), Lead Balloon (shotgun)
- Priority Farm: Firewerks shield
- Farming Method: Moxxi’s Big Encore for efficiency
- Best For: All levels, early gear farming, shield collectors