The Poison Tile Problem in Dragon Quest 1
As you explore the vast world of Alefgard in Dragon Quest I HD-2D Remake, you’ll quickly notice those ominous purple tiles scattered across the landscape. These swamp tiles damage your hero with every step, gradually chipping away at your HP as you traverse certain areas.
Early in the game, this constant damage can be annoying and potentially dangerous, especially if you’re low on healing items or far from a safe resting spot. Fortunately, there are two solutions to this problem—one available early in your journey, and one that requires significant progression and combat prowess.
Let me break down both methods so you can choose the approach that fits your current stage in the game.
Method 1: Safe Passage Spell (Early Game Solution)
The first and most accessible way to handle poison tiles is by learning the Safe Passage spell. This is a spell you can obtain relatively early in your adventure, making it the go-to solution for most of the game.
Where to Find the Safe Passage Scroll
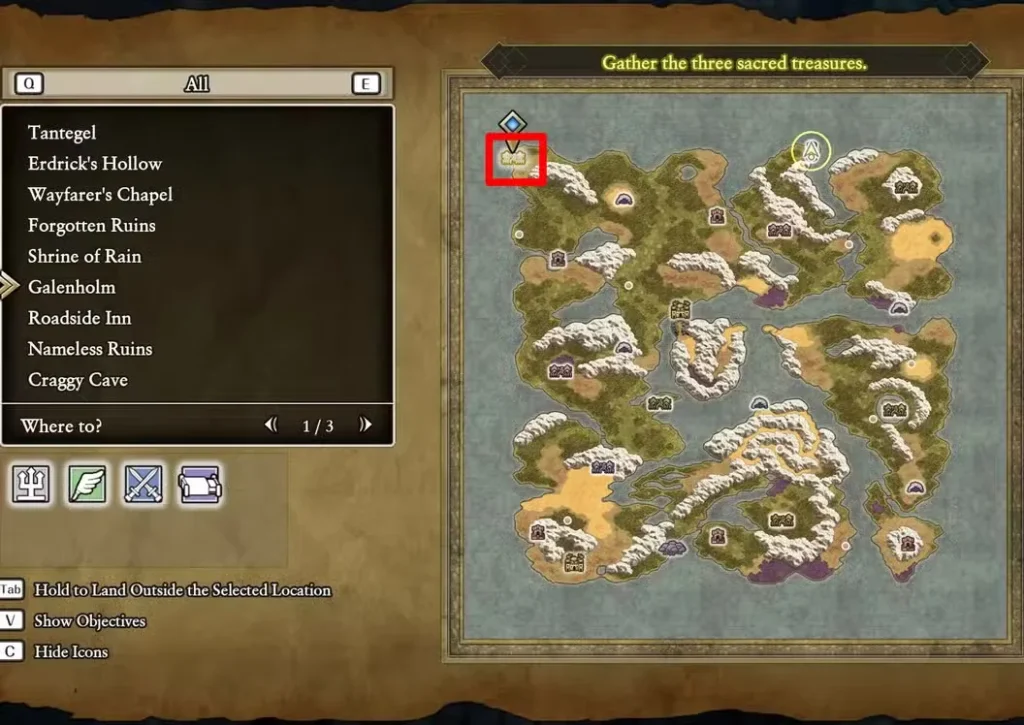
Location: Galenholm
When you can access it: Early in the story
Galenholm is a town you’ll visit during the early portions of Dragon Quest 1’s main storyline. If you’re also working through the Zalen questline, you’ll encounter him here as well, making it a particularly worthwhile stop.
Step-by-step instructions:
- Travel to Galenholm (located in the far northwest corner of the map)
- Look for the house in the southwest corner of town
- Enter the house and locate the bookshelf
- Interact with the bookshelf to claim the Safe Passage scroll
How to Use Safe Passage
Once you’ve grabbed the scroll, here’s how to activate it:
- Open your menu and navigate to your Item Bag
- Find the Safe Passage scroll in your inventory
- Use the scroll to learn the spell permanently (this consumes the scroll)
- The spell will now appear in your Spells menu
Using the spell in the field:
- Open your menu during exploration
- Select Spells
- Choose Safe Passage
- Your hero will glow with a protective aura
While Safe Passage is active, you can walk over purple swamp tiles without taking any damage. The effect lasts for a set number of steps, so you’ll need to recast it periodically if you’re traversing large poisonous areas.
MP Management Tip: Safe Passage costs MP to cast, so be mindful of your mana reserves. If you’re planning a long journey through swampy terrain, consider bringing Magic Water or resting at an inn before venturing out. For more tips on managing your resources, check out our items and combat guide.
When Safe Passage Is Most Useful
This spell is invaluable throughout the mid-game when you’re exploring remote areas of Alefgard. Certain dungeons and landmark locations feature extensive swamp sections, and Safe Passage lets you navigate them without constantly stopping to heal.
It’s also helpful when you’re grinding for experience or searching for treasure in swampy regions. The less HP you waste on environmental damage, the longer you can stay in the field before needing to return to town.
Method 2: Erdrick’s Armour (Late Game Solution)
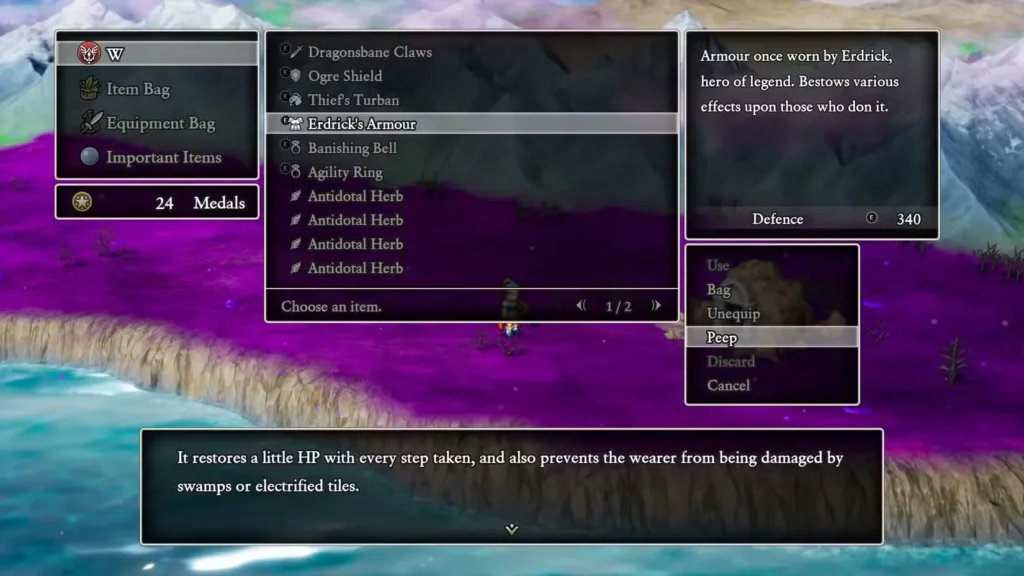
The second method for handling poison tiles is to obtain Erdrick’s Armour, one of the legendary hero’s most powerful equipment pieces. This isn’t just a solution to poison tiles—it’s one of the best armor pieces in the entire game.
Why Erdrick’s Armour Is Incredible
When equipped, Erdrick’s Armour provides multiple game-changing benefits:
- Complete poison immunity – Walk over swamp tiles without taking any damage
- Electrified tile immunity – Also protects against those dangerous electric floor tiles
- Passive HP regeneration – Restores a small amount of health with every step you take
- Spell and breath damage reduction – Reduces damage from magical attacks and dragon breath
Essentially, once you have this armor, you’ll never need to cast Safe Passage again. The passive regeneration alone makes it worth the effort to obtain, as you’ll naturally heal between battles while exploring.
How to Get Erdrick’s Armour
Here’s where things get challenging. Erdrick’s Armour is obtained by defeating the Knight Aberrant, a powerful optional boss found in the town of Damdara.
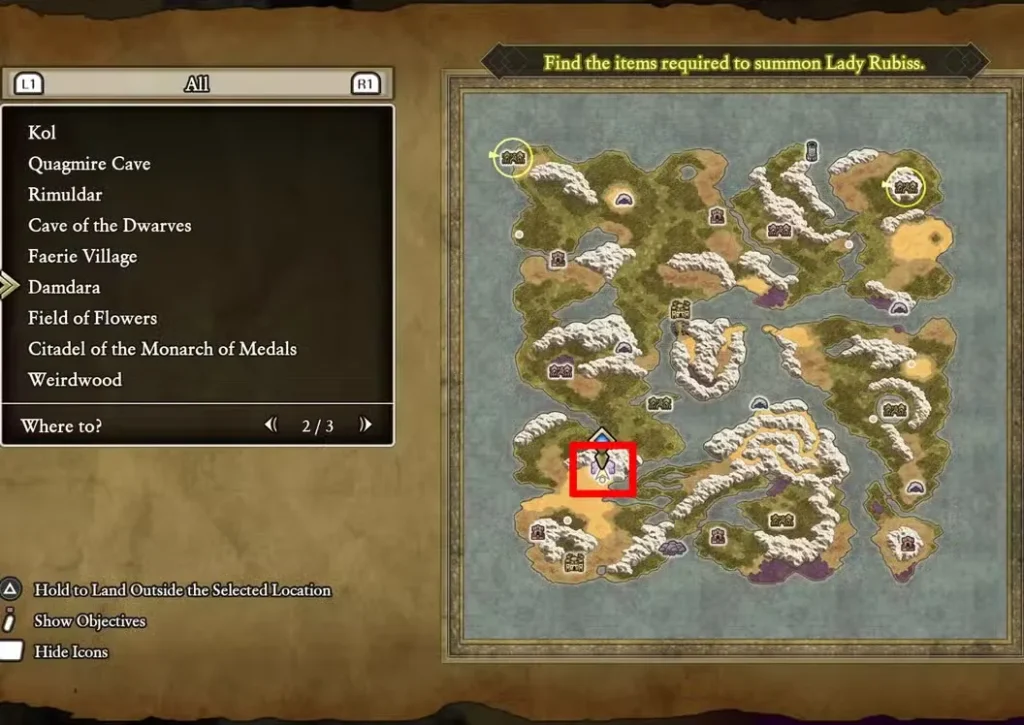
Location: Damdara
Where to find it: Southwest corner of Alefgard, between Faerie Village and the Citadel of the Monarch of Medals
Finding the Knight Aberrant:
- Travel to Damdara (you’ll visit this town during the main story)
- Navigate to the small alcove in the center of town
- You’ll need to pass through some swamp tiles to reach it (ironic, right?)
- Interact with the location to trigger the boss fight
Important note: This is an optional encounter, meaning you can challenge it whenever you feel ready. There’s no time limit or story requirement, so don’t feel pressured to tackle it before you’re properly prepared.
Defeating the Knight Aberrant: Complete Strategy
The Knight Aberrant is legitimately one of the toughest fights in Dragon Quest 1 HD-2D Remake. This isn’t a boss you can stumble into and expect to win—you need proper preparation and a solid tactical approach.
Recommended Level and Equipment
Minimum Level: 30+
Don’t even consider attempting this fight below Level 30. Even at that level, you’ll need to execute your strategy flawlessly. If you’re struggling at Level 30, grind to Level 31 or 32 before trying again.
Essential Equipment:
Before challenging the Knight Aberrant, make sure you have the best available gear:
- Siren Sword – Top-tier weapon for this stage of the game
- Dragon Shield – Provides excellent defense against physical attacks
- Phantom Mask – Found in a blue chest behind locked doors
- Dragon Mail – One of the best armor pieces before obtaining Erdrick’s Armour
If you’re missing any of these pieces, take time to acquire them before the fight. The difference between mediocre equipment and optimal equipment is often the difference between victory and defeat.

Required Spell: Moreheal
Make sure you’ve learned the Moreheal spell before attempting this boss. This powerful healing spell is absolutely critical for surviving the Knight Aberrant’s damage output.
Moreheal restores significantly more HP than the basic Heal spell, allowing you to recover from the knight’s hardest-hitting attacks. Without it, you’ll struggle to keep pace with the incoming damage.
For help finding other powerful spells, check our complete guide to special scrolls and skills.
The Winning Strategy
Here’s the proven method for taking down the Knight Aberrant:
Turn 1 – Set Up Your Defense:
- Cast Dodgy Dance immediately
- This ability increases your evasion, making the knight miss more often
Throughout the Fight:
- Refresh Dodgy Dance regularly – Keep this buff active at all times
- The effect wears off after a certain number of turns, so recast it before it expires
Healing Priority System:
Follow these HP thresholds religiously:
- Normal status: Stay above 210 HP at all times
- Defense debuff active: Stay above 275 HP
The Knight Aberrant can apply a defense debuff that makes you take significantly more damage. When you see this status effect, immediately raise your healing threshold. One unlucky hit while debuffed and under 275 HP can end your run.
Offensive Approach:
- Use standard Attacks to chip away at the knight’s health
- Don’t waste MP on offensive spells—you need every point for Moreheal and Dodgy Dance
- This will be a long fight, so settle in for the grind
Understanding the Knight Aberrant’s Moveset
What makes this boss dangerous is the potential for nasty attack sequences. The Knight Aberrant can:
- Deal heavy physical damage with sword strikes
- Apply defense debuffs that amplify damage taken
- String together multiple attacks in succession
The randomness factor means even with perfect execution, you might get unlucky with a brutal combo. Don’t get discouraged if you lose a few attempts—that’s part of the challenge.
Mental preparation: Accept that this might take 3-5 attempts even with optimal strategy. Each failed attempt teaches you more about the boss’s patterns and timing.
What to Do When You Win
After defeating the Knight Aberrant, you’ll see a glowing spot appear in the arena. Interact with it to claim your prize: Erdrick’s Armour.
Immediately equip it and enjoy never worrying about poison tiles again. The passive regeneration will also make general exploration significantly more comfortable, as you’ll naturally heal between random encounters.
This armor will serve you through the endgame, making it one of the most valuable pieces of equipment you’ll obtain during your entire playthrough.
Which Method Should You Use?
The answer depends on where you are in your journey:
Early to Mid-Game (Levels 1-25):
- Use the Safe Passage spell exclusively
- It’s accessible, costs minimal MP, and solves the problem effectively
- Don’t attempt the Knight Aberrant until you’re significantly stronger
Late Game (Level 30+):
- Challenge the Knight Aberrant when you have optimal equipment
- Erdrick’s Armour is superior in every way and eliminates the need for Safe Passage
- The passive benefits make late-game exploration much smoother
Completionist Approach:
- Get Safe Passage early for immediate relief
- Use it throughout the mid-game while leveling up
- Obtain Erdrick’s Armour once you’re strong enough
- Now you have both options, though you’ll primarily use the armor
Additional Benefits of Erdrick’s Armour
Beyond solving the poison tile problem, Erdrick’s Armour has strategic value in challenging encounters. If you’re working through difficult areas like Weirdwood and the Mirages boss fight, the passive regeneration and damage reduction can be the difference between success and failure.
The armor also makes dungeon exploration more efficient. Since you’re constantly regenerating HP, you can fight more consecutive battles before needing to rest or use healing items. This speeds up experience grinding and resource collection significantly.
Final Thoughts
Poison tiles are a persistent hazard throughout Dragon Quest I & II HD-2D Remake, but they don’t have to be a major obstacle. Whether you choose the accessible Safe Passage spell or invest the time to obtain Erdrick’s Armour, you have effective solutions available.
For most players, I recommend this progression:
- Grab Safe Passage from Galenholm early
- Use it throughout the mid-game
- Challenge the Knight Aberrant around Level 30-32
- Equip Erdrick’s Armour and enjoy the endgame benefits
The Knight Aberrant fight is tough, but the rewards are absolutely worth the effort. Erdrick’s Armour isn’t just a quality-of-life upgrade—it’s a significant power increase that makes the late-game content more manageable.
With the information in this guide, you’re ready to tackle poison tiles head-on (or just walk right over them without a care). Good luck with the Knight Aberrant, and may Erdrick’s legacy guide your path through Alefgard!