Maximize your survival in Dying Light: The Beast with our strategic upgrade priority guide. Learn which items to upgrade first for maximum efficiency and resource optimization.
In the brutal wilderness of Dying Light: The Beast, every upgrade decision can mean the difference between triumphant survival and becoming another corpse littering Castor Woods. With limited Manual Pages and precious crafting materials, knowing exactly which items deserve your immediate attention becomes a survival-critical skill.
This isn’t about collecting every upgrade eventually – it’s about strategic resource allocation that transforms Kyle from vulnerable survivor into apex predator. The wrong upgrade priorities will leave you underpowered when facing the game’s most dangerous encounters, while smart choices create cascading advantages that compound throughout your entire adventure.
The Upgrade Priority Philosophy: Impact vs. Investment
Before diving into specific items, understanding the strategic framework behind upgrade priorities helps you make informed decisions even when facing new equipment or changing circumstances.
High-Impact, Low-Investment Items: These provide immediate, noticeable improvements with relatively common materials. They form the foundation of your upgrade strategy.
Force Multiplier Upgrades: Items that enhance your effectiveness across multiple scenarios. These offer the best long-term value for resource investment.
Situational Powerhouses: Specialized equipment that dominates specific encounters but requires rare materials. These come later in your priority sequence.
Resource Efficiency Principle: Early upgrades should reduce resource consumption in other areas, creating positive feedback loops that accelerate your overall progression.
Priority #1: Bandages – Your Lifeline to Survival
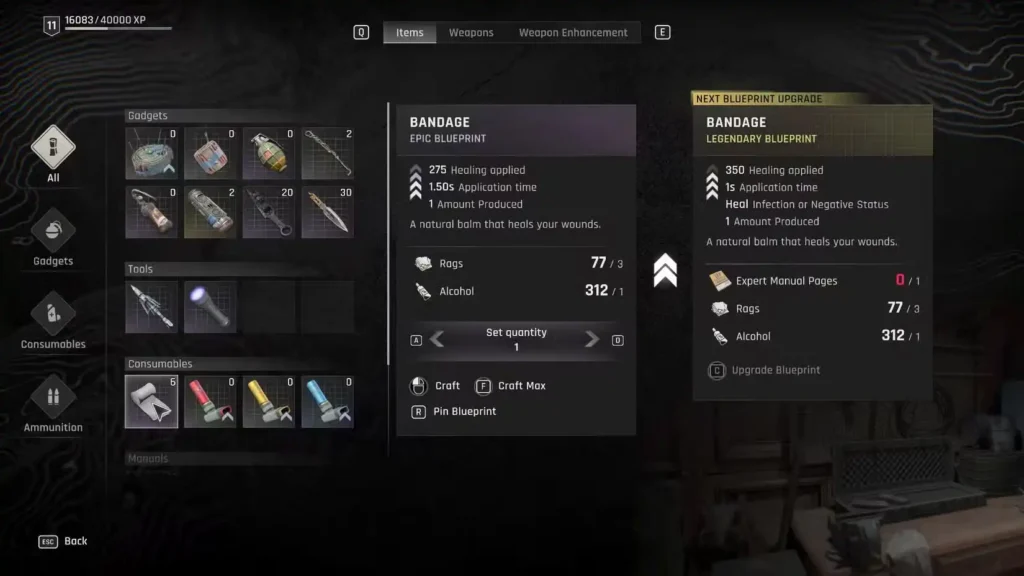
Nothing else matters if you can’t stay alive long enough to use it. Bandages represent your primary healing source and should consume your upgrade resources before any other consideration.
Why Bandages Dominate Priority: In Dying Light: The Beast, health management isn’t just about convenience – it’s about maintaining combat effectiveness and avoiding experience point penalties from death. Every point of damage you can efficiently heal represents maintained capability for continued survival.
Upgrade Impact Analysis:
- Grey to Epic: Healing effectiveness increases dramatically while reducing consumption rate
- Epic to Legendary: Wait until late-game story progression makes Legendary Manual Pages available
- Resource ROI: Early Manual Pages invested in bandages save resources across all other activities
Strategic Integration: Upgraded bandages enable more aggressive tactical approaches, allowing you to take calculated risks that generate better loot and experience. This creates a positive feedback loop where better healing enables better resource gathering.
Practical Application: With Epic-quality bandages, you can engage in extended combat scenarios that would otherwise require retreat and resource consumption. This translates to more efficient landmark clearing, survivor rescues, and convoy raids.
TL;DR – Bandages: Absolutely critical first priority for survival foundation, enabling aggressive tactics and preventing death penalties while creating positive resource feedback loops.
Priority #2: UV Flashlight – Your Crowd Control Salvation
The UV Flashlight transforms from basic survival tool to tactical crowd control weapon through strategic upgrades, becoming essential for managing overwhelming encounters.
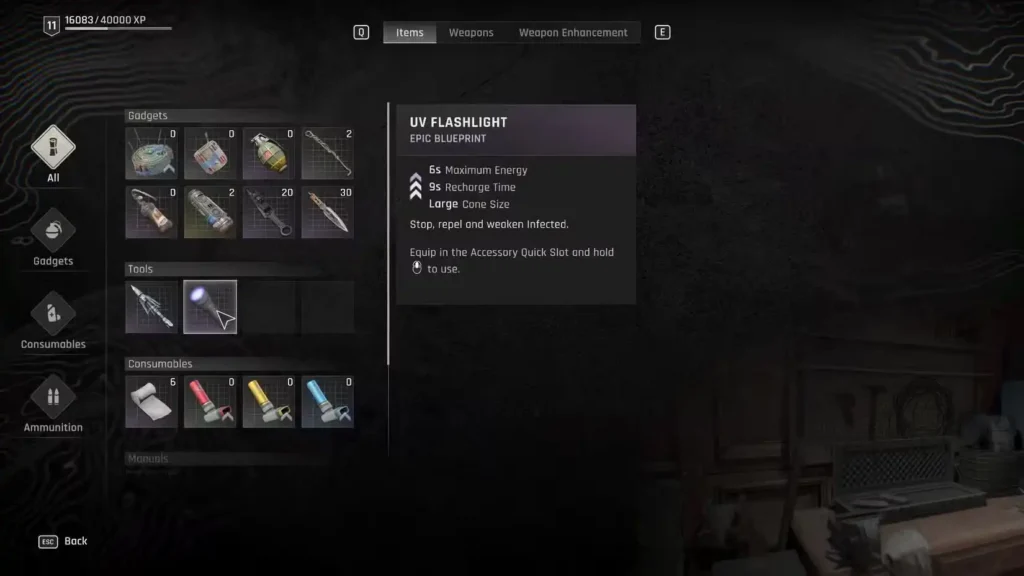
Enhanced Capability Breakdown:
- Extended Duration: Longer active periods for sustained crowd control
- Improved Recharge Rate: Faster recovery between uses for continuous deployment
- Enhanced Range: Greater effective distance for safer enemy management
Tactical Applications:
Stamina Management Strategy: When exhausted during combat, the UV Flashlight provides crucial breathing room for recovery. Upgraded versions offer longer protection periods, allowing complete stamina regeneration during intense encounters.
Elite Enemy Control: Volatiles and Virals represent lethal threats that can end encounters instantly. The UV Flashlight’s slowing effect becomes survival-critical during night encounters or when accidentally triggering dangerous spawns.
Combat Integration: Advanced players use UV Flashlight cycling to maintain continuous pressure on enemy groups while managing weapon durability and stamina. This technique requires upgraded equipment for effectiveness.
Resource Efficiency: Upgraded UV Flashlights reduce reliance on expensive consumables like molotovs and grenades for crowd control, preserving these resources for truly overwhelming situations.
TL;DR – UV Flashlight: Essential crowd control tool that enables stamina recovery, slows elite enemies, integrates with advanced combat tactics, and reduces expensive consumable usage.
Priority #3: Hunting Bow – Silent Death from Distance
The Hunting Bow represents your primary stealth elimination tool and strategic advantage for managing dangerous encounters before they become overwhelming.
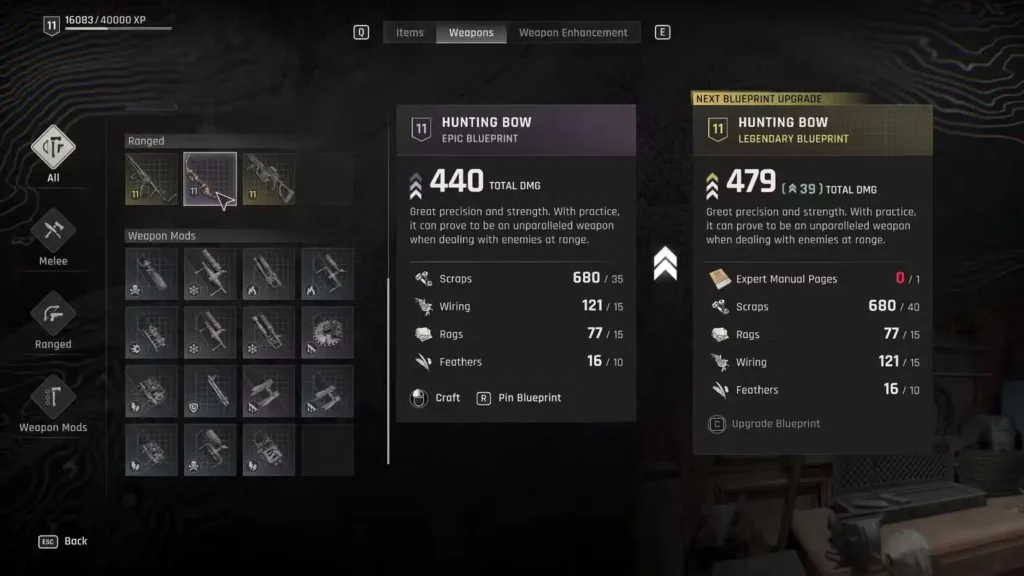
Immediate Availability Advantage: Unlike many weapons requiring story progression or rare materials, the Hunting Bow blueprint sits atop your first workbench, providing immediate access to this crucial capability.
Upgrade Impact Sequence:
- Rare Quality: Available immediately, provides solid baseline performance
- Epic Quality: Significant damage increase enabling one-shot eliminations of priority targets
- Arrow Variety: Fire Arrows from Gas Station Voltage Pole dramatically expand tactical options
Stealth Integration Strategy: The bow’s silent operation allows systematic enemy reduction without alerting nearby threats. This capability becomes essential for managing Dark Zones, convoy raids, and landmark exploration efficiently.
Resource Material Planning: Epic quality upgrades require substantial material investment: Rags, Wire, Feathers, Leather, Scraps, and Intermediate Manual Pages. Plan gathering routes to accumulate these materials efficiently.
Advanced Tactical Applications:
- Priority Target Elimination: Screamers, Toads, and other alert-capable enemies
- Explosive Trigger: Remote Gas Tank detonation for area denial
- Silent Reconnaissance: Enemy position identification before engagement
- Resource Conservation: Reducing reliance on ammunition-consuming firearms
TL;DR – Hunting Bow: Critical stealth tool available immediately, enables silent priority target elimination, requires substantial material investment for Epic upgrade, essential for tactical engagement control.
Priority #4: Throwing Knives – Ultimate Versatility Tool
Throwing Knives provide unmatched tactical versatility, serving offensive, defensive, and utility roles across every encounter type in the game.
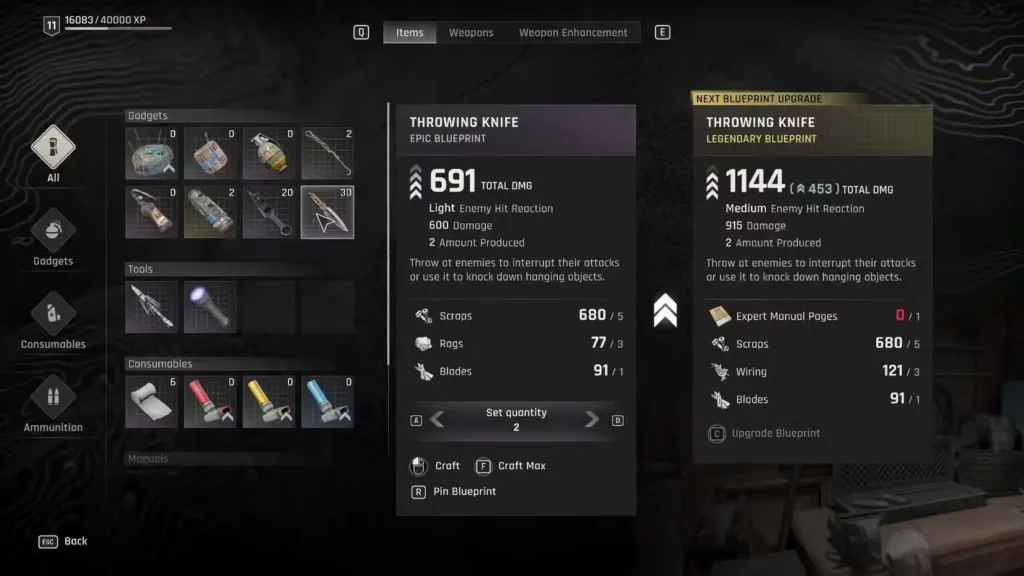
Multi-Role Functionality:
Defensive Applications: Single-button zombie grab escapes provide instant relief from potentially fatal situations. This capability alone justifies prioritizing throwing knife upgrades.
Offensive Capabilities: Enhanced damage and knockback effects against human enemies create tactical advantages during bandit encounters and territory control scenarios.
Stealth Operations: Instant takedown capability from behind reduces noise generation and conserves stamina during systematic area clearing.
Combat Integration: Quick deployment during intense encounters provides emergency solutions when primary weapons fail or become impractical.
Upgrade Economics: Throwing knives are consumed upon use, making upgrade quality crucial for maximizing value from limited inventory. Higher quality versions deliver significantly more impact per knife expended.
Resource Efficiency: Upgraded throwing knives reduce reliance on more expensive consumables for similar tactical effects, creating resource savings that compound over time.
TL;DR – Throwing Knives: Unmatched versatility for defense, offense, stealth, and emergency situations; consumed upon use making quality upgrades essential for resource efficiency.
Priority #5: Molotov Cocktails – Area Denial Mastery
Fire represents one of the most effective crowd control mechanisms in Dying Light: The Beast, and Molotov upgrades dramatically enhance this capability.
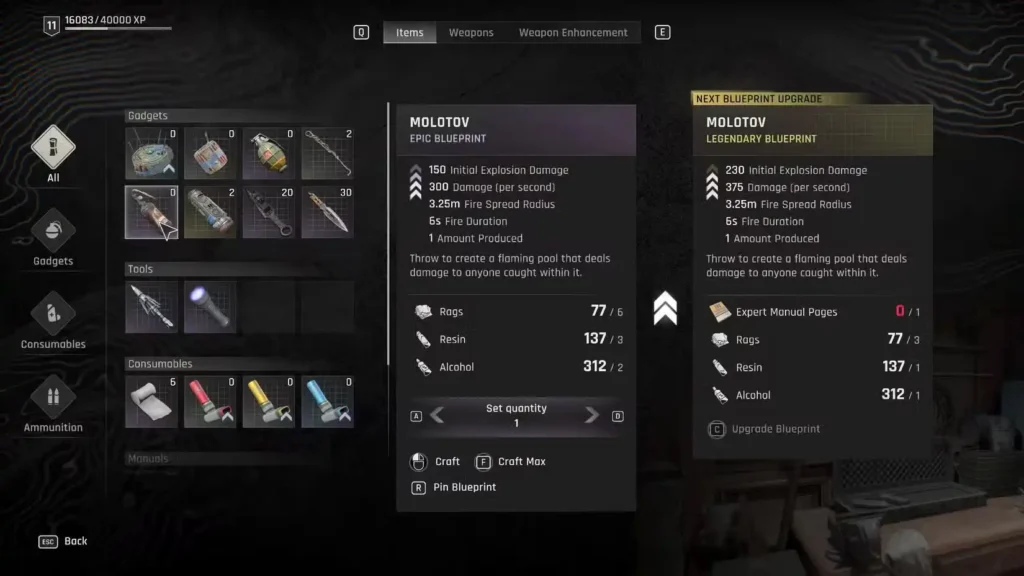
Area Control Mechanics: Molotovs create persistent fire zones that continuously damage enemies while blocking movement paths. This area denial capability becomes crucial for managing overwhelming encounters.
Upgrade Impact Analysis:
- Duration Extension: Longer-lasting fires provide extended area control
- Damage Amplification: Higher damage per second affects more enemy types
- Coverage Area: Enhanced spread creates larger denial zones
Strategic Applications:
Horde Management: Well-placed Molotovs can eliminate entire groups of basic infected while creating barriers against reinforcing enemies.
Escape Route Creation: Fire curtains provide temporary safe zones during overwhelming encounters, allowing tactical repositioning or complete escape.
Chokepoint Control: Narrow passages, doorways, and bridges become controllable terrain features through strategic Molotov deployment.
Elite Enemy Considerations: While Virals and Volatiles continue attacking while burning, the damage over time effect significantly reduces their threat level during extended encounters.
Safety Protocols: Burning enemies can transmit fire damage to players through contact, requiring tactical awareness of fire spread patterns and enemy movement.
TL;DR – Molotov Cocktails: Powerful area denial tool for horde management, escape route creation, and chokepoint control; requires tactical awareness of fire damage transmission risks.
Priority #6: Hand Grenades – Ultimate Stopping Power
Hand Grenades represent the highest single-target damage option available, making them essential for dealing with the game’s most challenging encounters.
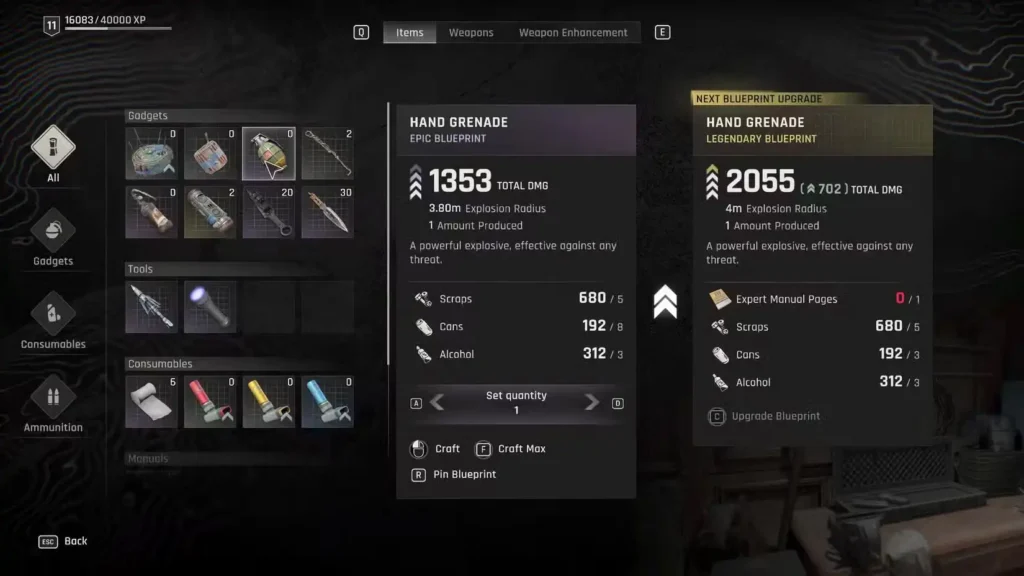
Damage Scaling Analysis:
- Basic Quality: ~700 damage in 3.6-meter radius
- Maximum Quality: Substantially higher damage in 4-meter radius
- Shrapnel Effects: Area denial through persistent hazard creation
Primary Target Categories:
Mixed Enemy Groups: Large clusters of basic infected led by armored variants become manageable through single grenade deployment.
Heavy Elite Enemies: Goons, Demolishers, and other tanky enemies require explosive damage to eliminate efficiently without excessive resource consumption.
Human Combat Scenarios: Bandit groups using cover and ranged weapons become vulnerable to explosive area damage that bypasses their defensive positioning.
Chimera Encounters: Boss-level enemies often require explosive damage to break through their enhanced defensive capabilities.
Tactical Deployment Considerations:
- Blast Radius Awareness: Friendly fire potential requires careful positioning
- Enemy Movement Prediction: Leading targets for maximum impact
- Environmental Interaction: Using terrain features to amplify explosive effects
- Resource Conservation: Reserve for encounters where other methods prove insufficient
TL;DR – Hand Grenades: Maximum single-target damage for elite enemies, mixed groups, human combat, and boss encounters; requires careful deployment to avoid friendly fire damage.
Priority #7: Reinforcement Mod – Weapon Durability Solution
Weapon degradation represents a constant resource drain that the Reinforcement Mod effectively addresses, making it a valuable middle-priority upgrade.
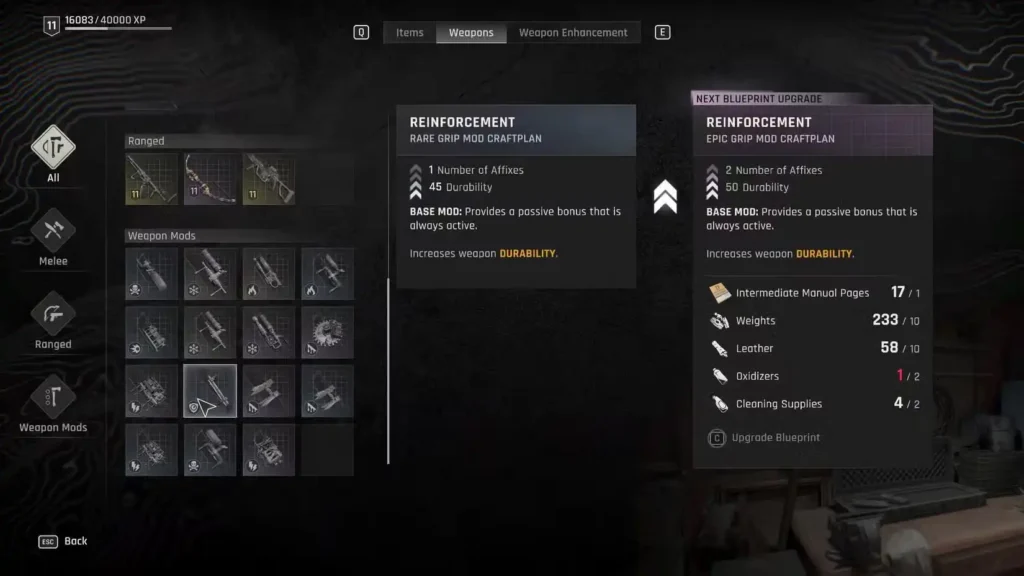
Durability Impact:
- Basic Quality: +35 durability points
- Higher Qualities: Up to +55 durability points
- Practical Effect: Significantly extended weapon lifespan before repair requirements
Strategic Value: The Reinforcement Mod reduces frequency of weapon repairs, conserving Scraps and Blades for other essential crafting activities. This resource efficiency becomes increasingly important as combat intensity escalates.
Acquisition Information: Located at Factory Relay Substation north of Recreation Island, this mod requires specific exploration but provides immediate benefit upon installation.
Integration with Game Systems: The mod bridges the gap until unlocking the Efficient Fighting Skill, which provides alternative solutions to weapon durability concerns. Early game acquisition significantly improves resource efficiency.
Application Strategy: Install on your primary melee weapon to maximize impact. The durability bonus applies to your most-used equipment, providing the greatest resource savings.
TL;DR – Reinforcement Mod: Reduces weapon repair frequency, conserves crafting materials, available through specific exploration, bridges gap to late-game durability solutions.
Priority #8: Endurance Booster – Stamina Management Mastery
The Endurance Booster addresses one of the game’s most limiting resources – stamina – making it crucial for extended survival scenarios despite requiring rare crafting materials.
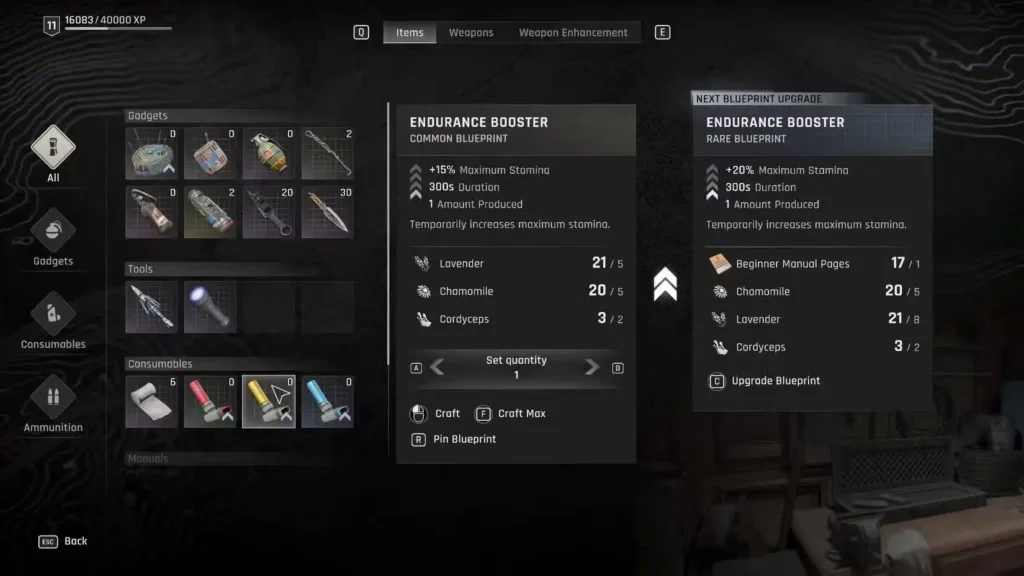
Stamina Scaling:
- Grey Quality: +15% maximum stamina
- Epic Quality: +30% maximum stamina
- Strategic Impact: Dramatically extends combat and parkour capabilities
Critical Scenarios:
Night Survival: Extended running during Volatile encounters requires substantial stamina reserves. The Endurance Booster can determine survival during emergency escape scenarios.
Extended Combat: Prolonged encounters drain stamina through attack and defense actions. Enhanced stamina pools enable sustained engagement without vulnerability periods.
Parkour Challenges: Complex traversal sequences require stamina management for successful completion. The booster provides safety margins for navigation mistakes.
Resource Scarcity: Cordyceps and other rare ingredients make this item expensive to craft. However, the survival benefits justify the investment for critical scenarios.
Usage Optimization: Reserve Endurance Boosters for genuinely challenging scenarios rather than routine encounters. The rarity of crafting materials demands strategic deployment.
TL;DR – Endurance Booster: Essential for night survival and extended encounters, provides significant stamina enhancement, requires rare materials demanding strategic usage.
Integration with Overall Survival Strategy
These upgrade priorities don’t exist in isolation – they integrate with your broader survival methodology to create comprehensive advantages. Understanding how upgraded equipment enhances fundamental survival techniques helps maximize the value of your resource investments.
Upgrade Synergies:
- Upgraded bandages enable aggressive tactics that generate more upgrade materials
- Enhanced UV Flashlight facilitates safer landmark exploration for blueprint acquisition
- Improved Hunting Bow reduces resource consumption during stealth operations
- Better throwing knives provide reliable backup options during equipment failures
Resource Flow Optimization: Smart upgrade priorities create positive feedback loops where improved equipment generates more resources for further improvements, accelerating your progression curve.
TL;DR – Integration: Upgrade priorities synergize with fundamental survival strategies to create positive resource feedback loops and accelerated progression.
Upgrade Timeline and Resource Management
Early Game Focus (First 10 Hours):
- Bandages to Epic quality (immediate survival foundation)
- UV Flashlight to Rare quality (basic crowd control)
- Hunting Bow baseline improvements (stealth capability)
Mid Game Development (Hours 10-25):
- Complete UV Flashlight upgrades (advanced crowd control)
- Throwing Knives to Epic quality (versatility maximization)
- Molotov Cocktails enhanced effectiveness (area control)
Late Game Optimization (25+ Hours):
- Hand Grenades for boss encounters (maximum damage)
- Specialized mods and boosters (efficiency optimization)
- Situational equipment based on playstyle preferences
Resource Allocation Strategy: Reserve Legendary Manual Pages for Bandages only until you have substantial surplus. The survival benefit of maximum healing efficiency outweighs all other considerations during progression.
TL;DR – Timeline: Follow staged upgrade progression matching game phases, prioritize survival foundation early, add tactical capabilities mid-game, optimize for efficiency late-game.
Final Optimization Thoughts
Successful upgrade prioritization in Dying Light: The Beast requires balancing immediate survival needs with long-term tactical advantages. The items listed here provide the maximum return on investment for most playstyles and encounter types.
Remember that upgrade priorities may shift based on your specific approach to the game. Stealth-focused players might prioritize bow upgrades higher, while aggressive players might rush grenade improvements. Use this guide as a foundation while adapting to your personal survival strategy.
The key principle remains constant: every upgrade should either improve your survival capability or enhance your ability to gather resources for future improvements. Avoid upgrade decisions that provide minimal impact or consume disproportionate resources without clear benefit.
Ready to optimize your survival loadout? Get Dying Light: The Beast on Steam, PlayStation, or Xbox and start building your perfectly upgraded survival arsenal.
Looking for more strategic advantages? Don’t miss our complete docket codes collection to start your adventure with exclusive gear that complements these upgrade priorities perfectly!