Treasure hunting in Dying Light: The Beast hits different when you’re dealing with cryptic clues while zombies are breathing down your neck. The D3 Treasure Map is one of those delightfully frustrating puzzles that seems straightforward until you’re standing on the Hardware Store roof wondering where the hell that “blocked tenement house” actually is.
If you’ve been scratching your head over this particular treasure hunt, you’re definitely not alone. The clue about reaching the location “from the terrace of the hardware store” is technically accurate but practically misleading. Let’s cut through the confusion and get you that sweet loot without the headache.
Why the D3 Treasure Map Matters
Before we dive into the solution, let’s talk about why this treasure hunt is worth your time:
- Cabinet of Curiosities Achievement – Required for trophy/achievement completion
- Legendary Regeneration Boosters – 5 high-tier healing items that provide 300 seconds of continuous regeneration
- Military Medkit – Premium healing supplies for tough encounters
- Renewable loot – Respawns every two in-game days for repeated farming
- Exploration mastery – Teaches advanced navigation and puzzle-solving skills
The D3 treasure represents one of the most valuable single-location loot caches in the early-to-mid game, making it essential for players looking to gear up efficiently.
Finding the Hardware Store – Your Starting Point
Location Details
Area: Old Town region, northeastern section
Landmark: Near Railway Station
Map Coordinates: D3 grid square
Zone Type: Dark Zone Point of Interest
Navigation Tips
The Hardware Store can be tricky to spot initially, so here’s how to locate it efficiently:
Using Landmarks:
- Find the Railway Station first – This large, distinctive building serves as your primary navigation reference
- Look northeast from the station – The Hardware Store sits in this general direction
- Use high vantage points – Climb tall buildings or structures for better visibility
- Deploy binoculars – Essential for spotting Dark Zone markers from distance
Visual Identification:
- Dark Zone icon on your map indicating special loot potential
- Hardware Store signage visible from street level
- Multi-story building with accessible rooftop areas
- Urban commercial architecture typical of retail establishments
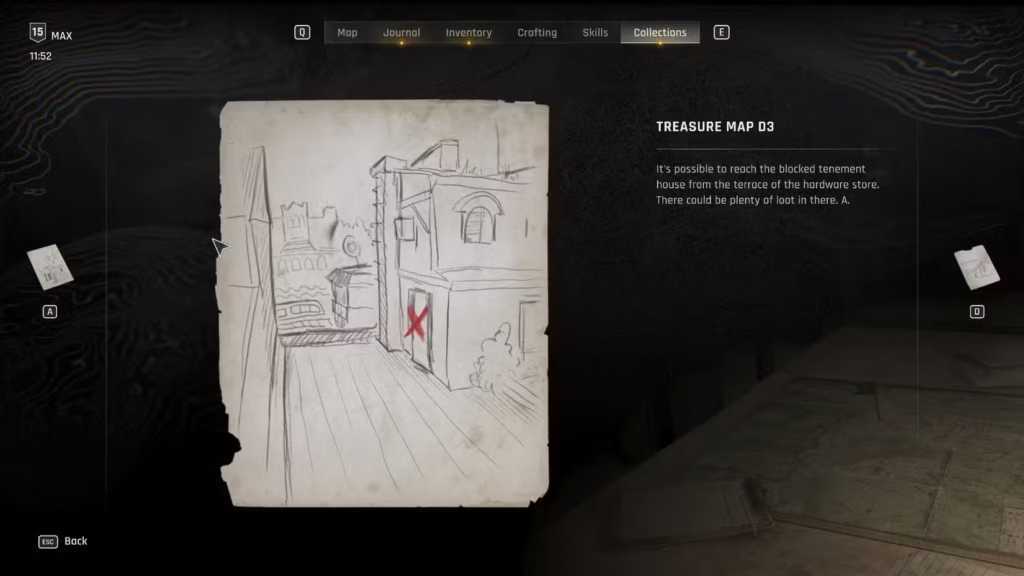
Decoding the D3 Treasure Map Clue
Let’s break down the actual treasure map text and why it’s so confusing:
The Original Clue
“It’s possible to reach the blocked tenement house from the terrace of the hardware store. There could be plenty of loot there. A.”
Why This Clue Is Misleading
The phrase “from the terrace” suggests a direct route from the Hardware Store roof to your destination. In reality, you need to:
- Use the Hardware Store as a starting point – Not a direct launch pad
- Cross the street – The target building is on the opposite side
- Navigate building-to-building – Requires parkour skills and route planning
- Look for visual cues – The “blocked” entrance is key to identifying the right location
This type of misdirection is typical of Dying Light’s treasure hunt design – technically accurate but requiring creative interpretation.
Step-by-Step Treasure Location Guide
Phase 1: Accessing the Treasure Map
Before starting your hunt, make sure you can reference the map:
- Open Main Menu – Press your designated menu button
- Navigate to Collections Tab – Usually found in the main menu structure
- Scroll to Treasure Hunts section – Contains all discovered treasure maps
- Select D3 Treasure Map – Opens the clue for reference during exploration
Pro Tip: Keep this menu accessible during your hunt – you might need to reference the clue multiple times while navigating.
Phase 2: Rooftop Navigation
Starting from the Hardware Store location:
- Climb to the Hardware Store roof – Use exterior elements like fire escapes, ledges, or parkour routes
- Orient toward the opposite street – Face away from your original approach direction
- Identify the target building – Look for a structure with visible terrace areas
- Plan your crossing route – Assess the safest path across the street gap
Safety Considerations:
- Clear local zombies first – Eliminate street-level threats before committing to parkour
- Check stamina levels – Ensure you have enough energy for extended climbing
- Plan escape routes – Always know how to retreat if things go wrong
Phase 3: Target Building Identification
The “blocked tenement house” has specific identifying features:
Visual Markers:
- Small terrace area with outdoor furniture (specifically a couch)
- Wooden plank barrier blocking a door entrance
- Apartment-style architecture consistent with residential buildings
- Accessible gap allowing you to reach the terrace level
Navigation Strategy:
- Cross to the opposite building – Use parkour to bridge the street gap
- Locate the terrace with couch – This distinctive furniture piece confirms correct location
- Find the blocked door – Look for wooden planks covering an entrance
- Prepare for lockpicking – You’ll need to breach this door shortly
Phase 4: Accessing the Hidden Treasure
Once you’ve identified the correct building and terrace:
- Remove the wooden plank – Interact with the barrier to clear the entrance
- Pick the door lock – Use your lockpicking skills to gain entry
- Enter the apartment – You’re now inside the treasure location
- Navigate to kitchen area – The safe is located in this specific room
Lockpicking Tips:
- Bring sufficient picks – Don’t get stuck unable to complete the treasure hunt
- Practice beforehand – Ensure your lockpicking skills are adequate
- Clear the area – Eliminate any zombies that might interrupt the process
Cracking the Safe Combination
Finding the Clue
Inside the apartment, you need to locate a specific piece of paper that contains the safe combination:
Clue Location: Small room/kitchen area
Document Type: Handwritten note or paper scrap
Content Preview: References calling a number at a specific time, mentions it’s not ‘SAFE’
Decoding the Combination
The note references the time “12:25:55” and mentions that it’s not ‘SAFE.’ This wordplay indicates:
Safe Combination: 12 – 25 – 55
The clever part of this puzzle is that the word “SAFE” in the note refers both to safety (as in, not safe to call at that time) and the actual safe you’re trying to open. The time becomes your combination.
Opening the Safe
- Locate the safe in the kitchen area
- Input the combination – Enter 12, then 25, then 55
- Confirm the sequence – Make sure each number is correctly entered
- Open and collect rewards – Claim your treasure!
Treasure Rewards Breakdown
Military Medkit
Value: High-tier healing item
Usage: Emergency healing for dangerous encounters
Strategic Importance: Essential for late-game boss fights and challenging zones
5x Legendary Regeneration Boosters
Effect Duration: 300 seconds (5 minutes) of continuous healing
Rarity: Legendary-tier consumables
Crafting Alternative: Can be made using Poppy and rare resources, then upgraded with Expert Manual Pages
Strategic Usage Tips:
- Save for boss encounters – Don’t waste on regular zombie fights
- Use during exploration – Great for dangerous area reconnaissance
- Combine with combat – Allows aggressive tactics with safety net
- Emergency situations – Perfect for when regular healing isn’t enough

Advanced Treasure Hunting Strategies
Respawn Mechanics
The D3 treasure location operates on a 48-hour respawn timer:
- Real-time equivalent – Approximately 2 in-game days
- Loot refresh – Both safe contents and container items reset
- Renewable farming – Create a regular treasure hunting schedule
- Calendar tracking – Mark when you last looted for optimal timing
Integration with Other Activities
Combine D3 treasure hunting with related activities:
Resource Farming Routes:
- Scraps and blades – Hardware Store area contains crafting materials
- Money making opportunities – Sell excess items for cash
- XP farming – Combat experience from area zombies
Achievement Completion:
- Cabinet of Curiosities progress – Part of larger achievement/trophy
- Other treasure maps – Develop skills for remaining hunts
- Exploration mastery – Builds navigation and puzzle-solving abilities
Common D3 Treasure Map Mistakes
Mistake #1: Misinterpreting “From the Terrace”
Many players assume they can directly access the target from the Hardware Store roof, leading to wasted time searching for non-existent direct routes.
Mistake #2: Wrong Building Identification
Not all buildings with terraces are the correct location. Look specifically for the couch and wooden plank markers.
Mistake #3: Ignoring the Time Clue
Some players overthink the safe combination, missing the obvious 12:25:55 time reference in the note.
Mistake #4: Inadequate Preparation
Arriving without sufficient lockpicks or stamina, forcing retreat and retry attempts.
Expert Tips for Treasure Hunting Success
Pre-Hunt Preparation Checklist
- Lockpicking supplies – Bring extra picks for safety
- Stamina management – Rest or use energy items before complex parkour
- Combat readiness – Clear weapons and healing items
- Map access – Ensure you can quickly reference the treasure map clue
Efficiency Optimization
- Daylight timing – Easier navigation and reduced zombie activity
- Route memorization – Learn the path for faster repeat visits
- Combo with other activities – Maximize area productivity
- Documentation – Screenshot or note the location for future reference
Integration with Overall Progression
The D3 treasure hunt represents more than just a single loot opportunity:
Skill Development
- Advanced parkour techniques – Building-to-building navigation
- Puzzle-solving abilities – Interpreting cryptic clues
- Environmental awareness – Reading visual and contextual cues
- Resource management – Optimal use of consumables
Long-term Benefits
- Achievement progression – Cabinet of Curiosities completion
- Farming establishment – Regular high-value loot source
- Exploration confidence – Mastery of complex navigation challenges
- Combat preparation – Premium healing items for future encounters
Final Thoughts: Mastering Castor Woods’ Hidden Secrets
The D3 Treasure Map perfectly embodies what makes Dying Light: The Beast’s exploration so rewarding. It combines environmental storytelling, practical puzzle-solving, and meaningful rewards into a single, memorable experience.
While the initial confusion around the Hardware Store clue might be frustrating, successfully solving this treasure hunt builds confidence for tackling the other manual pages and hidden secrets scattered throughout Castor Woods.
Remember, treasure hunting in The Beast isn’t just about individual rewards – it’s about developing the skills and knowledge that make you a master of this dangerous world. The D3 location might give you legendary healing items today, but the problem-solving skills you develop will serve you throughout your entire survival journey.
For more treasure hunting and exploration guides, check out our complete safe combinations list and all missions walkthrough. Happy hunting, and may your lockpicking skills never fail you when it matters most!
Official Game Resources:
- Dying Light: The Beast Official Site
- Steam Store Page
- PlayStation Store
- Xbox Store