There’s something undeniably satisfying about slicing through zombie hordes with a proper sword instead of just whacking them with makeshift clubs and rusty pipes. Dying Light: The Beast brings back the elegant art of zombie swordsmanship from the original game, but finding these deadly blades requires more strategy than you might expect.
Whether you’re dreaming of clean decapitations or just want a weapon that feels more civilized than a crowbar, this guide will get you swinging steel like a post-apocalyptic samurai in no time.

Why Swords Are Game-Changers in Dying Light: The Beast
Before we dive into locations and farming strategies, let’s talk about what makes swords special in this zombie-infested world:
- Superior reach compared to most melee weapons
- High damage multipliers for headshots and decapitations
- Excellent crowd control with sweeping attacks
- Satisfying combat animations that never get old
- Upgrade potential that scales with your progression
Personal take: After spending hours with various makeshift weapons, getting your first proper sword feels like a massive upgrade in both effectiveness and style. Plus, there’s psychological satisfaction in wielding a “real” weapon instead of improvised tools.
The key thing to understand is that swords in Dying Light: The Beast aren’t just lying around waiting to be picked up – you need to either craft them or know exactly where to look for the good ones.
The Rust: Your First Sword and Long-Term Companion
Finding The Rust Blueprint
Your sword journey begins with The Rust – a makeshift blade that might not look like much, but can carry you through most of the game when properly upgraded. Here’s exactly where to find it:
Location: Highway Bus Refuge (Safe Spot) Map Grid: Approximately C3 (north of Town Hall in the Old City) Access: Available early in the game
Navigation tip: The grid system can be a bit tricky to read at first, but look for the bus converted into a safe haven. It’s hard to miss once you’re in the general area, and the blueprint is waiting inside for you to discover.
Why The Rust Is Worth Your Investment
Don’t let the name fool you – this “rusty” sword has serious potential:
- Specializes in precision targeting for clean decapitations
- Upgradeable through multiple quality tiers (Normal → Rare → Epic → Legendary)
- Uses common crafting materials that you’ll find naturally
- Scales with your level and Manual Page discoveries
Strategic insight: Many players overlook The Rust because it doesn’t look impressive initially. But a fully upgraded Rust can outperform many “better” weapons you’ll find later, especially when you factor in the materials investment versus performance ratio.
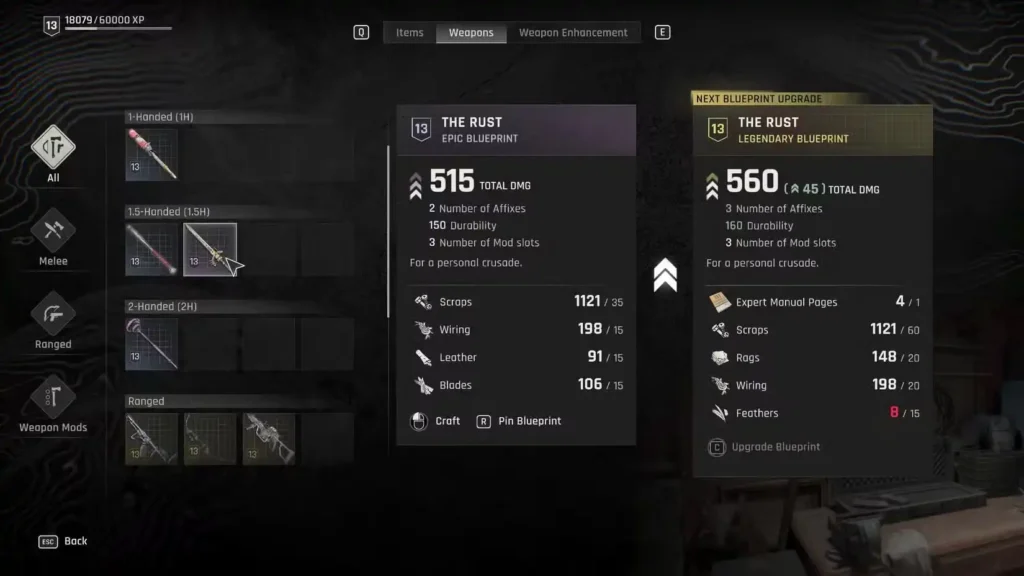
Complete Upgrading Strategy for The Rust
Understanding the Quality System
The Rust follows Dying Light: The Beast’s standard quality progression, but each tier dramatically improves its effectiveness:
Normal → Rare → Epic → Legendary
Each upgrade increases:
- Base damage output
- Weapon durability
- Head shot damage multipliers
- Overall effectiveness against tougher enemies
Required Materials by Upgrade Tier
Basic to Epic Upgrades:
- Scraps – Farm these efficiently from destroyed items
- Wiring – Check out our electrical parts farming guide
- Leather – Obtained from various sources throughout Castor Woods
- Blades – Salvaged from other weapons or found in loot
- Basic and Intermediate Manual Pages – Farm these systematically
Legendary Upgrade (Final Tier):
- Feathers – Best farming locations here
- Expert Manual Pages – Rare drops that require dedicated farming
Resource management tip: Start collecting upgrade materials early, even before you find The Rust blueprint. The materials are useful for other upgrades too, so you’re never wasting effort.
Power-Up Your Sword with Mods
Essential Sword Modifications
Once you have The Rust (or any two-handed sword), consider these game-changing mods:
Avalanche Mod:
- Adds freezing effects to charged attacks
- Slows down enemy movement
- Creates tactical advantages in crowd situations
Frost Mod:
- Applies frost damage over time
- Stacks with other elemental effects
- Particularly effective against tougher infected
Why mods matter: A modded sword isn’t just about damage – the crowd control effects can save your life when you’re surrounded. The freezing effects give you breathing room to reposition or line up perfect headshots.
Mid-Game Sword Hunting: Convoy Farming Strategy
When to Transition to Convoy Farming
Once you hit level 10-12 and want something more powerful than The Rust, it’s time to start hunting Military Convoys. This isn’t guaranteed, but the payoff can be huge.
The Convoy System Explained
Military Zombies carry Keycards that unlock convoy caches containing high-quality weapons. Here’s how the system works:
- Kill Military Zombies to collect keycards
- Use keycards to open convoy containers
- Loot refreshes daily at specific times
- Epic quality weapons have decent drop rates at certain locations
Best Convoy Locations for Sword Farming
Mountain Tunnel Convoy (North of Highway Tower Safe Spot)
- Highest probability for Modern Sabre drops
- Convenient farming due to nearby safe spot
- Daily refresh makes grinding efficient
Mountain Path Convoy (Grid G6)
- Alternative location if Mountain Tunnel is disappointing
- Good variety of weapon types
- Slightly harder to reach but worth the trek
Farmlands Convoy (Between D6/7)
- Easier access for early-game convoy farming
- Mixed loot pool – not just swords
- Good backup option when other spots are farmed out
Optimal Convoy Farming Method
- Clear the convoy and loot everything
- Sleep at nearby safe spot to advance time
- Return the next morning for fresh loot
- Repeat until satisfied with your sword collection
Efficiency tip: Combine convoy farming with other activities in the area. Check for ammo locations or complete nearby side quests while you’re waiting for loot to refresh.
Advanced Sword Combat Techniques
Maximizing Sword Effectiveness
Master the charged attack system:
- Hold attack button for devastating charged strikes
- Charged attacks trigger mod effects more reliably
- Perfect for groups of weaker enemies
Positioning is everything:
- Use sword reach to maintain safe distance
- Back up while swinging to avoid counterattacks
- Position enemies in lines for maximum sweep damage
Head shot prioritization:
- Swords excel at precision strikes
- Decapitations are instant kills on most enemies
- Practice timing for consistent head targeting
Smart Progression Planning
Early Game Sword Strategy
- Focus on finding The Rust blueprint first
- Collect upgrade materials passively while exploring
- Upgrade gradually as materials become available
- Learn sword combat mechanics before pursuing better weapons
Mid-Game Transition
- Begin convoy farming around level 10-12
- Keep The Rust as backup while hunting for upgrades
- Experiment with mods to find your preferred playstyle
- Balance sword upgrades with other priority items
Late Game Optimization
- Perfect your convoy farming routes for efficient grinding
- Stockpile materials for multiple weapon upgrades
- Consider multiple specialized swords for different situations
Essential Resources for Sword Masters
Official Game Information:
- Official Dying Light: The Beast Website
- Steam Store Page
- PlayStation Store
- Xbox Store
Weapon and Combat Guides:
- Best Early Game Weapons Guide
- Complete Safe Codes for Hidden Weapons
- Fast XP Farming for Weapon Skills
- Beginner Combat Tips and Tricks
Getting a proper sword in Dying Light: The Beast transforms your combat experience from desperate survival to stylish zombie-slaying artistry. Whether you’re crafting and upgrading The Rust into a legendary blade or grinding convoys for that perfect Modern Sabre, the journey to sword mastery is one of the most rewarding progression paths in the game.
Remember, a sword is only as good as the survivor wielding it – so practice those techniques, upgrade strategically, and most importantly, enjoy the satisfying art of post-apocalyptic swordsmanship!