Find all 6 Mysterious Stick locations in Dying Light: The Beast and unlock the legendary Beaver’s Stick weapon. Complete guide with dam puzzle solution and cave location.
The Most Hidden Legendary Weapon in Castor Woods
The Beaver’s Stick represents one of Dying Light: The Beast’s most elaborate Easter eggs and hidden weapon quests. This legendary weapon isn’t just rare because of its obscure location – it’s wrapped in a multi-phase puzzle that combines exploration, environmental storytelling, and a genuinely creepy supernatural encounter that feels like stepping into a fever dream.
What makes this weapon special isn’t just its 100% knockdown chance (which is genuinely overpowered), but the journey to obtain it. You’ll follow a trail of mysterious sticks scattered across Castor Woods’ waterways, solve an environmental puzzle involving an actual beaver dam, and face off against a nightmare creature that can only be defeated with the very weapon you’re trying to unlock.
Why pursue the Beaver’s Stick:
- Guaranteed knockdown – No enemy can remain standing after being hit
- Unique mechanics – Unlike any other weapon in the game
- Easter egg value – One of the game’s most creative hidden secrets
- Combat utility – Crowd control potential is unmatched
- Collector’s item – True completionist reward
Understanding the Beaver’s Stick Quest Structure
This weapon collection differs significantly from other legendary weapons in the game. Instead of a single location or straightforward puzzle, you’re embarking on a multi-phase treasure hunt:
Phase 1: Discovery and Collection
Find all six Mysterious Sticks scattered along Castor Woods’ river systems
Phase 2: Dam Restoration
Place all sticks at the beaver dam to alter the environment
Phase 3: Time Manipulation
Use the game’s sleep system to advance the puzzle state
Phase 4: Underwater Exploration
Discover the hidden beaver cave beneath the modified dam
Phase 5: Nightmare Encounter
Face the supernatural Zombie Beaver in a dream sequence
Each phase builds on the previous ones, creating a quest that feels more like solving an ancient mystery than simply collecting a weapon.
Finding the Beaver’s Dam – Your Starting Point
Location: Extreme southwest section of Castor Woods River
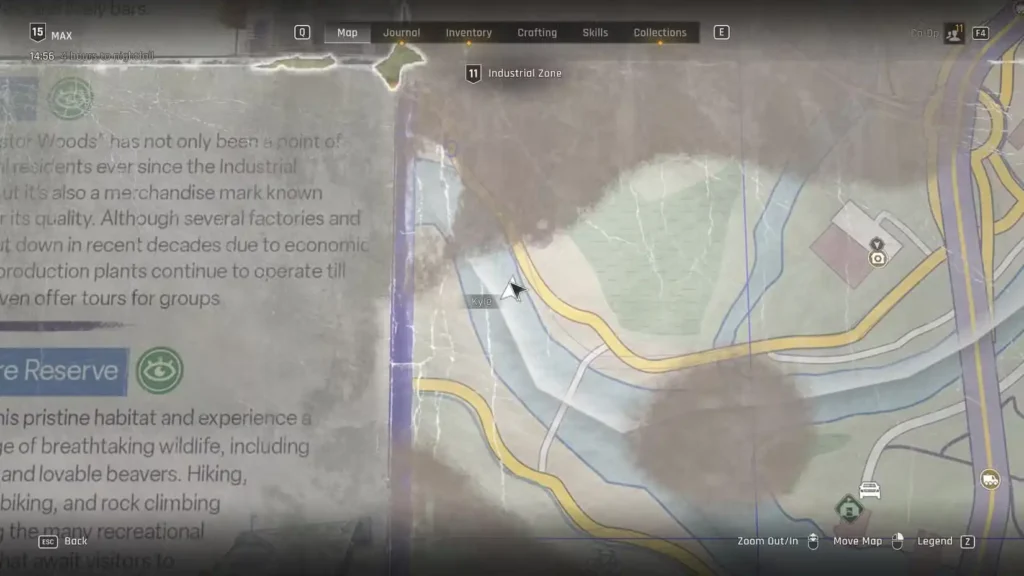
The beaver dam serves as both your starting point and final destination for this quest. Finding it requires navigating to the map’s southwestern boundary.
Navigation Strategy:
- River following: Start from any accessible point on the Castor Woods River
- Downstream travel: Head consistently southwest along the riverbank
- Map boundary: Continue until you reach the last available zone
- Shore examination: Follow the shoreline carefully – the dam blends into the natural environment
Dam Identification:
- Natural construction: Looks like an authentic beaver dam, not obviously artificial
- Isolated location: Positioned away from main travel routes and safe zones
- Survivor Sense highlight: The first Mysterious Stick near the dam glows when highlighted
- Environmental storytelling: The dam shows recent construction and maintenance
Pro tip: Use Survivor Sense frequently while exploring the river areas – Mysterious Sticks can be easily overlooked without the highlighting system.
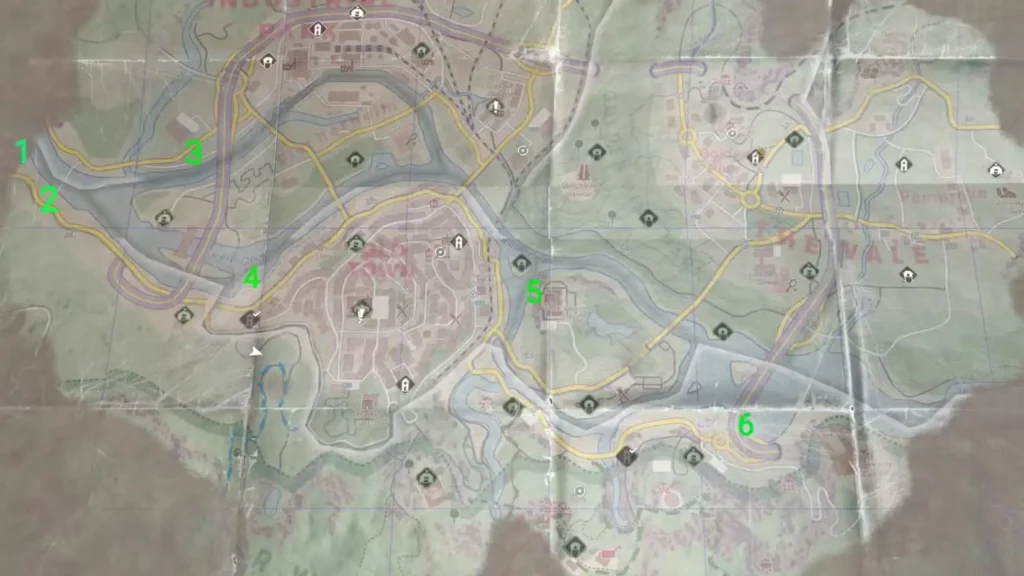
All Six Mysterious Stick Locations
Stick #1 – The Dam Discovery
Location: Green rock formation south of the beaver dam
This stick serves as your introduction to the quest mechanics and confirms you’ve found the correct dam location.
Collection details:
- Proximity indicator: Very close to the dam structure itself
- Visual landmark: Positioned on distinctive green rock formation
- Survivor Sense essential: Easy to miss without highlighting
- Quest initiation: Collecting this stick begins the beaver dam puzzle
Stick #2 – Downstream Drift
Location: Slightly downstream from the dam, near the shore
Navigation from Dam:
- Direction: Move downstream (following water flow direction)
- Distance: Short walk from the dam location
- Positioning: Close to the riverbank, not in deep water
- Environmental clues: Look for areas where debris might naturally collect
Stick #3 – River Branch Explorer
Location: North-heading river branch, across from the main stream
This stick requires more exploration and demonstrates the quest’s geographic scope.
Access method:
- River crossing: You’ll need to cross the main riverbank
- Branch identification: Look for tributary streams heading north
- Exploration reward: This stick rewards thorough area exploration
- Landmark navigation: Use the river system as your primary navigation tool
Stick #4 – Old Town Riverbank
Location: Near the riverbank adjacent to Old Town area
Strategic positioning:
- Urban proximity: Close to Old Town’s developed area
- Riverbank search: Scan the shoreline systematically
- Accessibility: Easier to reach from Old Town safe zones
- Travel efficiency: Can be collected while completing other Old Town activities
Stick #5 – Paradise Island to Asylum Route
Location: Shore crossing between Paradise Island and the Asylum
This stick connects two major areas and requires understanding the map’s water-based geography.
Collection strategy:
- Area transition: Positioned along the travel route between major locations
- Shore following: Trace the shoreline between Paradise Island and Asylum areas
- Dual purpose: Collect while traveling between these significant locations
- Environmental integration: Shows how the quest spans multiple map regions
Stick #6 – Bridge Connection
Location: Under the bridge connecting Mountain region to Farmlands/Villa areas
The final stick is positioned at a major infrastructure landmark.
Bridge identification:
- Major crossing: This is a significant bridge, not a minor stream crossing
- Regional connection: Links Mountain zone to Farmlands and Villa areas
- Underneath search: Look beneath the bridge structure, not on top
- Structural shelter: The stick is protected by the bridge’s underside
Collection Optimization Strategy
Efficient gathering route:
- Start from dam: Begin at the beaver dam to understand the quest scope
- Follow water flow: Use the river system as your primary navigation method
- Combine with other activities: Collect sticks while completing nearby quests or resource farming
- Map marking: Use in-game markers to track collected vs. remaining sticks
Time management:
- Daylight collection: Better visibility makes sticks easier to spot
- Safety considerations: River areas can contain infected – clear enemies first
- Resource gathering: Combine stick hunting with resource farming routes
Dam Restoration Puzzle
With all six sticks collected, return to the beaver dam to begin the environmental manipulation phase.
Stick Placement Process:
- Dam approach: Return to the original beaver dam location
- Placement interaction: Use each stick at designated points around the dam
- Survivor Sense guidance: Use highlighting to identify correct placement locations
- Audio confirmation: Listen for sound cues indicating successful placement
Environmental Feedback:
- Progressive changes: Each placed stick subtly alters the dam’s appearance
- Audio cues: Distinct sounds confirm correct placement
- Visual modifications: The dam structure shows signs of reinforcement
- Water flow changes: Stream patterns begin to shift slightly
Critical next step: After placing all six sticks, you must sleep until the next morning at any safe zone to advance the puzzle state.
Time Advancement and Environmental Change
The beaver dam puzzle incorporates the game’s day/night cycle as a mechanical element.
Sleep Requirement:
- Any safe zone works: Travel to your most convenient safe zone location
- Sleep until morning: Use the bed interaction to advance time
- Puzzle advancement: This triggers the dam’s environmental changes
- Return timing: Come back to the dam after sleeping to see results
Dam Transformation:
- Reduced water flow: The stream level drops noticeably
- New accessibility: Previously underwater areas become accessible
- Environmental storytelling: The completed dam shows impressive engineering
- Exploration opportunity: Lower water reveals hidden cave entrance
Why this matters: The time advancement represents the dam’s construction completing and beginning to affect water flow – realistic environmental puzzle design.
Underwater Cave Discovery
With the water level reduced, you can access the previously hidden beaver cave.
Cave Access:
- Dam climbing: Climb over the completed beaver dam structure
- Southern shore: Dive on the south side of the dam
- Bottom navigation: Stay close to the riverbed while searching
- Algae concealment: The cave entrance is hidden behind underwater vegetation
Cave Exploration:
- Tunnel following: Navigate through the underwater passage
- Air pocket: The cave contains breathable air once inside
- Interior discovery: Find the mysterious workbench and living area
- Environmental storytelling: Someone has been surviving here throughout the apocalypse
Safety tip: Ensure you have sufficient stamina for underwater navigation. Practice breath-holding techniques with shorter underwater sections first.
The Nightmare Encounter
The cave contains a sleeping area that triggers the quest’s supernatural climax.
Dream Sequence Initiation:
- Sleeping spot interaction: Find and use the bed in the beaver cave
- “Rest until night” selection: Choose this specific option to enter the nightmare
- Reality shift: The cave environment transforms into something more sinister
- Enemy spawn: The Zombie Beaver appears as a unique boss encounter
Combat Mechanics:
- Invulnerability: The Zombie Beaver cannot be harmed by conventional weapons
- Weapon requirement: Only the Beaver’s Stick can damage this enemy
- Workbench interaction: Retrieve the Beaver’s Stick from the workbench during the nightmare
- Combat resolution: Equip and use the Beaver’s Stick to defeat the supernatural creature
Quest Completion:
- Second sleep: Use the bed again after defeating the Zombie Beaver
- Reality return: Exit the nightmare and return to normal cave environment
- Blueprint unlock: The Beaver’s Stick blueprint becomes available for crafting
- Weapon acquisition: You now have access to this unique legendary weapon
Beaver’s Stick Weapon Analysis
Unique Properties:
- 100% knockdown chance: Every hit guarantees enemy knockdown
- No weapon modifications: Cannot be enhanced with standard weapon mods
- Crowd control mastery: Unparalleled for managing multiple enemies
- Infinite utility: Knockdown effect never diminishes or fails
Combat Applications:
- Horde management: Systematically knock down large groups of infected
- Escape facilitation: Create openings in enemy formations
- Human enemy control: Equally effective against Baron’s soldiers
- Defensive positioning: Control enemy advancement in tight spaces
Strategic Value:
- Unique mechanics: No other weapon offers guaranteed knockdown
- Tactical flexibility: Works in both offensive and defensive scenarios
- Resource independence: Doesn’t require ammunition or special materials
- Long-term viability: Effectiveness doesn’t diminish with game progression
Combat integration: The Beaver’s Stick pairs excellently with high-damage weapons – use it to knock enemies down, then switch to heavy damage dealers for elimination.
Alternative Legendary Weapons
If the Beaver’s Stick quest feels too elaborate, consider these other legendary options:
Easier Acquisition:
- EXPcalibur II – Complex but more straightforward collection process
- The Needle SMG – Challenging but traditional puzzle-solving approach
- Sawblade Launcher – Parkour-based rather than exploration-based
Similar Crowd Control:
- Flamethrower – Skill tree unlock with area denial capabilities
- Grenade Launcher – Explosive crowd control alternative
For complete legendary weapon coverage, check our all legendary weapons guide.
Quest Design Appreciation
The Beaver’s Stick quest represents some of the most creative hidden content in Dying Light: The Beast:
Environmental Integration:
- Realistic puzzle mechanics – Dam construction affects water flow logically
- Geographic scope – Quest spans multiple map regions organically
- Time integration – Day/night cycle becomes part of puzzle solution
- Supernatural elements – Dream sequence adds mystical atmosphere
Player Engagement:
- Discovery reward – Finding the initial dam feels like genuine exploration
- Progressive revelation – Each phase reveals more about the mysterious setup
- Environmental storytelling – Cave contents suggest rich backstory
- Mechanical uniqueness – Weapon properties justify elaborate acquisition process
Resource and Time Investment
Expected Time Commitment:
- Initial discovery: 30-60 minutes depending on exploration efficiency
- Stick collection: 60-90 minutes for systematic gathering
- Dam puzzle completion: 15-30 minutes including sleep cycle
- Cave exploration and nightmare: 20-30 minutes
- Total investment: 2-3 hours for complete quest line
Skill Requirements:
- Basic swimming ability – For underwater cave navigation
- Navigation skills – River-based exploration across multiple map regions
- Combat readiness – Various infected encounters during collection
- Patience – Quest requires methodical exploration and puzzle-solving
Worth consideration: This represents one of the game’s most time-intensive single weapon acquisitions, but also one of the most rewarding from both gameplay and discovery perspectives.
Integration with Overall Progression
When to pursue:
- Mid-game timing – After developing basic exploration and combat skills
- Safe zone access – Need multiple safe zones for efficient travel and sleeping
- Equipment preparation – Decent weapons for clearing infected during exploration
- Skill development – Swimming and navigation abilities for efficient collection
Progression benefits:
- Map knowledge – Quest familiarizes you with river systems and water-based travel
- Exploration skills – Develops thorough area searching abilities
- Resource awareness – Learn locations of additional materials during collection
- Combat confidence – Unique weapon provides new tactical options
The Beaver’s Stick quest represents the perfect blend of exploration, puzzle-solving, and supernatural storytelling that makes Dying Light: The Beast’s hidden content so compelling. It rewards thorough exploration with both a powerful weapon and a genuinely memorable gaming experience.
Ready to explore more of Castor Woods’ secrets? Check our complete quest guide for additional hidden content, or browse our resource farming guide to optimize your collection routes.
Official Game Resources:
- Official Dying Light: The Beast Website
- Steam Store Page
- PlayStation Store
- Xbox Store