Complete the Power Gambit quest in Dying Light: The Beast with our detailed walkthrough. Learn how to drain the turbine hall, activate generators, and survive the Baron’s ambush.
Getting the Lights Back On – Your Mission to Castor Woods
The Power Gambit quest is one of those missions that sounds simple on paper but quickly becomes a multi-layered puzzle wrapped in combat challenges. You’re tasked with restoring power to Old Town by fixing up the Castor Woods power station, but as with everything in Dying Light: The Beast, nothing goes according to plan.
This quest is essential for progressing the main story and building trust with the local survivors. Plus, once you complete it, you’ll have a much better understanding of the game’s environmental puzzle mechanics – skills you’ll definitely need later.
What You’ll Need Before Starting
Before heading to Castor Woods, make sure you’re properly equipped:
- Decent melee weapons – You’ll face Baron’s soldiers who are much tougher than regular zombies
- Throwing knives or ranged weapons – Perfect for dealing with armored enemies
- Medkits – The underwater sections and combat encounters can drain your health
- Lockpicking tools – There’s valuable loot to grab along the way
Pro tip: Check out our early game weapons guide to make sure you’re carrying the right gear for this mission.
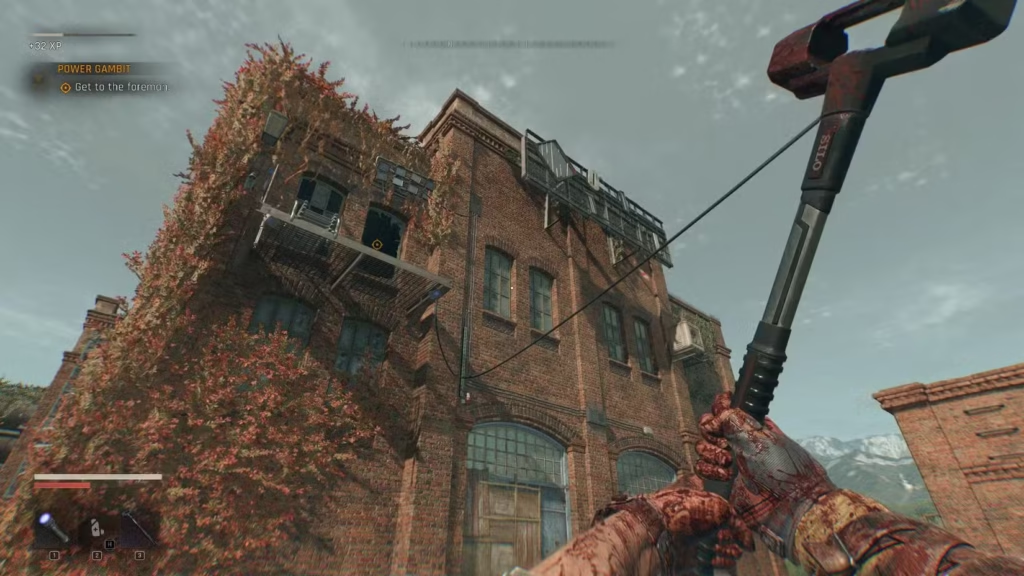
Step 1: Finding Your Way Into the Power Station
Once you reach the marked location on your map, you’ll encounter a foreman from Jacob’s group who’ll try to discourage you from entering. Don’t let him talk you out of it – you’ve got work to do.

Getting Inside:
- Look for the building with the small shed attached to it
- Use the shed to climb up to the open window
- Navigate carefully along the ledges – one wrong move and you’re starting over
- Once inside, you’ll meet Largo, who explains the situation
The key insight here: The game doesn’t hold your hand with obvious entrances. Get comfortable with looking for alternative routes and using your parkour skills creatively. This pattern repeats throughout The Beast.
Step 2: The Great Flood Problem
After talking to Largo, you’ll discover the main turbine hall is completely flooded. This is where the quest gets interesting – you’re essentially playing an underwater puzzle game while managing your oxygen.

Draining the Water Process:
First – Fix the Leak:
- Dive into the flooded turbine hall
- Follow the stream of bubbles to locate the broken pipe
- Find and turn both valve markers underwater
- Survival tip: Use the air pockets above the big turbines to catch your breath without swimming all the way back
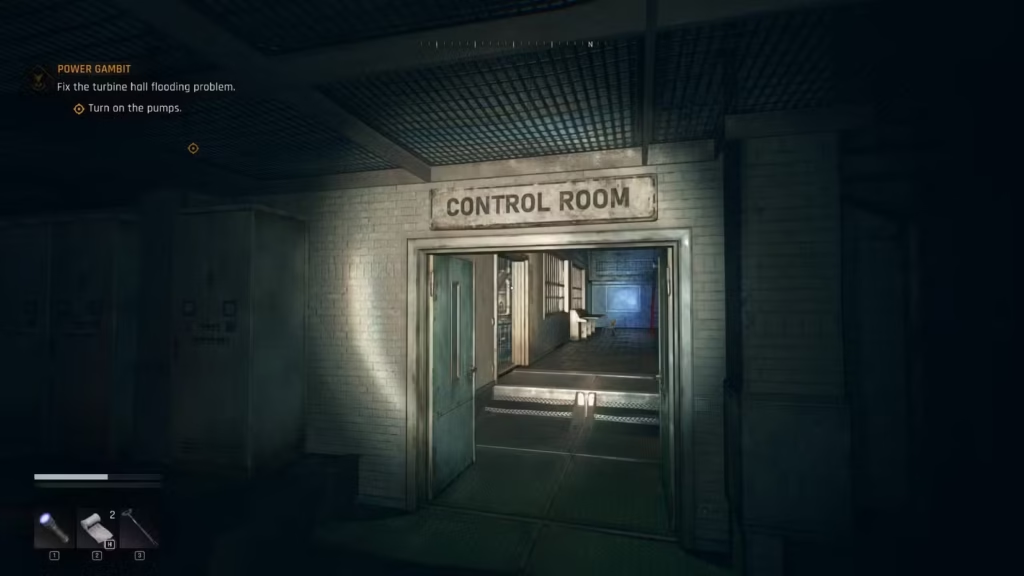
Second – Power Up the Pumps:
- Head to the Control Room on the upper level
- Locate the Backup Generator room
- Activate the generator using the control buttons
- Move the large cabinet blocking the small vent
- Thread the power cable through the vent to connect the junction boxes
This section teaches you the game’s approach to environmental puzzles – they’re always logical, but require you to think in 3D space and use the environment creatively.
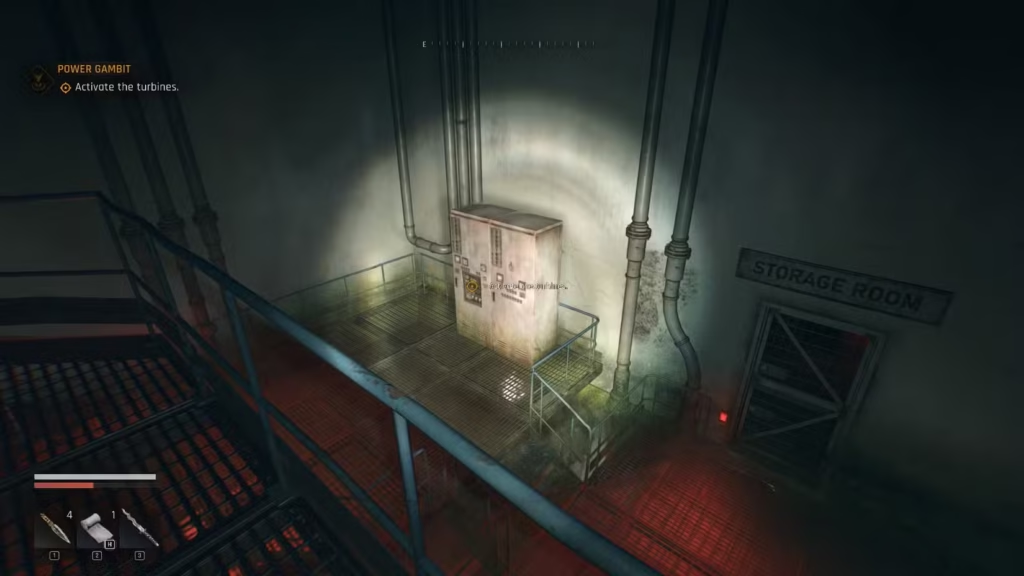
Step 3: Turbine Activation Puzzle
With the water drained, you can finally access the turbines. But surprise – there’s not enough water pressure to make them work properly.
The Valve Wrench Hunt:
- Go to Pipe 1C at the far end of the turbine room
- Examine the red pipe system at the top
- You’ll need a valve wrench, which is located in area A
- Climb up the vent next to the locked Storage Room door
- Grab the wrench and any other useful loot
- Turn the valves at both pipes 1C and 2C
- Return to turbine controls and fire them up
Don’t miss this: The Storage Room contains some excellent early-game loot. Check our best items to upgrade first guide to see what’s worth prioritizing.
Step 4: The Baron’s Betrayal – Combat Time
Here’s where the quest takes a dramatic turn. Largo reveals he’s working for the Baron, and suddenly you’re surrounded by heavily armed soldiers. But Kyle has a trick up his sleeve – when pushed too far, he goes berserk.
Combat Strategy Against Baron’s Soldiers:
Melee Combat Tips:
- Soldiers will dodge and block your standard attacks
- Wait for them to attack, then block at the perfect moment to stagger them
- Use your berserker mode to break through their defenses
- Don’t button mash – timing is everything
Alternative Approaches:
- Throwing knives bypass their blocking abilities
- Ranged weapons work well if you can create distance
- Environmental kills are always satisfying and effective
What makes this fight special: Unlike zombie encounters, these soldiers use actual tactics. They’ll flank you, coordinate attacks, and retreat when wounded. It’s a preview of the more challenging human enemies you’ll face later in the game.
For more advanced combat techniques, check out our beginner survival guide for detailed combat breakdowns.
Wrapping Up and Moving Forward
After clearing out the soldiers, you’ll need to report back to the Sheriff and Jacob at the town hall. Along the way, Pietro will contact you about power substations, but that’s a task for later.
Key Takeaways from Power Gambit:
- Environmental puzzles often have multiple steps that build on each other
- Always look for alternative routes when the obvious path is blocked
- Human enemies require different tactics than zombies
- The game rewards thorough exploration with valuable loot
Troubleshooting: The Soft Lock Bug
Unfortunately, some players experience a game-breaking bug at the end of this quest where progression stops after defeating all the soldiers.
Quick Fix Solutions:
- Return to main menu and reload your save
- If that doesn’t work, take intentional damage to force a checkpoint reset
- The bug seems to be tied to specific combat outcomes, so the reload usually resolves it
What’s Next?
Completing Power Gambit opens up several new quest lines and activities. You’ll want to explore:
- Safe codes and combinations for additional loot
- XP farming methods to level up efficiently
- Resource farming locations for crafting materials
The Power Gambit quest perfectly encapsulates what makes Dying Light: The Beast special – it combines environmental puzzles, parkour challenges, and intense combat into one cohesive experience. Master these elements here, and you’ll be well-prepared for the challenges ahead.
Ready to dive deeper into Dying Light: The Beast? Check out our complete mission and quest list to plan your next adventure, or browse our difficulty settings guide to find the perfect challenge level.
Official Game Links:
Official Dying Light: The Beast Website
PlayStation Store