Get the devastating Sawblade Launcher in Dying Light: The Beast! Complete climbing guide for Silos Safe Zone with parkour routes, power restoration, and crafting requirements.
The Ultimate Crowd Control Weapon – If You Can Reach It
The Sawblade Launcher in Dying Light: The Beast isn’t just another weapon – it’s a game-changing tool that transforms how you approach large groups of infected. This legendary launcher fires spinning sawblades that slice through multiple enemies, making it one of the most satisfying crowd control weapons in the game.
But here’s the catch: getting it requires one of the most challenging parkour sequences in the early game. The blueprint sits atop the Silos Safe Zone in Pembroke, protected by a complex climbing puzzle that tests your movement skills and problem-solving abilities. The reward? A weapon so devastating it’s worth every frustrating retry.
Why the Sawblade Launcher is Worth the Challenge
Before we tackle the demanding climb, let’s understand what makes this weapon special:
Combat Advantages:
- Multi-target damage – Sawblades slice through entire groups of infected
- Excellent range – Effective at medium to long distances
- High damage per shot – Each sawblade deals substantial damage
- Crowd control mastery – Perfect for clearing chokepoints and narrow areas
- Satisfying feedback – Incredibly rewarding to use against hordes
Strategic Value:
- Early game power spike – Available much earlier than other legendary weapons
- Resource efficiency – One shot can eliminate multiple enemies
- Tactical flexibility – Works in both offensive and defensive situations
- Upgrade potential – Can be enhanced through the crafting system
The trade-off: This weapon requires significant skill investment to acquire, plus substantial crafting resources to build.
Prerequisites and Preparation
Skill Requirements:
- Intermediate parkour ability – The climb involves complex sequences
- Problem-solving patience – Some sections require multiple attempts
- Combat readiness – You’ll face infected during the power restoration phase
Recommended Preparation:
- Practice parkour basics – Master wall-running and pipe swinging first
- Bring healing supplies – Falls and combat encounters can drain health
- Clear schedule – This isn’t a quick collection – expect 20-30 minutes minimum
Timing consideration: Attempt this during daytime when visibility is optimal and infected are less aggressive.
For fundamental movement skills, check our beginner survival guide before attempting this challenging sequence.
Finding the Silos Safe Zone
Location: Pembroke area, easternmost section of the map
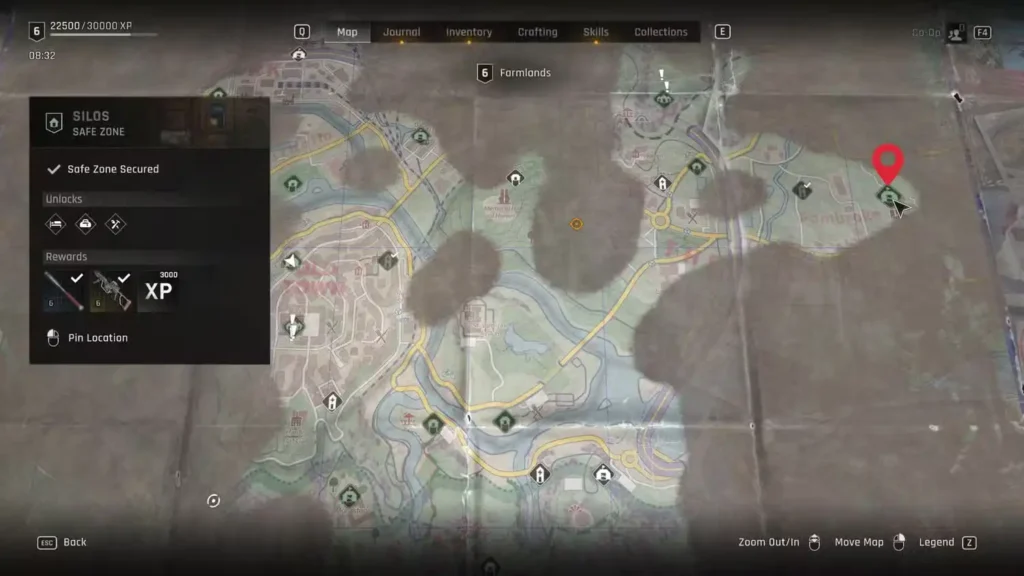
The Silos structure is unmistakable once you’re in the right area – a massive industrial complex with towering cylindrical storage units. The key landmark is the truck conveniently positioned beside the Silos – this vehicle serves as your entry point to the climbing sequence.
Navigation Tips:
- Map reference: Look for the distinctive Silos icon in Pembroke
- Ground approach: The truck placement makes the starting point obvious
- Area hazards: Clear ground-level infected before beginning your climb
The Climbing Sequence – Phase by Phase
Phase 1: Initial Ascent
Starting from the truck:
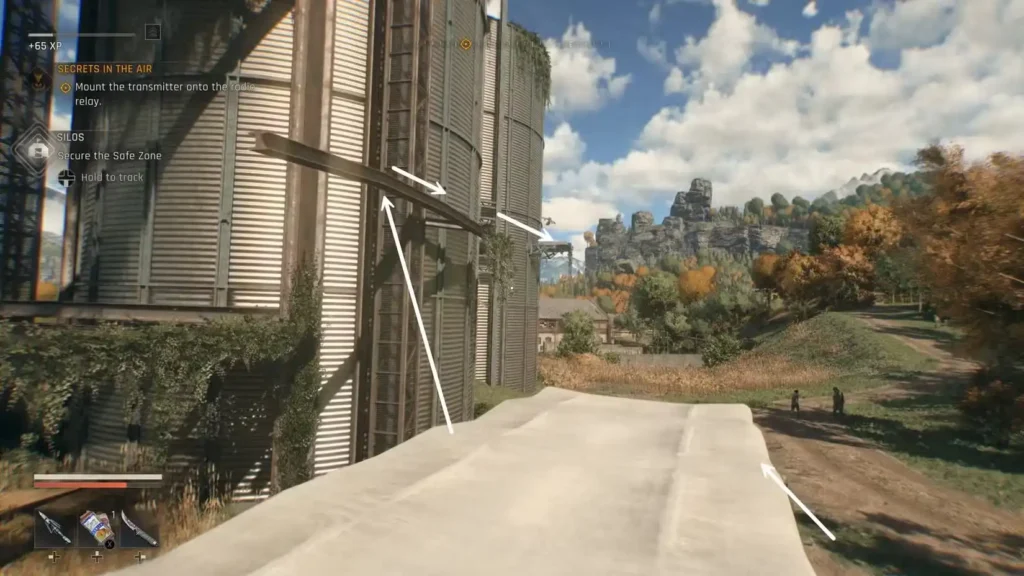
- Steel beam acquisition: Grab the steel beam near the truck – this is your first climbing tool
- Crossing technique: Use the beam to bridge the gap to the right side of the Silos
- Grip transition: Once across, grab the metal frame on the exterior wall
- Catwalk access: Use the metal frame to reach the metal catwalk on the right side
Key insight: This opening sequence teaches you the basic mechanics you’ll use throughout the entire climb – tool usage, gap crossing, and grip transitions.
Phase 2: Swinging Progression
From the first catwalk:
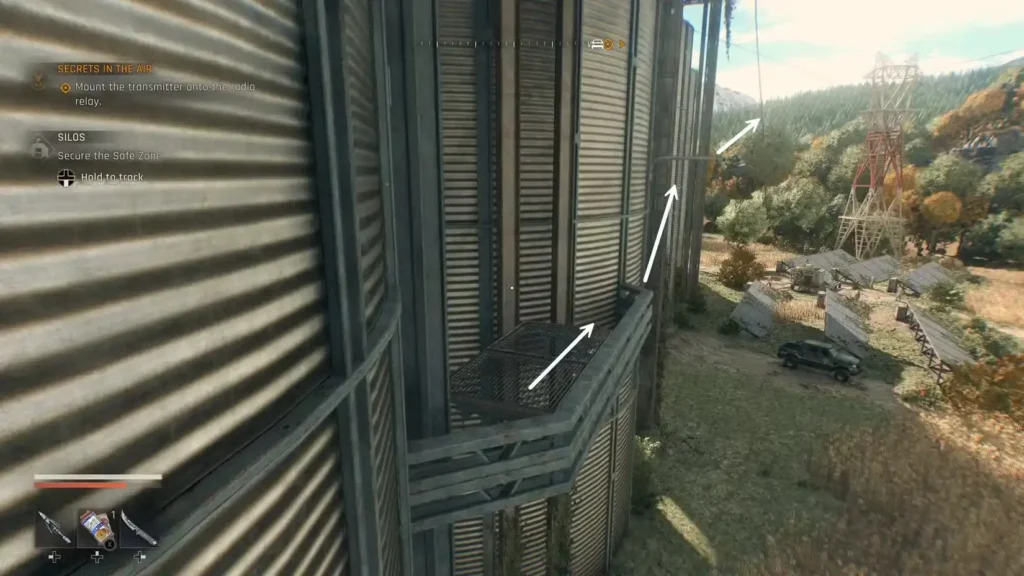
- Lamp post swing: Use the nearby lamp post to swing across to a red pipe
- Pipe chaining: Jump from the first red pipe to the second red pipe
- Multiple lamp posts: Navigate two more lamp post swings in sequence
- Catwalk landing: You’ll eventually land on another catwalk level
Critical timing: Each swing requires precise timing – wait for the full swing arc before releasing to jump to the next element.
Phase 3: Reaching Level Two
The rope grab sequence:
- Catwalk jump: From your landing catwalk, prepare for another jump
- Lamp post swing: Swing from the lamp post one more time
- Rope grab: Catch the rope to pull yourself up to the second level
- Level two access: Successfully reaching this point unlocks the next phase
Essential shortcut creation: Immediately upon reaching the second catwalk level, drop down the collapsible ladder. This creates a permanent shortcut that allows you to skip the entire initial parkour section if you fall or need to return later.
Why this matters: The ladder shortcut is crucial – it eliminates the need to repeat the complex early climbing sequence if something goes wrong in later phases.
Phase 4: The Final Ascent
From the second level catwalk:
- Forward progression: Continue forward on the catwalk directly in front of you
- Steel beam navigation: Walk carefully along the steel beam – falling here sends you back to level two
- Rope identification: Look to the right to spot the rope that leads to the top level
- Final rope swing: Jump to grab this rope, then transition to the red pipe
- Summit achievement: Follow the red pipe to reach the top of the Silos
Success indicator: Once you reach the top level, you’ll see electrical equipment and infected enemies – this confirms you’ve completed the climbing challenge.
Power Restoration Challenge
Reaching the top is only half the battle. Now you need to restore power to activate the safe zone.
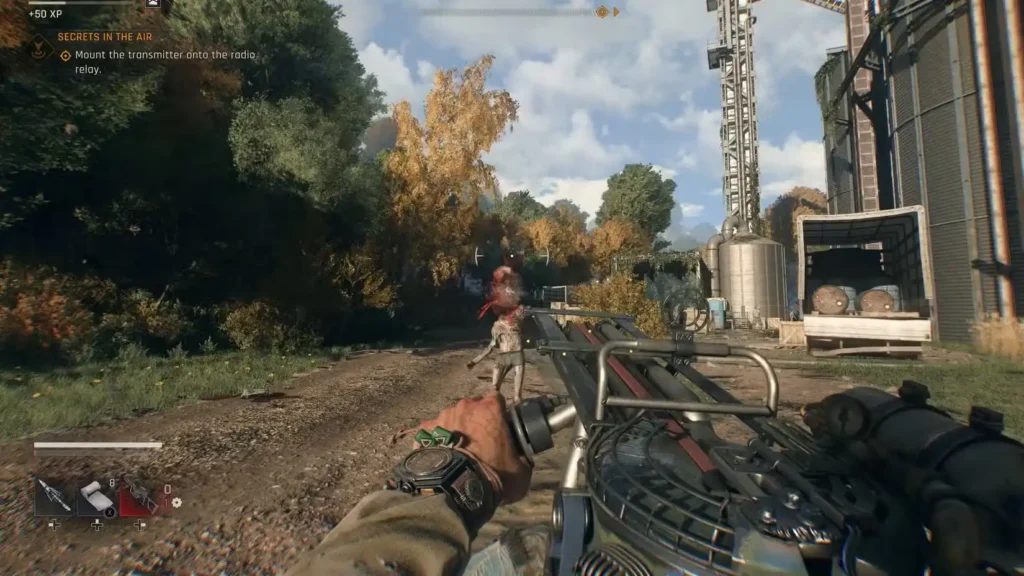
Combat Encounter:
- Enemy presence: Multiple zombies patrol the top level
- Strategy choice: Either clear all enemies systematically or make a speed run to the electrical systems
- Recommended approach: Clear enemies first for safety – the electrical work requires focus
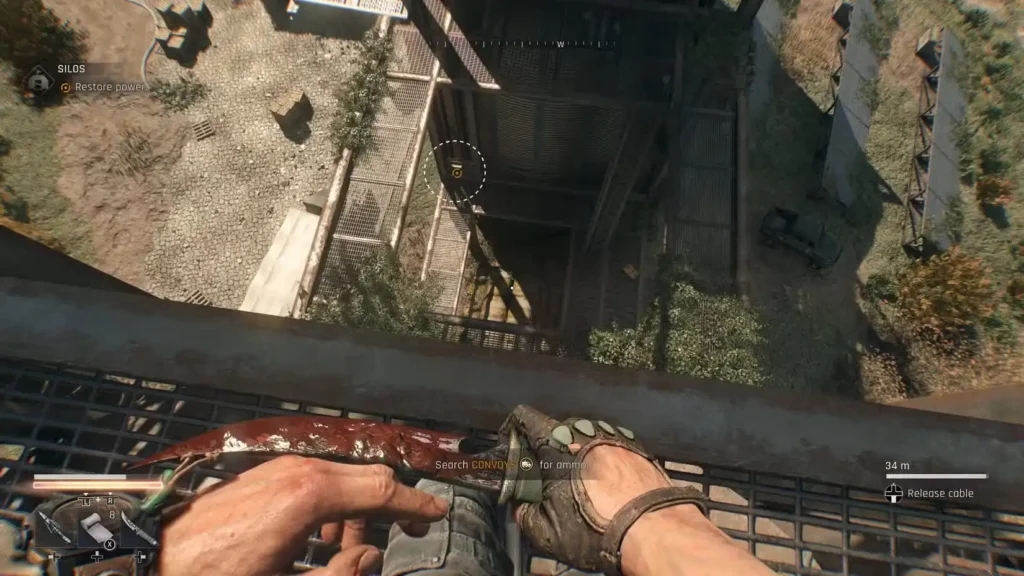
Electrical System Puzzle:
Phase 1 – Upper connection:
- Cable location: Find the power cable near the electrical equipment on top
- Upper box connection: Attach the cable to the electrical box on the Silos roof
- Ladder deployment: Drop down the second collapsible ladder – another important shortcut
Phase 2 – Lower connection:
- Descent: Use the newly deployed ladder to reach the lower level
- Cable routing: Connect the wire to the electrical box below
- Power restoration: This completes the circuit and activates the safe zone
System result: Power restoration unlocks the safe zone and makes the interior accessible.
Accessing the Safe Zone Interior
With power restored, you can finally access the Sawblade Launcher blueprint.
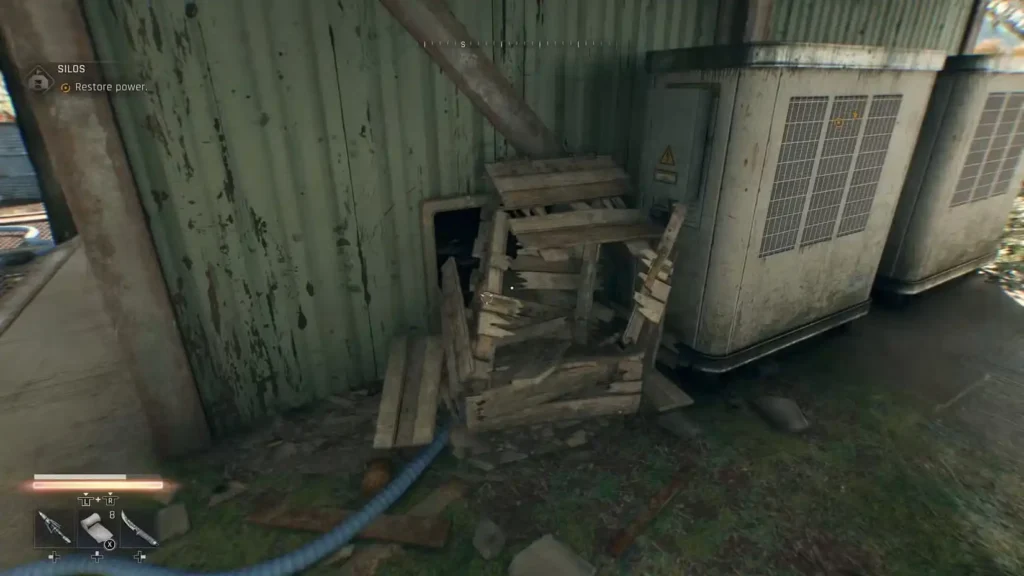
Entry Method:
- Crate obstacle: Look for a wooden crate blocking a vent passage near the electrical boxes
- Crate destruction: Break the wooden crate to clear the path
- Vent access: Enter through the now-accessible vent to reach the safe area interior
Known Bug and Workaround:
Problem: Some players encounter a bug where the wooden crate cannot be destroyed.
Solution steps:
- Verify ladder deployment: Ensure all collapsible ladders are properly dropped down
- Game restart: Exit to main menu and reload your save
- Automatic resolution: The restart often fixes the bug or teleports you directly inside the safe room
Prevention tip: Always deploy ladders immediately when you reach each level – this reduces bug occurrence chances.
Blueprint Collection and Crafting
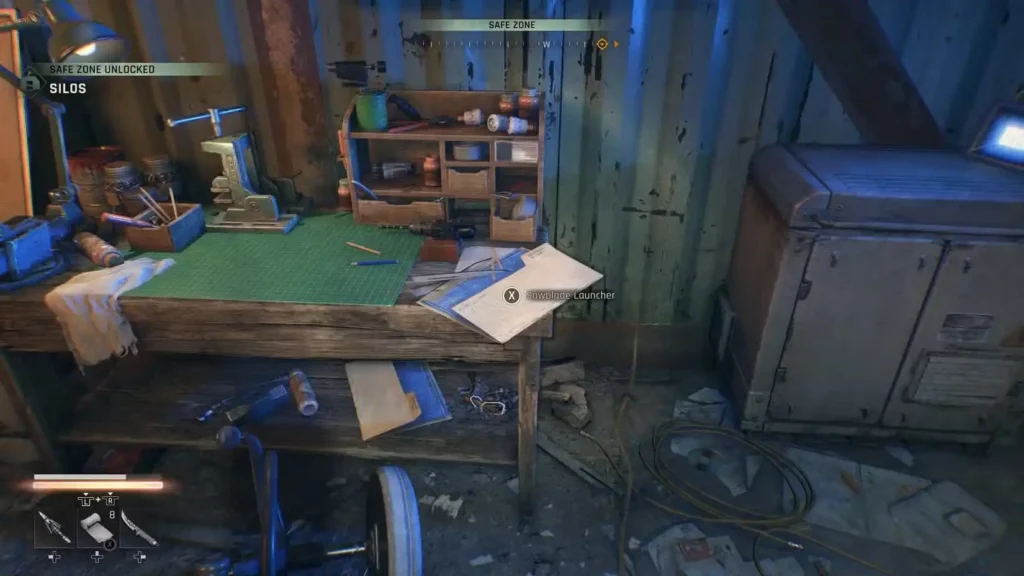
Inside the Safe Zone:
- Workbench location: The Sawblade Launcher blueprint sits on the main workbench
- Additional resources: Collect other crafting materials available in the safe zone
- Blueprint acquisition: Interact with the workbench to add the Sawblade Launcher to your crafting recipes
Sawblade Launcher Crafting Requirements
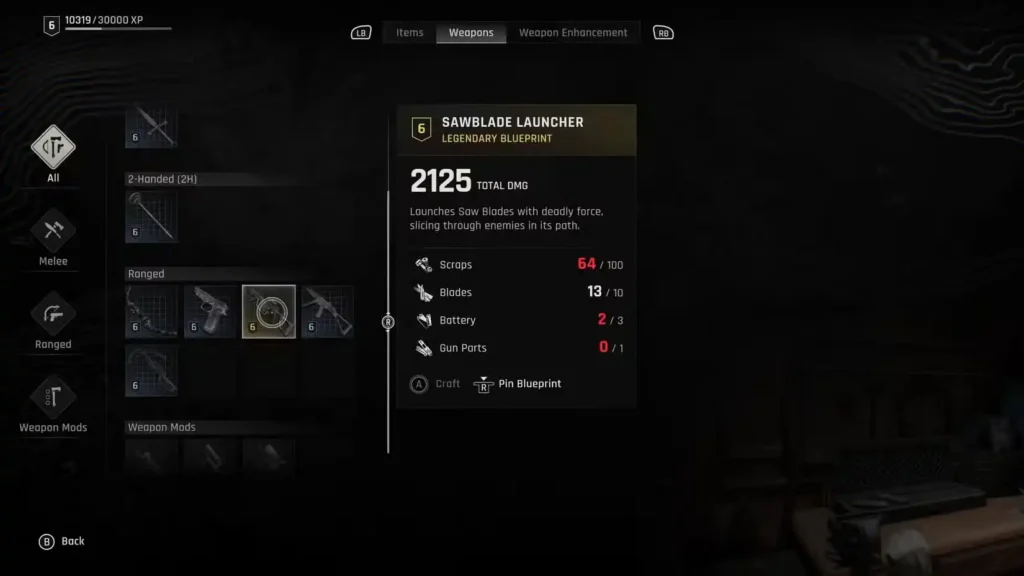
Once you have the blueprint, you’ll need substantial resources to craft your weapon:
Required Materials:
- 100x Scraps – The largest resource requirement
- 10x Blades – Specialized crafting components
- 3x Batteries – Electrical components for the launcher mechanism
- 1x Gun Parts – Weapon assembly components
Resource Acquisition Strategy:
Scraps (100x needed):
- Primary challenge: This is the most demanding resource requirement
- Farming locations: Check our scraps and blades farming guide for optimal collection routes
- Time investment: Expect significant farming time for this quantity
Blades (10x needed):
- Moderate requirement: More manageable than scraps but still requires dedicated farming
- Shared farming: Often found in the same locations as scraps
- Quality focus: Higher-tier areas yield better blade drop rates
Batteries (3x needed):
- Electronic sources: Found in electronic equipment and vehicles
- Urban areas: Cities and industrial zones have higher battery spawn rates
- Moderate rarity: Not too difficult to acquire with focused searching
Gun Parts (1x needed):
- Military sources: Military convoy locations often contain gun parts
- Weapon dismantling: Break down unwanted firearms for parts
- Single requirement: Only need one, making this the easiest component to acquire
Optimization and Upgrade Strategies
Immediate Crafting vs. Resource Building:
- Craft immediately: If you have resources, build it right away for immediate combat advantage
- Resource stockpiling: Build up materials for multiple legendary weapons simultaneously
- Strategic timing: Consider your current combat needs vs. future weapon plans
Upgrade Path Planning:
- Manual page integration: The Sawblade Launcher can be upgraded using manual pages
- Priority consideration: Check our upgrade priority guide to see where this weapon fits in your progression plan
- Long-term viability: This weapon remains effective throughout the entire campaign when properly upgraded
Combat Application and Strategy
Optimal Usage Scenarios:
- Chokepoint defense – Perfect for narrow passages and doorways
- Horde clearing – Excellent against large groups of infected
- Medium-range engagement – Most effective at intermediate distances
- Area denial – Forces enemies to reconsider their approach routes
Tactical Considerations:
- Ammunition management – Sawblades aren’t infinite – use strategically
- Friendly fire awareness – In co-op, be mindful of teammate positioning
- Environmental usage – Ricochets and wall hits can extend damage range
Combat synergy: Pairs excellently with other legendary weapons for different engagement ranges. Check our best early game weapons guide for complementary weapon recommendations.
Alternative Legendary Weapons
If the Sawblade Launcher climbing challenge feels too daunting, consider these alternatives:
Easier Legendary Options:
- The Needle SMG – Less challenging parkour requirements
- Sunray Revolver – More puzzle-based than parkour-based
- Hunting Bow – Simple blueprint acquisition from Monastery
Similar Combat Role Weapons:
- Grenade Launcher – Skill tree unlock with similar crowd control capabilities
- Flamethrower – Also skill tree unlocked, excellent for groups
For complete legendary weapon coverage, see our all legendary weapons guide.
Risk vs. Reward Analysis
High Risk Elements:
- Complex parkour sequence with multiple failure points
- Significant resource investment for crafting
- Time commitment for both acquisition and material farming
- Early game challenge – attempting this before developing adequate skills
High Reward Elements:
- Game-changing crowd control capabilities
- Early access to legendary-tier weapon
- Long-term combat effectiveness throughout campaign
- Skill development – mastering this climb improves overall parkour ability
Bottom line: The Sawblade Launcher represents one of the best risk-to-reward ratios for early game legendary weapons, provided you’re willing to invest the time and effort required.
Final Tips for Success
Parkour Mastery:
- Practice basic movements before attempting the full sequence
- Study each phase individually rather than rushing through
- Use shortcuts wisely – always drop ladders when available
- Stay patient – rushing leads to falls and frustration
Resource Planning:
- Start farming early – begin collecting scraps and blades while learning parkour
- Optimize routes – combine Sawblade farming with other resource gathering
- Consider alternatives – ensure this weapon fits your preferred combat style before heavy investment
The Sawblade Launcher climb represents a perfect microcosm of what makes Dying Light: The Beast special – challenging environmental puzzles that reward skilled players with powerful tools. Master this sequence, and you’ll have both an incredible weapon and the confidence to tackle any parkour challenge the game throws at you.
Ready to expand your legendary arsenal? Explore our complete quest guide for more challenging objectives, or check our XP farming guide to level up the skills you’ll need for advanced parkour sequences.
Official Game Resources:
- Official Dying Light: The Beast Website
- Steam Store Page
- PlayStation Store
- Xbox Store