Here’s something Ghost of Yotei doesn’t tell you clearly enough: there’s no respec system. Every skill you unlock at the Altar of Reflections is permanent. No refunds, no do-overs, no “oops, I wasted 5 skill points on abilities I never use.”
This creates genuine tension in your skill choices. Unlike games where you can freely experiment and reset your build, Ghost of Yotei demands strategic thinking. You need to invest your limited early-game skill points into abilities that will carry you through the brutal journey ahead—not waste them on situational perks you’ll use twice.
I learned this the hard way on my first playthrough, picking skills that sounded cool but rarely proved useful in actual combat. By the time I realized my mistake, I was 10 hours in and stuck with a suboptimal build.
So let me save you from that frustration. Here are the 9 essential skills you should prioritize early to transform Atsu into a devastating warrior capable of taking down the Yotei Six and their forces across Ezo. These aren’t just “good” skills—they’re foundation abilities that fundamentally improve how you play.

Understanding the Altar of Reflections System
How Skill Unlocking Works
Before we dive into specific skills, let’s clarify the mechanics:
Finding Shrines and Altars
- Skills are only obtained at Altars found at Shrines across Ezo
- You don’t earn skills through XP, leveling, or mission completion
- Each Shrine visit grants skill points to spend at the Altar of Reflections
- This means exploration directly translates to character power
The No-Respec Reality
- Once you unlock a skill, it’s permanent
- You cannot reset or reassign skill points
- Bad choices early can haunt you for the entire playthrough
- This makes early skill selection critically important
Why This Matters: Unlike Wolf skills (where you eventually unlock everything), Atsu’s skill tree has more options than you’ll have points for a long time. Prioritization isn’t optional—it’s survival.
1. Perfect Parry: Your Combat Foundation
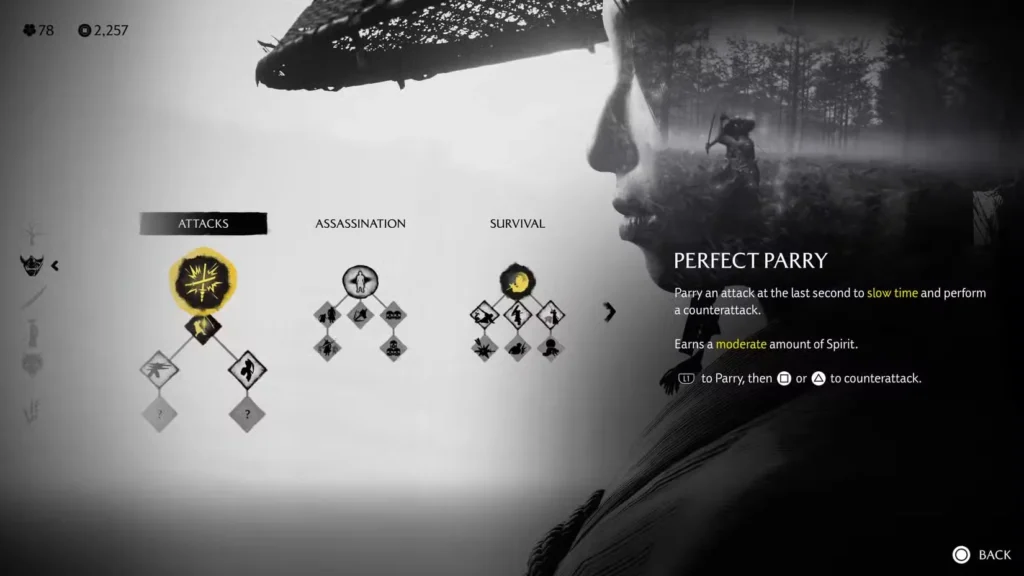
The Single Most Important Skill in the Game
What it does:
- Parry an attack at the last possible second to trigger slow motion
- Perform a devastating counterattack (Square or Triangle)
- Counterattack cannot be blocked or parried by enemies
- Generates moderate Spirit on successful execution
- Input: L1 to parry → Square/Triangle to counter
Why this should be your FIRST skill unlock:
Perfect Parry transforms Ghost of Yotei’s combat from chaotic button-mashing to a beautiful, calculated dance. It’s the difference between barely surviving fights and dominating them with style.
The flow-state effect: Once you master Perfect Parry timing, combat enters this rhythm where you’re reading enemy attacks, parrying at the perfect moment, countering with guaranteed damage, and chaining these interactions into devastating sequences.
Against predictable enemies (early-game bandits, basic soldiers), you can chain Perfect Parries repeatedly, making fights feel like choreographed samurai cinema. Against tougher opponents, Perfect Parry creates the openings you need to deal damage safely.
Spirit generation matters too. That moderate Spirit gain adds up, giving you resources for healing or special attacks without relying solely on risky aggressive play.
Learning curve tip: Practice Perfect Parry timing on weak enemies early. Find a low-level bandit camp and just work on that last-second timing until it becomes muscle memory. The investment pays off for the entire game.
This is non-negotiable. If you only follow one recommendation from this guide, let it be this: unlock Perfect Parry first.
2. Roll: Essential Mobility and Survival
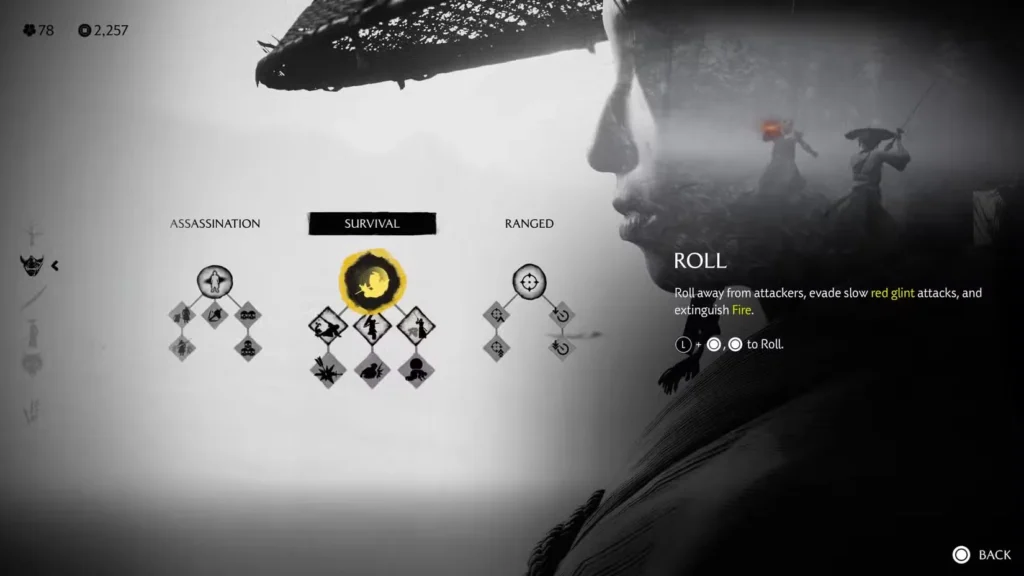
Get Out of Danger Fast
What it does:
- Roll away from attackers, covering more distance than dodge
- Evade slow red glint attacks that can’t be blocked or parried
- Extinguish fire on Atsu instantly
- Input: L + Circle, or just Circle to roll
Why you need this early:
The standard dodge is fine for basic repositioning, but Roll is a survival tool that gets you out of situations where dodge leaves you still in danger range.
Against brutes and heavy enemies who use those devastating red glint attacks, Roll gives you the distance to escape safely. These attacks can’t be blocked or parried—you either dodge/roll or you take massive damage.
The fire extinguishing feature is clutch. Fire arrows and flaming swords are common threats, and being able to immediately put yourself out with a quick roll can save your life during chaotic multi-enemy encounters.
Positioning advantage: Roll covers enough distance to actually reposition meaningfully. Need to create space to heal? Roll. Need to get behind an enemy? Roll. Need to escape a surrounded situation? Roll away and reassess.
Priority level: This should be your second unlock after Perfect Parry. The combo of Perfect Parry (offense) and Roll (defense/mobility) creates a solid foundation for everything that follows.
3. Perfect Dodge: Maximum Safety and Counter Potential
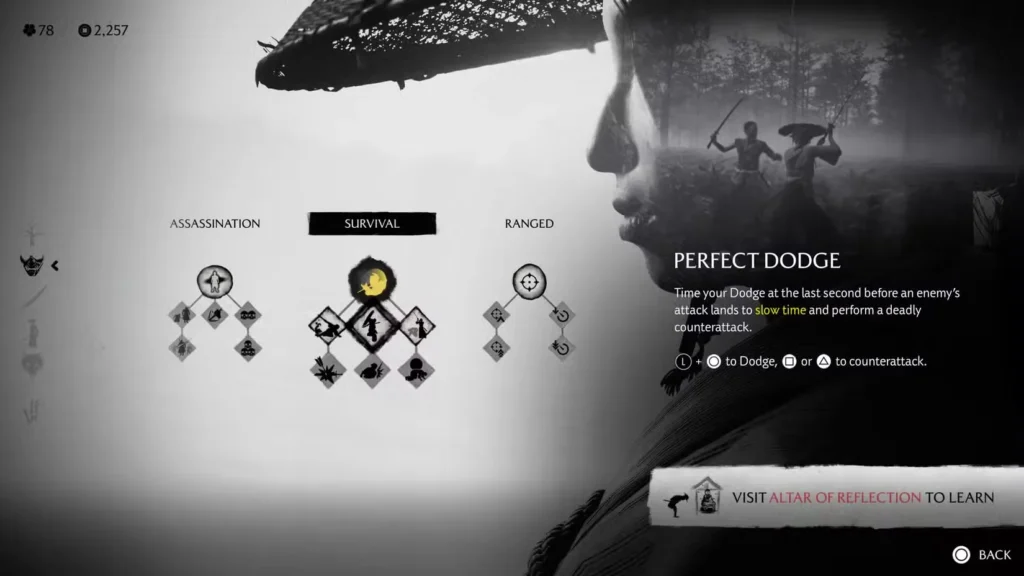
The Defensive Alternative to Parrying
What it does:
- Dodge at the last possible second before an attack lands
- Triggers slow motion like Perfect Parry
- Perform a deadly counterattack (Square or Triangle)
- Works on any attack, including red glint attacks
- Input: L + Circle to dodge → Square/Triangle to counter
Why this is essential after unlocking Roll:
Perfect Dodge gives you a second way to enter that powerful slow-motion counter state, but with more flexibility than Perfect Parry.
The key advantage: Perfect Dodge works on red glint attacks. Remember how those can’t be parried? Perfect Dodge handles them, giving you offensive counterplay against attacks that normally force pure defense.
Risk management: Some players find dodging timing easier than parry timing. Perfect Dodge gives you options—if you’re uncertain about parrying, you can Perfect Dodge instead without losing the counterattack opportunity.
Build diversity: With both Perfect Parry and Perfect Dodge unlocked, you can adapt your defensive response based on enemy type, attack pattern, and your comfort level in the moment.
Combat flow: The ability to enter slow-motion counters from either parries or dodges means you’re constantly creating offense from defense. Every enemy attack becomes a potential opening for you.
Unlock order: Get this third, after Perfect Parry and Roll. Now you have complete defensive coverage with maximum counterattack potential.
4. Onryo’s Will: Your Get-Out-of-Death-Free Card
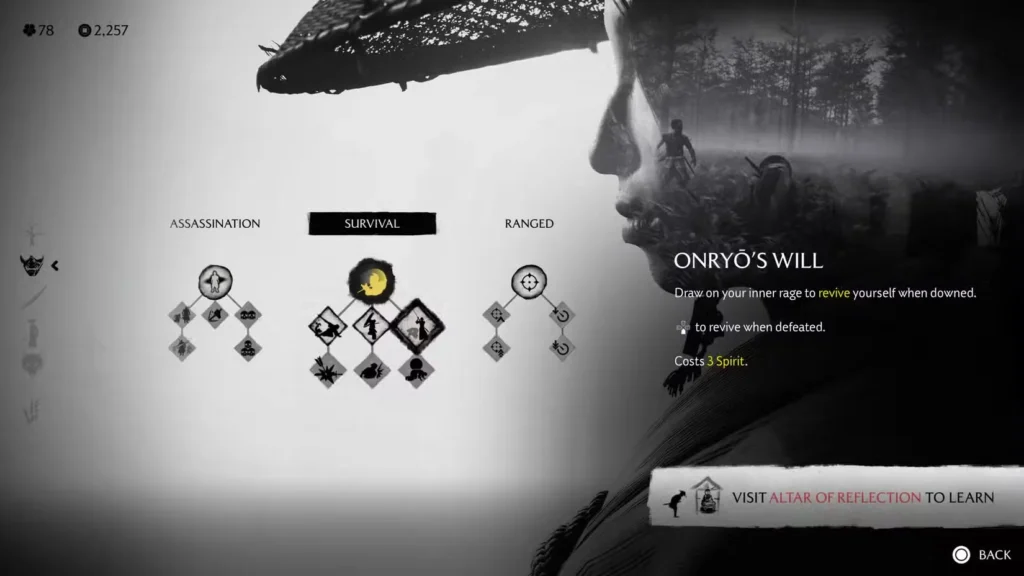
Resurrect Yourself Mid-Combat
What it does:
- Revive yourself when downed in combat
- Uses your inner rage to come back from “death”
- Costs 3 Spirit to activate
- Input: Down on D-Pad when defeated
Why this matters more than you think:
Ghost of Yotei is brutal. Atsu goes down in just a few hits, and the margin for error against skilled opponents is razor-thin. One mistake, one missed parry, one moment of hesitation—and you’re staring at the death screen.
Onryo’s Will is insurance. It’s the skill that forgives your mistakes and gives you a second chance to turn the fight around.
Perfect for duels: When facing elite katana-wielders or the Yotei Six members themselves, having this safety net means you can fight aggressively without the fear that one error ends the entire encounter.
The Spirit cost is fair: Yes, 3 Spirit is significant—it’s the same as a full heal. But here’s the thing: if you’re already down, you didn’t use that Spirit to heal in time anyway. Onryo’s Will is your backup plan when you failed to execute your primary plan.
Psychological benefit: Knowing you have a resurrection available makes you play more confidently. You take calculated risks, go for aggressive plays, and push your limits—because you know death isn’t truly final.
When to unlock: This should be your fourth priority. Once you have your defensive foundation (Perfect Parry, Roll, Perfect Dodge), grab this safety net before pushing deeper into Ezo’s dangers.
5. Killer’s Instinct: Stealth Detection Made Easy
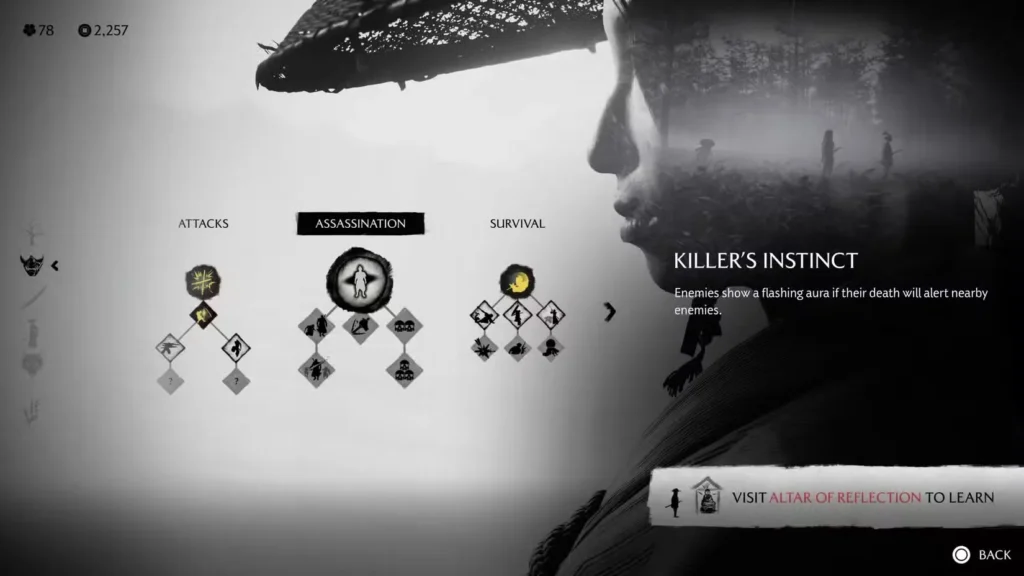
Know Before You Strike
What it does:
- Enemies show a flashing aura if their death will alert nearby foes
- Appears when hovering over a target ready for assassination
- Red flashing aura = enemy is being watched, kill will trigger alarm
- Solid outline = safe kill, nobody is watching
Why stealth players need this:
Stealth in Ghost of Yotei rewards patience and awareness, but it also punishes imperfect information. You can manually track enemy sight lines and figure out who’s watching whom, but why do that when Killer’s Instinct does it for you?
Confidence in kills: No more “I think it’s safe?” hesitation. The flashing aura tells you definitively whether an assassination will stay silent or blow your cover.
Efficiency boost: Clear camps faster by knowing exactly which enemies you can safely eliminate without breaking stealth. This speeds up your infiltration dramatically.
Learning tool: Even if you’re experienced at reading enemy patterns, Killer’s Instinct helps you improve by showing you which sight lines you missed. Over time, you get better at predicting detection without the indicator.
Foundation for Chain Assassination: You need this skill unlocked to access Chain Assassination (our next priority), which makes it essential for stealth builds.
When to unlock: If you favor stealth, grab this fifth. If you’re pure combat-focused, you can delay it—but I still recommend getting it relatively early since Ghost of Yotei rewards flexible playstyles.
6. Chain Assassination: Double the Kills, Zero the Alerts
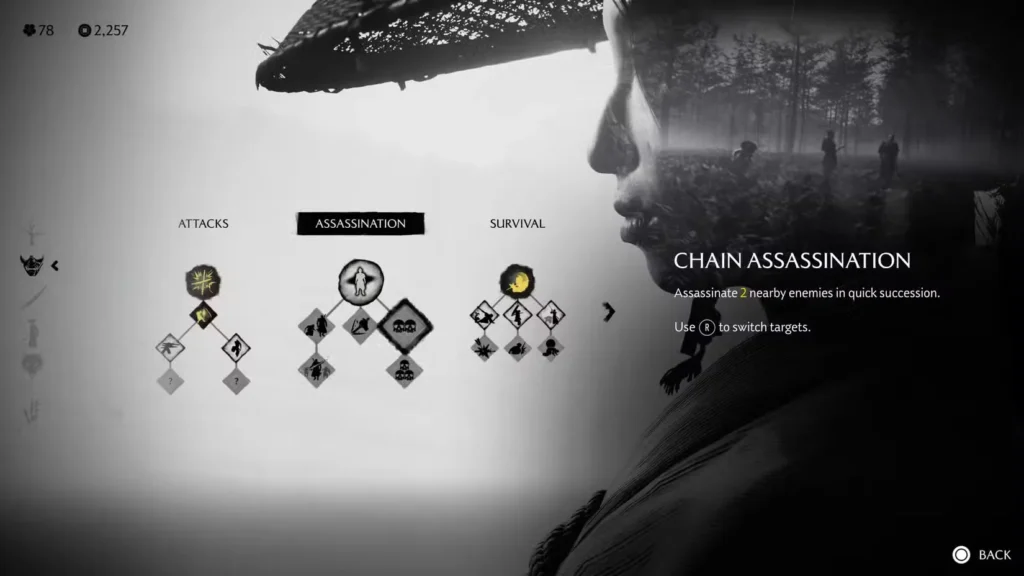
Eliminate Two Enemies Simultaneously
What it does:
- Assassinate 2 nearby enemies in quick succession
- Use R to switch between targets before executing
- Both enemies die without alerting others (if Killer’s Instinct shows safe)
Why this is a game-changer for stealth:
Every bandit camp has pairs of enemies standing together, chatting, patrolling side-by-side. Without Chain Assassination, you have to separate them (throwing sake bottles, waiting for patrol patterns) or accept that killing one alerts the other.
With Chain Assassination, you just kill both. It’s that simple, and it’s incredibly satisfying.
Tactical efficiency: Camps that would take 10 minutes of careful separation and patience can be cleared in 3 minutes with Chain Assassinations on grouped enemies. You’re not just more effective—you’re dramatically faster.
Reduced risk: Every moment you spend in a camp increases chances of detection. Killing pairs instantly means fewer opportunities for things to go wrong.
Synergy with Killer’s Instinct: These skills work together beautifully. Killer’s Instinct tells you if it’s safe, Chain Assassination executes the plan. It’s the perfect stealth combo.
When to unlock: Immediately after Killer’s Instinct, making this your sixth skill. If you’re building for stealth, these two should be consecutive unlocks.
7. Brute Assassination: No Enemy Type Is Safe
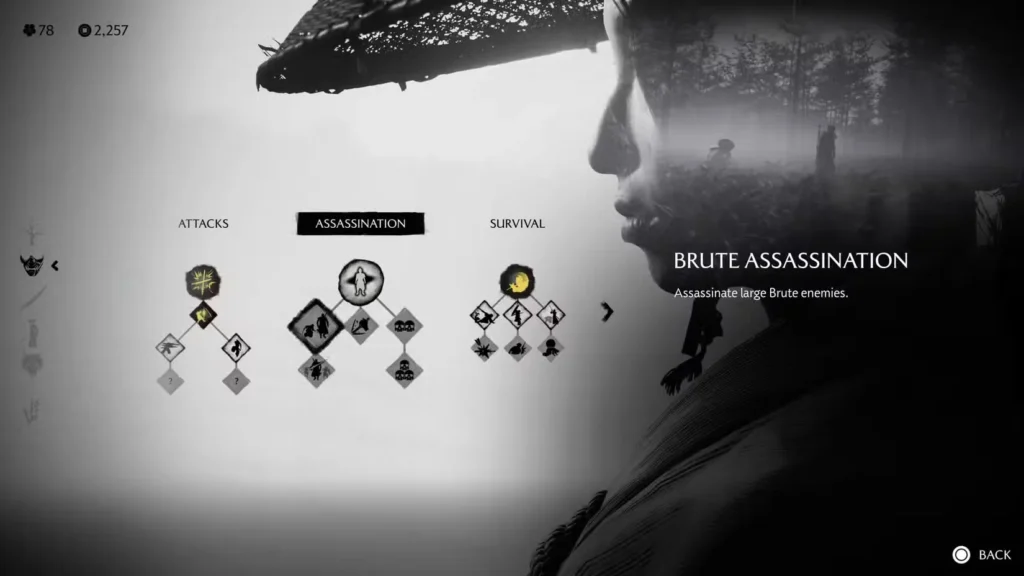
Stealth Kill the Unkillable
What it does:
- Allows assassination of large Brute enemies
- Brutes can now be killed silently like standard enemies
- Removes the biggest obstacle to full-stealth camp clears
Why this completes your stealth toolkit:
Before unlocking Brute Assassination, these hulking behemoths are stealth-killers in the most literal sense. You can’t assassinate them, which means you either:
- Leave them for last and fight them openly (breaks stealth)
- Avoid camps with Brutes entirely (limits your options)
- Use tons of resources trying to kill them quietly with ranged attacks
With Brute Assassination, none of that matters. Every enemy type can now be eliminated silently. Full ghost runs become possible.
Strategic freedom: No longer do you need to plan entire infiltrations around “the Brute problem.” Just assassinate them like anyone else and move on.
Late-game camps: As you progress, more camps include Brutes. This skill’s value only increases as the game continues.
When to unlock: For stealth players, this is your seventh priority after completing the Chain Assassination combo. For combat-focused players, you can skip or delay this significantly.
8. Heavenly Slash: Aggressive Offense That Pays for Itself
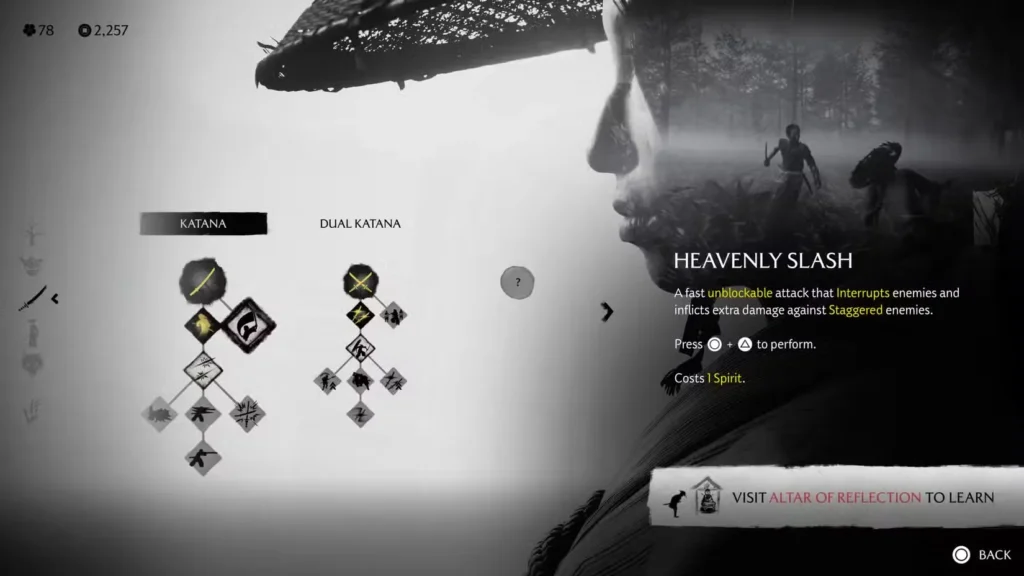
Your Signature Offensive Tool
What it does:
- Fast, unblockable attack that interrupts enemies
- Inflicts extra damage against Staggered enemies
- Dash forward while attacking
- Costs 1 Spirit
- Input: Circle + Triangle
Why aggression becomes the best defense:
Heavenly Slash represents a philosophy shift: instead of spending Spirit on healing, spend it on overwhelming offense that prevents you from taking damage in the first place.
The unblockable property means enemies can’t defend against it. Shielded opponents, defensive stances, parry attempts—none of it matters. Heavenly Slash goes through everything.
Against staggered enemies, the bonus damage is devastating. You or your Wolf breaks enemy posture, you Heavenly Slash, they die before recovering. It’s a guaranteed kill setup.
The dash property gives you mobility while attacking. Close gaps on archers, chase fleeing enemies, or reposition while maintaining pressure. It’s aggressive movement that also deals damage.
Spirit economy: Yes, it costs Spirit. But killing enemies faster means taking less damage, which means healing less. The Spirit investment pays for itself by keeping you healthy through aggression.
When to unlock: This should be your eighth priority for balanced builds. If you’re pure stealth, you can skip it. If you’re combat-focused, consider grabbing it even earlier (maybe fifth or sixth).
9. Concentration: Turn Your Bow Into a Precision Weapon
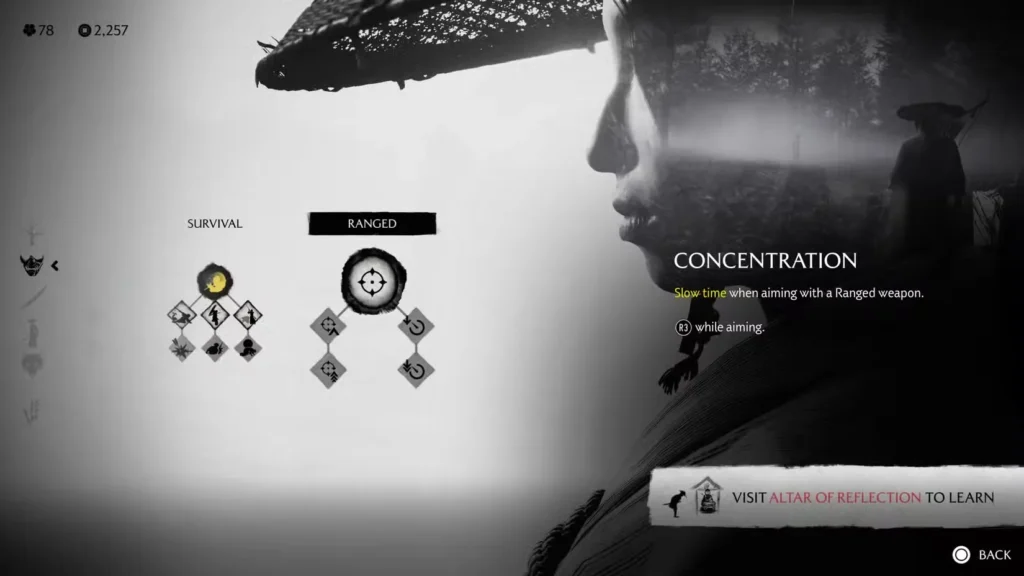
Slow-Motion Archery
What it does:
- Slow time while aiming ranged weapons
- Makes headshots dramatically easier to land
- Input: R2 while aiming
Why this transforms ranged combat:
Headshots kill unarmored enemies instantly (except Brutes). But landing headshots on moving, approaching enemies while under pressure is genuinely difficult at normal speed.
Concentration makes you a master archer regardless of your actual aiming skill. Time slows, you line up the shot, headshot lands, enemy dies. Repeat.
Strategic applications:
Camp initiation: Start infiltrations by using Concentration to headshot archers or isolated enemies from range, thinning numbers before going loud or staying ghosted.
Panic button: Surrounded and need to thin the herd? Concentration lets you quickly dome multiple enemies even in chaotic situations.
Dangerous targets: That enemy with the fire arrows causing problems? Concentration headshot. That officer rallying troops? Concentration headshot. Problem solved.
Resource efficiency: Killing with headshots means not spending Spirit on combat abilities or healing from prolonged fights.
When to unlock: This is your ninth priority for most builds. If you heavily favor bow combat, consider grabbing it earlier (maybe sixth or seventh). If you rarely use your bow, you can delay or skip entirely.
The Optimal First 9 Skills Unlock Order
Your Step-by-Step Progression
Here’s the recommended path for maximum effectiveness:
- Perfect Parry – Combat foundation, non-negotiable
- Roll – Essential mobility and survival
- Perfect Dodge – Complete defensive coverage
- Onryo’s Will – Safety net for mistakes
- Killer’s Instinct – Stealth awareness (if stealth-focused) OR Heavenly Slash (if combat-focused)
- Chain Assassination – Stealth efficiency (if stealth-focused) OR Concentration (if combat-focused)
- Brute Assassination – Complete stealth toolkit (if stealth-focused) OR next priority from opposite tree
- Heavenly Slash – Aggressive offense (if not grabbed earlier)
- Concentration – Ranged precision (if not grabbed earlier)
Flexibility note: This path prioritizes combat fundamentals first (skills 1-4), then branches based on your preferred playstyle. Adjust the order based on whether you lean stealth, combat, or balanced.
Skills to Avoid Early (Save for Later)
Don’t Waste Points on These Yet
While I’ve focused on what to unlock, it’s equally important to know what not to prioritize:
Situational combat skills that only work in specific scenarios you rarely encounter
Advanced combo abilities that require mastery of fundamentals you haven’t developed yet
Niche stealth tools beyond the core trio (Killer’s Instinct, Chain Assassination, Brute Assassination)
Passive stat boosts that provide marginal improvements compared to game-changing active abilities
Save your skill points for the essentials first. You can circle back to experimental or advanced skills once you’ve built a solid foundation.
How to Find More Shrines (And Skill Points)
Maximizing Your Skill Acquisition
Since skills only come from Shrines, here’s how to find them efficiently:
Buy maps from Cartographers in villages and inns—they reveal Shrine locations across regions
Follow golden birds during exploration—they often lead to Shrines and other secrets
Use your Spyglass from high vantage points to spot Shrines in the distance
Complete Tales and side quests—NPCs often point you toward Shrines as rewards or quest locations
Explore thoroughly—Shrines are deliberately placed in scenic or significant locations worth discovering
Pro tip: Prioritize buying Shrine maps early. The cost is minimal compared to the value of unlocking these essential skills faster.
For more about Ghost of Yotei’s systems and world, check out the official PlayStation page or explore the game’s setting and context.
Final Thoughts: Build Your Foundation First
The no-respec system in Ghost of Yotei isn’t a punishment—it’s an invitation to commit to your choices and live with their consequences. But that doesn’t mean you should go in blind.
The nine skills outlined here form the foundation every Atsu needs regardless of playstyle preferences. Combat fundamentals, defensive options, stealth essentials, and offensive tools that carry you from early game through the final confrontations with the Yotei Six.
After unlocking these, you have freedom to experiment, specialize, and build toward advanced techniques. But skip these essentials, and you’ll struggle unnecessarily through fights that should be manageable.
Start with Perfect Parry. Add Roll. Build from there. Trust the process, and you’ll transform Atsu into an unstoppable force of vengeance across Ezo.
Now get to those Shrines, make smart choices at the Altar of Reflections, and show the Yotei Six why they should have made sure Atsu stayed dead.
Which skills did you prioritize first? Any regrets about early skill choices? Share your build progression below!
Also Read: