So, you’ve made it into the forest with your herd of Calicorns. Nice work! But don’t get too comfy—this part of the game is full of sneaky traps, missable moments, and “oops” cliffs that will test your reflexes.
If you’re chasing Decorations, achievements, and perfect herd management, let’s break it down step by step—without the boring walls of text. If you missed it, be sure to check out our Herdling Walkthrough for Chapter 1 and Chapter 2.
At a Glance: Chapter Walkthrough Summary
| Category | Total |
| New Calicorns | 2 (plus a missable one) |
| Decorations | 6+ |
| Achievements | 5+ |
| Resting Spots | 1 |
| Major Puzzles | 2 (Log push, Totem traps) |
| Missable Moments | 1 big Calicorn near cliff |
River Crossing & First Decorations
Your first challenge? Cross the river. Nothing fancy here—just keep pushing forward. On the other side, you’ll find a path with a massive stone statue blocking the scene.
Right next to it? Your first Decoration. Just press X (on Xbox) to scoop it up and slap it on your Calicorns. Boom—achievement unlocked already. Not a bad start.
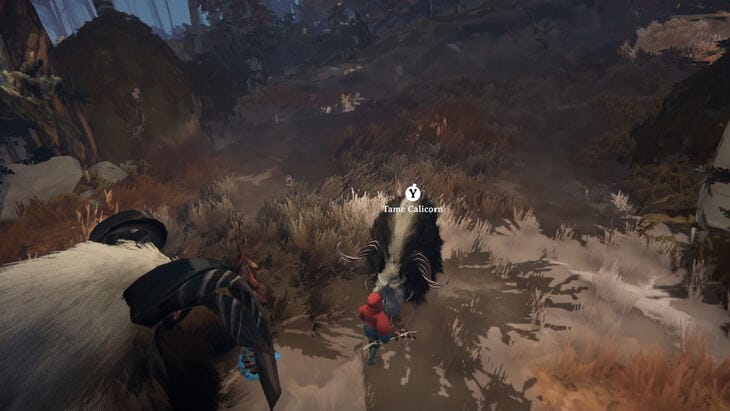
Wooden Bridge, Log Puzzle & New Calicorn
Keep leading your herd to the wooden bridge and cross it. Once you hit the river again, search left—you’ll spot another Decoration hanging from a tree. Collect it, then push forward.
The road ahead is blocked, but don’t panic. A fallen tree log helps you out here, and with your Calicorns’ teamwork, you’ll push it through. Problem? Cement cylinders on the other side are blocking… but surprise! A new Calicorn is chilling there, ready to lend a hoof. Tame this beauty and add it to your squad.
Tall Grass Tutorial & Dangerous Junk Road
After taming, you’ll snake your way through fences and get a handy tutorial: Plowing through tall grass (hammer that right trigger a few times).
Easy XP move. Just watch out once you return to the road because the ground is covered in spiky scrap metal. This stuff won’t KO you, but it can wreck your herd’s health if you’re careless.
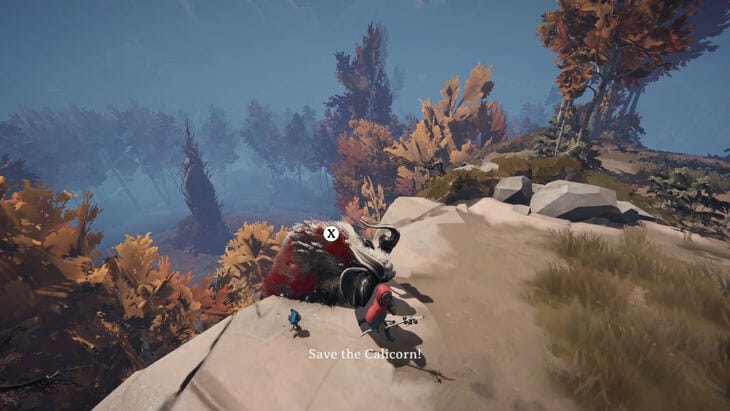
Missable Calicorn: The Cliffside Rescue
Here’s where things get spicy. Up ahead near the cliff, you’ll spot a giant Calicorn… but this one’s a missable achievement moment.
- If you take too long, the cliff will crumble and bye-bye Calicorn.
- Want to save it? Stand by its side, wait for the notice above its head, press X, and pull back with your left stick ASAP.
- Nail it, and congrats—you just grabbed another achievement plus a brand-new Calicorn for your collection.
Feed and tame it right after, so your herd stays strong.
More Decorations & A Well-Earned Rest Stop
Cross the tree root bridge (yep, fancy forest architecture incoming), and grab another Decoration on the other side. Keep pushing—another Decoration will be tucked away before you hit the walls.
Shortly after, you’ll stumble across your first Resting Spot. Light the campfire, give your Calicorns a nice scrub, and unlock—guess what? Yep, another achievement. Basically, you’re running an animal spa at this point.
Totem Trap Area (The Bird Gauntlet)
Now comes the trickiest section: totem traps + angry birds. Here’s the deal:
- If you or your herd touch the totems, the birds perched on top will go into “Hunt Mode” and dive-bomb your squad.
- Achievement hunters: there’s a trophy tied to making it through without triggering an attack.
The first trap is the hardest. Pro tip: destroy it yourself with your character while keeping your herd at a distance. That way, they won’t get targeted.
Keep holding the slowdown button while guiding your Calicorns through the narrow path, hugging tunnels and avoiding tree spikes. It’s tense, but manageable.
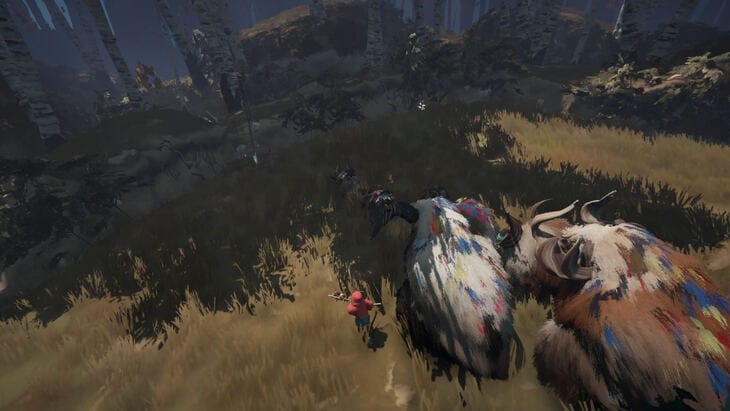
Shortcut Choices & More Decorations
Soon you’ll hit a fork. There’s an altar with—you guessed it—another Decoration in the middle. Both paths rejoin eventually, but take the right path. It’s shorter and way safer for your herd.
Grab the two more Decorations waiting in the next area. Whether you stay left or right with the bird patrol doesn’t matter much, but pro-strats say the right path is tighter and safer for your herd.
Survive the final bird gauntlet without any swoop attacks, and yes, that’s yet another achievement unlocked.
Final Stretch: To the Ferry
If your Calicorns took hits, you’ll find berries nearby—feed them before moving to the big open area. Then it’s just a peaceful lead-up to the ferry. Once you reach it:
🎉 Chapter complete + another achievement. Done and dusted.
Quick Tips & Final Thoughts
- Don’t sleep on Decorations. Not only do they make your Calicorns look cooler than an esports team in matching hoodies, but they also tie into achievements.
- Save the cliffside Calicorn. If you miss it, you’ll be kicking yourself later—it’s one of the trickiest but most satisfying challenges.
- Take your time in bird zones. Rushing here is like speed-running Dark Souls blindfolded—sure, it’s possible, but your herd’s gonna suffer.
✅ With this full guide, you’ll snag every Decoration, tame every Calicorn, and unlock every achievement in this chapter without missing a beat.
FAQ – Quick Answers for Calicorn Chapter 3
You’re talking about the big one near the cliff that can fall if you’re slow. Head to that narrow path by the cliff, get right next to it, wait for the “save” prompt, smash that X button, and pull back with the stick to save it before it tumbles off. Miss this moment, and you’ll lose the Calicorn and the achievement tied to it.
Plow lets you bust through tall grass to clear a path for your herd. When you see tall grass blocking the way, just hammer the right trigger button repeatedly to “plow” through it without slowing down your Calicorns. Handy for those quick escapes or speedy travel moments!
Decorations are more than just cool gear for your Calicorns—they help you unlock achievements and make your herd stand out. You find them scattered along paths, hanging from trees, or near altars. Pick them up with X and equip them to your Calicorns to boost your swag and rack up those sweet achievement points.