Find Shakra and get the Bilewater map in Hollow Knight Silksong. Complete guide with navigation tips, prerequisites, and strategies for this challenging poisonous region.
TL;DR
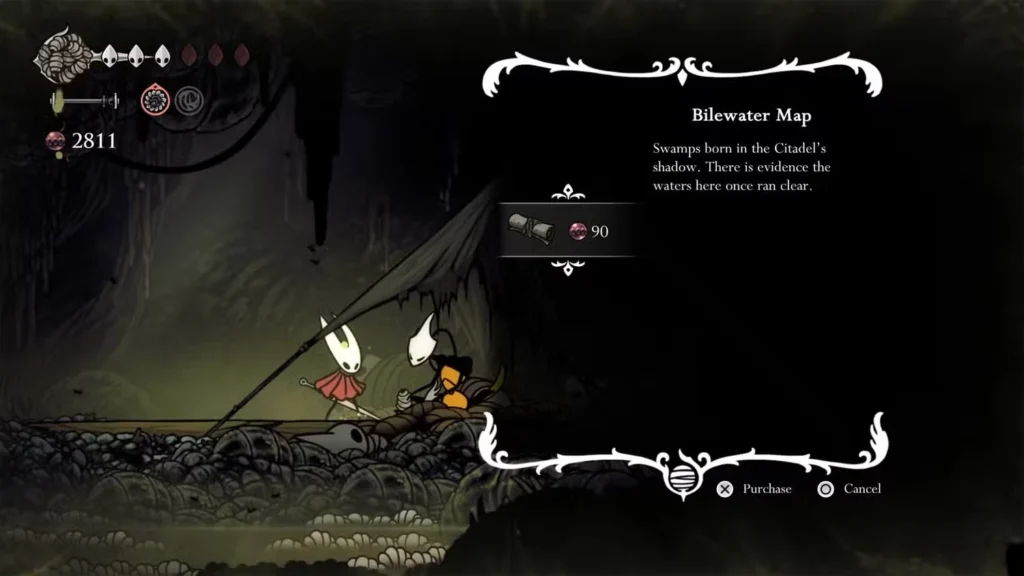
The Bilewater map costs 90 Rosaries from Shakra, who’s located in a tunnel filled with her signature rings. You’ll need the Faydown Cloak (double jump) to reach her. Navigate right from the entrance, climb platforms while avoiding poisonous water and traps, then use double jump and Clawline to reach Shakra’s elevated position.
Bilewater stands as one of Hollow Knight Silksong’s most treacherous regions – a sprawling network of poisonous waterways, trap-filled platforms, and hostile maggots that actively drain your Silk reserves. Without a proper map, this toxic labyrinth becomes a nightmare of backtracking and dangerous wrong turns. Here’s your complete guide to finding Shakra and securing the Bilewater map before the region’s hazards overwhelm you.
Important naming note: While some players refer to this area as “Bilgewater,” the correct name is Bilewater – a distinction that matters when searching for guides and discussing the game online.
Why the Bilewater Map Is Essential
Unlike other regions in Silksong where getting lost means mild inconvenience, Bilewater punishes poor navigation with genuine resource drain. The omnipresent poisonous water contains aggressive maggots that continuously eat away at Hornet’s Silk, making it progressively harder to use abilities or regenerate masks.

Bilewater’s unique hazards include:
- Silk-draining maggots in all water sources
- Trap-triggered platforms that collapse when ropes are cut
- Complex vertical layouts that are easy to misnavigate
- Enemy-guarded chokepoints that block obvious routes
Without the map, you’ll waste precious Silk wandering through dead ends while the environment slowly weakens your capabilities. This makes the Bilewater map one of the most immediately practical acquisitions in the game.
Prerequisites: What You Need Before Starting
The Faydown Cloak (double jump) is absolutely mandatory for reaching Shakra in Bilewater. While you might theoretically reach the general area without it, the specific tunnel containing Shakra requires double jump mechanics to access safely.
Essential abilities:
- Faydown Cloak – Double jump for reaching elevated platforms
- Clawline – Grappling hook for precise platform navigation
- 90 Rosary Beads – Shakra’s asking price for the map
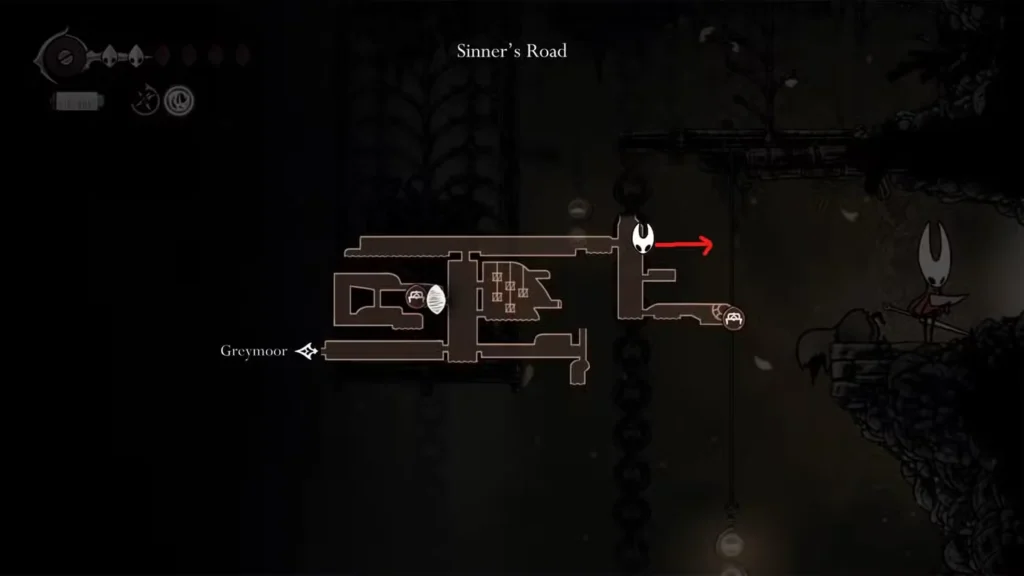
Access route: Early in the game, Bilewater is primarily accessible from Sinner’s Road. Later progression opens additional entry points, but this remains the most straightforward initial approach.
Pro tip: Before attempting this journey, ensure your Silk reserves are fully upgraded. The maggots don’t discriminate – they’ll drain whatever Silk you have available.
Navigation Route: From Entrance to Shakra
The path to Shakra follows a generally rightward progression with several critical vertical challenges. Each section builds on the previous one’s complexity, requiring both patience and precision.
Initial Rightward Progression
Starting from the Bilewater entrance, your primary objective is maintaining rightward momentum while avoiding the numerous environmental hazards.
Step-by-step navigation:
- Go right from the entrance across the cage to the next room
- Continue right while avoiding water – any contact triggers maggot attacks
- Identify guarded platforms – some enemies protect crucial jumping points
- Avoid cutting ropes – many trigger platform collapse traps
- Jump onto cages when available to reach higher platforms
Trap awareness: Bilewater’s rope-triggered traps aren’t always obvious. If you see a rope suspending a platform, consider whether cutting it serves any purpose before acting. Most rope-cutting in this area leads to platform destruction rather than progression.
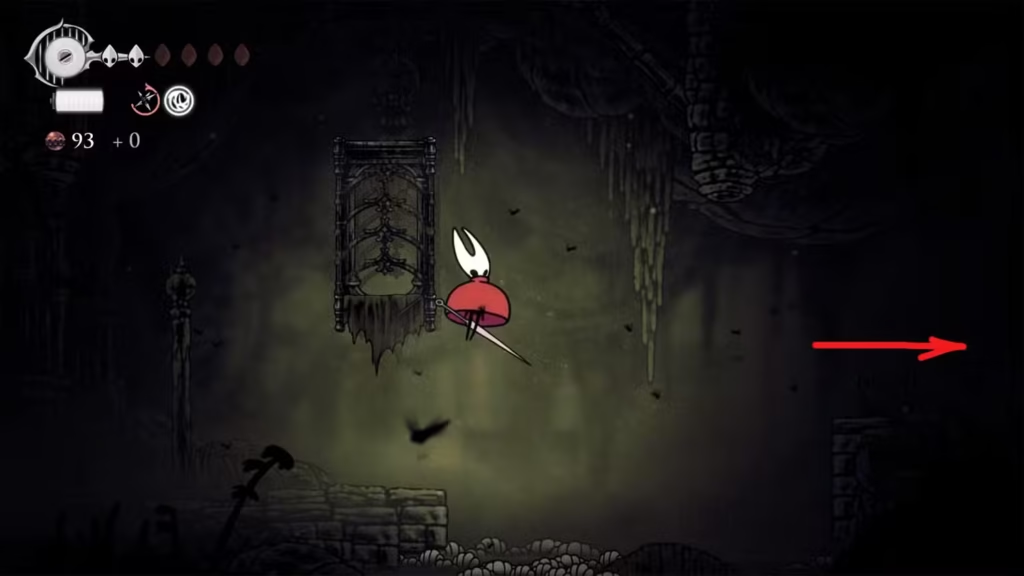
Vertical Climbing Challenges
As you progress rightward, the route becomes increasingly vertical, requiring wall-climbing skills and enemy avoidance techniques.
Climbing sequence:
- Jump across trap-filled platforms – test each platform’s stability
- Cling to walls to ascend vertical sections
- Avoid enemies while climbing – prioritize evasion over combat
- Look for leftward platforms – these often indicate progression points
- Enter doors that appear after successful climbing sequences
Enemy strategy: The enemies in Bilewater’s vertical sections are positioned to knock you into poisonous water. Rather than engaging them directly, focus on timing your climbs to avoid their attack patterns entirely.
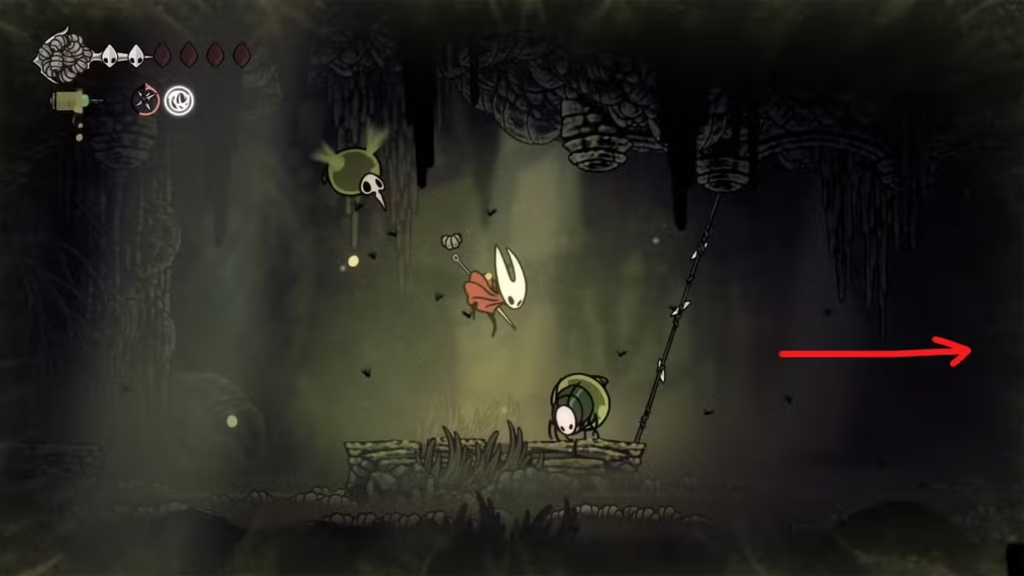
The Final Approach: Cage Leverage and Leftward Movement
The navigation pattern shifts as you approach Shakra’s location, requiring leftward movement and cage-based platforming.
Final approach steps:
- Use cages as leverage to jump left and proceed ahead
- Continue left consistently until Shakra’s signature rings become visible
- Identify the narrow tunnel filled with Shakra’s distinctive ring markers
- Prepare for double jump requirements – this is where Faydown Cloak becomes essential
Visual landmark: Shakra’s rings serve as unmistakable navigation aids. Once you start seeing them, you’re on the correct path regardless of how confusing the route might have seemed.
Accessing Shakra’s Tunnel: The Double Jump Challenge
The tunnel containing Shakra represents the most technically demanding part of the journey. Without the Faydown Cloak, this section is completely inaccessible, which explains why early-game players often struggle to complete this acquisition.
Pre-Tunnel Preparation: Bellway and Bench Access
Before entering Shakra’s tunnel, prioritize survival infrastructure. The upcoming platforming sequence has significant failure potential, making nearby respawn points crucial.
Infrastructure setup:
- Go left from the tunnel entrance first
- Follow signs to the Bellway station
- Activate the Bellway for fast travel access
- Rest at the nearby bench to establish a respawn point
This preparation might seem like a detour, but it eliminates the need to repeat the entire navigation sequence if you die during the tunnel ascent.
Tunnel Ascent: Double Jump and Clawline Mastery
The tunnel itself tests every movement ability you’ve acquired, combining wall-climbing, double jumping, and grappling hook precision.
Tunnel navigation sequence:
- Use double jump to reach tunnel walls
- Cling to tunnel walls and begin ascending
- Double jump again at appropriate intervals
- Aim Clawline to the right side to reach platforms safely
- Avoid spikes through precise grappling hook timing
- Use green bulbs as intermediate grappling points
- Climb platforms to the right when they become available
Critical timing: The combination of double jump and Clawline usage requires specific timing to avoid spike damage. Practice the sequence of double jump → wall cling → Clawline deployment until it becomes muscle memory.

Meeting Shakra: Map Purchase and Beyond
Shakra’s location in Bilewater follows her established pattern of humming melodically while offering essential cartographic services. Her presence confirms you’ve successfully navigated the region’s most challenging approach sequence.
Map transaction details:
- Speak with Shakra to initiate map purchase dialogue
- Pay 90 Rosary Beads for the Bilewater map
- Receive immediate map functionality for the region
Post-purchase benefits: With the map acquired, previously confusing areas become manageable. You can now efficiently locate missed collectibles, identify optimal routes to other regions, and navigate back through Bilewater without resource waste.
Strategic Exploration: Using Your New Map
The Bilewater map reveals several previously hidden progression routes and optional content areas. Understanding these connections helps optimize your overall Silksong progression.
Key map revelations:
- Hidden passages that bypass major hazard zones
- Shortcut connections to other regions
- Collectible locations worth revisiting with better equipment
- Quest-relevant areas for future storyline progression
Backtracking recommendations: With the map in hand, consider revisiting areas you passed through during the initial navigation. Many contain secrets that were impossible to spot without proper orientation.
Combat and Hazard Management in Bilewater
Effective Bilewater exploration requires specific hazard management strategies beyond simple navigation. The region’s environmental threats demand tactical approaches.
Maggot management: The Silk-draining maggots respond to specific combat techniques. Rather than fighting them individually, focus on area-of-effect abilities that clear multiple threats simultaneously.
Water navigation: When water contact becomes unavoidable, minimize exposure time and immediately seek dry platforms. The maggot drain effect stacks with prolonged exposure.
Platform stability: Always test platform stability before committing to jumps. Many Bilewater platforms are designed to collapse after brief contact, requiring quick movement planning.
Connecting to Broader Progression
Bilewater serves as a crucial junction between multiple regions and storylines in Silksong. Understanding its connections helps optimize your overall progression strategy.
The region links to several important areas including The Slab and provides access to key items like the Ruined Tool. Planning your Bilewater exploration around these connections maximizes efficiency.
Future considerations: Many of Bilewater’s secrets require abilities you won’t acquire until later in Act 1. The map helps identify these areas for future revisiting.
Available across Steam, Nintendo Switch, PlayStation, and Xbox, Silksong’s interconnected world design means every map matters for the complete experience.
Final Thoughts: Conquering Bilewater’s Challenges
The Bilewater map acquisition represents a significant milestone in your Silksong journey – not just for the cartographic benefits, but for the skill development required to reach Shakra. The navigation challenges, hazard management, and precise platforming all serve as preparation for the greater trials ahead.
With Shakra’s map in hand and the region’s secrets revealed, Bilewater transforms from intimidating obstacle to navigable challenge. The poisonous waters and trap-filled platforms remain dangerous, but they no longer hold the power to derail your progression through systematic confusion.
Master Bilewater’s unique demands, and you’ll have developed skills that serve you well throughout Pharloom’s most challenging regions. Every successful navigation through its toxic depths builds confidence and competence for the greater mysteries that await in Team Cherry’s masterfully crafted world.