Learn how to craft the Cogfly tool in Hollow Knight Silksong. Find the High Halls location, get Craftmetal, and unlock powerful flying companions for combat and quests.
Your Personal Air Force: Understanding the Cogfly Tool
In the challenging world of Hollow Knight Silksong, few tools offer the tactical versatility of the Cogfly. This remarkable device doesn’t just add another attack option to your arsenal – it fundamentally changes how you approach both combat and exploration by providing autonomous flying companions that fight alongside you.
Think of the Cogfly as your personal squadron of mechanical allies. These aren’t just decorative pets; they’re strategic combat assets that can turn the tide in difficult battles, especially against aerial enemies that love to stay just out of your needle’s reach.
Why the Cogfly Tool Deserves Your Attention
The Cogfly represents one of Silksong’s most innovative tool concepts, offering benefits that extend far beyond simple damage dealing:
Combat Applications:
- Aerial enemy control – Perfect for flying foes that frustrate ground-based fighters
- Multi-target engagement – Handle multiple enemies simultaneously
- Damage over time – Continuous pressure while you focus on other threats
- Positioning assistance – Cogflies can distract enemies while you maneuver
Quest and Exploration Benefits:
- Delivery missions – Essential for quests like Great Taste of Pharloom
- Time-sensitive challenges – Provides support during no-damage delivery runs
- Crowd control – Manages enemies while you focus on objectives
- Tool synergy – Combines with other tools for devastating effects
Pro tip: The Cogfly’s true power reveals itself when combined with the Pollip Pouch from the Rite of the Pollip quest, adding venom damage that transforms your flying companions into lethal poison-dealers.
Prerequisites: Skills You’ll Need for the Journey
Before attempting to reach the Cogfly’s location in the High Halls, ensure you have these essential movement abilities:
Required Ancestral Arts:
- Clawline (Harpoon Hook) – Absolutely crucial for vertical navigation
- Faydown Cloak (Double Jump) – Essential for reaching upper platforms
Warning: Attempting this route without both abilities will result in frustration and impossible barriers. The High Halls’ vertical design assumes you have mastered these movement techniques.
Additional Preparation:
- Craftmetal – Required for tool construction (we’ll cover sources below)
- Combat readiness – The High Halls contain challenging enemies
- Patience – This is a complex navigation sequence that rewards careful progression
Craftmetal Sources: Fuel for Your Flying Factory
Before diving into the High Halls expedition, you’ll need Craftmetal to actually construct the Cogfly tool once you find it. This valuable resource has several reliable sources:
Early Game Source:
- Pebb in Bone Bottom – Purchase from this merchant early in your journey
Exploration Rewards:
- The Marrow near Hunter’s March – Hidden in exploration areas
- End of the lake in Fleatopia – Requires thorough area exploration
- Various hidden locations throughout Pharloom
Resource management tip: Craftmetal is valuable enough that you should gather it whenever possible. Having multiple units available allows for immediate tool crafting when opportunities arise.
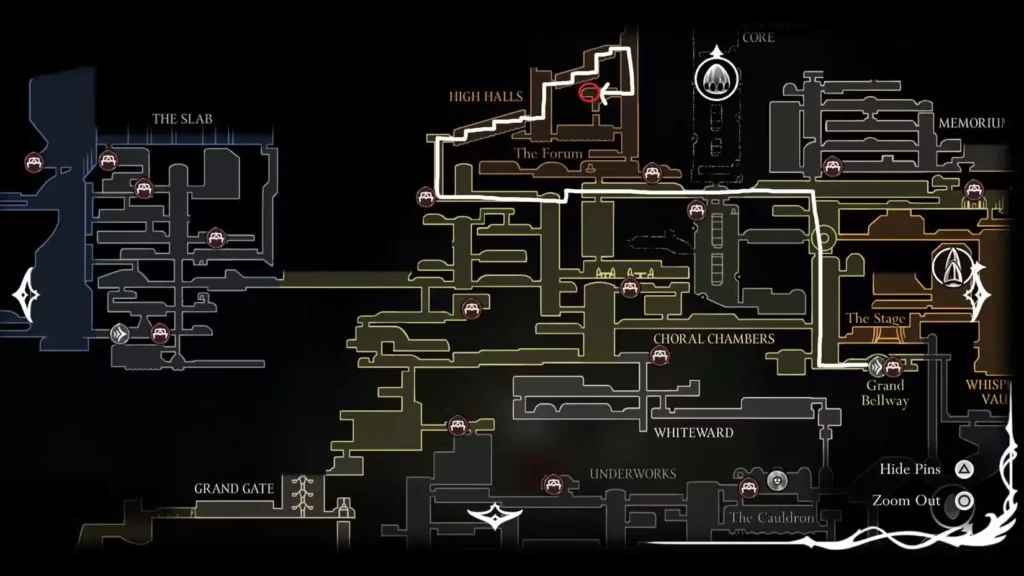
Route Planning: Two Paths to the High Halls
The journey to the Cogfly begins at the top western corner of the Choral Chambers, but you have two viable approach routes depending on your familiarity with the area.
Route Option 1: Conductor’s Melody Path (Experienced Players)
If you’ve already learned the Conductor’s Melody, you can use that familiar route:
- Head left from the starting point
- Glide down to reach the station and bench
- Use established navigation patterns
Route Option 2: Grand Bellway Route (Recommended for Most Players)
For a more straightforward approach:
- Travel to the Grand Bellway – Use fast travel if available
- Proceed to the Cogwork Dancers boss room – This serves as your navigation landmark
- Begin the High Halls ascent from there
Navigation tip: The Cogwork Dancers boss room provides an excellent reference point because it’s a memorable landmark that most players will recognize.
Step-by-Step High Halls Navigation
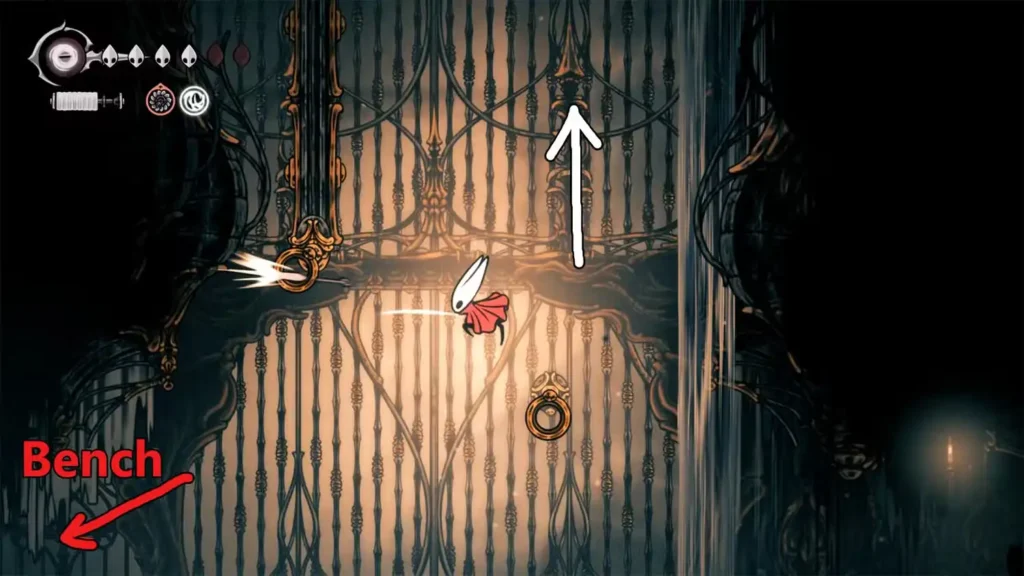
Phase 1: Initial Ascent from Cogwork Dancers
- Head left from the boss room – Maintain this direction consistently
- Continue until you spot a bench – This serves as your first checkpoint
- Double jump upward – Use Faydown Cloak to reach higher platforms
- Harpoon into the rings – Use Clawline to grapple onto hanging anchor points
- Repeat the ring sequence – Multiple grapple points lead progressively higher
- Reach the top of this section – You’ll know you’re there when the environment changes
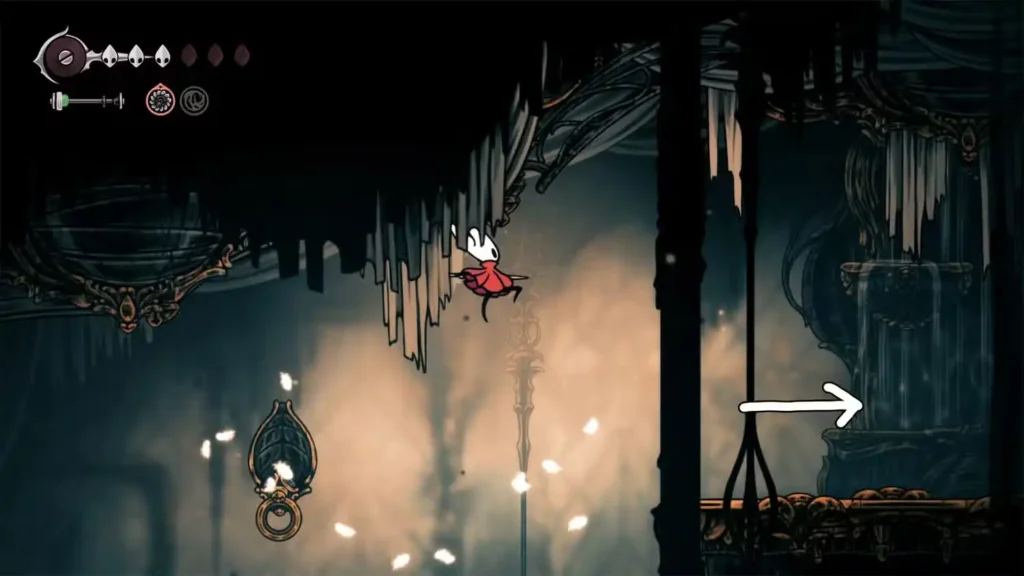
Phase 2: Horizontal Water Room Navigation
- Proceed right – Enter the wide horizontal chamber
- Note the running water and platforms – You’re now officially in the High Halls
- Platform hop strategically – Jump across the water-filled room
- Use rings when necessary – Grapple points fill gaps between platforms
- Progress to the next room – Continue the eastward movement
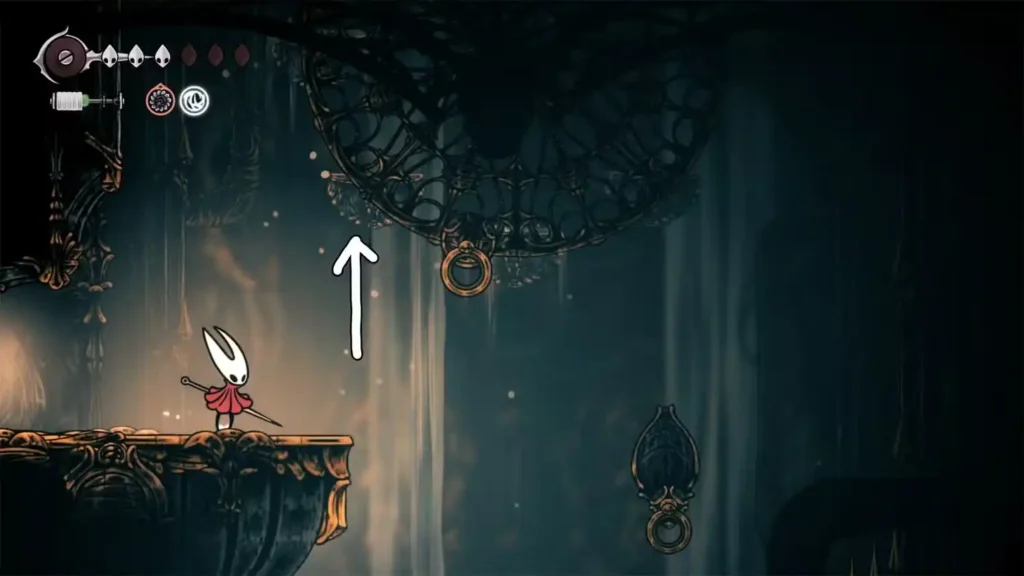
Phase 3: Giant Wheel Challenge
- Look up to spot the giant spinning wheel – This is a major navigation landmark
- Harpoon into wheel rings – Timing is crucial as the wheel rotates
- Ascend to the upper wheel – There’s typically a second wheel above the first
- Combine skills for vertical progression – Use double jump, dash, and grapple in sequence
- Enter the right-side room – This leads to the next navigation phase
Phase 4: Enemy Platform Section
- Navigate enemy-filled platforms – Similar to your initial High Halls entry
- Hook onto floating rings – Use established grappling techniques
- Move forward to the following room – Continue progression toward your goal
Phase 5: Spike Descent Challenge
- Look down and prepare to glide – This section requires precise timing
- Avoid the spike obstacles – Glide carefully while watching for threats
- Quickly use Clawline – Grab onto the ring as soon as it’s safe
- Watch spikes retract – The obstacles remove themselves once you’re positioned correctly
- Continue downward descent – Use the same technique repeatedly
- Locate the enemy across the left path – This marks your destination approach
Claiming Your Prize: Cogfly Tool Construction
Final Steps:
- Enter the left room – The enemy marks the correct passage
- Navigate to the end of the path – The Cogfly tool awaits
- Inspect the tool location – Interact with the crafting station
- Use Craftmetal to construct – Transform raw materials into functional tool
- Rest at a bench – Required to equip your new Cogfly tool
Construction note: The crafting process is immediate once you have the required Craftmetal, but you must rest at a bench before the tool becomes available in your equipment menu.
Maximizing Cogfly Effectiveness
Basic Combat Strategies:
- Deploy before engaging – Activate Cogflies before entering combat areas
- Focus on positioning – Let your companions handle aerial threats while you control ground combat
- Monitor companion health – Cogflies can be destroyed and need strategic protection
- Coordinate attacks – Time your strikes with companion movements for maximum damage
Advanced Synergy Techniques:
- Pollip Pouch combination – Adds venom damage to all Cogfly attacks
- Tool rotation – Switch between Cogfly and other tools based on encounter needs
- Environmental awareness – Use Cogflies to trigger distant switches or mechanisms
- Crowd control mastery – Deploy companions to manage multiple enemy types simultaneously
Quest Applications: Great Taste of Pharloom
The Great Taste of Pharloom quest represents one of the Cogfly’s most important applications. This challenging delivery mission requires:
Mission Requirements:
- Deliver Courier’s Rasher within strict time limits
- Avoid taking any damage during the delivery
- Navigate through enemy-filled areas efficiently
Cogfly Advantages:
- Enemy distraction – Companions draw attention while you focus on movement
- Aerial threat management – Flying enemies can’t interfere with your delivery
- Route clearing – Cogflies can eliminate obstacles ahead of your path
- Damage prevention – Companions handle threats that might otherwise hit you
Platform Availability and Community
Ready to command your own flying squadron? Hollow Knight Silksong is available across all major platforms:
- Steam – Download on Steam
- Nintendo Switch – Get it on Nintendo eShop
- PlayStation – Available on PlayStation Store
- Xbox – Download from Xbox Store
Advanced Cogfly Mastery Tips
Companion Management:
- Learn deployment timing – Activate Cogflies just before engaging enemies
- Understand duration limits – Companions don’t last forever; time their use strategically
- Practice recall techniques – Some situations require dismissing companions early
- Master positioning – Place yourself where Cogflies can be most effective
Tool Integration:
- Experiment with other tools for combination attacks
- Consider crest synergies that enhance tool effectiveness
- Practice tool switching during combat for adaptive strategies
- Develop tool rotation patterns for different enemy types
Troubleshooting Common Navigation Issues
High Halls Challenges:
- Grapple point timing – Practice ring grabbing on easier areas first
- Vertical progression – Remember that most High Halls navigation requires upward thinking
- Spike section difficulty – Take your time; rushing leads to damage
- Enemy interference – Clear threats before attempting complex navigation
Tool Crafting Problems:
- Missing Craftmetal – Return to earlier areas to gather more resources
- Bench requirement – Always rest at a bench after crafting to enable tool equipping
- Inventory management – Ensure you have tool slots available before crafting
Final Thoughts: Command the Skies
The Cogfly tool represents one of Silksong’s most innovative approaches to companion-based combat, transforming solo battles into coordinated squadron engagements. The journey to obtain it through the High Halls challenges your mastery of advanced movement techniques while rewarding success with genuinely game-changing capabilities.
From the moment you first deploy your mechanical companions, you’ll understand why the Cogfly is considered essential for tackling Silksong’s most challenging content. Whether you’re struggling with aerial enemies, attempting difficult delivery quests, or simply want to experience the satisfaction of commanding your own flying army, the Cogfly delivers on all fronts.
Ready to build your aerial squadron? The High Halls await, and with them, the power to transform every battle into a coordinated assault. Check out our comprehensive tools guide and advanced combat strategies to make the most of your new flying companions. The skies of Pharloom are yours to command.