Lost after reaching Greymoor in Hollow Knight Silksong? Our complete guide covers essential upgrades, boss fights, and progression paths to unlock new abilities and areas.
So you’ve finally made it through the Far Fields and burst through that ceiling into Greymoor – congratulations! But now you’re probably staring at those three directional signs wondering “okay, what now?” Don’t worry, we’ve all been there. Greymoor can feel overwhelming at first with its branching paths and multiple objectives, but there’s actually a pretty logical progression path that’ll set you up for success.
Let me walk you through exactly what you should prioritize after arriving in this sprawling area, along with some pro tips I’ve picked up during my own playthroughs.
Step 1: Secure Your Bearings – Buy That Map!
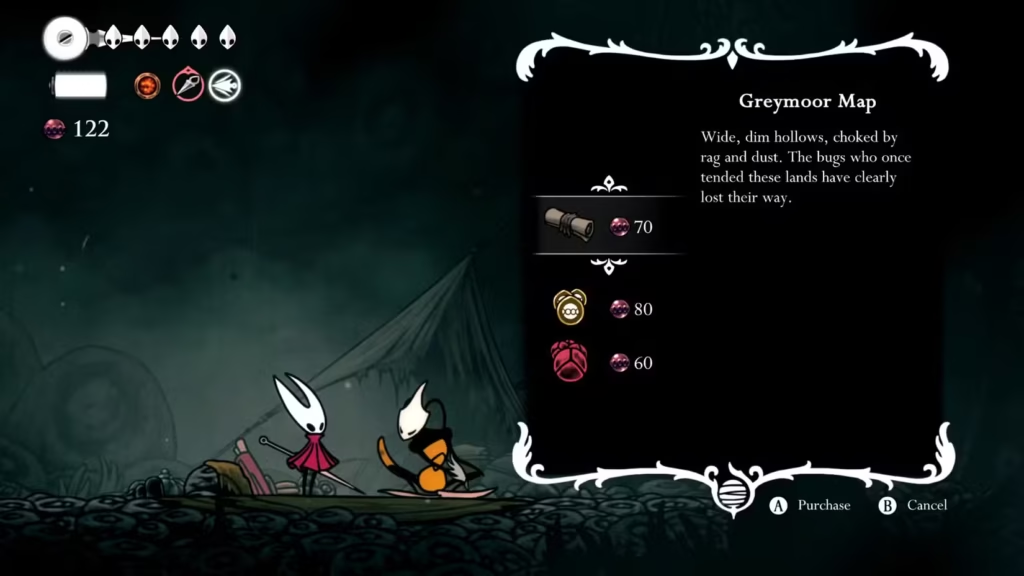
First things first – you absolutely need that map. After emerging from the Far Fields, head right into the new area and drop down those stone steps. You’ll find a bench (always nice to see) and meet Shakra, who’s got some helpful warnings about the local wildlife.
She’ll offer you Greymoor’s map for 70 Rosaries. Now, I know 70 Rosaries might seem steep early on, but trust me on this one – it’s worth every bead. Greymoor is massive and interconnected in ways that aren’t immediately obvious. Having that map will save you hours of wandering around lost.
Pro tip: If you’re running low on Rosaries, check out our comprehensive rosary farming guide before making this purchase.
Once you’ve got your map sorted, backtrack to the Greymoor entrance and head left until you reach the Halfway Home – a cozy little hub that’ll become your home base for this area.
Step 2: Meet Nuu and Grab the Hunter’s Journal
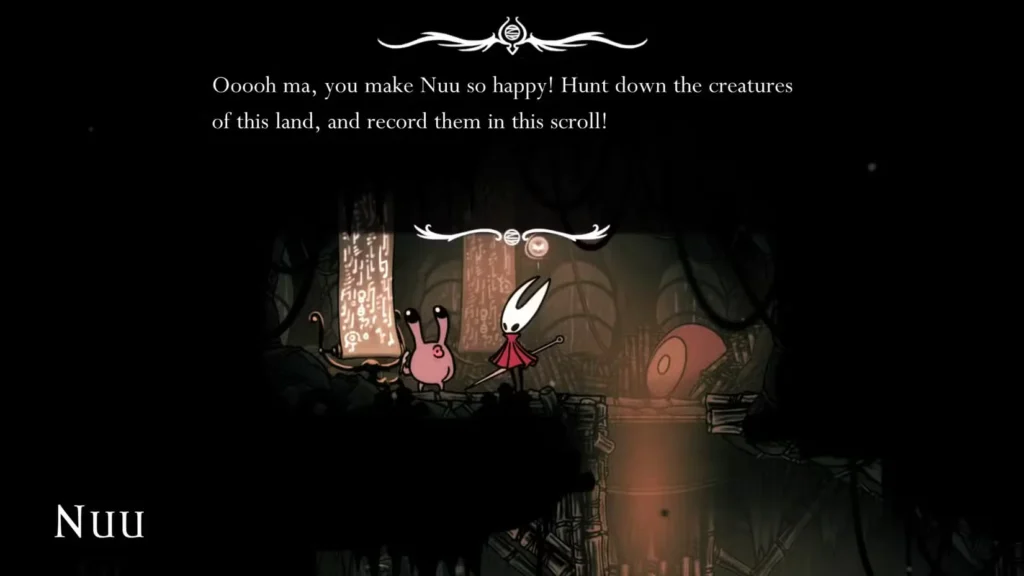
The Halfway Home is more than just a place to rest. You’ll find it on the left side of the Greymoor entrance – look for a building with a locked front door, then circle around to find the actual entrance.
Inside, you’ll meet Creige the innkeeper, but the real star here is Nuu. This adorable little snail is hanging out in the rafters, scribbling away on a massive scroll. Talk to Nuu and accept their wish to receive the Hunter’s Journal – essentially Silksong’s version of a bestiary that tracks all the creatures you encounter.
Why this matters: The Hunter’s Journal isn’t just for completionists. It actually provides valuable intel on enemy attack patterns and weaknesses. Plus, filling it out completely unlocks some pretty sweet rewards later in the game. For more details on maximizing your bestiary, check our complete Hunter’s Journal guide.
Don’t forget to unlock that door on the right side of the building using the lever inside – it’ll give you a convenient shortcut for later visits.
Step 3: Face Your First Major Challenge – Moorwing

Now comes the fun part. From the Halfway Home, venture left through those complex ruins until you reach a large lake with an air vent. Drop down and continue left to face Greymoor’s first major boss: Moorwing.
Here’s where things get real. Moorwing is no joke – every single one of its attacks deals two full Masks of damage, which can end your run pretty quickly if you’re not careful. The timing on its moveset can be tricky to nail down, especially if you’re still adjusting to Hornet’s movement compared to the Knight from the original game.
Insider tip: There’s actually a way to skip this fight entirely if you’re struggling. Find all the Fleas scattered around the area and return them to the Fleamaster. He’ll move his Caravan to Moorwing’s location, effectively disabling the boss encounter. It’s a clever alternative route that Team Cherry included for players who prefer exploration over combat.
For detailed strategies on taking down this aerial menace, our Moorwing boss guide breaks down all its attack patterns and safe spots.
Step 4: Unlock New Territories – Bellhart and Shellwood
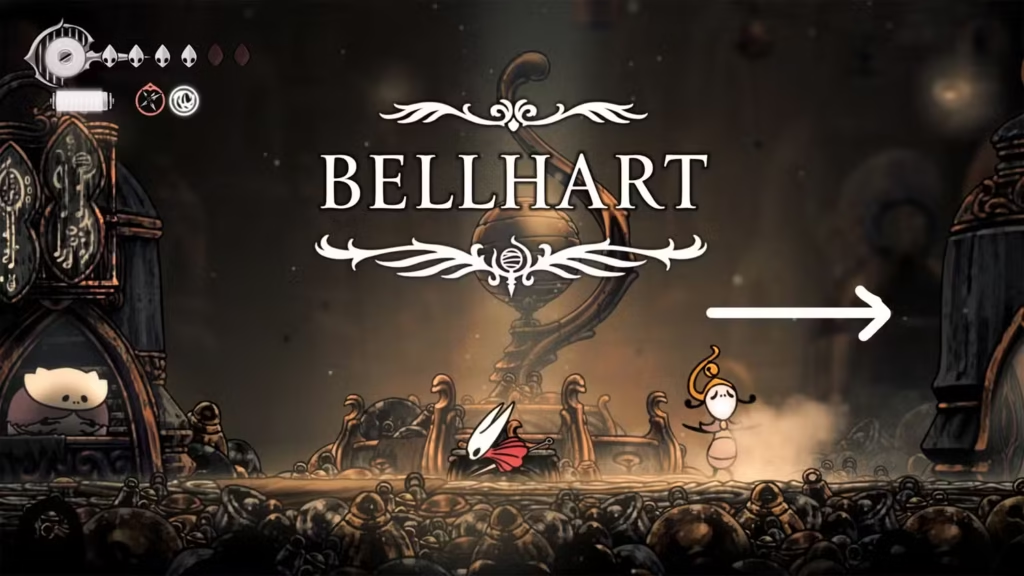
Defeating Moorwing (or bypassing it with the Fleamaster trick) opens up two crucial new areas: Bellhart and Shellwood. But here’s the catch – Bellhart is completely haunted when you first arrive, with all its inhabitants trapped in silk cocoons. It’s honestly pretty creepy the first time you see it.
To lift the Haunting and restore Bellhart to its former glory, you’ll need to venture through Shellwood first. This forest area is packed with challenging platforming sections, hidden collectibles, and some of the game’s most memorable boss encounters.
Step 5: Navigate Shellwood and Defeat Sister Splinter

Shellwood’s maze-like structure can be confusing at first, but the general progression path leads you upward through increasingly complex platforming challenges. Near the top of the area, you’ll encounter Sister Splinter – a boss that’s literally embedded in the ceiling.
This fight is all about positioning and patience. Sister Splinter will slam down with massive claws, summon thorn barriers that block off sections of the arena, and call in flying reinforcements. The key is staying mobile and learning the timing of when to strike versus when to focus purely on survival.
Combat tip: Sister Splinter’s thorn attacks follow predictable patterns. Once you recognize them, you can actually use the blocked areas to your advantage for positioning. Our complete boss strategies guide covers advanced tactics for this and other challenging encounters.
After defeating Sister Splinter, make sure to unlock the elevator shortcut back to the central bench. Trust me, you’ll be thankful for this time-saver later.
Step 6: Master Wall-Jumping with Cling Grip

Here’s where Silksong really starts to feel like its own game. After beating Sister Splinter, head left and navigate around the platforms to reach the other side of the central column. Watch out for those sneaky flower bugs that disguise themselves – they’ll pop out if Hornet gets too close.
Use your downward slash to pogo across the white flowers on the left side, then enter the room beyond. Navigate to the Weaver Statue at the end and use your Bind skill to unlock Cling Grip.
Game changer alert: Cling Grip is arguably one of the most important abilities in all of Silksong. It works similarly to the Mantis Claw from Hollow Knight, letting Hornet grab onto vertical surfaces and jump off them. This ability completely transforms how you navigate the world and opens up tons of previously inaccessible areas.
For a detailed breakdown of how to unlock this essential skill, check our wall jump and cling grip guide.
Step 7: Confront the Widow and Save Bellhart
With Cling Grip in hand, you can now reach the far top-right section of Shellwood to face the Widow – the boss responsible for Bellhart’s haunted state. This spider-like creature wields dual claws and has some nasty silk-spinning abilities that create both projectile and area-denial attacks.
The Widow fight is visually spectacular. When you finally defeat her, Hornet will leap onto the boss, deliver the finishing blow with her nail, and use the Widow’s own silk to tear her apart. It’s a satisfying conclusion to this story arc.
Reward time: Defeating the Widow unlocks the Needolin ability – another crucial skill that you’ll use constantly throughout the rest of your journey. For specific strategies on mastering this new technique, our Needolin unlock guide has you covered.
Step 8: Explore Liberated Bellhart and Upgrade Your Needle

Once Bellhart is free from the Haunting, take time to explore this charming town properly. There’s a lot packed into this small area:
- A merchant on the left side selling useful items
- A Wishwall with three quests you can pick up for extra rewards
- Relic Keeper Scrounge, who’ll trade Rosaries for your collected artifacts
- Pinmaster Plinney, who offers something very special
Plinney is the real MVP here. As thanks for saving Bellhart, he’ll upgrade your Needle for free – your first damage boost in the game! This upgrade makes a noticeable difference in combat effectiveness, especially against tougher enemies you’ll encounter later.
Don’t miss this: Plinney also offers a quest to find materials for further Needle upgrades. These upgrades are crucial for late-game content, so definitely grab this quest. Our complete needle upgrade guide covers all upgrade locations and requirements.
What’s Next? Your Path Forward
With Cling Grip, Needolin, and an upgraded Needle, you’ve essentially completed Greymoor’s main progression sequence. But here’s where Silksong really opens up – you now have several options for where to go next:
Option 1: Continue the Main Story Head to the Blasted Steps (accessible from the left exit of the Shellwood Bell Beast station) to finish Act 1 by facing the Last Judge outside the Citadel. This leads directly into Act 2 content.
Option 2: Exploration and Backtracking With your new abilities, tons of previously inaccessible areas are now open for exploration. Consider revisiting earlier zones like the Far Fields or Deep Docks to discover new secrets and collectibles.
Pro tip: This is actually the perfect time to tackle some of the earlier side quests that might have been too challenging before. Our best early game quests guide covers which ones are worth prioritizing with your new abilities.
Essential Tips for Greymoor Success
Before you dive deeper into your adventure, here are some hard-learned lessons from my time in Greymoor:
Save your Rosaries strategically: While it’s tempting to spend them on every upgrade you see, prioritize essential items like maps and key upgrades first. Check our merchant buying priority guide for smart spending strategies.
Don’t neglect your Tool Pouch: Shell Shards become increasingly important for purchasing upgrades. Our shell shards and tool pouch guide explains how to maximize your carrying capacity.
Master the new movement options: Hornet handles very differently from the Knight. Take time to practice combining Cling Grip with your other abilities – the movement possibilities are incredible once you get the hang of it.
Ready to Continue Your Journey?
Greymoor represents a major turning point in Silksong’s difficulty and complexity. The abilities you’ve gained here – especially Cling Grip and Needolin – form the foundation for everything that comes next. Whether you choose to push forward into Act 2 or spend time exploring with your new skills, you’re now properly equipped for whatever Pharloom throws at you.
The world of Silksong is vast and full of secrets waiting to be discovered. With this progression path under your belt, you’re ready to tackle whatever challenges lie ahead. Good luck, and may your silk be strong!
Want to get Hollow Knight: Silksong for yourself? Check it out on Steam, Nintendo Switch, PlayStation, or Xbox. For more guides and the latest updates, visit the official Silksong website.